The Boy Who Bakes

Edd Kimber
  • Home
  • Recipes
  • My Books
  • Blog
  • Recipe Index
  • About
  • Home
  • Recipes
  • My Books
  • Blog
  • Recipe Index
  • About

Recipes

  • All
  • baking
  • Biscuits and Cookies
  • Breads and Quickbreads
  • Bundts
  • Cakes
  • Chocolate
  • Dessert
  • drinks
  • Holidays
  • Pastry
  • Scones and Quickbreads

Dark Chocolate Espresso Loaf Cake

Edd Kimber April 18, 2019

This post is sponsored by Doves Farm

Dark Chocolate Espresso Loaf Cake
Serves 10-12

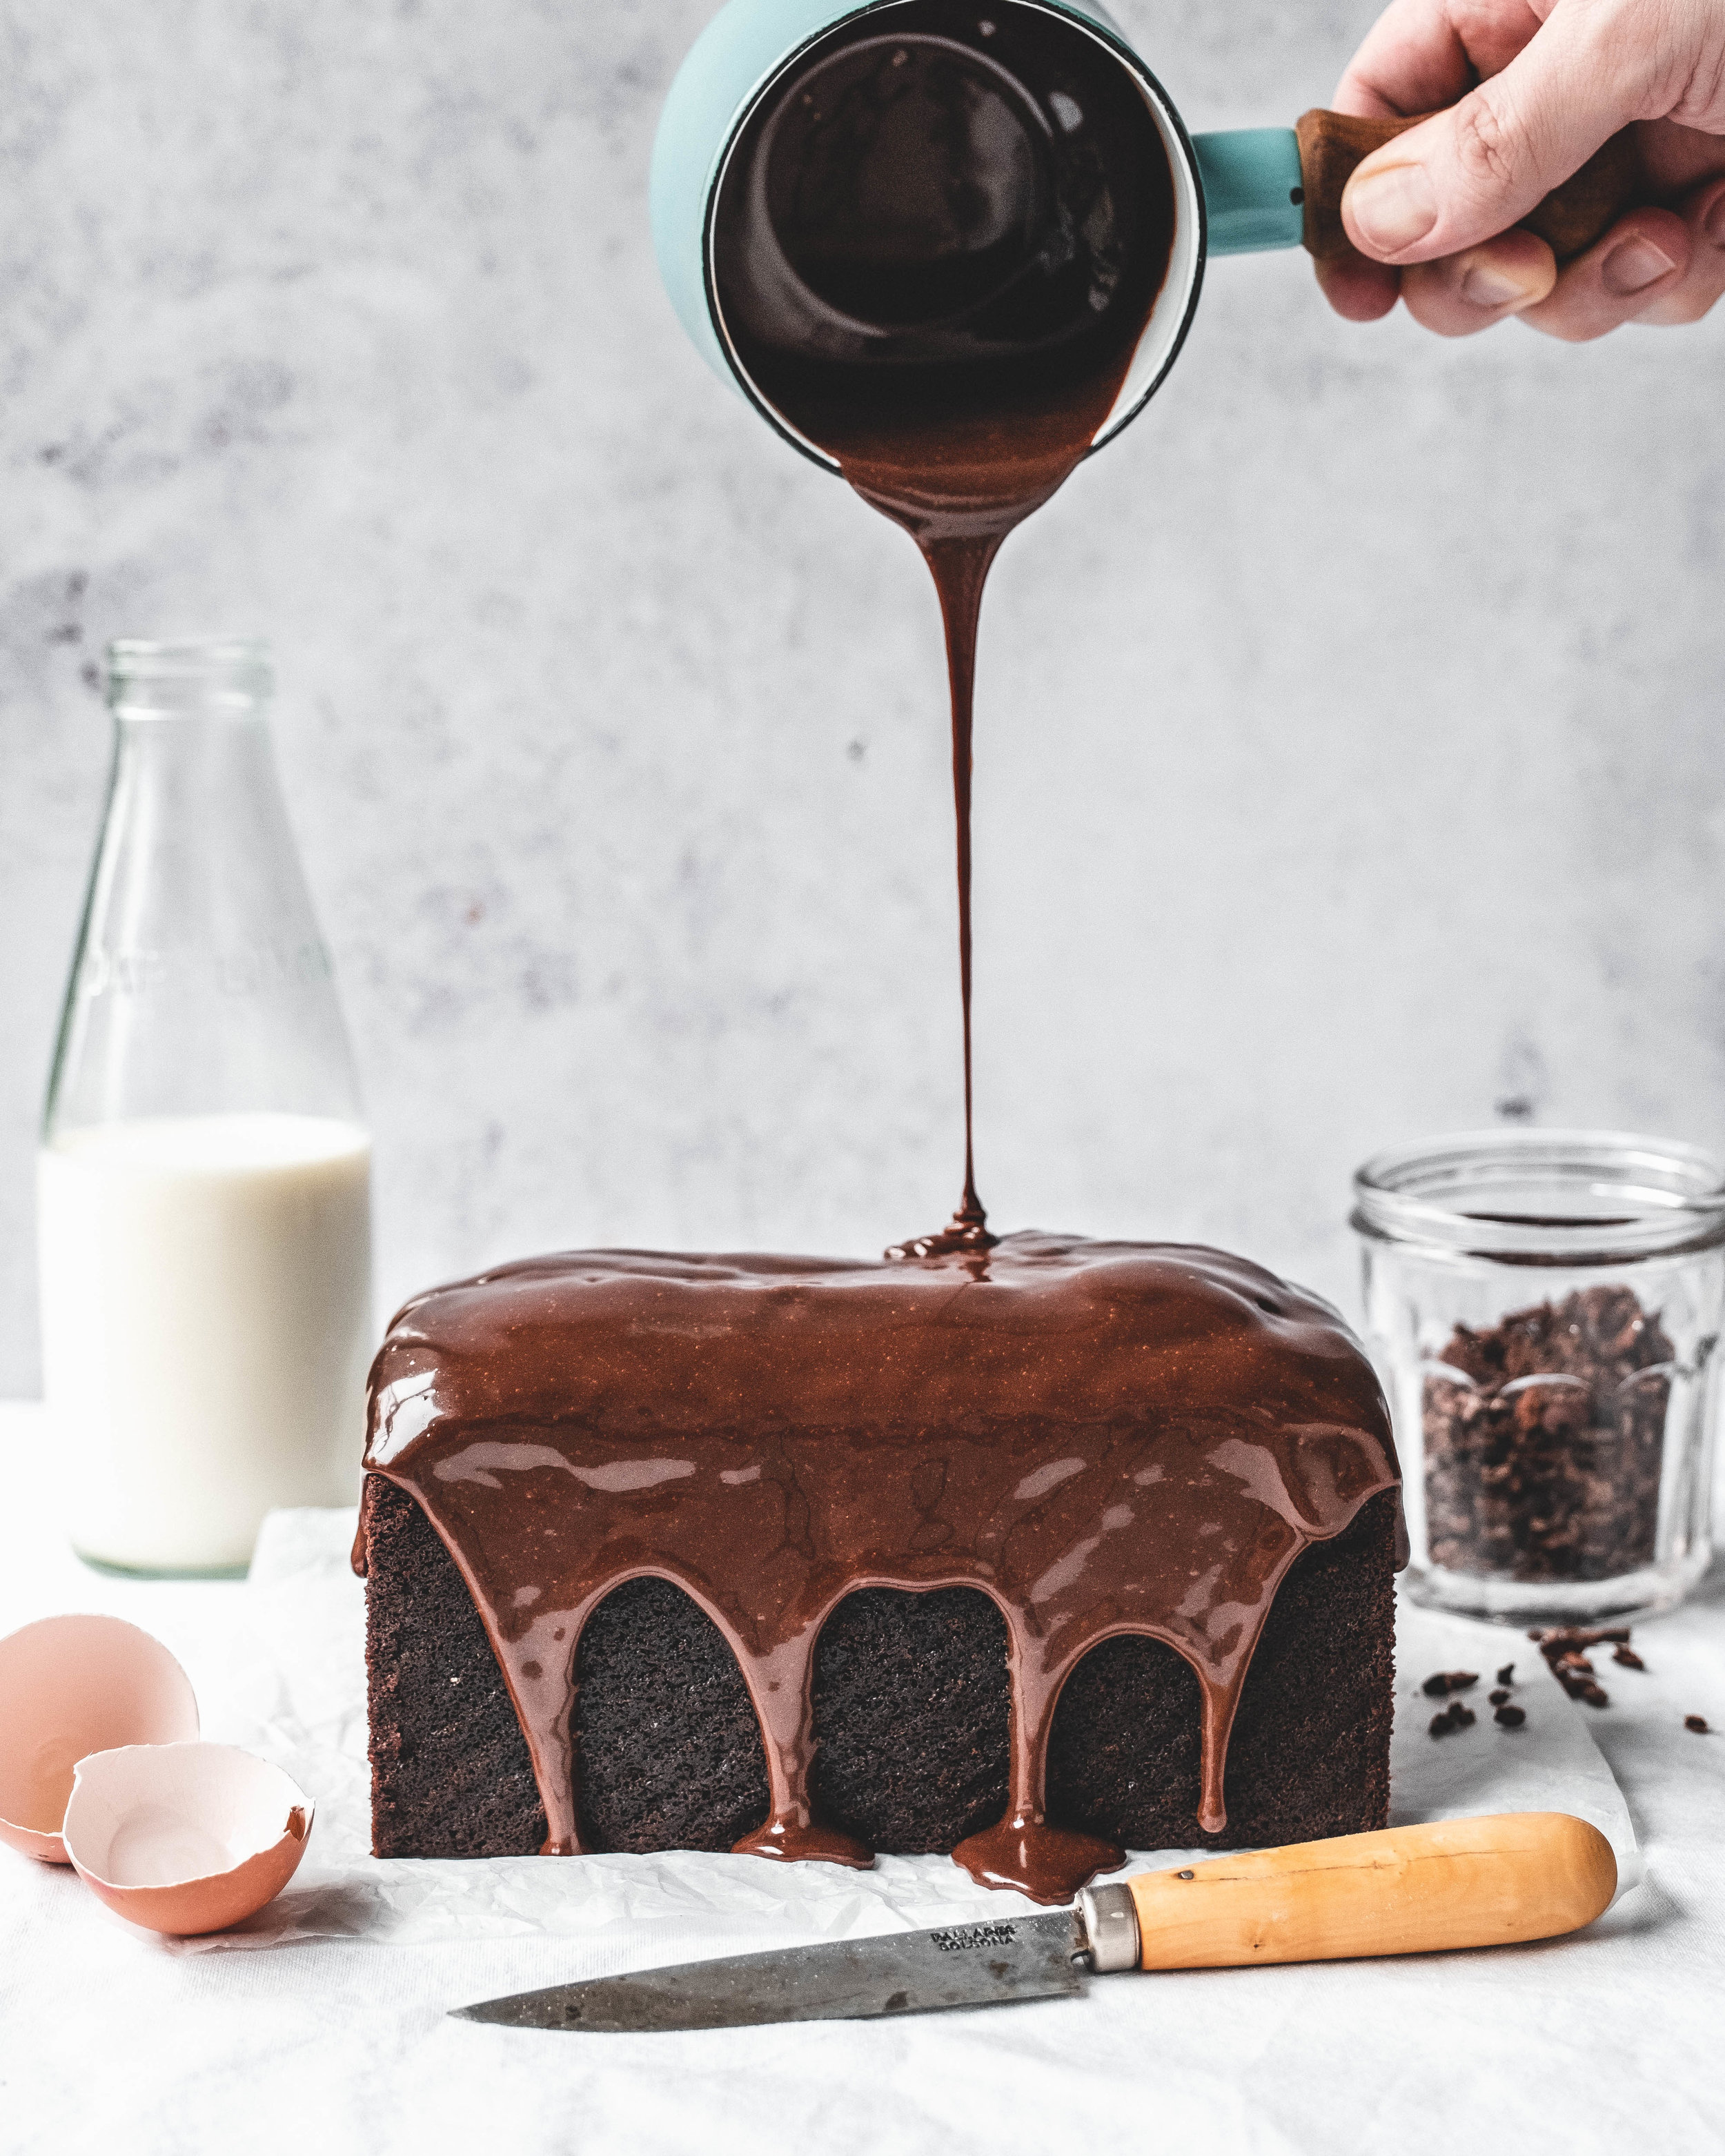
Not every occasion calls for a layer cake, but every occasion definitely calls for cake, and since it’s Easter that cake deserves to be a rich chocolate cake. This cake? Well, this cake is good for any occasion, simple enough for when the family pops by at the weekend and impressive enough it could happily be a birthday cake. Of course the cake tastes amazing; rich and dark, dense and moist like all the best chocolate cakes. It is made with a mixture of Doves Farm Organic Stoneground Wholemeal Spelt Flour and ground almonds, which give the finished cake an enviable texture that keeps incredibly well (4-5 days at least) but also a much deeper flavour than with regular flour. The glaze is the final flourish that makes this cake so special, a milk chocolate glaze infused with espresso and cardamom, a combination that might be a little unexpected but is truly delightful. My friends like to joke that I have an overly enthusiastic love of cardamom, an enthusiasm they say sometimes goes too far…finding a way to sneak it into any recipe I can and to them I say hush now…But if it’s not your thing the cake is just as good without it - a simpler coffee and chocolate cake. 

Sour Cream Chocolate Loaf Cake 
150g unsalted butter, room temperature
300g light brown sugar
1 tsp vanilla extract
2 large eggs
200g Doves Farm Organic Stoneground Wholemeal Spelt Flour
100g ground almonds
75g cocoa powder
1 1/2 tsp baking soda 
1/2 tsp salt
150g sour cream
185ml hot coffee (see note)

Espresso Cardamom Milk Chocolate Glaze 
100g milk chocolate, finely chopped
125ml double cream
1/8 tsp ground cardamom
1 tbsp instant espresso powder

Loaf Cake (1 of 1)-8.jpg

Preheat the oven to 180C (160C Fan) and lightly grease a 2 lb loaf pan, lining with parchment paper. This is a large sized loaf pan, if the one you have is smaller (a 1lb / 450g sized pan is very common) you can happily half the recipe, or use the excess batter to make cupcakes.

In a large bowl beat together the butter and sugar, for about 5 minutes or until light and fluffy. Add the vanilla and beat for a few seconds to combine. Add the egg one at a time, making sure you’re beating fully between each addition. 

Meanwhile mix together the flour, almonds, cocoa powder, baking soda and salt, then pass it through a fine mesh sieve to remove any lumps of cocoa. Add the dry goods to the butter mixture in three additions, alternating with sour cream. Finish by mixing in the hot coffee, until you have a smooth cake batter. Scrape the finished batter into the prepared loaf pan, gently smoothing out the top. Bake in the preheated oven for about 50 minutes or until a skewer inserted into the middle of the cake comes out clean. Allow the cake to cool in the loaf pan for about 15 minutes before transferring to a wire rack to cool completely.

For the glaze place all of the ingredients into a large bowl and set over a pan of simmering water. Heat, stirring occasionally, until everything has melted and you have a smooth silky ganache. Pour the ganache over the cooled cake, allowing it drip down the sides of the cake. Set aside for about an hour or so until the ganache has a chance to set.

Note: for this cake, unlike other chocolate cakes that use coffee for depth, we want to taste the coffee so feel free to use the strongest coffee you can make

In Chocolate, Cakes
13 Comments
sheet cake (1 of 1)-3.jpg

Chocolate Sheet Cake with Whipped Salted Caramel Ganache Frosting

Edd Kimber April 11, 2019

If you’ve never made a one bowl cake let me introduce you to the easiest chocolate cake you’ll ever make. You can get this cake in the oven in under ten minutes and it uses ingredients you probably have in your kitchen right now. To make it easier the cake is oil based although I’ve made butter versions with lots of success as I know some people don’t like oil based cakes. I will say this though in defence of oil cakes, they keep incredibly well. I recently made a layer cake version of this recipe and it was perfect five days later (thats before I cut into it obviously, as once you’ve cut into the cake it will start to stale slowly.


Now the cake is great but boy the frosting I have used is ridiculously good, I challenge to get it all onto the cake with eating at least a few tablespoons of it straight from the bowl, like you did when you were a child, or like you do every time you make a cake if you’re anything like me. I have been making caramel ganache for years, I have a truffle based on this idea in my second book, but I haven’t made any in years. Thankfully my friend Erin from Cloudy Kitchen made a batch for some doughnuts recently and it reminded me how good it was. I followed her lead and made it with milk chocolate but I wanted it as a frosting so whipped the finished ganache which gives it a lighter texture, almost like Swiss meringue buttercream. To really crown the cake I have topped it with with a sprinkling of cocoa nibs and salted peanuts. The nibs give a nice texture and add a great depth of chocolate flavour. The peanuts obviously give more texture and a little saltiness that balances the sweetness elsewhere in the recipe, plus it also happily gives the finished cake a snickers vibe which is no bad thing. 

Chocolate Sheet Cake
Makes a 9x13 cake that serves 12-18 people

250g plain flour
75g cocoa powder
1 tsp baking powder
2 tsp baking soda
1/2 tsp salt
300g light brown sugar
2 large eggs
100ml oil (you can use something neutral tasting or olive oil)
225g sour cream
225ml hot coffee

Whipped Salted Caramel Milk Chocolate Ganache
200g milk chocolate, finely chopped
400ml double cream
200g caster sugar
1 tsp vanilla bean paste
1 tsp flaked sea salt
50g unsalted butter

salted peanut and cocoa nibs, for garnish  


Preheat the oven to 180C/160C fan and lightly grease a 9x13 inch brownie pan, lining with a strip of parchment paper. The excess parchment should hang over the sides of the pan which will make removing the cake a lot easier later.

Make the ganache first as it needs a couple hours to chill before whipping. Place the chocolate into a medium bowl and set near the stove. Place the cream into a small saucepan and bring to a simmer. Place the sugar into medium sized saucepan and place over medium heat and cook until melted and caramelised to the colour of a rusty penny. Once caramelised add the butter and salt and stir to combine. Add the cream in two additions, being careful as it will bubble up viciously. Once the bubbling has subsided you should have a smooth caramel, if the cream wasn’t hot enough you may have a couple lumps which will melt if you just pop it back over low heat and stir for a couple minutes. Stir in the vanilla and then pour the hot caramel over the chocolate, set aside for a couple minutes before stirring together to form a smooth ganache. Pop the bowl in the fridge for a couple hours or until thickened. Make sure you don’t leave the ganache in the fridge for too long as it will become too firm to whip, it still needs to be spreadable.

For the cake sieve the flour, cocoa, baking powder, baking soda, salt and brown sugar into a large bowl and use a whisk to combine so everything is evenly combined. Make a well in the middle of the bowl and pour in the remaining ingredients and whisk together until a smooth cake batter is formed. Pour the batter into the prepared pan and bake in the oven for about 25-30 minutes or until the cake springs back to a light touch and it is slightly pulling away from the sides of the pan. 

sheet cake (1 of 1)-4.jpg

Because the cake is quite large it is a little harder to manoeuvre than a traditional round layer cake so allow it cool in the pan for 30 minutes before using the excess parchment to lift it from the tin to a wire rack to cool completely. 

To frost the cake remove the ganache from the fridge and use a hand mixer to whisk until pale and fluffy. This only takes a couple minutes,  but be careful not to overdo it as whisked ganache can sometimes go grainy. Spread the ganache over the cake and sprinkle with a handful each of salted peanuts and cocoa nibs. 

Kept in a sealed container this cake will be fine for 4-5 days. 

In Chocolate, Cakes
49 Comments
Rhubarb and Custard (1 of 1).jpg

Rhubarb and Custard Brioche Tarts

Edd Kimber April 5, 2019

All I can say is thank god our tastes change and develop as we get older. As a child I winced at the sharp, almost sour rhubarb we grew in the garden, only happy to eat it when topped with a layer of crumble and accompanied with a dollop of vanilla ice cream. Coming from the rhubarb triangle, its a real place I swear look it up, this comes close to treason in the minds of my fellow Yorkshire folk. To be fair to my childhood taste buds this was not the wonderful forced rhubarb I adore today it was thick, woody and with no hint of pink. Thankfully these days I cannot get enough, it brightens up those cold winter months, a shining star in a world of grey. When it comes to rhubarb no one does it better than Yorkshire, home of the best forced rhubarb in the UK. Forcing is a process of growing rhubarb in dark huts which speeds up the growth resulting in beautifully thin and tender stalks of rhubarb with that delightful pink blush we all associated with rhubarb.

I know the web is full of recipes declaring they’re the best, the ultimate, the best darn recipe you will ever make so I will say this as even handed as I can manage, these are utterly delicious, sorry I couldn’t help myself, they’re just too good not to shout about from the rooftops, you need to make these, I implore you. The combination of rhubarb and custard is a well trodden path, reaching classic status for sure. To add another element I infused the custard with a selection of my favourite things that just so happen to pair wonderfully with the rhubarb. A handful of fresh ginger, a sprinkling of ground cardamom, a couple star anise and of course a healthy dose of vanilla, which all meshes together to give the custard a flavour worthy of the rhubarb that sits atop it. 

I have been making a version of these tarts (or buns I’m still not sure what to call them) for years, a blueberry topped version appears on the paperback cover of my book Patisserie Made Simple and is the version I made most often, but this new rhubarb brioche is definitely the only one I am making from now on. 

Rhubarb and Custard Brioche Tarts

Brioche

180g plain flour
180g strong bread flour
30g caster sugar
1 tsp fine salt
85ml whole milk, cold
7g dried fast action yeast
3 large eggs, plus one for glazing
150g unsalted butter, diced
Pearl sugar, for decoration

Spiced Custard
250ml whole milk
thumb sized piece of fresh ginger, sliced
1/4 tsp ground cardamom
1 tsp vanilla bean paste
2 star anise
100g caster sugar
1 large egg
2 large egg yolks
20g cornflour
25g unsalted butter, diced

Roasted Rhubarb
250g rhubarb
20g caster sugar
juice of 1 orange (I used a blood orange)
1/2 tsp vanilla bean paste

For the brioche place the flours, sugar salt and yeast into the bowl of a stand mixer and briefly mix to combine. Add the milk and egg and then knead of low/medium speed for about 10 minutes or until the dough is no longer sticking to the sides of the bowl. Add the butter and piece or two at a time, mixing until fully incorporated. Knead for a further 10 minutes or until the dough is no longer sticking to the sides of the bowl and smooth and elastic. Place the dough into a bowl, cover with clingfilm and refrigerate overnight. 

Note: the butter doesn’t want to be soft or warm but not cold from the fridge either, it needs to be pliable but still a little cool, when mixing we don’t want to warm up the dough, otherwise we’ll end up with a greasy dough.

Prepare the custard now too as it means come the morning when you assemble the tarts there is little work to do. Place the milk, flavourings and half the sugar into a saucepan and bring to a simmer. Remove from the heat, cover and set aside for an hour or so to infuse. After an hour bring the milk back to a simmer. Meanwhile whisk together the sugar and cornflour (doing this will prevent the cornflour going lumpy). Add the egg and yolks and whisk until smooth. Pour in the milk and whisk to combine. Pour the custard back into the pan, through a fine mesh sieve to remove the flavourings then place the pan back on the heat. Whisking constantly, cook the custard until it is thick, almost the consistency of wallpaper paste. Scrape the finished custard into a bowl, add the butter and mix until fully combined. Press a sheet of clingfilm onto the surface of the custard and refrigerate until needed.

In the morning take the brioche from the fridge and divide into 10 equal sized pieces. This can be done by eye or by weight, which is my preference. Form the brioche into balls and then flatten into discs, about 11-12cm wide. Use these discs of dough like pastry to line 10cm loose bottom tart tins, the excess of the dough will go up the sides as if making a tart shell. Place these onto a parchment lined baking tray and lightly cover with clingfilm or a tea towel, setting them aside for about an hour or until the dough has risen and is puffy, if you gently press the dough with your hand it should spring back very slowly, if it springs back fully it needs a little extra time. 

As the brioche proves we can work on the rhubarb. Cut into little battons, about 7cm wide and place onto a baking tray, sprinkling with the sugar, pouring over the orange juice and vanilla. Bake at 180C (160C fan) for about 10-12 minutes just until starting to soften. The baked rhubarb doesn’t want to be fully cooked as it will go back in the oven atop the brioche but it needs to be on its way. Set aside until the brioche is ready.

To assemble remove the custard from the fridge and beat to loosen a little. Brush the edges of the brioche with a beaten egg and then fill the middle of each tart with custard, topping each with a few stalks of rhubarb. Finish by sprinkling the exposed edge of the tarts with pearl sugar which will give a nice look and added texture. If you can get hold of pearl sugar you can use any bake proof sugar you like, be it sanding sugar, demerara or coffee crystals. Bake in the oven for 20-25 minutes or until the exposed brioche is golden brown. Remove and set aside to cool.

You can serve the brioche still slightly warm or room temperature which ever you prefer. These are best on the day made but you can also serve them a couple days after baking, gently reheating in  the oven will make them feel fresh again.  

In Breads and Quickbreads
18 Comments
LEMON POPPY cake (1 of 1).jpg

Almond Paste Lemon Poppy Seed Cake

Edd Kimber March 22, 2019

A lemon poppy seed cake? is it the 90’s again? I guess 90’s nostalgia has a place in food as well as fashion and a lemon poppy seed cake was one of the first things I remember making in the late 90’s when I was getting deeper and deeper into my baking obsession. Funnily I don’t think I have made one since, which is strange as I love the combination but maybe I relegated it to the more mundane, the more run of the mill recipes that once checked off my list im done with, relegate to the back of the cupboard? Regardless, here it is again, made after a request from my boyfriends mum for her birthday I couldn’t find the poppy seeds in time for her birthday so you guys get the full package but she had to make do with just lemon).

For the recipe im using something I’ve had bookmarked for the longest time, from the first Tartine cookbook, yeah I’ve had it bookmarked for a very long time, that book came out in 2006! The reason the recipe intrigued me was the use of almond paste. As a lover of all things almond it’s a little surprising I’ve never used almond paste in a cake batter like this, probably since it’s not exactly easy to come by in the UK, marzipan being the default almond vehicle you find here in supermarkets. Lets just get this straight, this cake is worth finding the paste, the texture it gives is sublime, I would go so far as to say it is my ideal cake texture, moist enough that it doesn’t necessarily need frosting and a cake that stays fresh for at least four days.

For those who may have thought that almond paste and marzipan are the same thing here is a quick primer. Marzipan is generally lower in almonds than its counterpart, its normally composed of sugar and almonds, mostly also come with some egg white and glucose too but it normally only has 25-35% almonds so its a pretty sweet confection. Almond paste is much higher in almonds, normally at least 50%. Generally it also only has sugar and almonds, nothing else needed. Marzipan might be easy to use to cover cakes, or model with but almond paste is better inside a cake as the egg white can dry out the paste making it tough and chewy. Whilst almond paste might not be available in UK supermarkets it’s still pretty easy to get a hold of. Try Ocado, Amazon, or for my favourite Skandi Kitchen also sell it online and in their London store (they also happen to be the cheapest stockist). The one thing to avoid is anything labeled as 100% or pure almond paste, this is actually more of an almond butter and not the same product.

Almond Paste Lemon Poppy Seed Cake
Adapted from ‘Tartine’ by Elisabeth Prueitt

Makes 1 large loaf cake (see note below)

Almond Paste Cake Batter
95g plain flour
1/2 tsp baking powder
1/4 tsp salt
2 heaped tablespoons poppy seeds
5 large eggs
1 tsp vanilla extract
200g almond paste
200g caster sugar
225g unsalted butter, room temperature
zest of 3 lemons

Lemon Simple Syrup
juice of 2 lemons
100g caster sugar

Candied Lemon Peel
2 lemons
caster sugar (see recipe)

Lemon Glaze
juice of 1 lemon
185g icing sugar
pinch of salt

Preheat the oven to 180C (160C fan) and lightly grease, and line with parchment paper, a 9x5 inch loaf pan.

For the batter mix together the flour, baking powder, salt and poppy seeds, setting aside for the moment. Add the almond paste, in small pieces, into the bowl of a stand mixer and mix on low speed, with the paddle attachment, for a few minutes to soften. Add in the sugar a little bit at a time, mixing until the almond paste breaks down into a coarse crumbly mixture. If you do this stage too quickly and not allow the almond paste to break down into a coarse crumb, you risk the finished batter having lumps. Add the butter a couple pieces at a time. Once all of the butter has been incorporated and a paste like texture has formed, add the lemon zest and up the speed to medium and cream together for about 5 minutes or until the mixture is pale and fluffy. Adding the lemon zest at this stage rather than folding in with the dry ingredients helps to draw out the oils making the finished cake more flavourful.

Add the eggs one at a time, beating until fully combined before adding another. Once all the eggs have been mixed in remove the bowl from the mixer, add in the dry goods and mix by hand until evenly combined. Scrape the finished batter into the prepared loaf pan and bake in the preheated oven for about 45-50 minutes or until the cake springs back to the touch or a skewer inserted into the middle of the cake comes out clean. Allow the cake to cool in the pan for 10-15 minutes whilst you make the simple syrup.

To make the syrup juice 2 lemons and add the same amount of sugar, by weight, to a saucepan along with the juice. Cook over medium heat for a couple minutes or until the juice has come to a simmer and the sugar has dissolved. Turn off the heat and set aside.

LEMON POPPY cake (1 of 1)-2.jpg

Carefully turn the cake out onto a wire rack set over a sheet pan or a piece of parchment. I like to use this cake upside down but do as you prefer. Using a skewer or toothpick prick the cake all over and then brush the syrup all over the top and sides of the cake. Allow the cake to cool fully before glazing.

I know topping the cake with the candied zest is gilding the lilly a little but I love the look and the slight bitterness and the texture adds a nice counterpoint to the cake, but feel free to leave it off if you prefer. To make it slice off the top and bottom of the lemon and then cut into wedges. Carefully slice away the flesh of the fruit leaving just the pith and peel. cut each wedge into thin strips. Place the strips of lemon peel into a saucepan and cover with cold water. Bring to a boil and cook for 5 minutes, then drain off the water and repeat with about 750ml water, simmering for 30 minutes this time. Drain the water as before but rather than discarding we need to measure how much we are left with. Add the water back into the pan with an equal amount of sugar, by weight, along with the peel (for me this meant roughly 350g sugar). This time we want to simmer the mixture for about 20-25 minutes or until the peel becomes slightly translucent, meaning it has absorbed enough of the syrup is properly candied. During this process be careful not to cook the peel too long as it will become too soft, losing any texture, I like mine to still have a little bite. Strain off the syrup (keep for when you need a simple syrup - great for cocktails) and allow to cool for a couple minutes. Toss the pieces of peel in a bowl of sugar, making sure to coat fully then place onto a wire rack to cool completely. Once fully cooled store in a sealed container in a dark cool spot.

For the glaze mix the juice of 1 lemon with just enough icing sugar to form a thick but pourable glaze, adding a pinch of salt to balance out the sweetness a little. Pour the glaze onto the top of the cake and use a spoon to tease it over the edges so it drips down the side. Top the cake with some of the candied peel (it makes more than you need but if your going to go to the lengths to actually make some you might as well make a little extra). Finish with a little sprinkling of poppy seeds.

Kept covered this cake keeps particularly well, at least 4 days.

Note: The loaf pan needed for this cake is a little bigger than the ones most people will have at home so if this is the case simply use enough batter to fill the pan about 3/4 full and then use the rest to make a few cupcakes, think of them as the chefs testers!

In Cakes
8 Comments
  • Recipes
  • Older
  • Newer

Twitter

  • Was 8 original films, 3 spin off films, a two part play not enough. Can we have something new. https://t.co/cBZdGEGeyv
    Apr 4, 2023, 1:46 PM
  • RT @deliciousmag: Cacio e pepe, but make it buns! These seriously cheesy bread rolls from @TheBoyWhoBakes are inspired by his favouri… https://t.co/oDZlaDgnN2
    Apr 2, 2023, 11:08 AM
  • RT @TheDailyShow: Congrats to Donald Trump on finally winning a majority of votes! https://t.co/ezP55HZgl0
    Mar 31, 2023, 12:43 AM

Instagram

This weeks bonus recipe, for subscribers to my newsletter, is this gorgeous sour cherry and coconut gateau basque. The crust is a buttery cross between pastry and cake, think a cakey cookie. The filling is a layer of sour cherry topped with a rich coconut custard. A real fun one to make too! Link to my newsletter can be found in my bio - #gateaubasque #pastrycream #coconut #sourcherry
In this months @olivemagazine (out today) the team came and photographed my petit kitchen and we talked about how we put our stamp on the place, without spending a fortune. We hated the bland kitchen that we inherited but, as it was relatively new an
In this months @olivemagazine (out today) the team came and photographed my petit kitchen and we talked about how we put our stamp on the place, without spending a fortune. We hated the bland kitchen that we inherited but, as it was relatively new and in good condition, it felt a waste to rip it out and we also didn’t want to spend the money it would take to rip out the whole thing and replace it (it’s a howdens shell so we could have done something cheaper like @plykeakitchens @holte.studio @madebyhusk) so instead I painted all of the cabinets, using @makeitrustoleum kitchen cabinet paint, to give it some personality and lighten the whole thing. Check out the magazine for the full run down. - #kitchendesign #kitchenremodel #rustoleumcabinettransformations #rustoleumkitchencupboardpaint #kitcheninspiration #theboywhobakes #olivemagazine
Are you making scones all wrong? Maybe, maybe not? But I do want to show you how I make them! This recipe is based on the method I learnt at @belmondlemanoir 12 years ago when I did a stage, and it makes the absolute lightest scones. And shock horror, it involves kneading the dough, albeit very lightly. You can get the full recipe in this weeks newsletter (free) linked in my bio. - #scones #bakingday #worldbakingday #afternoontea #hightea #englishscones #clottedcream #creamtea #theboywhobakes
facebook
  • Contact

The Boy Who Bakes

Edd Kimber

facebook