The Boy Who Bakes

Edd Kimber
  • Home
  • Recipes
  • My Books
  • Blog
  • Recipe Index
  • About
  • Home
  • Recipes
  • My Books
  • Blog
  • Recipe Index
  • About

Recipes

  • All
  • baking
  • Biscuits and Cookies
  • Breads and Quickbreads
  • Bundts
  • Cakes
  • Chocolate
  • Dessert
  • drinks
  • Holidays
  • Pastry
  • Scones and Quickbreads
black and white cookies made with black cocoa powder and discs of white chocolate, sprinkled with salt

Inside Out Chocolate Chip Cookies

Edd Kimber April 20, 2022

It’s a bit of a rarity these days that I actually get to enjoy making other peoples recipes (something I am trying to do a bit more of at the moment, to bake in a way that is purely about enjoyment, without it becoming work) but for the recent Bake For Ukraine bake sale I wanted to take a new cookie for my menu but I didn’t have the time to really work on anything new so instead turned to my cookbooks to find something I thought might work. The idea I wanted to go for was an inside out chocolate chip cookie, a dark chocolate cookie dough with white chocolate chunks. In the back of my head, I thought the brilliant book Sister Pie had something similar and thankfully I was right.

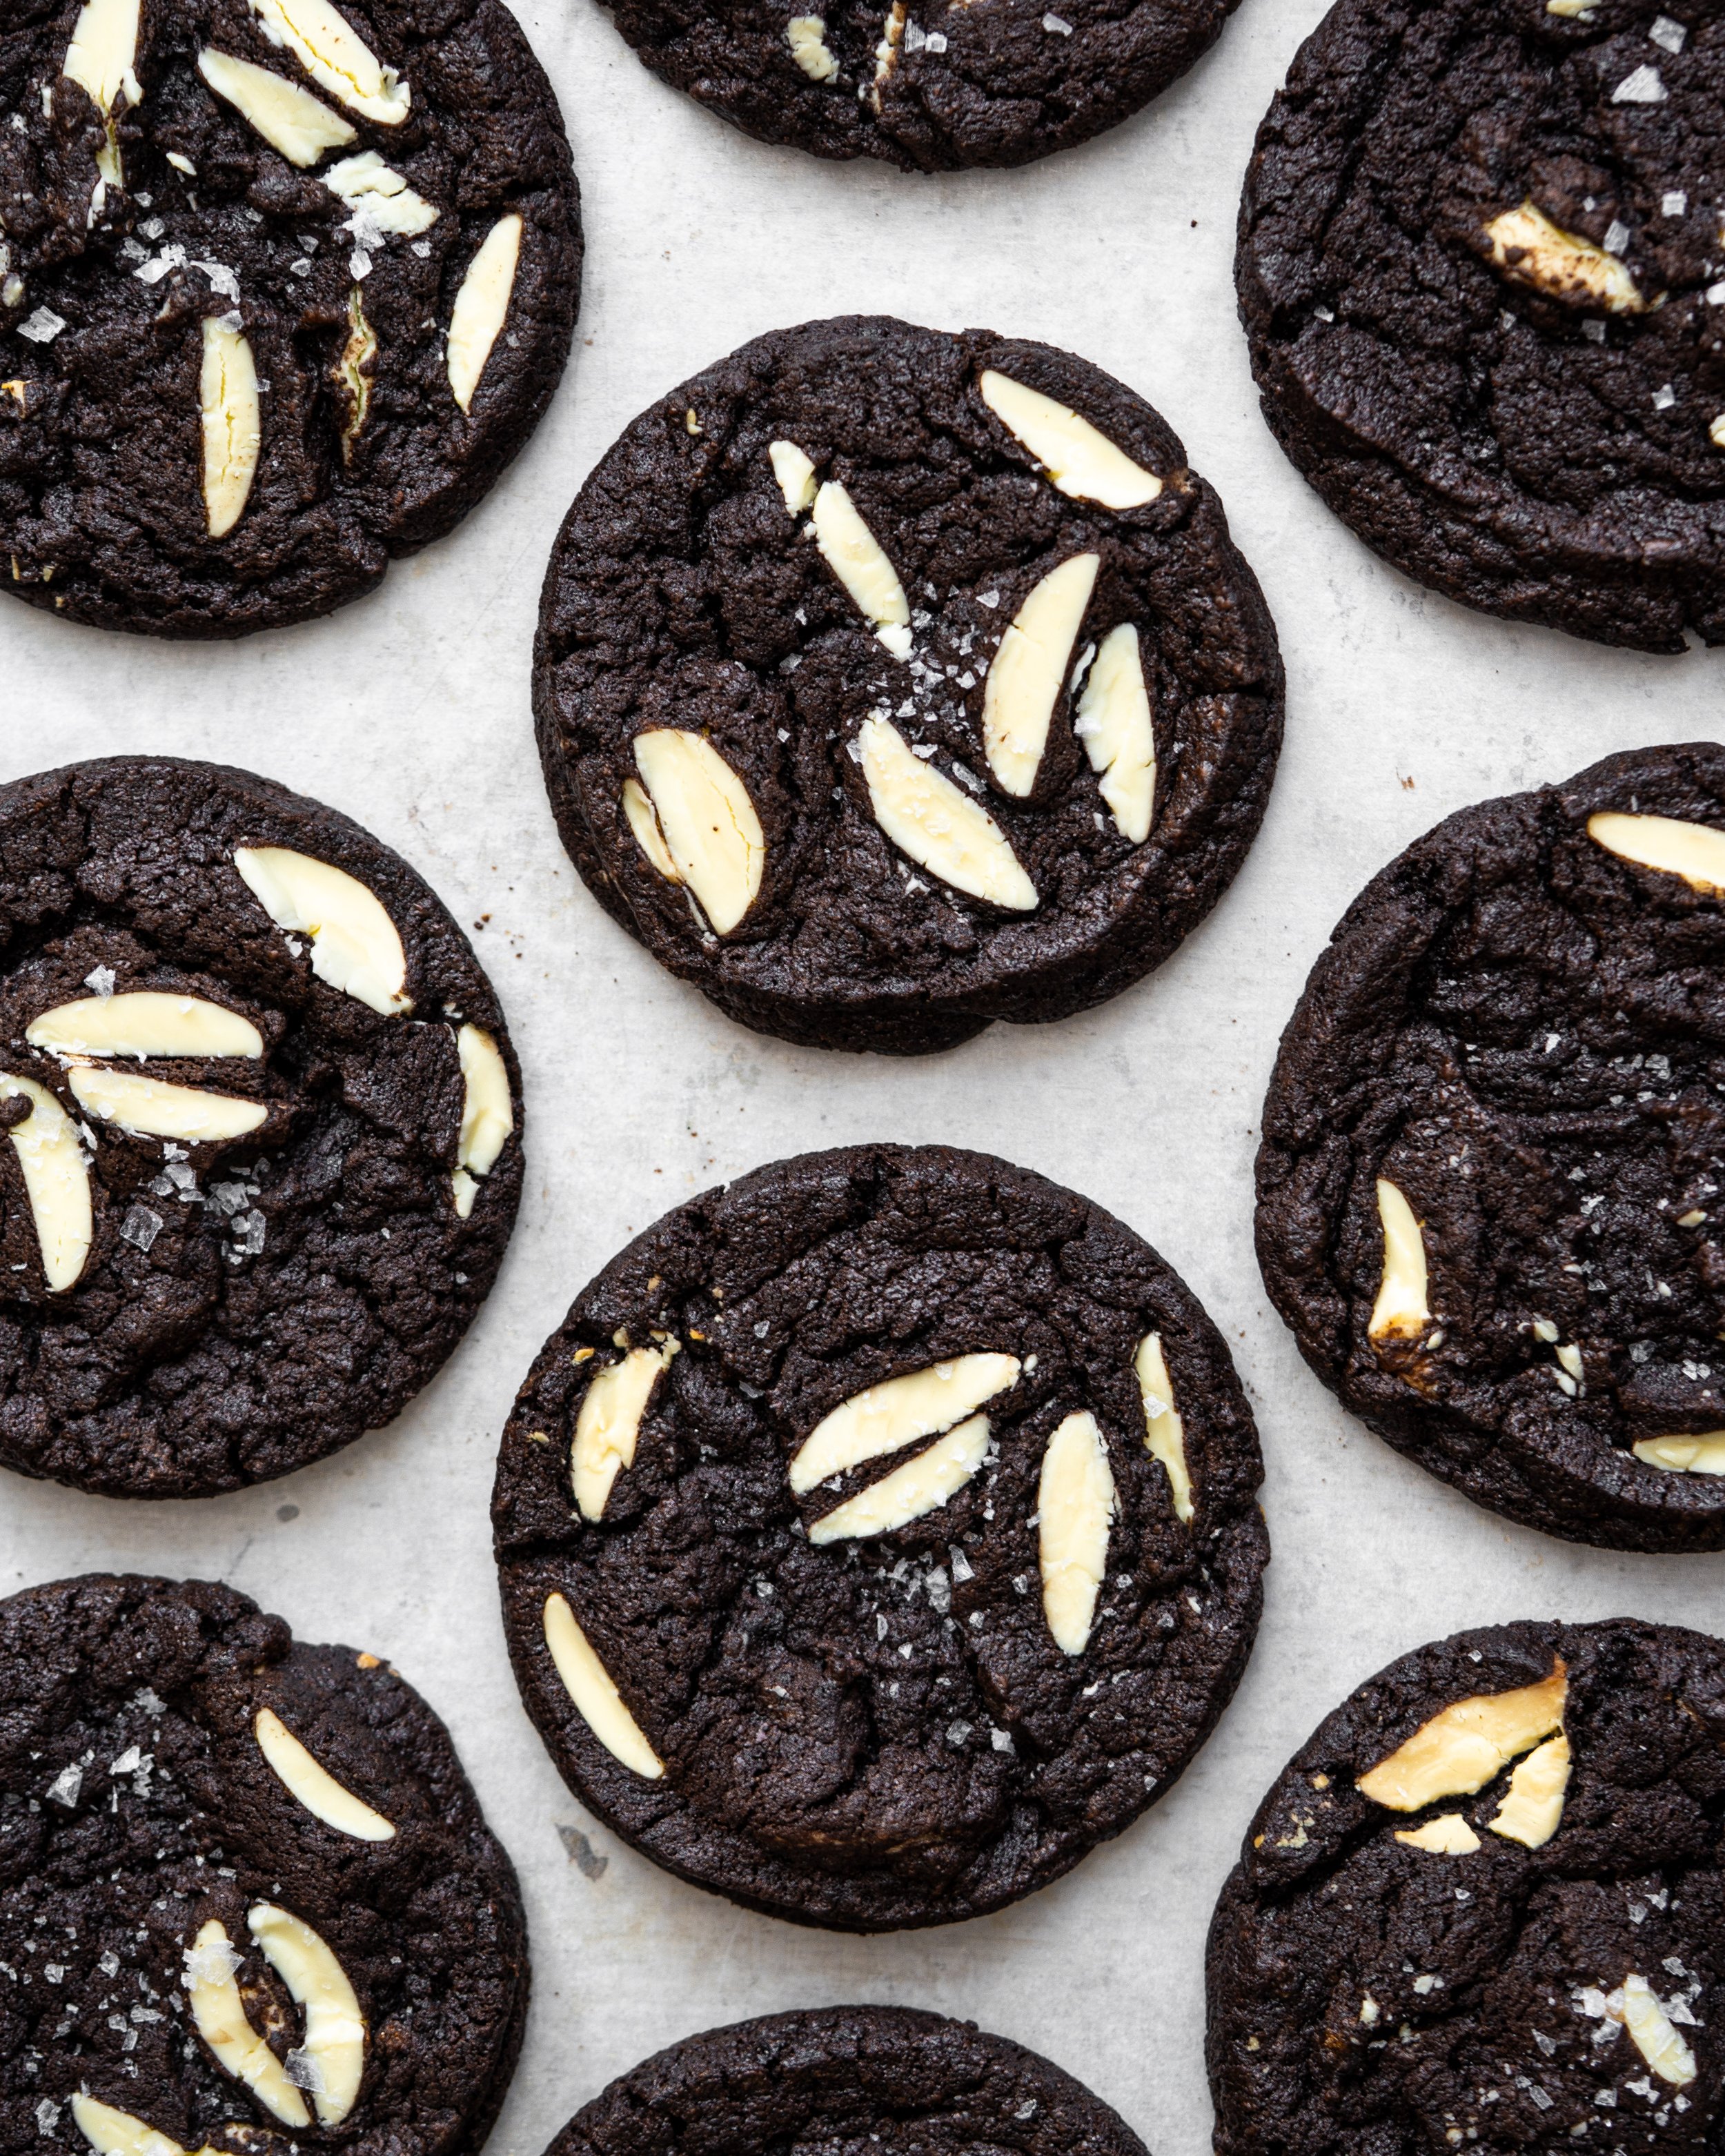
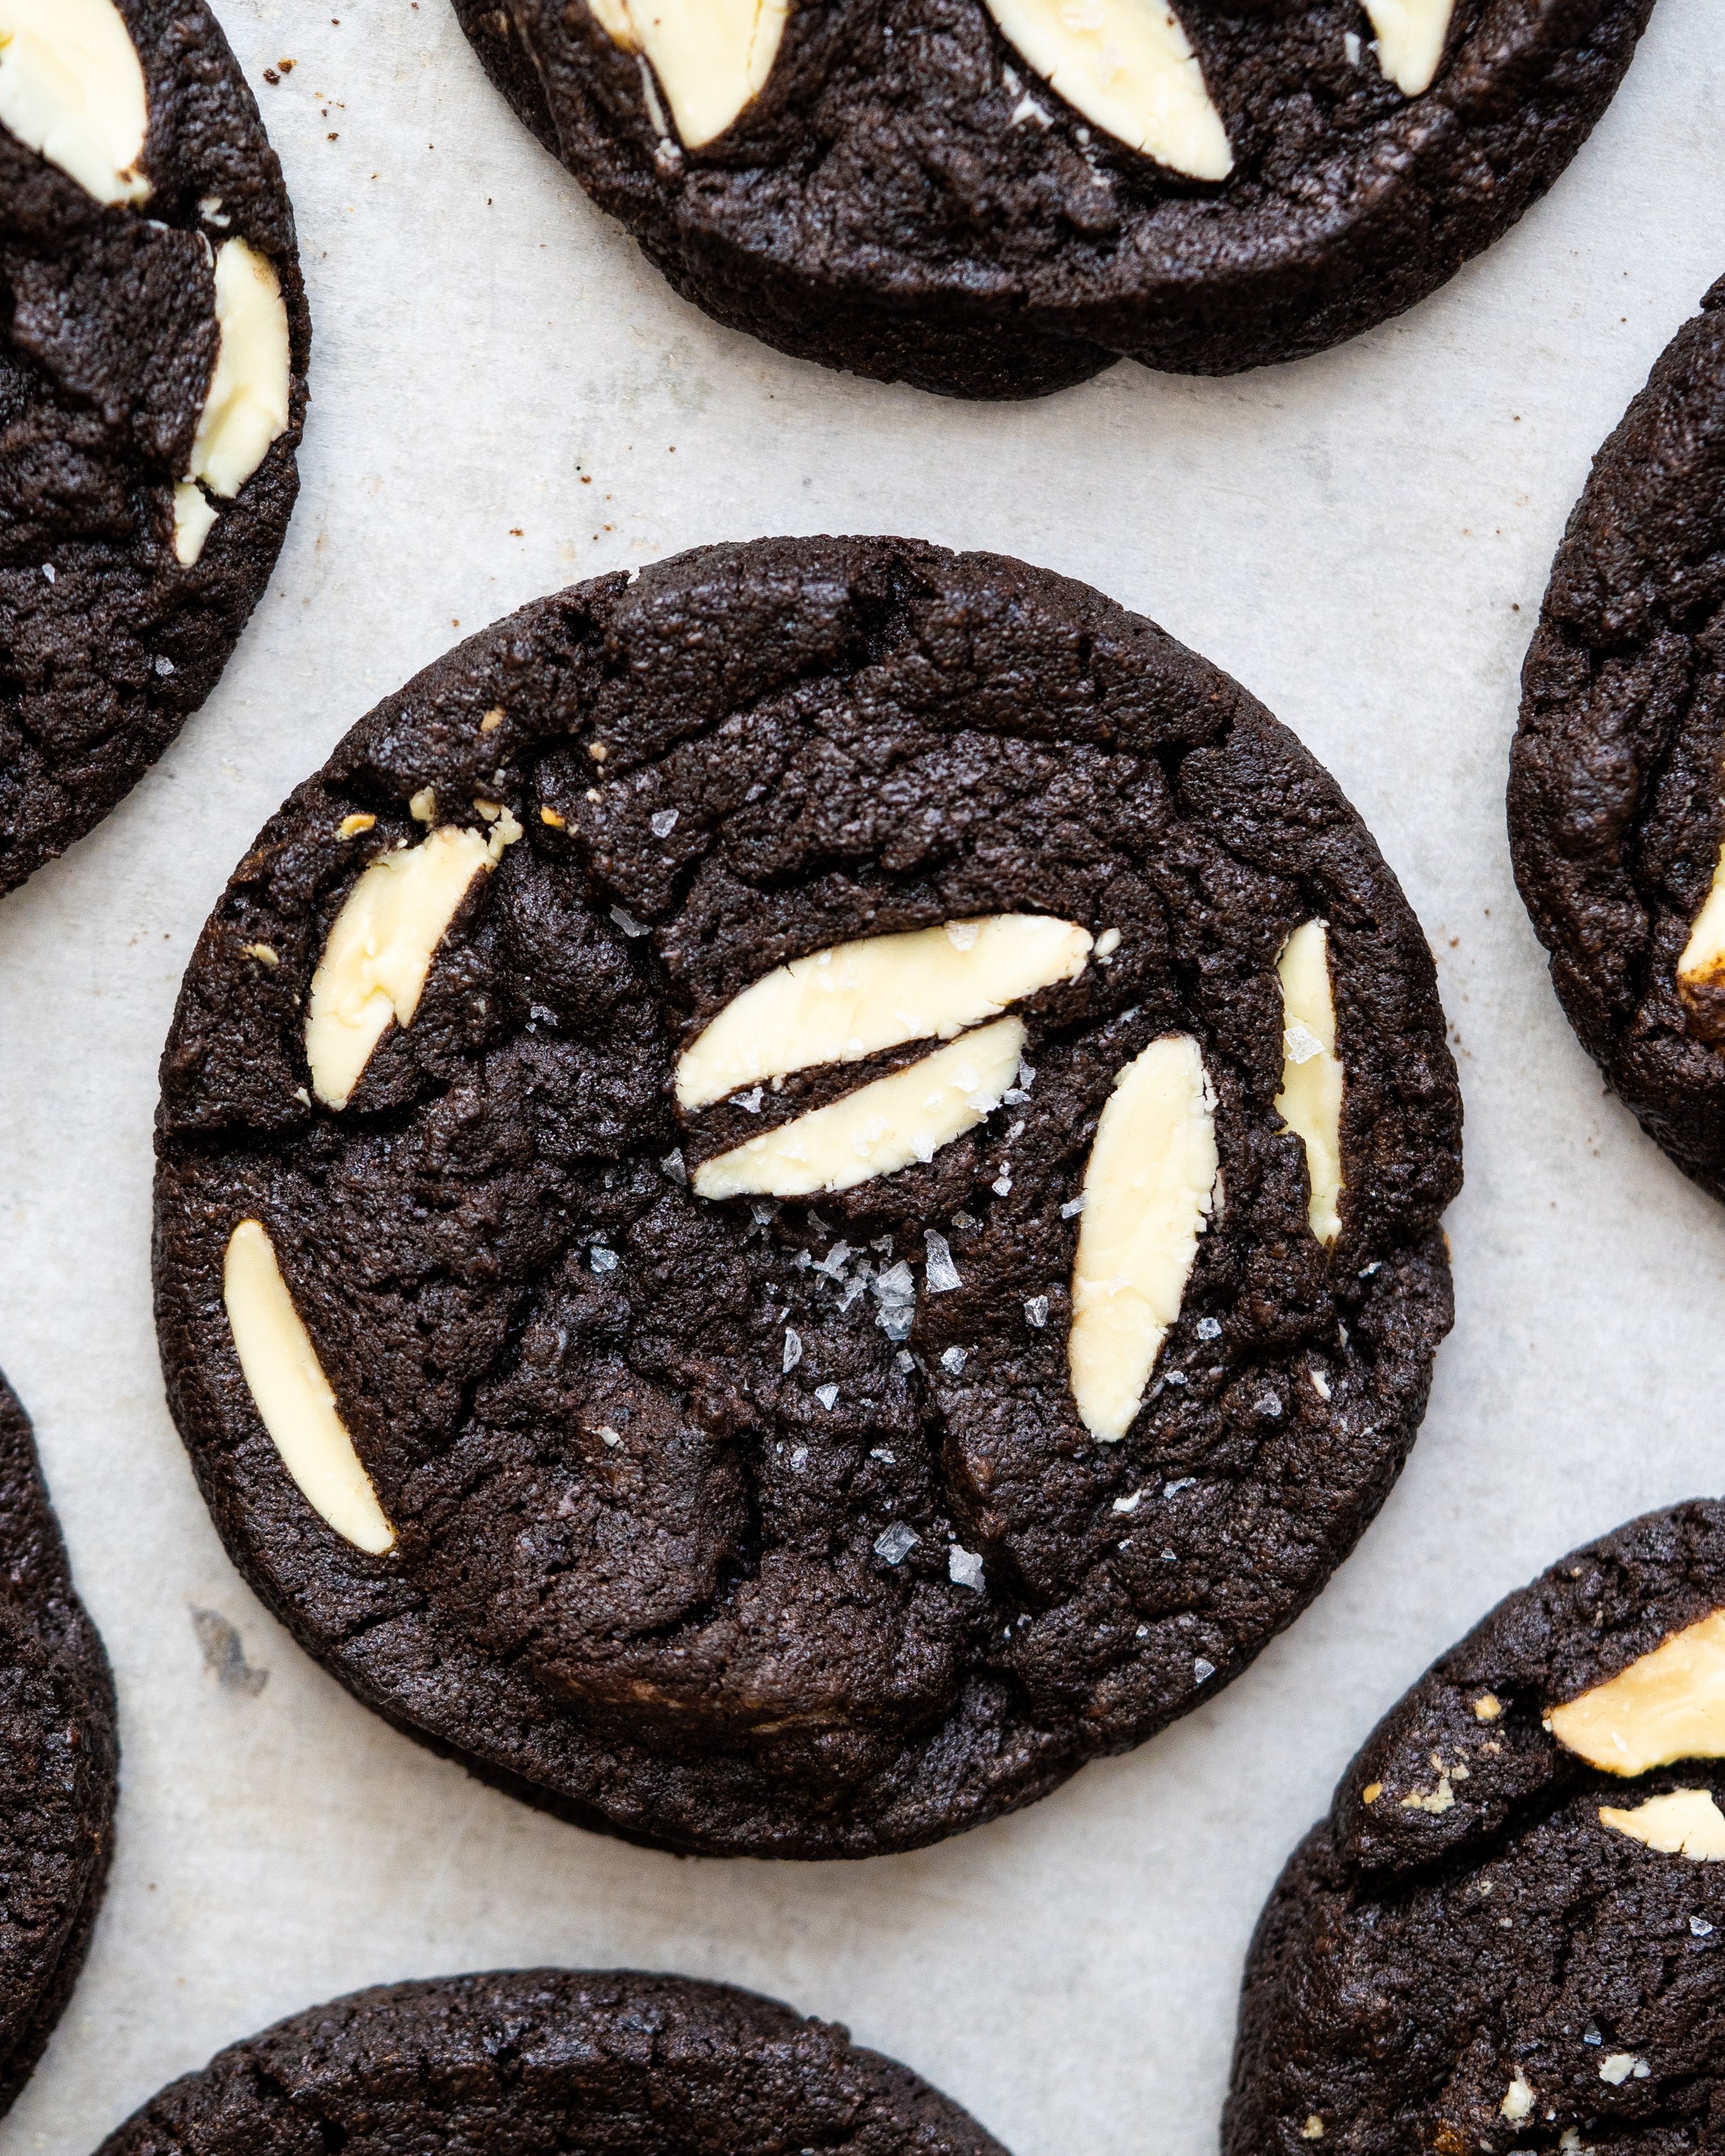
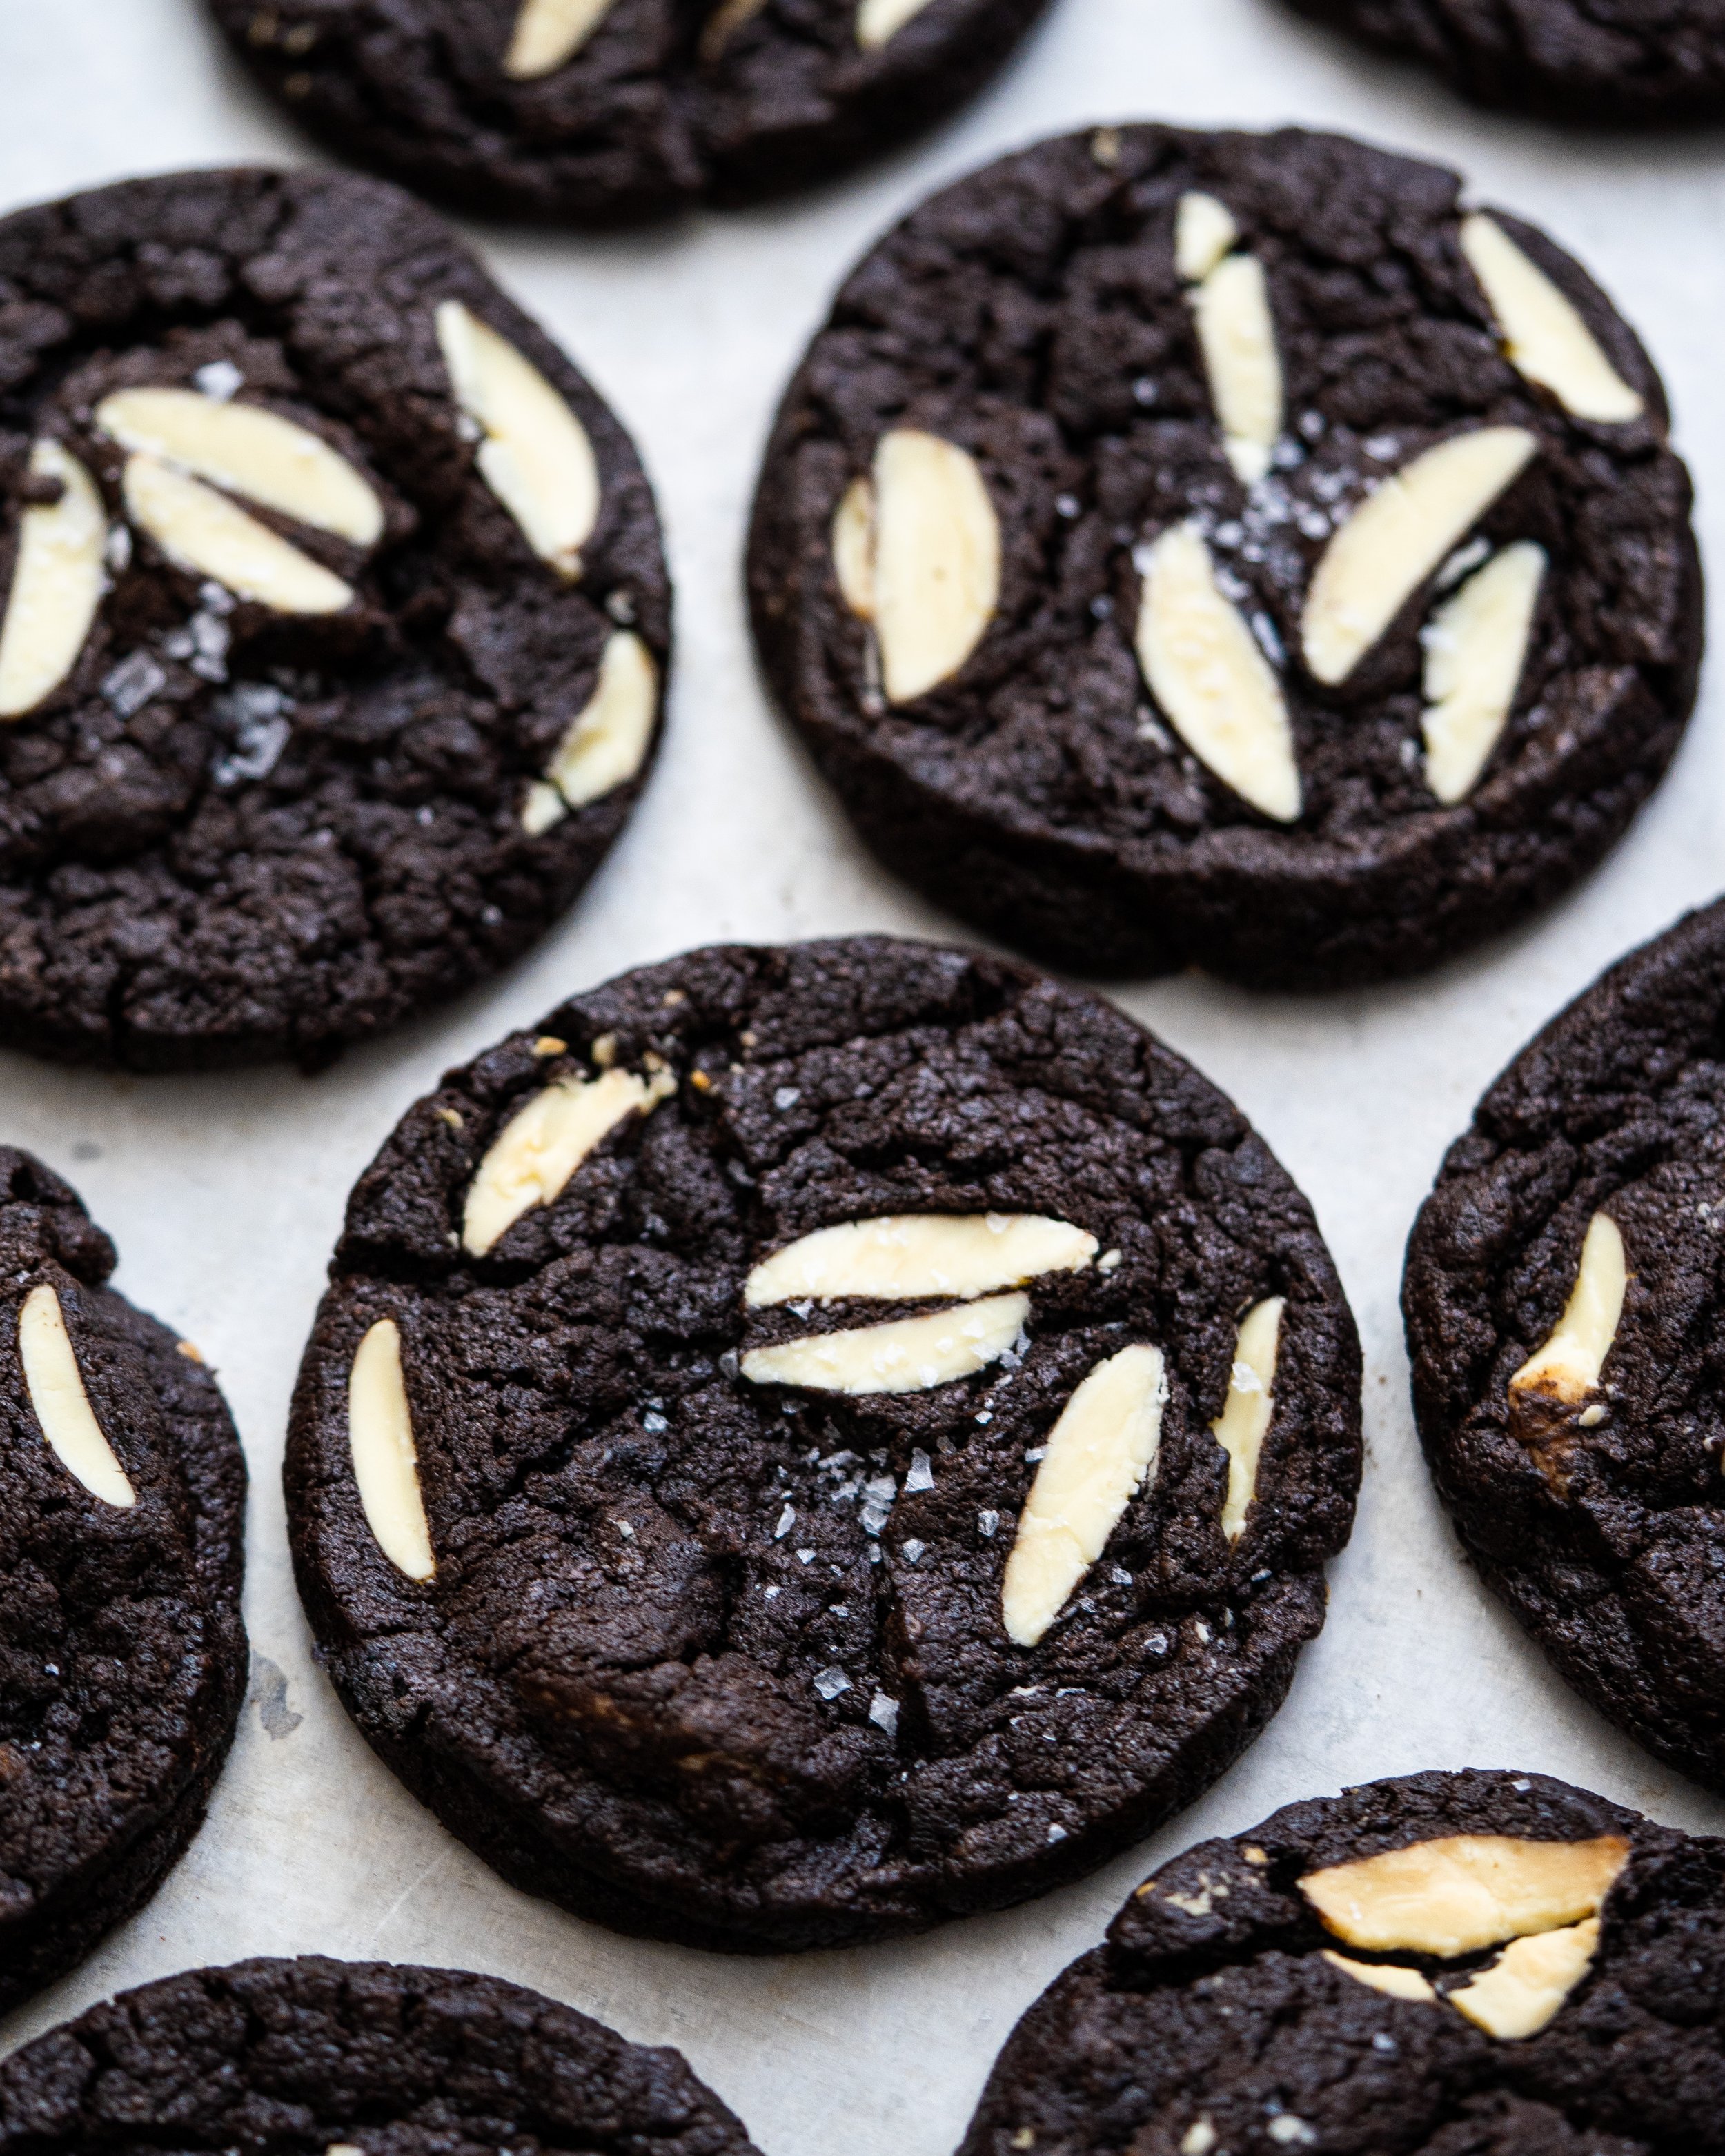
The cookie from the book is known as a double (okay triple) chocolate chip cookie and I thought it could easily be adapted to fit my idea. In the book the cookie has a pretty quick turnaround, the dough is baked as soon as it is made, no resting, just instant gratification. The recipe looked good to me but I needed something I could prep in advance so I did a quick test. I wanted to be able to make the dough a couple days in advance and then bake it as close to the bake sale as possible. I could either scoop the dough once chilled, as I often do with my cookie recipes, or I could roll it once made and chill it in individual portions. The chilled dough sets very firm so scooping or rolling it wasn’t an option so instead I opted to make it slice and bake style. This is pretty unusual for this type of cookie, normally being a technique you would use with something more akin to a shortbread. This technique also led to an interesting development when it came to flavour. When the cookies were sliced, and because I was using large discs of white chocolate, there was lots more chocolate peeking through the two sides of the cookie than when I made it according to the recipe. This had an unexpected benefit, the chocolate on the base of the cookie caramelised as it baked, meaning the flavour was a little less sweet and with more of a caramelised flavour, a double winner if you ask me.

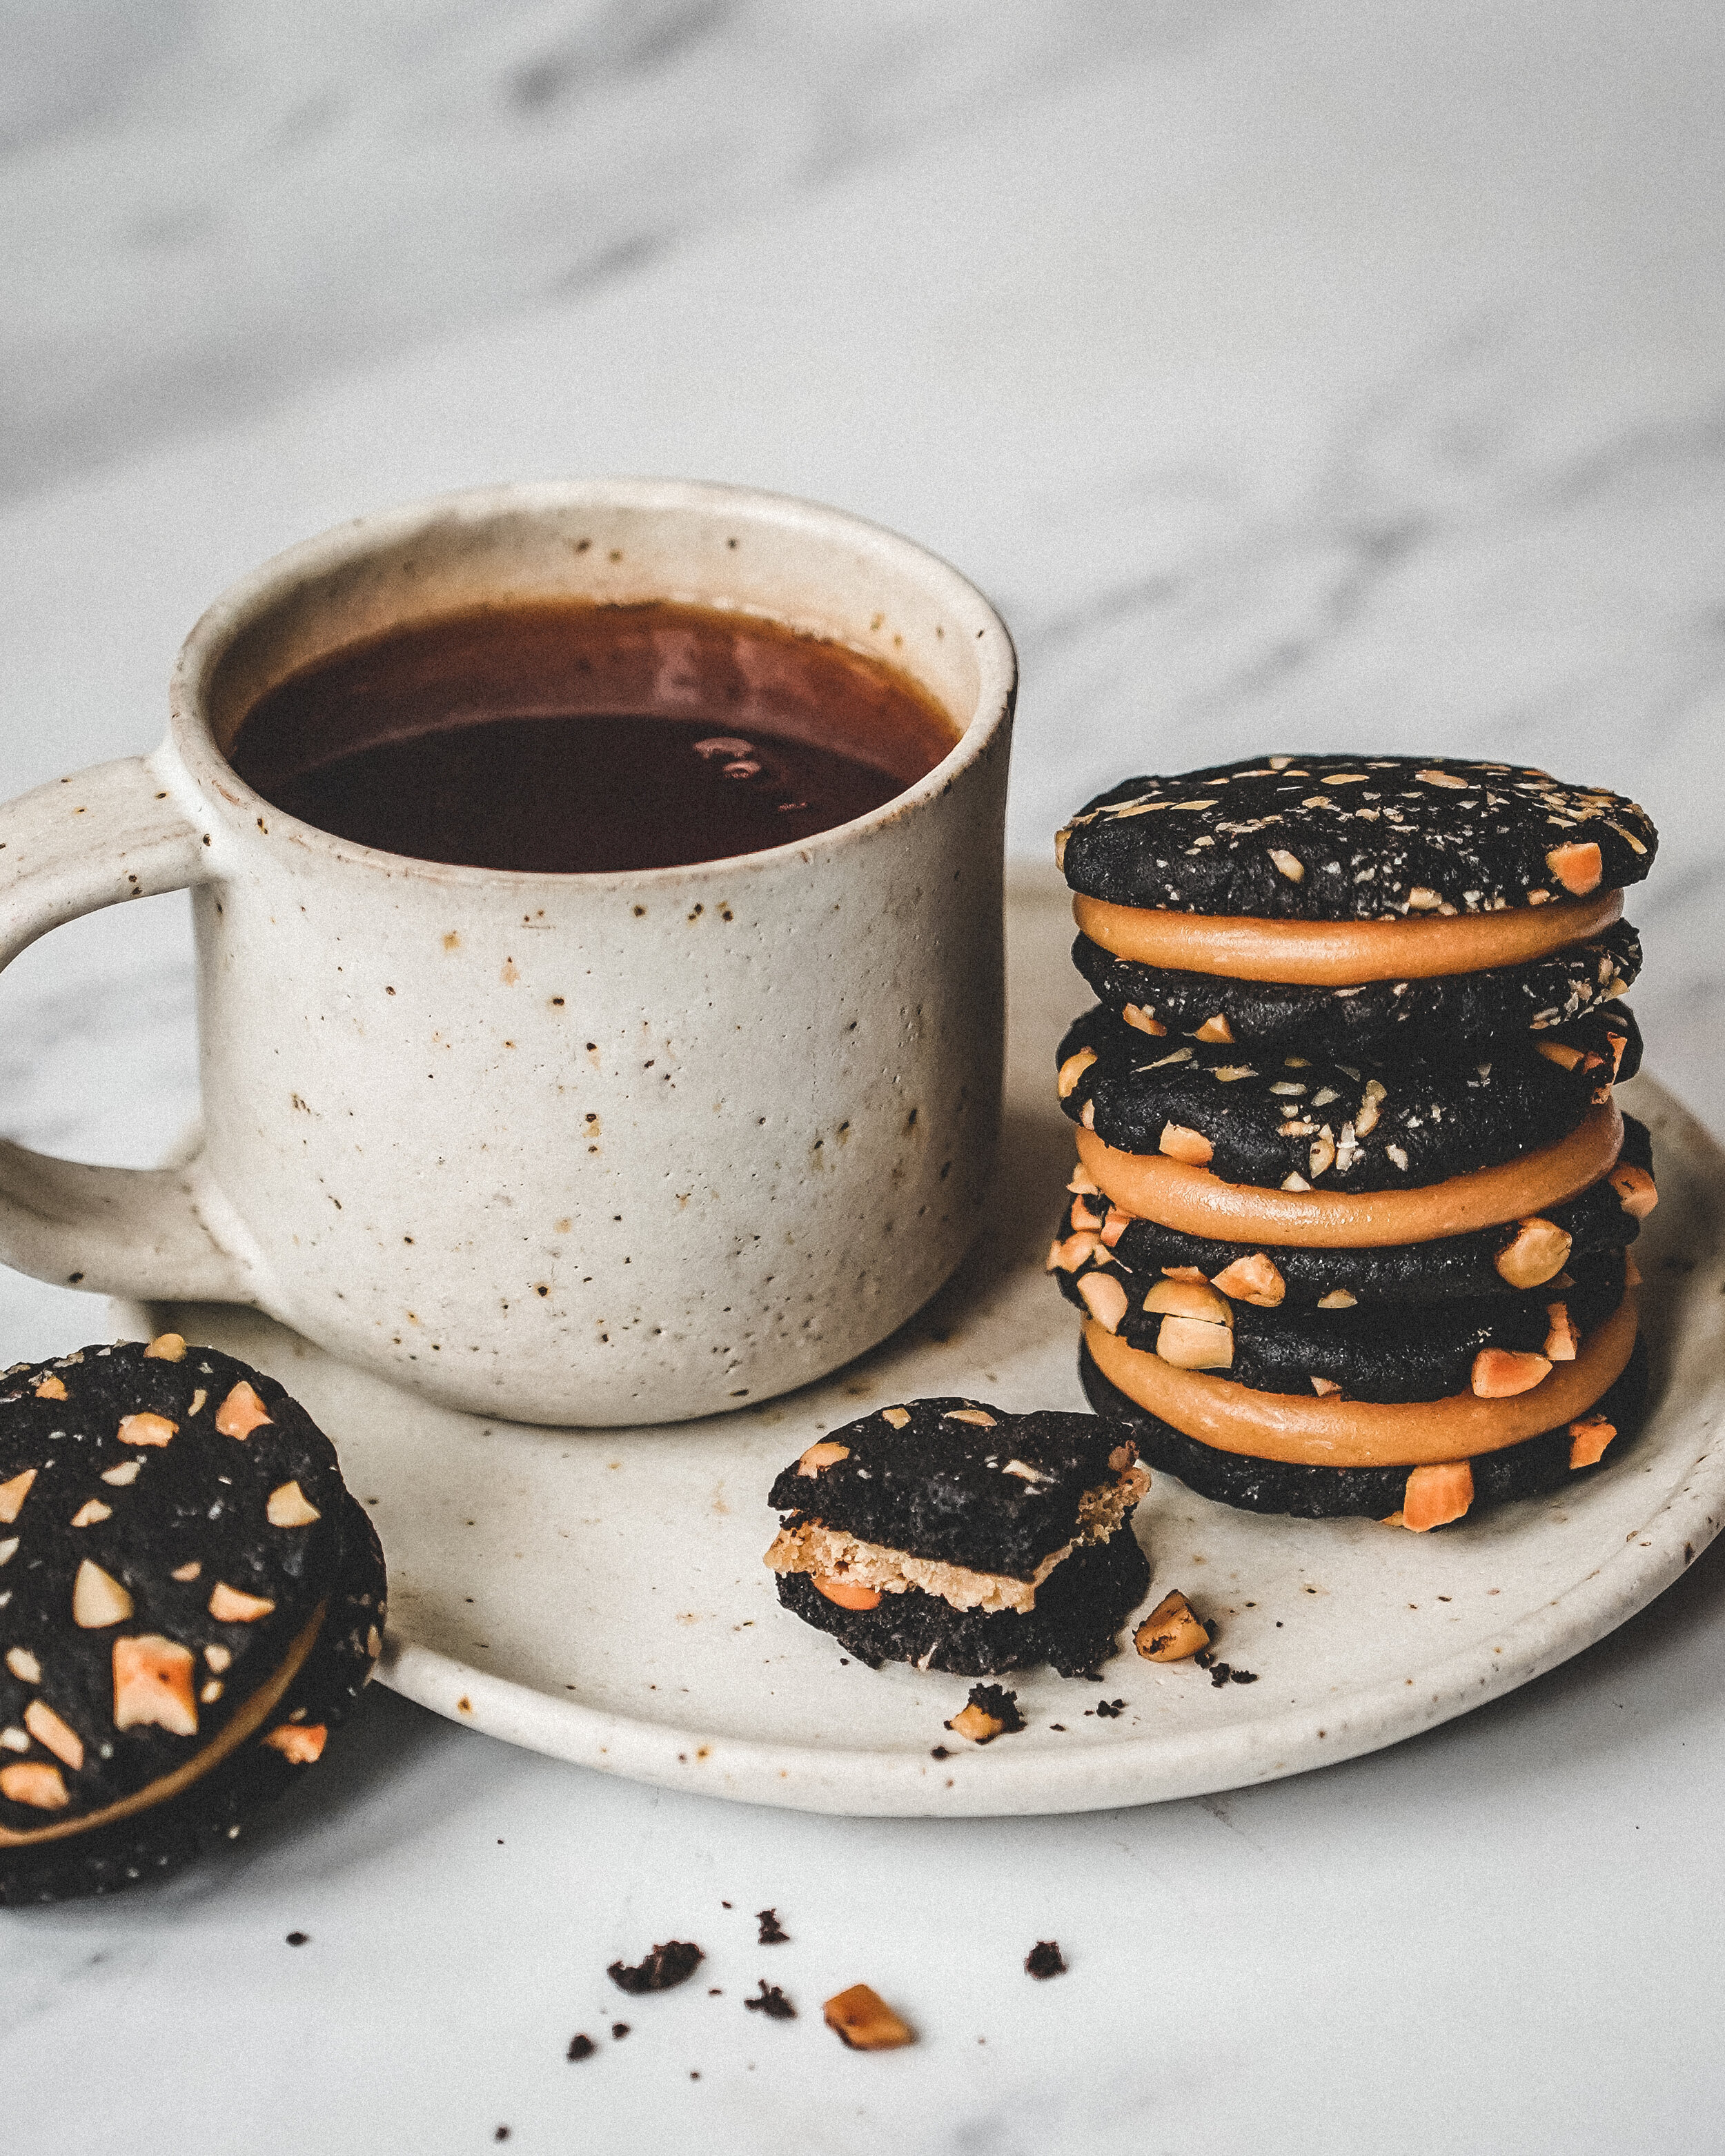
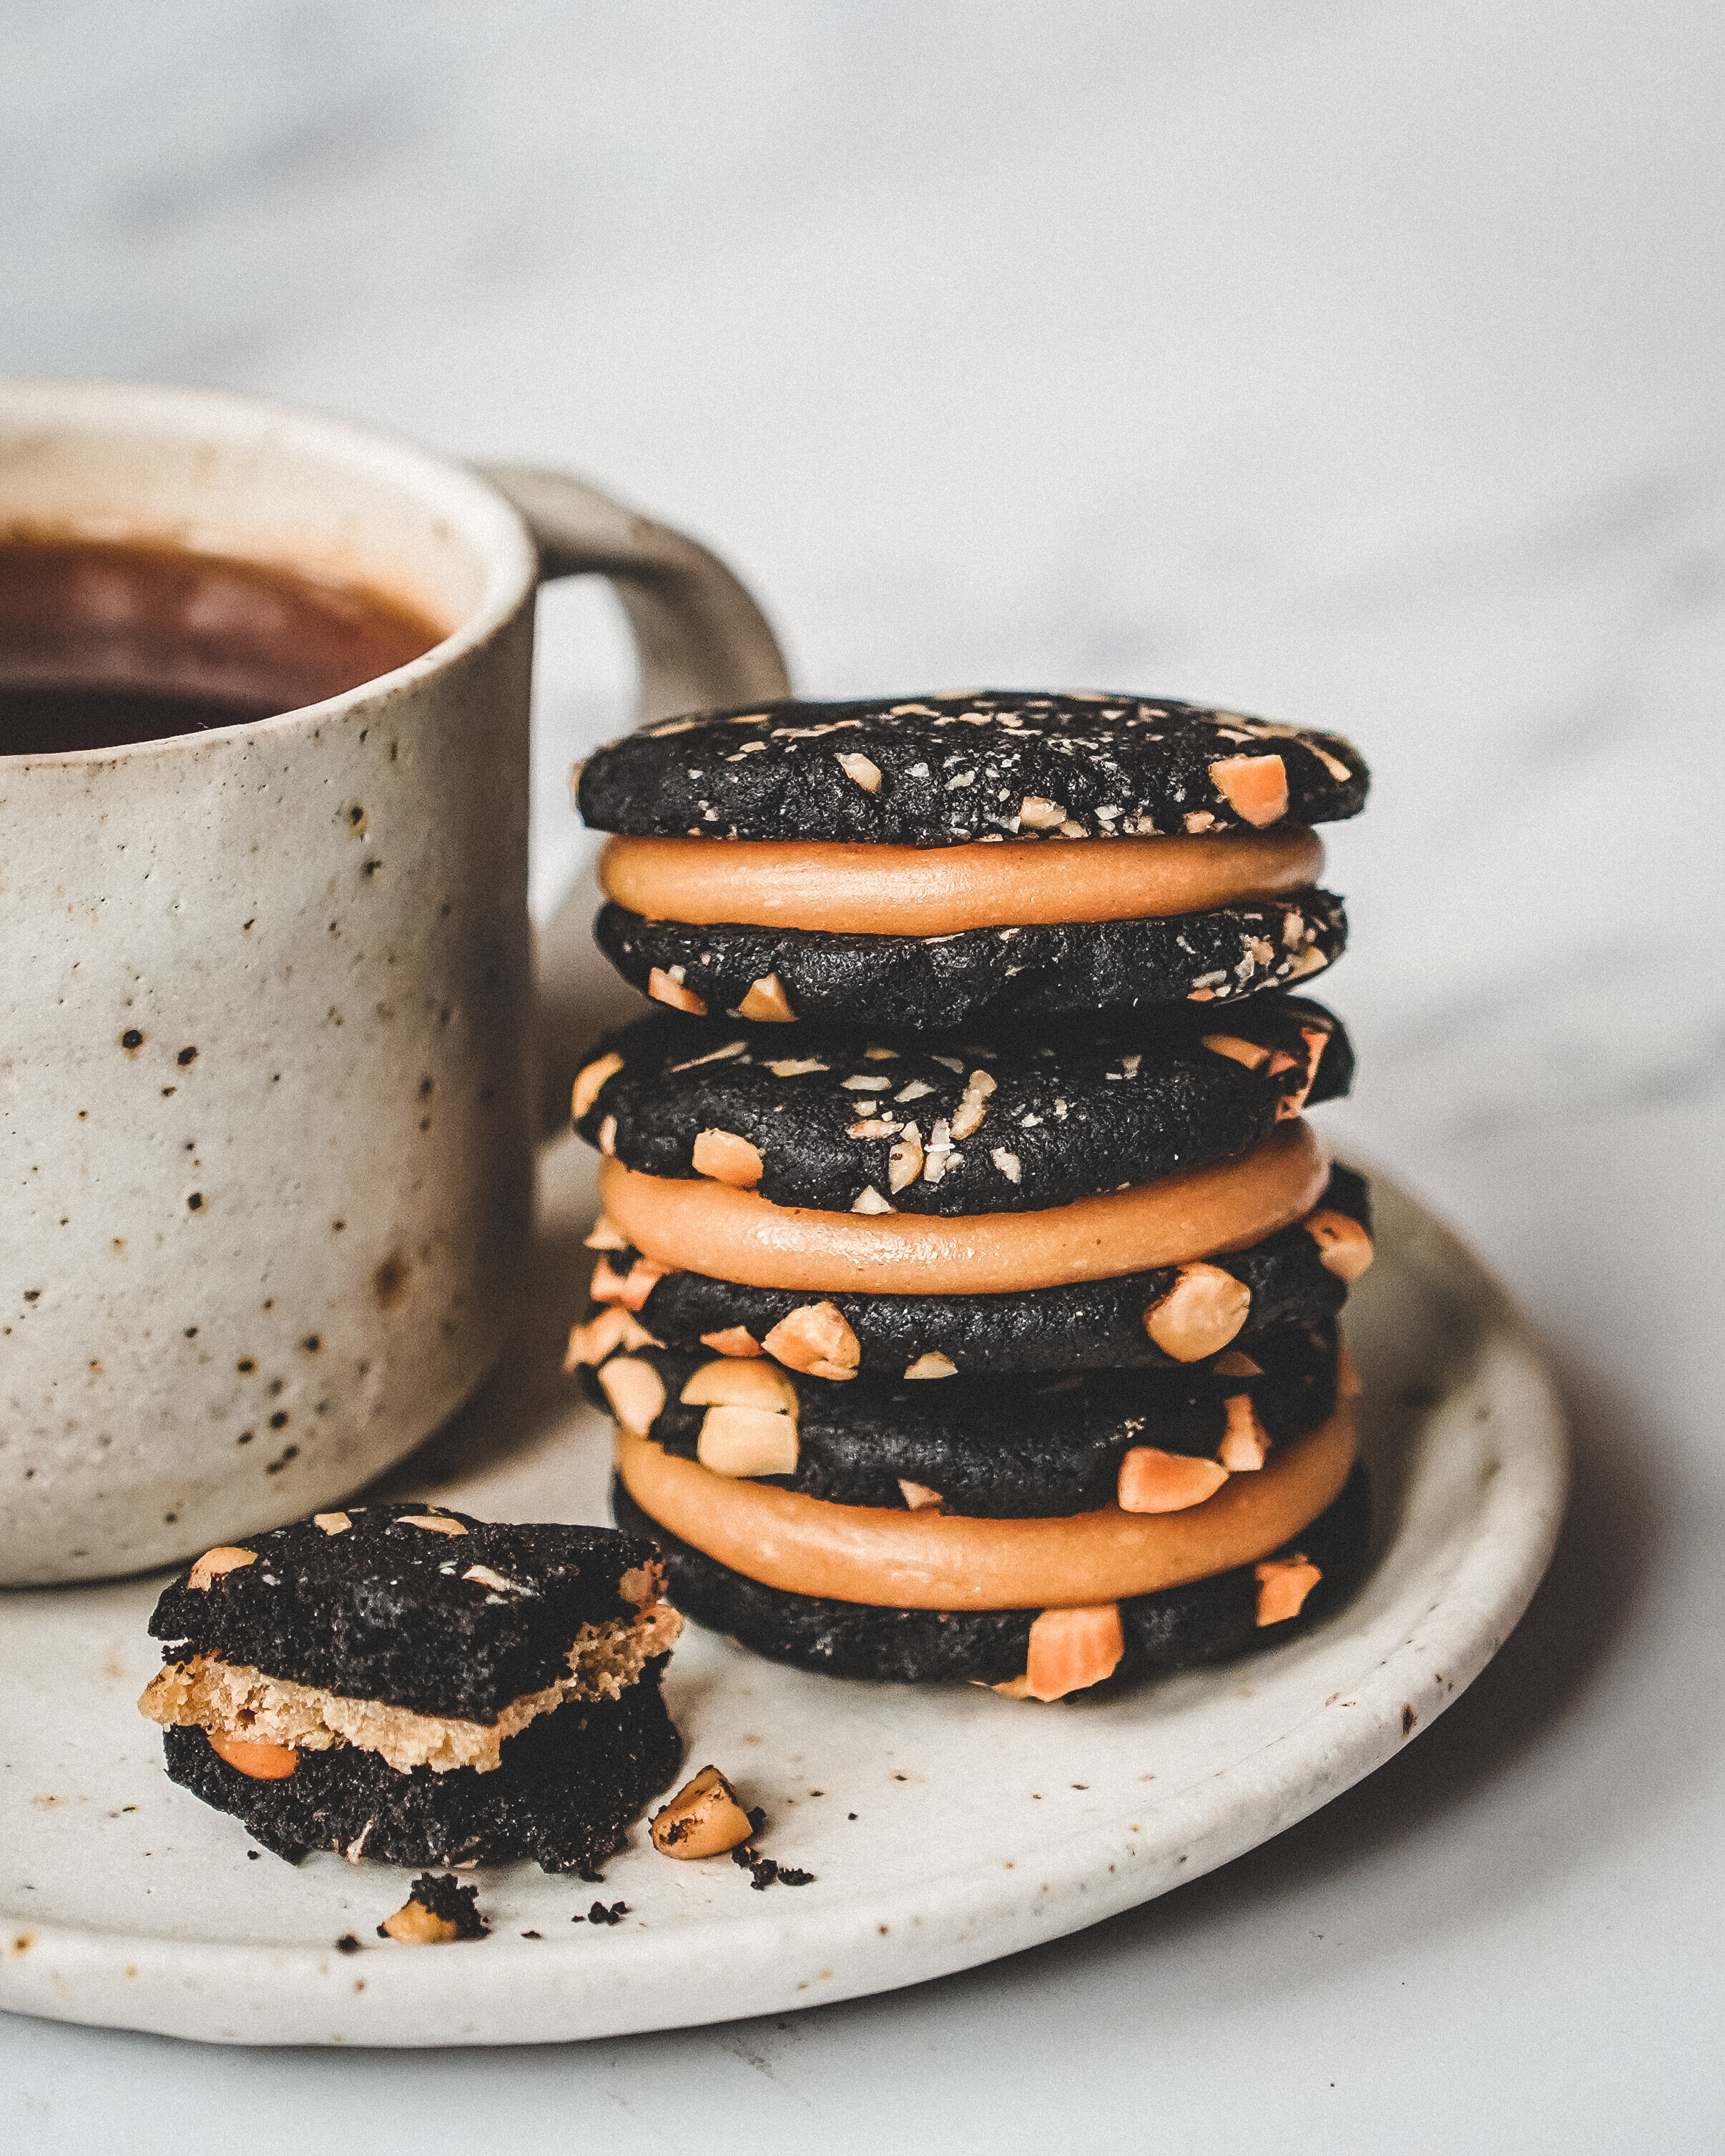
If you want a cookie that has a sweet and salty contrast with just a hint of an oreo flavour, this recipe is for you. The edges become nice and crisp and the centres become the ideal form of chewy, this is a winner of a recipe and one I will surely make time and time again. 

Inside Out Chocolate Chip Cookies
Adapted from the book Sister Pie by Lisa Ludwinski

225g dark chocolate, roughly chopped
115g white chocolate, roughly chopped
225g plain flour
60g black cocoa powder*
1 1/2 tsp baking powder
1 tsp bicarbonate of soda
1 1/2 tsp fine sea salt
225g unsalted butter, room temperature
150g caster sugar
150g light brown sugar
2 large eggs
250g white chocolate*

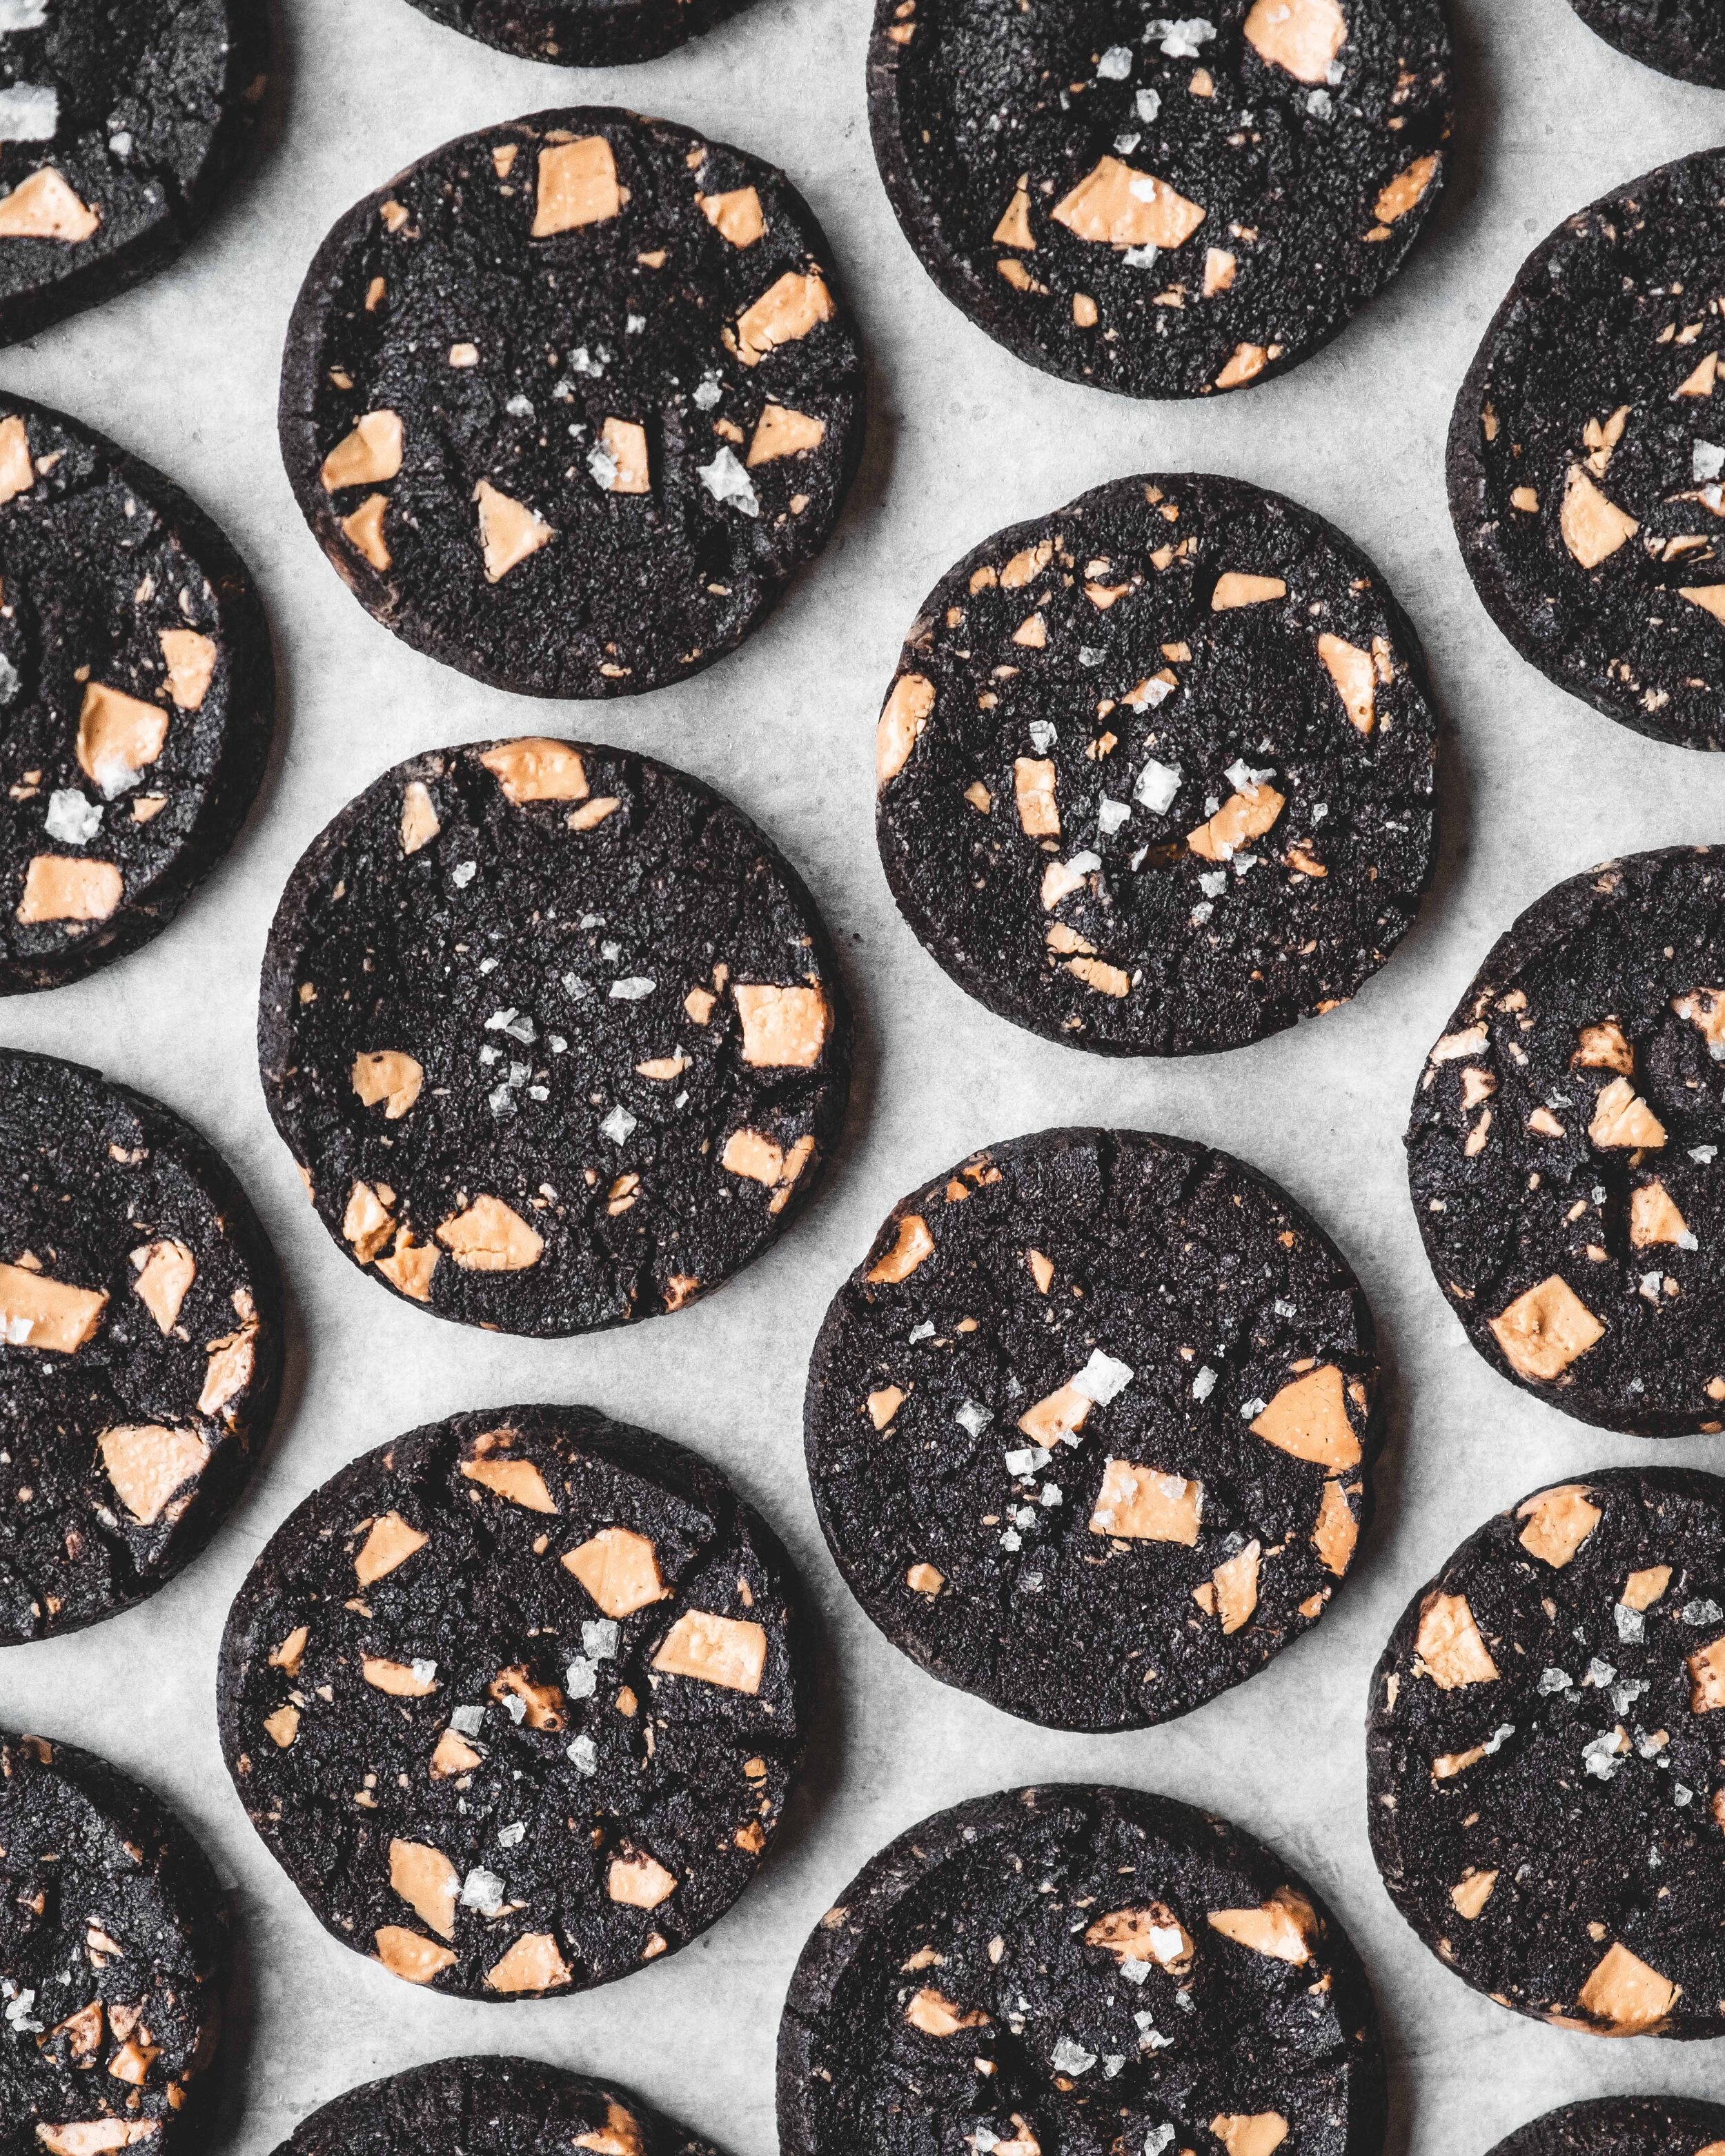
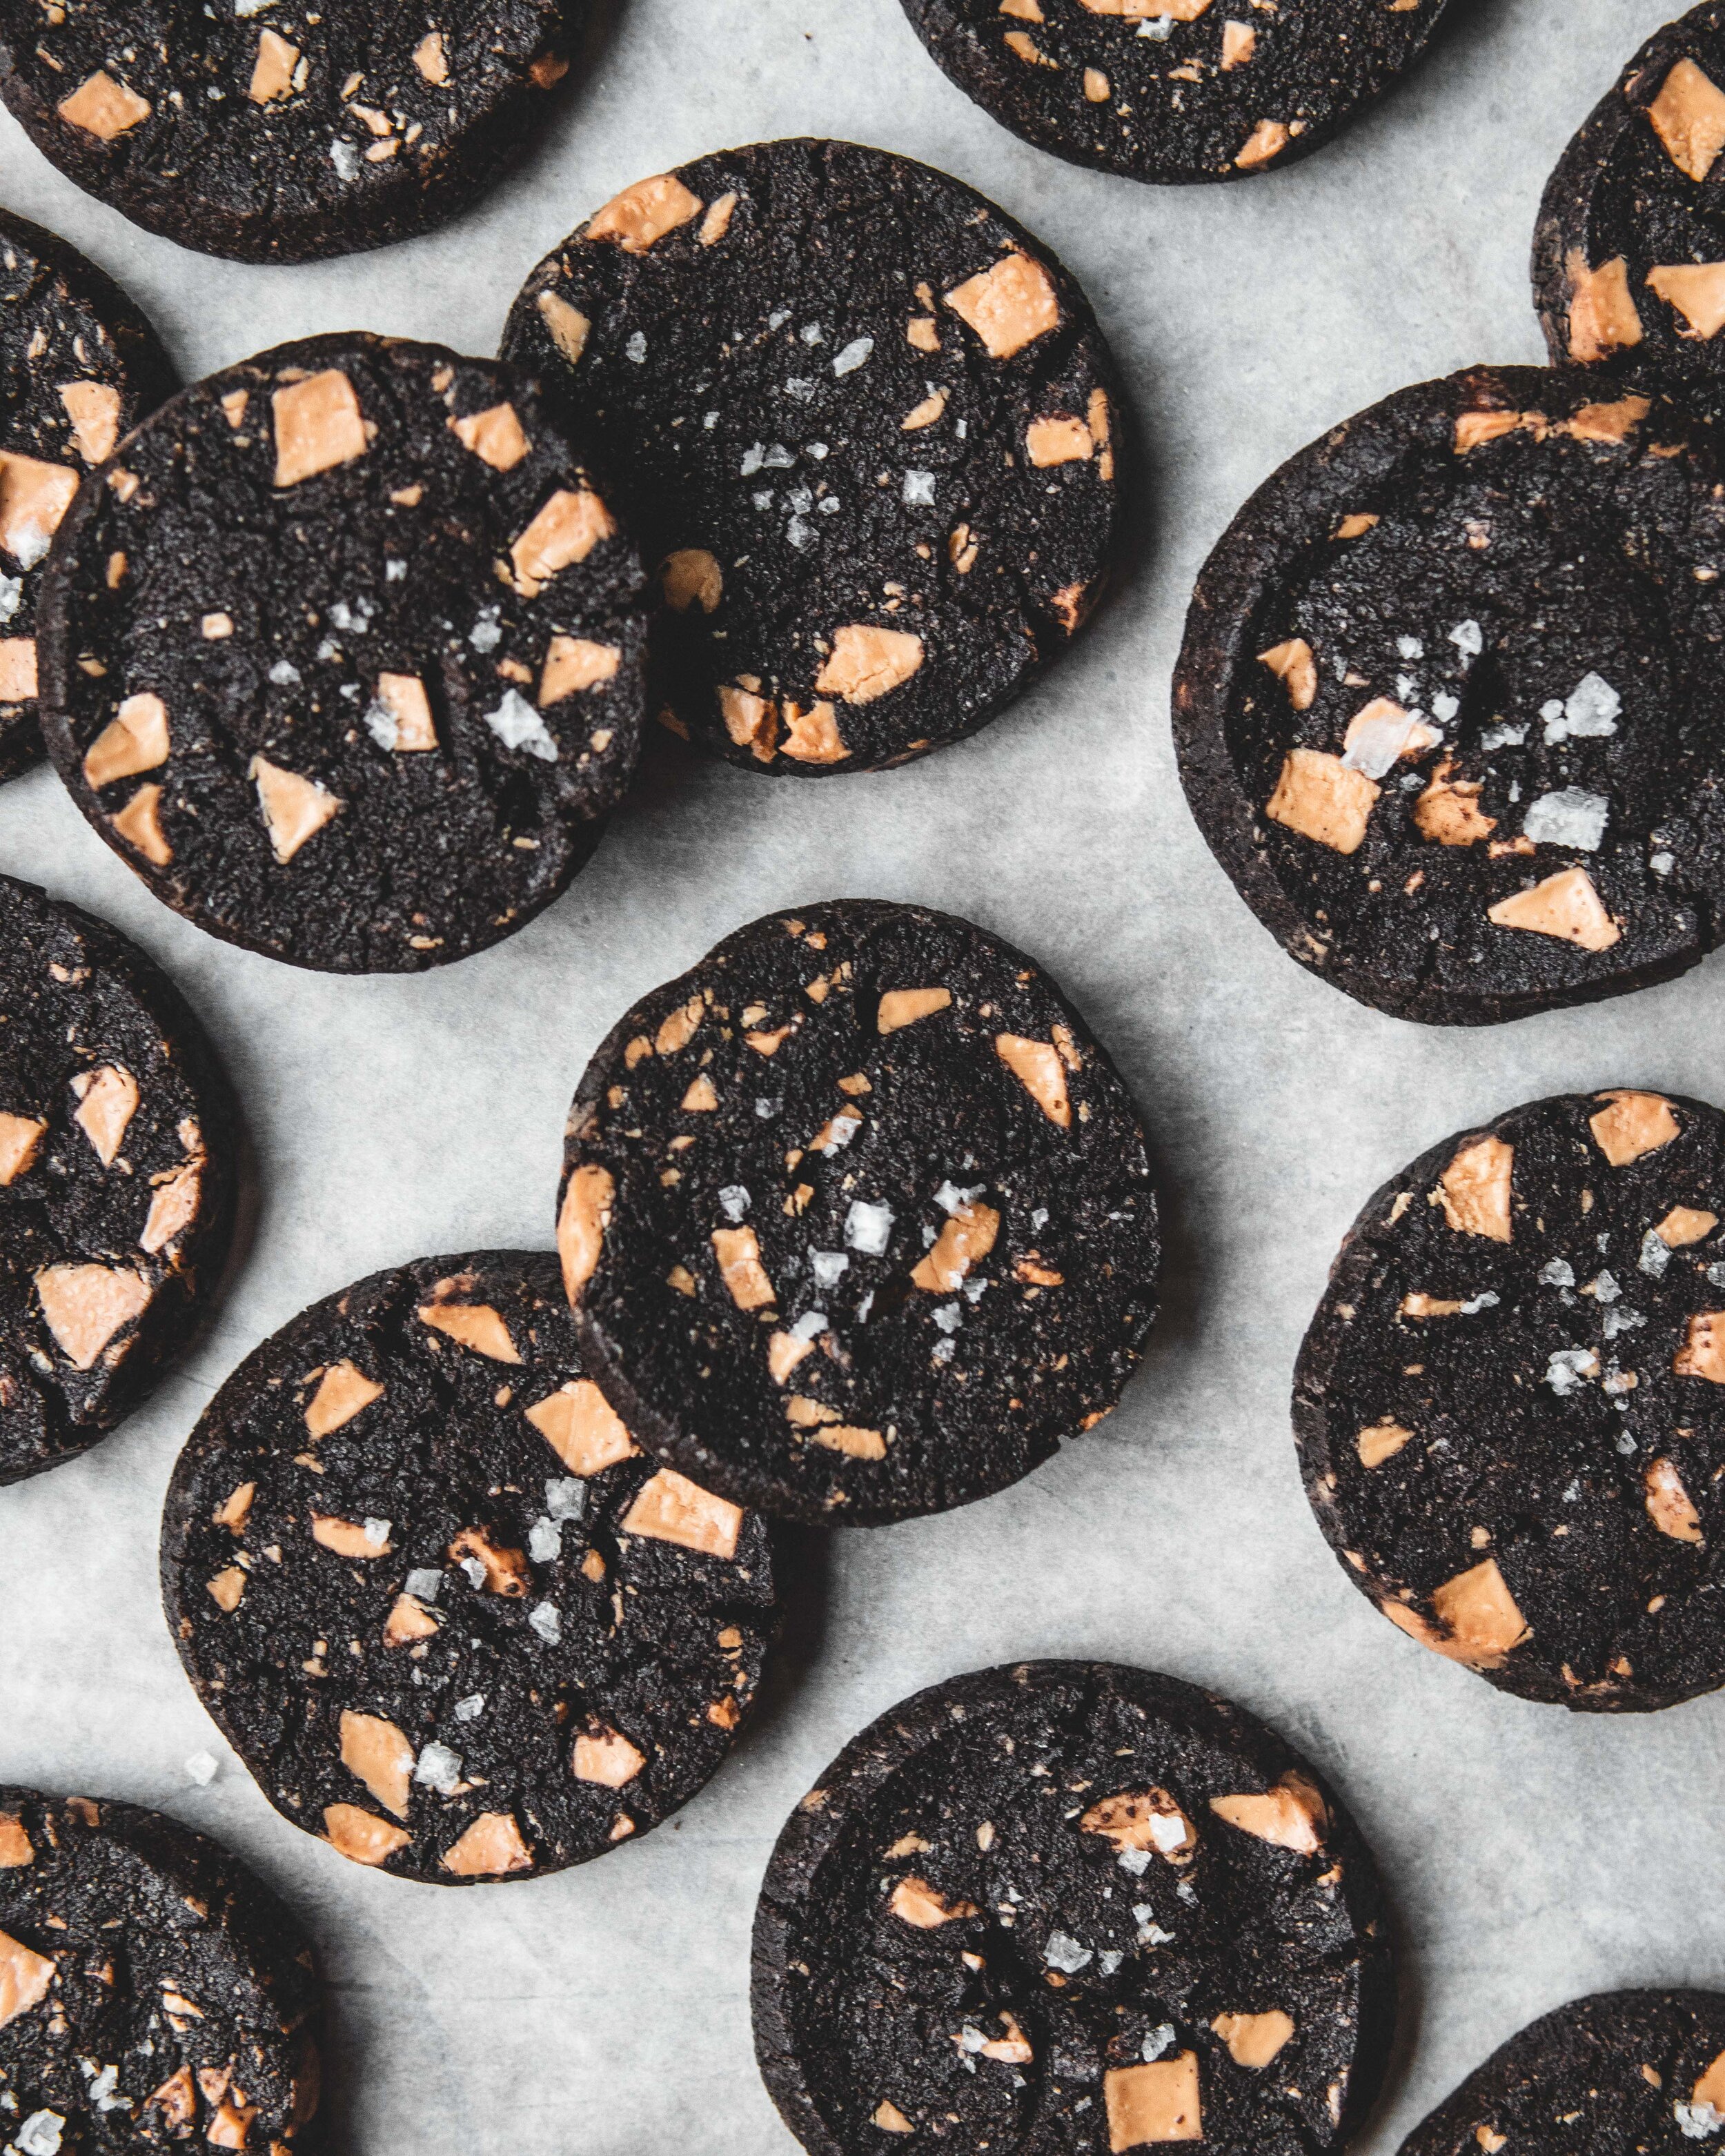
*To achieve the intense black and white look the these cookies have you need to use black cocoa powder, a sub category of dutched cocoa powder. This type of cocoa powder is very easy to buy online (I use the brand DeZaan) but if you cant find it you can use traditional dutched cocoa powder, the look just wont quite be the same. The black cocoa is also what contributes to that hint of oreo flavour. For the white chocolate I like to large chocolate discs but if you only have access to bars chop them into irregular sized chunks and avoid using white chocolate chips. 

To make the cookie dough place the two types of chocolate into a bowl set over a pan of simmering water and heat, stirring occasionally, until fully melted. Remove from the heat and set aside for 10 minutes to allow to cool. 

In a large bowl, whisk together the flour, cocoa powder, baking powder, bicarbonate of soda and salt. If using the black cocoa a good whisk should be fine as the black cocoa is lower in fat and doesn’t tend to clump. If using a regular dutch cocoa you may want to sieve this to ensure a lump free mixture. In a large bowl, using an electric mixer, cream together the butter and sugars, beating until light and fluffy, about 5 minutes. Add the eggs one at a time, beating until fully combined before adding the second. Pour in the cooled chocolate mixture and mix until the batter is uniform. Add the flour mixture and on low speed mix together just until a dough is formed. Add the second amount of white chocolate and mix until evenly distributed.

Scrape half the dough onto a large sheet of clingfilm and form into a rough log. Roll the dough in the clingfilm and use your hands to roll into a log that is about 2 inches thick. The dough is soft at this point so the shape wont be perfect. Transfer the log of dough to the fridge and repeat with the second half. Once the dough has had a little time to chill and firm up I like to take it out of the fridge and roll it to refine the shape and make it more evenly round. Chill until firm and ready to use, the dough will keep for about 3-4 days before baking. 

To bake, remove the dough from the fridge and allow to sit at room temperature whilst your oven preheats to to 180ºC (160ºC Fan). Line two large baking trays with parchment paper. 

Using a very sharp knife cut the cookie dough into pucks about 1 inch thick (the cookies should weigh around 60g each, I like to weigh my first cookie puck to ensure I am cutting them the right size). You may find the cookies break into pieces when sliced but don’t worry just press them back together and the’ll be fine. Place 6 cookies onto each of the prepared trays, spacing well apart as they spread. Sprinkle the cookies with a little flaked sea salt and bake in the oven for about 15-16 minutes. They’ll still be soft when they come out of the oven and will set up as they cool. 

After a few minutes transfer the cookies to a wire rack to cool completely. Repeat with the remaining cookie dough. 

Kept in a sealed container these will keep for 2-3 days. The dough can also be frozen for up to two months before baking. 


In Biscuits and Cookies Tags black cocoa, inside out, white chocolate, cookie, cookies, sister pie, double chocolate
2 Comments
black cocoa pb cookies-1.jpg

Black Cocoa Peanut Sandwich Cookies

Edd Kimber May 24, 2021

These cookies are so ridiculously simple and so delicious. The cookie element is based around my melting moment recipe, a melt in the mouth, incredibly tender cookie. I use black cocoa but you can also use a regular dutched cocoa powder if thats what you have on hand. The balls of cookie dough are rolled in salted peanuts and pressed into flat discs and then baked. The filling is a simple white chocolate ganache mixed with peanut butter. Its the sort of cookie you want mid morning with a strong cup of coffee. 

Before we get to the recipe lets talk about cocoa powder for a second. Cocoa powder comes from the cocoa pods and specifically the beans inside those pods, so far so obvious. The beans are fermented and then dried. Generally they are then roasted (unless the product is destined to be used for ‘raw’ chocolate or cocoa powder but I wont be talking about that process here). The beans are then cracked open and the nibs are ground into what is called cocoa liquor and then, using a hydraulic press, the liquor is pressed under great pressure to extract most of the cocoa butter leaving behind a product known as a cocoa cake. This cake is dried once again and then ground into cocoa powder. 

Why then is there such a variety in cocoa powders, what is the difference between natural, dutched and black? Natural is the cocoa powder made as above with no additional processing, it is a light almost dusty brown colour and is bright and acidic in flavour. Dutched cocoa goes through an alkalisation process which lessens the acidity and makes a deeper richer tasting cocoa powder with a darker colour. In the UK and Europe this is traditionally the main type of cocoa powder available although natural and raw cocoa have become more popular over the last few years. Black cocoa, with its characteristic charcoal black colour, is a variation of dutched cocoa powder, the process of alkalisation taken to its limit to make an intensely dark and slightly bitter cocoa powder, if you’ve ever eaten an oreo you’ve had black cocoa. I like black cocoa for its colour and its flavour but its not suitable for everything, the flavour isn’t a pronounced chocolate flavour its much more roasted than that so if you want classic chocolate flavours I would a traditional dutched powder.

Whenever I use black cocoa I am always asked where to buy it as in the UK it is a relatively unknown product, at least until recently. I would always bring some home from the US when there on holiday or for work, King Arthur Baking sell my go-to version. Someone imports that brand into the UK but it is criminally expensive so I am thankful that a few new brands have sprung up to make it easier, and cheaper, to buy. Van Houten was the first brand more widely available, selling on Amazon, but I am yet to test this brand out. When I buy the cocoa myself I get it from De Zaan, a commercial cocoa powder producer that have recently started selling in a more direct to customer facing way. You can find there cocoa powder on Amazon and on from HB ingredients. 

Before we get to the recipe a brief note on peanut butter. When baking with peanut butter you need to be careful about what style you use. Generally you want to be using a commercial peanut butter and this is for the simple reason that it is less likely to split creating odd textures in the finished recipes. By all means you can use a natural peanut butter but be aware the result might not look like you envisioned or like the images of the recipe. 

Black Cocoa Peanut Melting Moments with Peanut Butter Ganache
Makes 15 Sandwich Cookies

Cocoa Melting Moments
250g unsalted butter, room temperature
1/2 tsp vanilla extract
200g plain flour
60g black cocoa powder
85g icing sugar
30g cornflour
175g salted peanuts, roughly chopped

Peanut Butter Ganache
100ml double cream
125g white chocolate
75g smooth peanut butter 

Preheat the oven to 160ºC (140ºC Fan) and line a couple baking sheets with parchment paper.

For the cookies place the butter into a large bowl and use an electric mixer to beat until soft and creamy. Add the vanilla and beat briefly to combine. In a separate bowl whisk together the flour, cocoa, icing sugar and cornflour. Add the flour mixture to thee butter mixture and mix on slow speed just until a dough is formed. 

Divide the dough into 20g portions and roll them into balls. Roll the balls in the chopped peanuts, your not looking to fully coat the balls just get a decent amount of peanuts on each cookie. Place the balls onto parchment lined baking trays leaving a little space between each cookie. Using a glass or measuring cup press each ball into a flat disc. Spraying the glass with a little oil can help prevent them sticking. 

black cocoa pb cookies-1-2.jpg

Bake the cookies in the preheated oven for about 20-25 minutes or until the edges are set and dry.

Remove the trays from the oven and allow the cookies to cool fully. 

To make the ganache place the chocolate and cream into a small saucepan and place over low heat. Stir constantly, making sure to scrape the bottom of the pan to prevent anything from scorching, until the chocolate has melted. Pour the ganache into a small bowl and stir to make sure everything is combined. Set aside for 10 minutes before adding the peanut butter and using a small whisk to combine into the ganache. The ganache needs to be a little cool before adding the peanut butter as the heat can make the mixture split. Refrigerate the ganache until thickened enough to hold its shape but still spreadable, 60-90 minutes. Pipe or spread a small amount of ganache onto half of the cookies and sandwich together with a second cookie. Refrigerate for 30 minutes or until the ganache has fully set. 

Kept in a sealed container these will keep for 3-4 days.

In Biscuits and Cookies, Chocolate Tags black cocoa, melting moments, sandwich cookies, ganache, white chocolate, peanut butter, peanuts, easy, easy baking
4 Comments
black sables-3.jpg

Salted Black Cocoa Sables with Caramelised White Chocolate Chunks

Edd Kimber February 28, 2020

I feel like this post needs to start with an apology to my fellow British bakers because to make this exactly as written will be a little bit tough. Black cocoa, the elusive cocoa used to make Oreos and of course this sable cookie, is a little tough to track down here at home in Blighty Right now, in the UK, there is only one brand of black cocoa availble (over on amazon of course) and I have no idea of the quality. I am lucky to have a stash I bought from King Arthur Flour over in the US and I use it sparingly not wanting to run out anytime soon. The good news is that in this recipe the cocoa is mainly used for look so your favourite cocoa powder will also make for a wonderful cookie, just remember this recipe should you find some black cocoa and want to try a recipe that put its dramatic look to good use. 

I also realise as I am typing this that many of you may also never have heard of black cocoa powder. Simply put it’s just another version of ‘Dutched’ cocoa powder. Cocoa powder comes in two main forms, natural and dutched. Natural cocoa powder is the leftovers after cocoa mass is stripped of its cocoa butter (this form is more common in the US). Dutched cocoa powder goes through one extra step, it is washed in a solution of potassium carbonate to neutralise the acidity found in natural cocoa powder, it also happens to darken the colour of the cocoa powder and give it a deeper more roasted flavour profile (people argue whether natural or dutched has the strongest ‘chocolate’ flavour but I’m not getting into that today). Black cocoa powder goes through a more intense version of this dutching process which gives it an almost entirely black colour. Generally it isn’t seen as having the strongest chocolate flavour compared to the more common cocoa powder varieties so I use it mainly when I want a more dramatic colour, often blending it with a regular ducted cocoa powder to give the best of both worlds. 

In todays recipe I use the black cocoa to make a cookie that looks incredible and also one that gives a chocolate flavour but without overpowering the hero ingredient of this recipe, caramelised white chocolate. If you know me you know I love nothing more than a batch of this magic ingredient. By slowly roasting white chocolate you can caramelise it and add a ton of caramel notes to the chocolate. If you’ve never made it before let this recipe be the reason you finally give it a go. 

If you don’t want to track some black cocoa down this will still taste incredible with regular ducthed cocoa powder so don’t let that stop you from whipping up a batch, 

Salted Black Cocoa Sables with Caramelised White Chocolate Chunks

Makes 30-35
140g plain flour
140g wholemeal rye flour (you can replace with plain flour if you prefer)
40g black cocoa powder
3/4 tsp baking soda
1/2 tsp flaked sea salt
220g unsalted butter, room temperature
125g caster sugar
125g light brown sugar
1 tsp vanilla extract
200g caramelised white chocolate (recipe below), roughly chopped

To make the cookie dough sieve the flours, cocoa powder and baking soda into a large bowl, pushing any lumps of cocoa powder through the sieve. I avoid sieving unless necessary and this is one of those time. Cocoa powder often forms little lumps so it’s always important to sieve it unless you want little dry pockets throughout your recipe. Add the salt and whisk everything together. Place the butter and sugars into the bowl of an electric stand mixer, fitted with the paddle attachment, and on medium speed beat tother for about 2-3 minutes just until smooth and creamy (you can do this with an electric hand mixer too if you want). We don’t want to beat lots of air into the butter we just want to make it soft enough that the flour mixture combines easily so don’t overdo it at this stage. Add the vanilla and mix briefly to combine.

Turn the mixer off and pour in the flour mixture. We don’t want to make a huge mess and have a cloud of flour and cocoa powder cover every surface in your kitchen so cover the bowl of the mixer with a kitchen towel and then gently pulse the mixer on and off just to get the flour combined a little before turning the mixer to low to mix it in properly. We want to mix in the flour just until it disappears into the butter but before the mixture forms a ball of dough, it should still look a little crumbly. Add the chunks of caramelised white chocolate and mix briefly just to distribute. Tip the dough out onto the worksurface and use your hands to briefly bring together as a uniform dough. Cut the dough into two roughly equally sized pieces and set one aside for the moment. Form each ball of dough into a log that is roughly 4-5cm thick. Roll the log of dough in parchment or clingfilm and refrigerate until firm, about 3-4 hours. Repeat with the second piece of dough. 

When ready to bake preheat the oven to 160ºC (140ºC Fan) 325ºF and line a couple baking trays with parchment paper. Unwrap one of the logs of dough and use a sharp knife to cut into slices about 1/2 an inch, just over a cm, thick. Place them onto the prepared baking trays leaving just a little space between. The cookies will spread but not significantly. Sprinkle each with a little extra flaked sea salt, unless you are one of those people that have sent me angry emails about your hatred of salt being sprinkled onto cookies you guys can leave it off and stop emailing me. Bake in the preheated oven for 14 minutes. The cookies wont look done, they’ll be incredibly dark so you cant use visual clues and if you press them they’ll feel too soft but trust the process, as the cookies cool they crisp up leaving you with a wonderful sable texture. Sable is French for sand and these cookies should have a slightly crumbly, almost shortbread like texture. 

Kept in a sealed container these cookies will keep for about 4-5 days.

black sables-5.jpg

Caramelised White Chocolate

300g white chocolate, minimum 30% cocoa butter content

To make the caramelised white chocolate simple roughly chop the chocolate and add to rimmed baking tray. I use an American style quarter sheet pan which is the same size as a regular 9x13 brownie pan so if you own one of those you can also use that. Place the baking tray into an oven that has been preheated to 125ºC. You’re basically going to leave it in there for anything from an hour to hour and half until it has reached your desired level of caramelisation. The one thing you need to do is a lot of stirring. 

Every 10-15 minutes you need to remove the tray and give the chocolate a really good stir. When the chocolate comes out of the oven it may look a little stiff, a little grainy. With a good stir the chocolate will smooth out and become liquid again. To prevent the chocolate from burning or become an unpleasantly grainy mess you must do this stirring very well and every 15 minutes. Don’t be tempted to leave the chocolate any longer between stirs, it will stiffen up to a place from which it cant be rescued. The reason I recommend white chocolate with at least 30% cocoa butter is that it melts thinner and is easier to work with. Once the chocolate has reached a rich golden brown colour remove it from the oven and scrape it into a container. I like to divide it into rectangular plastic trays so it almost resembles the original bar form it came in. Refrigerate until solid and then use however you fancy. You’ll note my cookie recipe only use 200g and my recipe for the chocolate uses 300g of white chocolate. The reason for this is two fold. The chocolate is so good you’ll need extra to account for everything you snack on as you make the cookie dough and secondly making a smaller batch makes it more prone to problems so 300g is the smallest batch I would recommend making. 

In Biscuits and Cookies Tags black cocoa, sable cookies, caramelised white chocolate, theboywhobakes
25 Comments

Twitter

  • Was 8 original films, 3 spin off films, a two part play not enough. Can we have something new. https://t.co/cBZdGEGeyv
    Apr 4, 2023, 1:46 PM
  • RT @deliciousmag: Cacio e pepe, but make it buns! These seriously cheesy bread rolls from @TheBoyWhoBakes are inspired by his favouri… https://t.co/oDZlaDgnN2
    Apr 2, 2023, 11:08 AM
  • RT @TheDailyShow: Congrats to Donald Trump on finally winning a majority of votes! https://t.co/ezP55HZgl0
    Mar 31, 2023, 12:43 AM

Instagram

This weeks bonus recipe, for subscribers to my newsletter, is this gorgeous sour cherry and coconut gateau basque. The crust is a buttery cross between pastry and cake, think a cakey cookie. The filling is a layer of sour cherry topped with a rich coconut custard. A real fun one to make too! Link to my newsletter can be found in my bio - #gateaubasque #pastrycream #coconut #sourcherry
In this months @olivemagazine (out today) the team came and photographed my petit kitchen and we talked about how we put our stamp on the place, without spending a fortune. We hated the bland kitchen that we inherited but, as it was relatively new an
In this months @olivemagazine (out today) the team came and photographed my petit kitchen and we talked about how we put our stamp on the place, without spending a fortune. We hated the bland kitchen that we inherited but, as it was relatively new and in good condition, it felt a waste to rip it out and we also didn’t want to spend the money it would take to rip out the whole thing and replace it (it’s a howdens shell so we could have done something cheaper like @plykeakitchens @holte.studio @madebyhusk) so instead I painted all of the cabinets, using @makeitrustoleum kitchen cabinet paint, to give it some personality and lighten the whole thing. Check out the magazine for the full run down. - #kitchendesign #kitchenremodel #rustoleumcabinettransformations #rustoleumkitchencupboardpaint #kitcheninspiration #theboywhobakes #olivemagazine
Are you making scones all wrong? Maybe, maybe not? But I do want to show you how I make them! This recipe is based on the method I learnt at @belmondlemanoir 12 years ago when I did a stage, and it makes the absolute lightest scones. And shock horror, it involves kneading the dough, albeit very lightly. You can get the full recipe in this weeks newsletter (free) linked in my bio. - #scones #bakingday #worldbakingday #afternoontea #hightea #englishscones #clottedcream #creamtea #theboywhobakes
facebook
  • Contact

The Boy Who Bakes

Edd Kimber

facebook