The Boy Who Bakes

Edd Kimber
  • Home
  • Recipes
  • My Books
  • Blog
  • Recipe Index
  • About
  • Home
  • Recipes
  • My Books
  • Blog
  • Recipe Index
  • About

Recipes

  • All
  • baking
  • Biscuits and Cookies
  • Breads and Quickbreads
  • Bundts
  • Cakes
  • Chocolate
  • Dessert
  • drinks
  • Holidays
  • Pastry
  • Scones and Quickbreads

Panettone Semifreddo Ice Cream Sandwiches

Edd Kimber December 13, 2022

This post is sponsored by Wilfa

Just because it’s winter doesn’t mean we can’t enjoy a frozen dessert; I’m of the firm belief that ice cream is an all weather affair. This particular frozen treat is a brilliantly festive semifreddo sandwiched with panettone. Semifreddo, half frozen in Italian, is a traditional no churn ice cream from Italy. Made with a whipped egg foam and whipped cream it’s brilliantly creamy and rich, flavoured with pieces of amaretto and frozen cherries. If you saw my video earlier this week on toasted milk powder, you can also add a tablespoon of that to the semifreddo to really boost the flavour. Once frozen the semifreddo is cut into discs and sandwiched between two pieces of panettone, a great use for the Christmas bread.

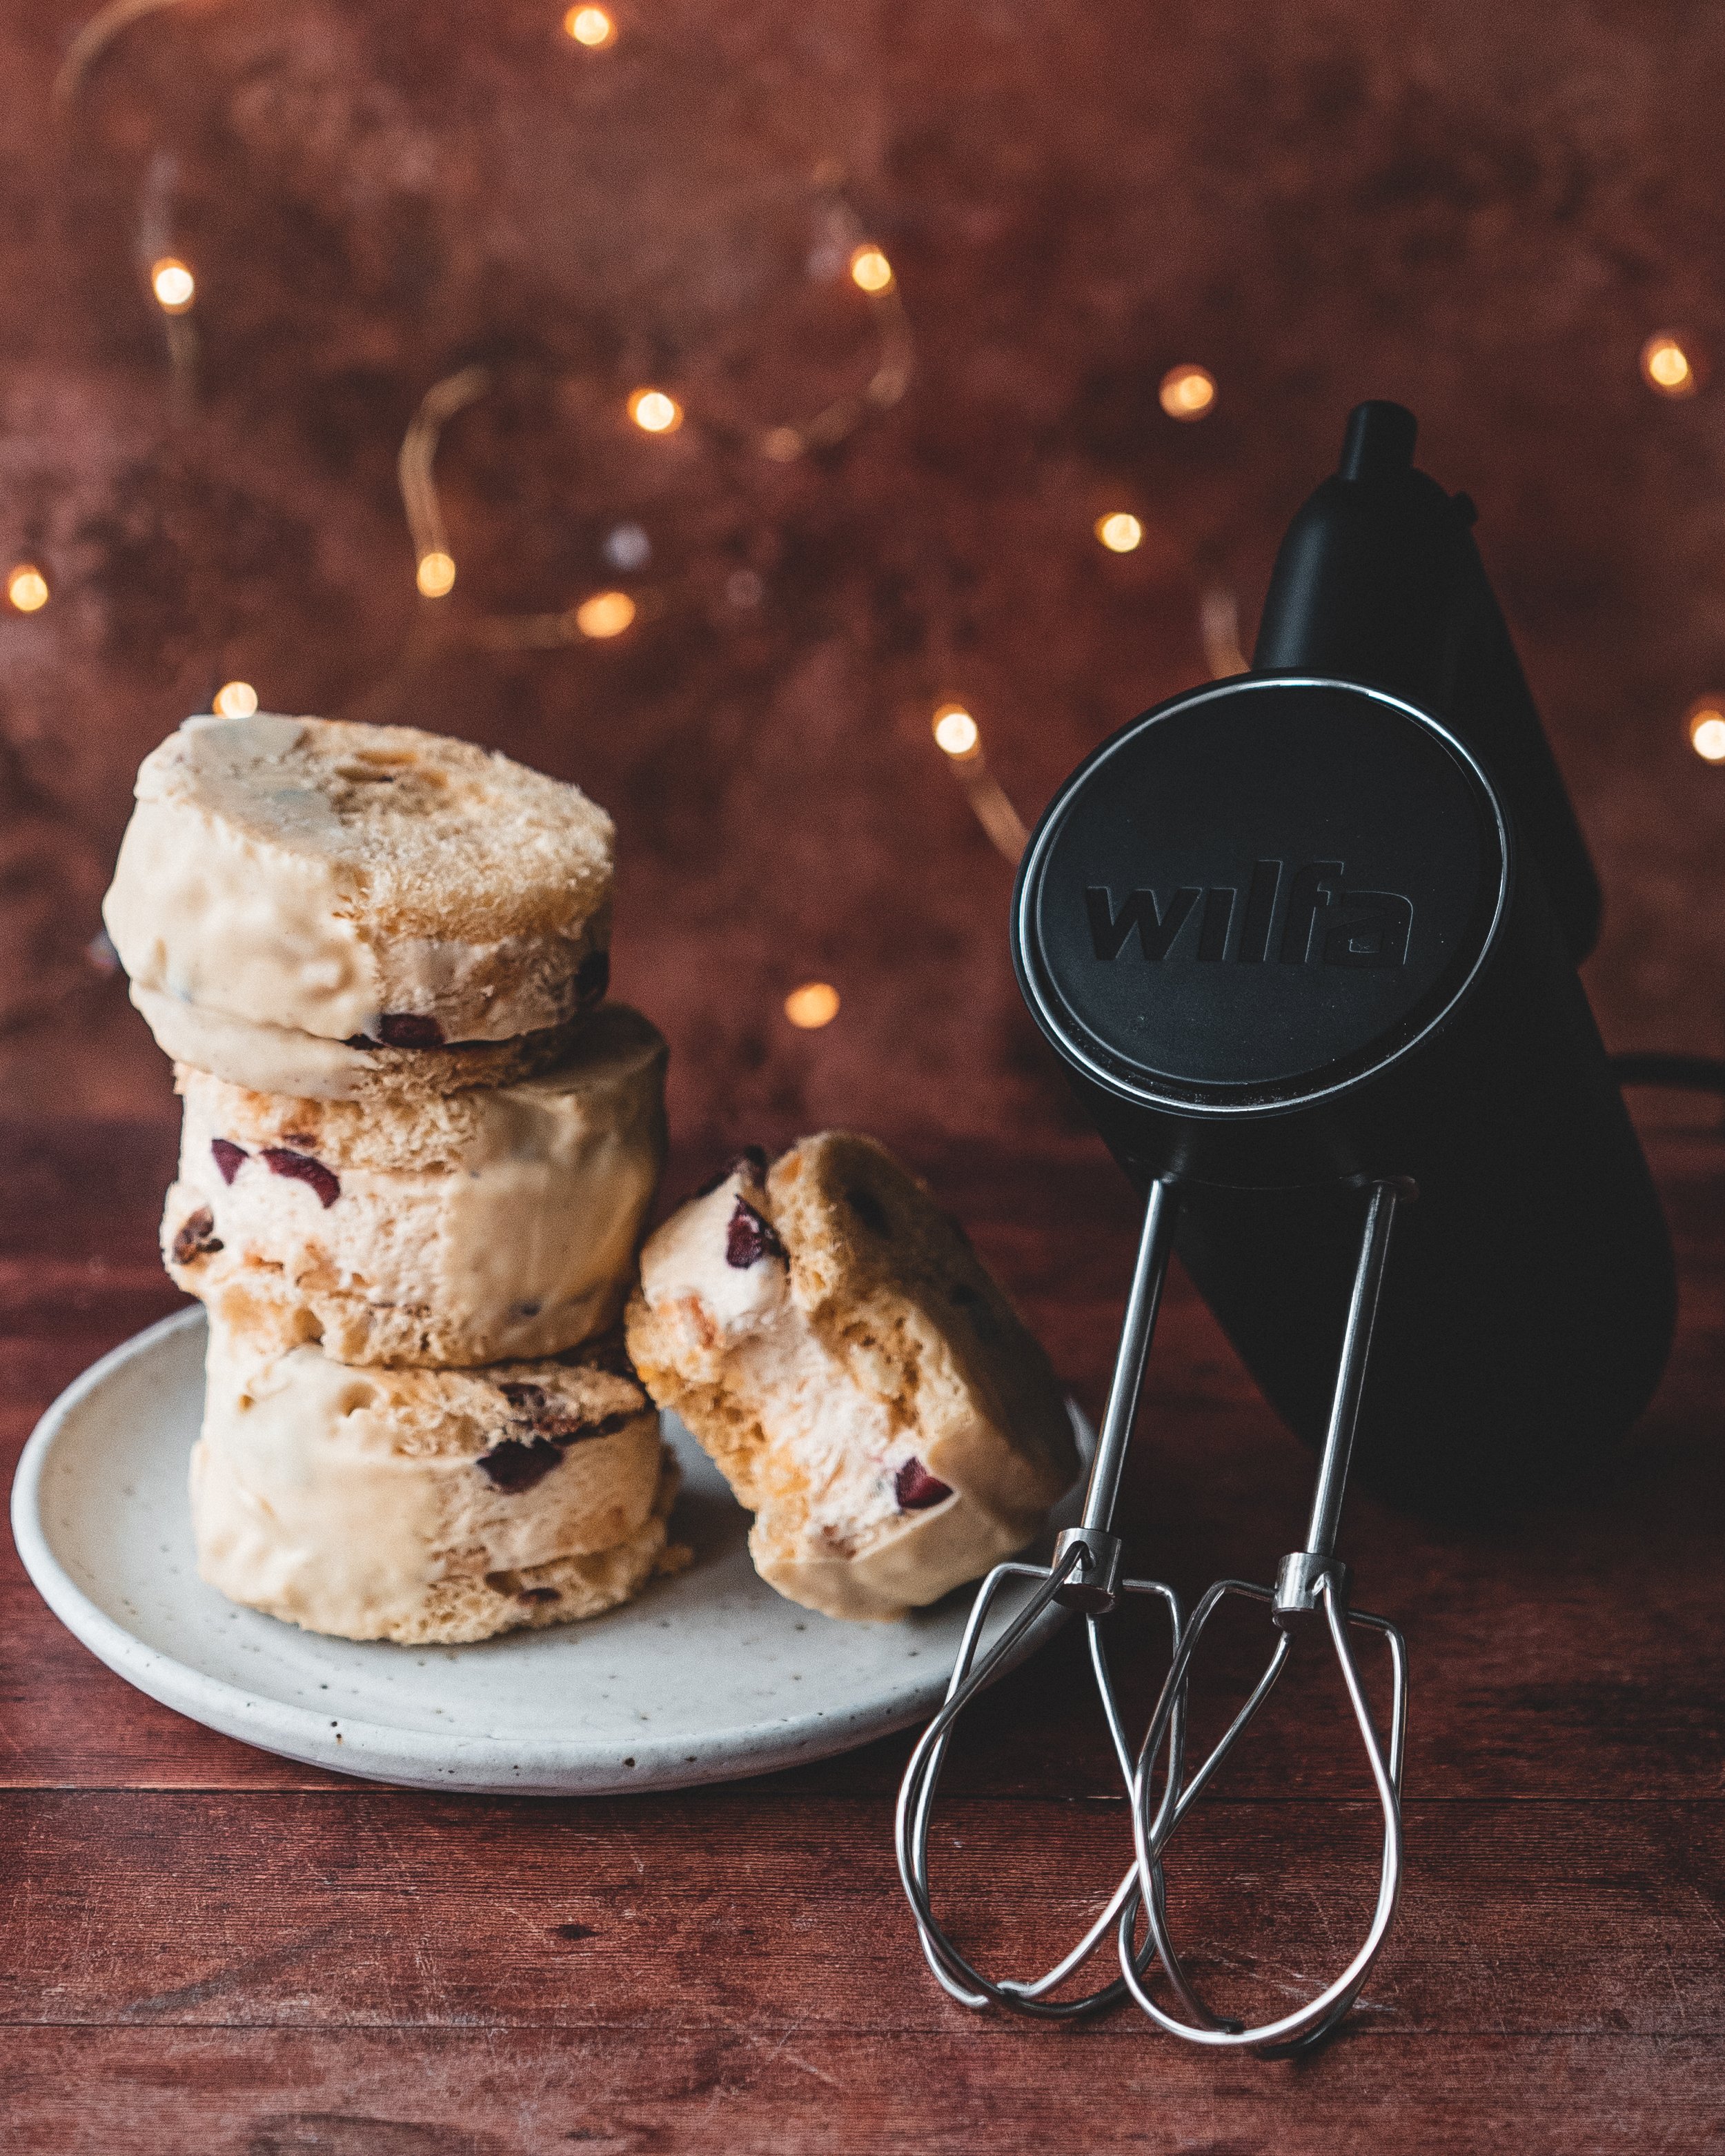
To make the semifreddo, I used my Wilfa Smooth Mix Hand Mixer. The mixer has Wilfa’s characteristic stylish design, like all there products, and of course brilliant function. It has a 5-speed action plus a boost button for when you need a little extra speed. For a hand mixer it also has a very impressive 500W motor meaning it has more than enough power. The thing that stands out for me though is how the mixer handles. Hand mixers are notorious for vibrating and over sustained use can be annoying to hold. The Wilfa hand mixer is much more stable and much nicer to use. I also think it would make a brilliant Christmas present, and using my code THEBOYWHOBAKES you can get 20% off!

Semifreddo
300ml double cream
2 large eggs
3 large egg yolks
125g caster
1 tsp vanilla bean paste
Few drops almond extract
1 tbsp toasted milk powder (optional)
50g soft amaretti cookies
100g frozen cherries, chopped

For the Sandwiches
1x750g loaf panettone
200g white chocolate
2 tbsp coconut oil

Lightly grease a quarter sheet pan or a 9x13 brownie pan and line the base and sides and with parchment paper.

Add the cream to a large bowl and whisk, using a Wilfa Smooth Mix Hand Mixer, until soft peaks form. Set aside for the moment.

Add the eggs, yolks and sugar to a separate large bowl and place the bowl over a pan of simmering water. Using the Wilfa Hand Mixer, whisk on low speed for about 6-8 minutes. Don’t worry about cleaning the beaters before whisking the eggs, since the egg yolks have fat the cream on them doesn’t matter. You want to whisk the mixture until it reaches 75C. This ensures the eggs are cooked but also helps us make a nice light foam. Remove the bowl from the heat and whisk on high speed for another 6-8 minutes until you have a pale and fluffy mixture that’s holds a ribbon when lifted from the bowl. Pour half of this egg mixture into the cream and use a spatula to lightly fold together. Repeat with the remaining egg mixture. Scrape this semifreddo mixture into the prepared tray and spread into an even layer. Crumble over the amaretti and scatter over the chopped cherries. Press a sheet of clingfilm onto the surface of the semifreddo and freeze for 8-10 hours or until firm.

Slice the panettone into 1cm thick slices and use a 8cm round cookie cutter to cut out 16 discs. Remove the semifreddo from the freezer and unmould it from the tray. Use the same cookie cutter to cut out 8 discs of semifreddo and sandwich together with two discs of panettone. Place back into the freezer whilst you prepare the white chocolate.

Note: don’t waste the leftover semifreddo and trimmings from the panettone. You can use both together to make a frozen trifle, the panettone off-cuts would also make a great bread pudding.

For the white chocolate, break it into small pieces and using either a microwave or a Bain Marie melt it together with the coconut oil. Pour into a small bowl and set aside until room temperature, liquid and pourable but without any real heat. Remove the ice cream sandwiches from the freezer and dip halfway into the chocolate mixture, allowing any excess chocolate to drop back into the bowl. Set down onto a piece of parchment paper and repeat with all 8 sandwiches. Once all have been dipped transfer to the freezer until ready to serve.

In Holidays, Dessert Tags wilfa, hand mixer, semifreddo, ice crea, ice cream sandwich, panettone, amaretti, amaretto, cherry
Comment

Maple Baked Pears with Granola Crumb

Edd Kimber April 28, 2022

Sponsored by Lizi’s Granola

Do you need an idea for a super quick and easy dessert for when anything more involved sends you running from the kitchen? Well today I have just that recipe. The prep time is super quick, you can be curled up on the sofa with in a couple minutes with dessert taking care of itself in the kitchen. 

If you had a childhood at all similar to me, then baked apples were a regular dessert, served hot from the oven with lots of thick custard. Cored apples were filled with dried fruit and baked until squishy, almost to the point of collapsing. At the time I found the dessert boring but now something simple like this is pure comfort for me. For this version I have opted for pears and I don’t roast them for so long that they are devoid of texture, I like them tender but not so soft they could be baby food. And talking of texture, to add an extra layer of crunch and an extra layer of flavour, I like to serve these pears with a scattering of Lizi’s High Protein Nuts and Seeds Granola. The granola adds a ton of interest to a very simple dessert and makes it something a little fancier. This particular granola is made with pumpkin seeds, walnuts and almonds and sweetened with a mix of apple juice and black treacle for a wonderful flavour that goes brilliant on this dessert. To roast the pears I like to use maple syrup and butter plus a little spice in the form of cardamom, cinnamon and orange zest. Whilst these flavours are a little autumnal you can adapt them to suit whatever you are fancying in the moment. You can also make similar desserts with summer fruits like peaches and plums, serving it with a little drizzle of double cream or a dollop of creme fraiche.

Maple Baked Pears with Granola Crumb
Serves 4

4 large pears, ripe but a little firm
100ml maple syrup
50g unsalted butter, diced
4 cardamom pods
1 cinnamon stick
3 strips orange zest
50g Lizi’s High Protein Nuts and Seeds Granola

Preheat the oven to 190C (170C fan).

Peel the pears, cut in half and then scoop out the cores. Into a rimmed baking tray pour the maple syrup and place the pears, cut side down, into the tray. Add the diced butter to the tray and scatter over the cardamom pods, the cinnamon stick and orange zest. 

Bake the pears in the oven for about 25 minutes or until tender, turning the pears halfway through cooking. To test the pears are cooked, pierce with a knife, they should present almost no resistance. By the time the pears are cooked the maple syrup and butter should have formed a syrupy sauce. 

To serve place two pear halves into a bowl scatter over a couple tbsp of the granola and a generous drizzle of the sauce. Serve with a dollop of creme fraiche or sour cream

In Dessert Tags pears, baked pears, maple syrup, maple, granola, Lizi's granola, dessert, easy dessert
Comment

No Bake Chocolate Tarts

Edd Kimber February 14, 2022

This post is sponsored by Lizi’s Granola

A well made chocolate tart is a thing of beauty, elegant and perfect for a valentines day treat. Made with a silky smooth chocolate filling and a thin crisp pastry base, it’s a delicious classic dessert. But what if you don’t have the time to make pastry or a baked chocolate filling? You make these no bake chocolate tarts, of course. In the place of the pastry a no-bake tart crust is made, with Lizi’s Granola, which adds both ease and speed but also a whole load of texture which is just fabulous to eat. For this particular recipe I chose the Lizi’s Original Nuts and Seeds Granola as the texture it provides made for a great tart base and most importantly a delicious flavour. The filling is a simple ganache made with almond milk and brown sugar for a warm toasty note that goes great with the chocolate and granola.

As you’ll see from the ingredients the recipe is vegan and whilst you could make swaps and switch in dairy if you’re not vegan I would encourage you to try it as written anyway. For the crust I like to use virgin coconut oil which has the flavour of coconut and adds a great layer of flavour to the whole dish. For the ganache I use an almond milk that has a hint of bitter almonds that adds to the nutty complexion of the dish. Dairy has stronger flavours so using a something more subtle like almond milk allows the full flavour of the chocolate shine through in the ganache.

When making the ganache it is important that the chocolate mixture ends up incredibly smooth and silky and to that end there a couple of guidelines to follow to ensure the perfect end result. Chop your chocolate nice and fine, this way the milk doesn’t need to be as hot to melt big chunks of chocolate. Bring the milk to a steam or just to a simmer but do not let it boil. Firstly some plant based milks do not like being boiled and they can split if they become too hot but most importantly the chocolate wont appreciate the milk being too hot. Ganache is an emulsion and the heat from the milk can cause the cocoa butter to separate leading to a split ganache. Once you have properly heated the milk you want to pour to over the chocolate and set aside for a few minutes before stirring together. This pause allows the chocolate to melt and the milk to cool down slightly so that when stirred together it forms a silky emulsified texture and you get the best possible texture for your tarts filling.

Whilst these tarts are incredibly easy to make they do need a little refrigeration time to get everything set so they are perfect made for a dinner party, or half the recipe to make a date night dessert perfect for you valentine. 

Note: to get 15% off your next order of Lizi’s Granola use the code theboywhobakes15 on lizs.co.uk 

No Bake Granola Chocolate Tarts
Makes 4

Tart Crust 
175g Lizi’s Original Nuts and Seeds Granola
80g coconut oil, room temperature
Pinch of fine sea salt

Vegan Ganache
265g dark chocolate, finely chopped
50g light brown sugar
115ml almond milk* 

To make the crust place the about 2/3 of the granola into a food processor, with the blade attached, and process until fine and crumbly. Add in the remaining granola, the oil and salt and process until everything is evenly combined and the mixture is clumped together. Divide this mixture equally between four loose bottomed 10cm tart tins and press firmly into the base and up the sides of the tin. 

Place the tart cases in the fridge whilst you work on the ganache. 

Ganache is most commonly made with chocolate and cream but for a vegan ganache I typically turn to a water ganache, a simple mixture of water and chocolate. Because the water has no flavour of its own the flavour of the chocolate is pure and unadulterated so with this style ganache its best to use a chocolate you absolutely love. For this particular recipe I am using a kind of hallway house between cream and water, almond milk which (depending on the brand you use) can add a subtle almond flavour to the ganache.

Place the chocolate into a bowl and set aside. Add the almond milk and sugar to the pan and gently heat until just steaming then pour over the chocolate and set aside for a couple minutes before stirring with a whisk until a silky smooth ganache is formed.

Pour the ganache into the chilled tart cases and place into the fridge until the ganache has set, a couple hours. 

Serve with a little vegan whipped cream or sour cream if you're not vegan.

Kept refrigerated these will keep for 3-4 days.

*you can you use any plant based milk for this recipe but I like using an almond or coconut version as both have flavours that can compliment chocolate.

In Chocolate, Dessert Tags no bake, tarts, granola, ganache, vegan baking, vegan
1 Comment
mango-1-2.jpg

Mango and Cardamom Ice Cream

Edd Kimber June 24, 2021

Have you ever wondered if buying and cooking with whats in season is really all us food writers make it out to be, is the quality really that much better? All I will say is Mangoes. Buy a mango at the wrong time of the year and you might get okay flavour but without a doubt the texture will be unbelievably hit or miss, coarse or rough, fibrous or crunch. We can all agree that a bad mango is a terribly sad thing. But buy a mango in season is a truly special thing, sweet and fragrant and beautifully soft. 

When I first looked at my house I was intrigued by the mango shop I spotted on the way to viewing, it wasn’t open but I was excited for the idea. When mangoes were in season and the shop finally opened I started buying box after box of incredible Indian and Pakistani mangoes, Alphonso and Kesar being my two favourite varieties, and it was all I could do not to eat the whole box right there and then. Instead, I have been making desserts, ice creams, purees and all manner of applications to try and prolong the mango season. 

This recipe is a glorious homage to mango and a beautiful summer recipe. The ice cream base is fairly classic, rich with dairy and egg yolks, with just one addition, the perfumed fragrance of cardamom which pairs so naturally with mango. When you make any fruit swirl ice cream you have one problem, water. Too much water in the ripple and you end up with a hard icy swirl that wont scoop like the ice cream. To prevent this you can cook the fruit puree with sugar to reduce the water level and make a syrup with a strong enough concentration of sugar that it will stay scoopable after freezing. With mango I vary this method a little as adding too much doesn’t do, the already sweet, fruit any flavours. Instead of traditional white sugar (sucrose) I use liquid glucose which tastes less sweet and as an invert sugar also helps keep the puree soft without becoming too sweet. 

Ripening Kesar Mangoes By Wrapping Them In Newspaper

Ripening Kesar Mangoes By Wrapping Them In Newspaper

Mango and Cardamom Ice Cream

Cardamom Ice Cream
250ml double cream
500ml whole milk
125g caster sugar
50g skimmed milk powder
5 large egg yolks
2 tsp vanilla bean paste
2 tsp ground cardamom 

Mango Swirl
300g diced mango
3 tbsp liquid glucose
Juice of 1 lime

To make the ice cream add the milk, cream, half the sugar the cardamom and vanilla to a large saucepan. Place the pan over medium heat and bring to a simmer. Turn off the heat and pop the lid on the pan, setting aside for an hour so the vanilla and cardamom can do their thing and infuse the dairy.

Once the hour is up place pan back on the heat and bring back to a simmer. Meanwhile place the egg yolks, the remaining sugar and milk powder into a large bowl and whisk together until the yolks are pale. Whilst continuing to whisk slowly pour in the milk mixture. This whisking helps prevent the eggs from scrambling and the slow pour helps gently increase the temperature of the eggs. Pour the custard back into the pan and over low heat, cook stirring constantly with a heatproof spatula, scraping the bottom of the pan, until the custard reaches 75-80C. Pour the custard into a bowl, through a fine mesh strainer to remove any lumps, and place the bowl into a large bowl filled with ice. Stir the custard for a few minutes until cooled to room temperature then press a sheet of clingfilm onto the surface of the custard, to prevent a skin for forming, and chill for at least four hours but preferably over night. This chilling does two things, it allows the flavours to enhance further plus cooling the custard down means when churning the ice cream is formed quicker which improves the texture.

For the mango swirl puree the mango in a blender and pour into a jug, passing through a fine mesh sieve. Add the liquid glucose and stir together, measuring how much puree you start out with. Pour into a small saucepan and over medium heat bring to a simmer and cook, stirring constantly until the volume has reduced by about 1/4. Add the lime juice and then refrigerate until needed. 

When the custard is thoroughly chilled churn using an ice cream machine, referring to the manufacturers instructions. Scrape some of the finished ice cream into a sealable container, drizzle over some of the puree and repeat until all of the ice cream and mango swirl have been used. Freeze for at least 4 hours or until firm. Homemade ice cream is best within a couple weeks.

Tip: If you always find your homemade ice cream a little too hard you can also add 2 tbsp vodka to the custard before churning which will help it stay scoopable

In Dessert Tags mango, ice cream, cardamom, ripple, kesar, alphonso, lime
1 Comment
  • Recipes
  • Older
  • Newer

Twitter

  • Was 8 original films, 3 spin off films, a two part play not enough. Can we have something new. https://t.co/cBZdGEGeyv
    Apr 4, 2023, 1:46 PM
  • RT @deliciousmag: Cacio e pepe, but make it buns! These seriously cheesy bread rolls from @TheBoyWhoBakes are inspired by his favouri… https://t.co/oDZlaDgnN2
    Apr 2, 2023, 11:08 AM
  • RT @TheDailyShow: Congrats to Donald Trump on finally winning a majority of votes! https://t.co/ezP55HZgl0
    Mar 31, 2023, 12:43 AM

Instagram

This weeks bonus recipe, for subscribers to my newsletter, is this gorgeous sour cherry and coconut gateau basque. The crust is a buttery cross between pastry and cake, think a cakey cookie. The filling is a layer of sour cherry topped with a rich coconut custard. A real fun one to make too! Link to my newsletter can be found in my bio - #gateaubasque #pastrycream #coconut #sourcherry
In this months @olivemagazine (out today) the team came and photographed my petit kitchen and we talked about how we put our stamp on the place, without spending a fortune. We hated the bland kitchen that we inherited but, as it was relatively new an
In this months @olivemagazine (out today) the team came and photographed my petit kitchen and we talked about how we put our stamp on the place, without spending a fortune. We hated the bland kitchen that we inherited but, as it was relatively new and in good condition, it felt a waste to rip it out and we also didn’t want to spend the money it would take to rip out the whole thing and replace it (it’s a howdens shell so we could have done something cheaper like @plykeakitchens @holte.studio @madebyhusk) so instead I painted all of the cabinets, using @makeitrustoleum kitchen cabinet paint, to give it some personality and lighten the whole thing. Check out the magazine for the full run down. - #kitchendesign #kitchenremodel #rustoleumcabinettransformations #rustoleumkitchencupboardpaint #kitcheninspiration #theboywhobakes #olivemagazine
Are you making scones all wrong? Maybe, maybe not? But I do want to show you how I make them! This recipe is based on the method I learnt at @belmondlemanoir 12 years ago when I did a stage, and it makes the absolute lightest scones. And shock horror, it involves kneading the dough, albeit very lightly. You can get the full recipe in this weeks newsletter (free) linked in my bio. - #scones #bakingday #worldbakingday #afternoontea #hightea #englishscones #clottedcream #creamtea #theboywhobakes
facebook
  • Contact

The Boy Who Bakes

Edd Kimber

facebook