The Boy Who Bakes

Edd Kimber
  • Home
  • Recipes
  • My Books
  • Blog
  • Recipe Index
  • About
  • Home
  • Recipes
  • My Books
  • Blog
  • Recipe Index
  • About

Recipes

  • All
  • baking
  • Biscuits and Cookies
  • Breads and Quickbreads
  • Bundts
  • Cakes
  • Chocolate
  • Dessert
  • drinks
  • Holidays
  • Pastry
  • Scones and Quickbreads

Espresso Caramel Sheet Cake

Edd Kimber November 16, 2021

Today I have a fabulous treat for you, a sneak peek at a seriously delicious recipe from my new book One Tin Bakes Easy which has now been out in the UK, Aus and NZ for a month and from today is also on sale in the USA and Canada.

If you haven’t heard about the book yet let me give a quick 30 second explanation. Last year I released my book One Tin Bakes, a collection of 70 recipes that are all made in the same 9x13 tin. I was blown away by the response, the book became a bestseller and even a year later I still see you guys baking from it every single day. The book came out in the midst of the pandemic and right in the middle of lockdowns all over the world. People were stuck at home and baking became one the things they relaxed with, everyone and their grandmother was making banana bread or turning out loaves of sourdough. When people picked up a copy One Tin Bakes it became really clear to me, through the emails and instagram DM’s I was receiving, that so many people baking last year were doing so for the very first time. Even though the recipes in One Tin Bakes are relatively simple there was still some nervousness with new bakers around many basics of baking. Because of this and the success of the book I decided to write a second volume in the series, a collection of 70 brand new recipes that were even easier than the original book. I am talking one bowl cakes that use the all in one method, treats that are no-bake, recipes that only use 5 ingredients. 

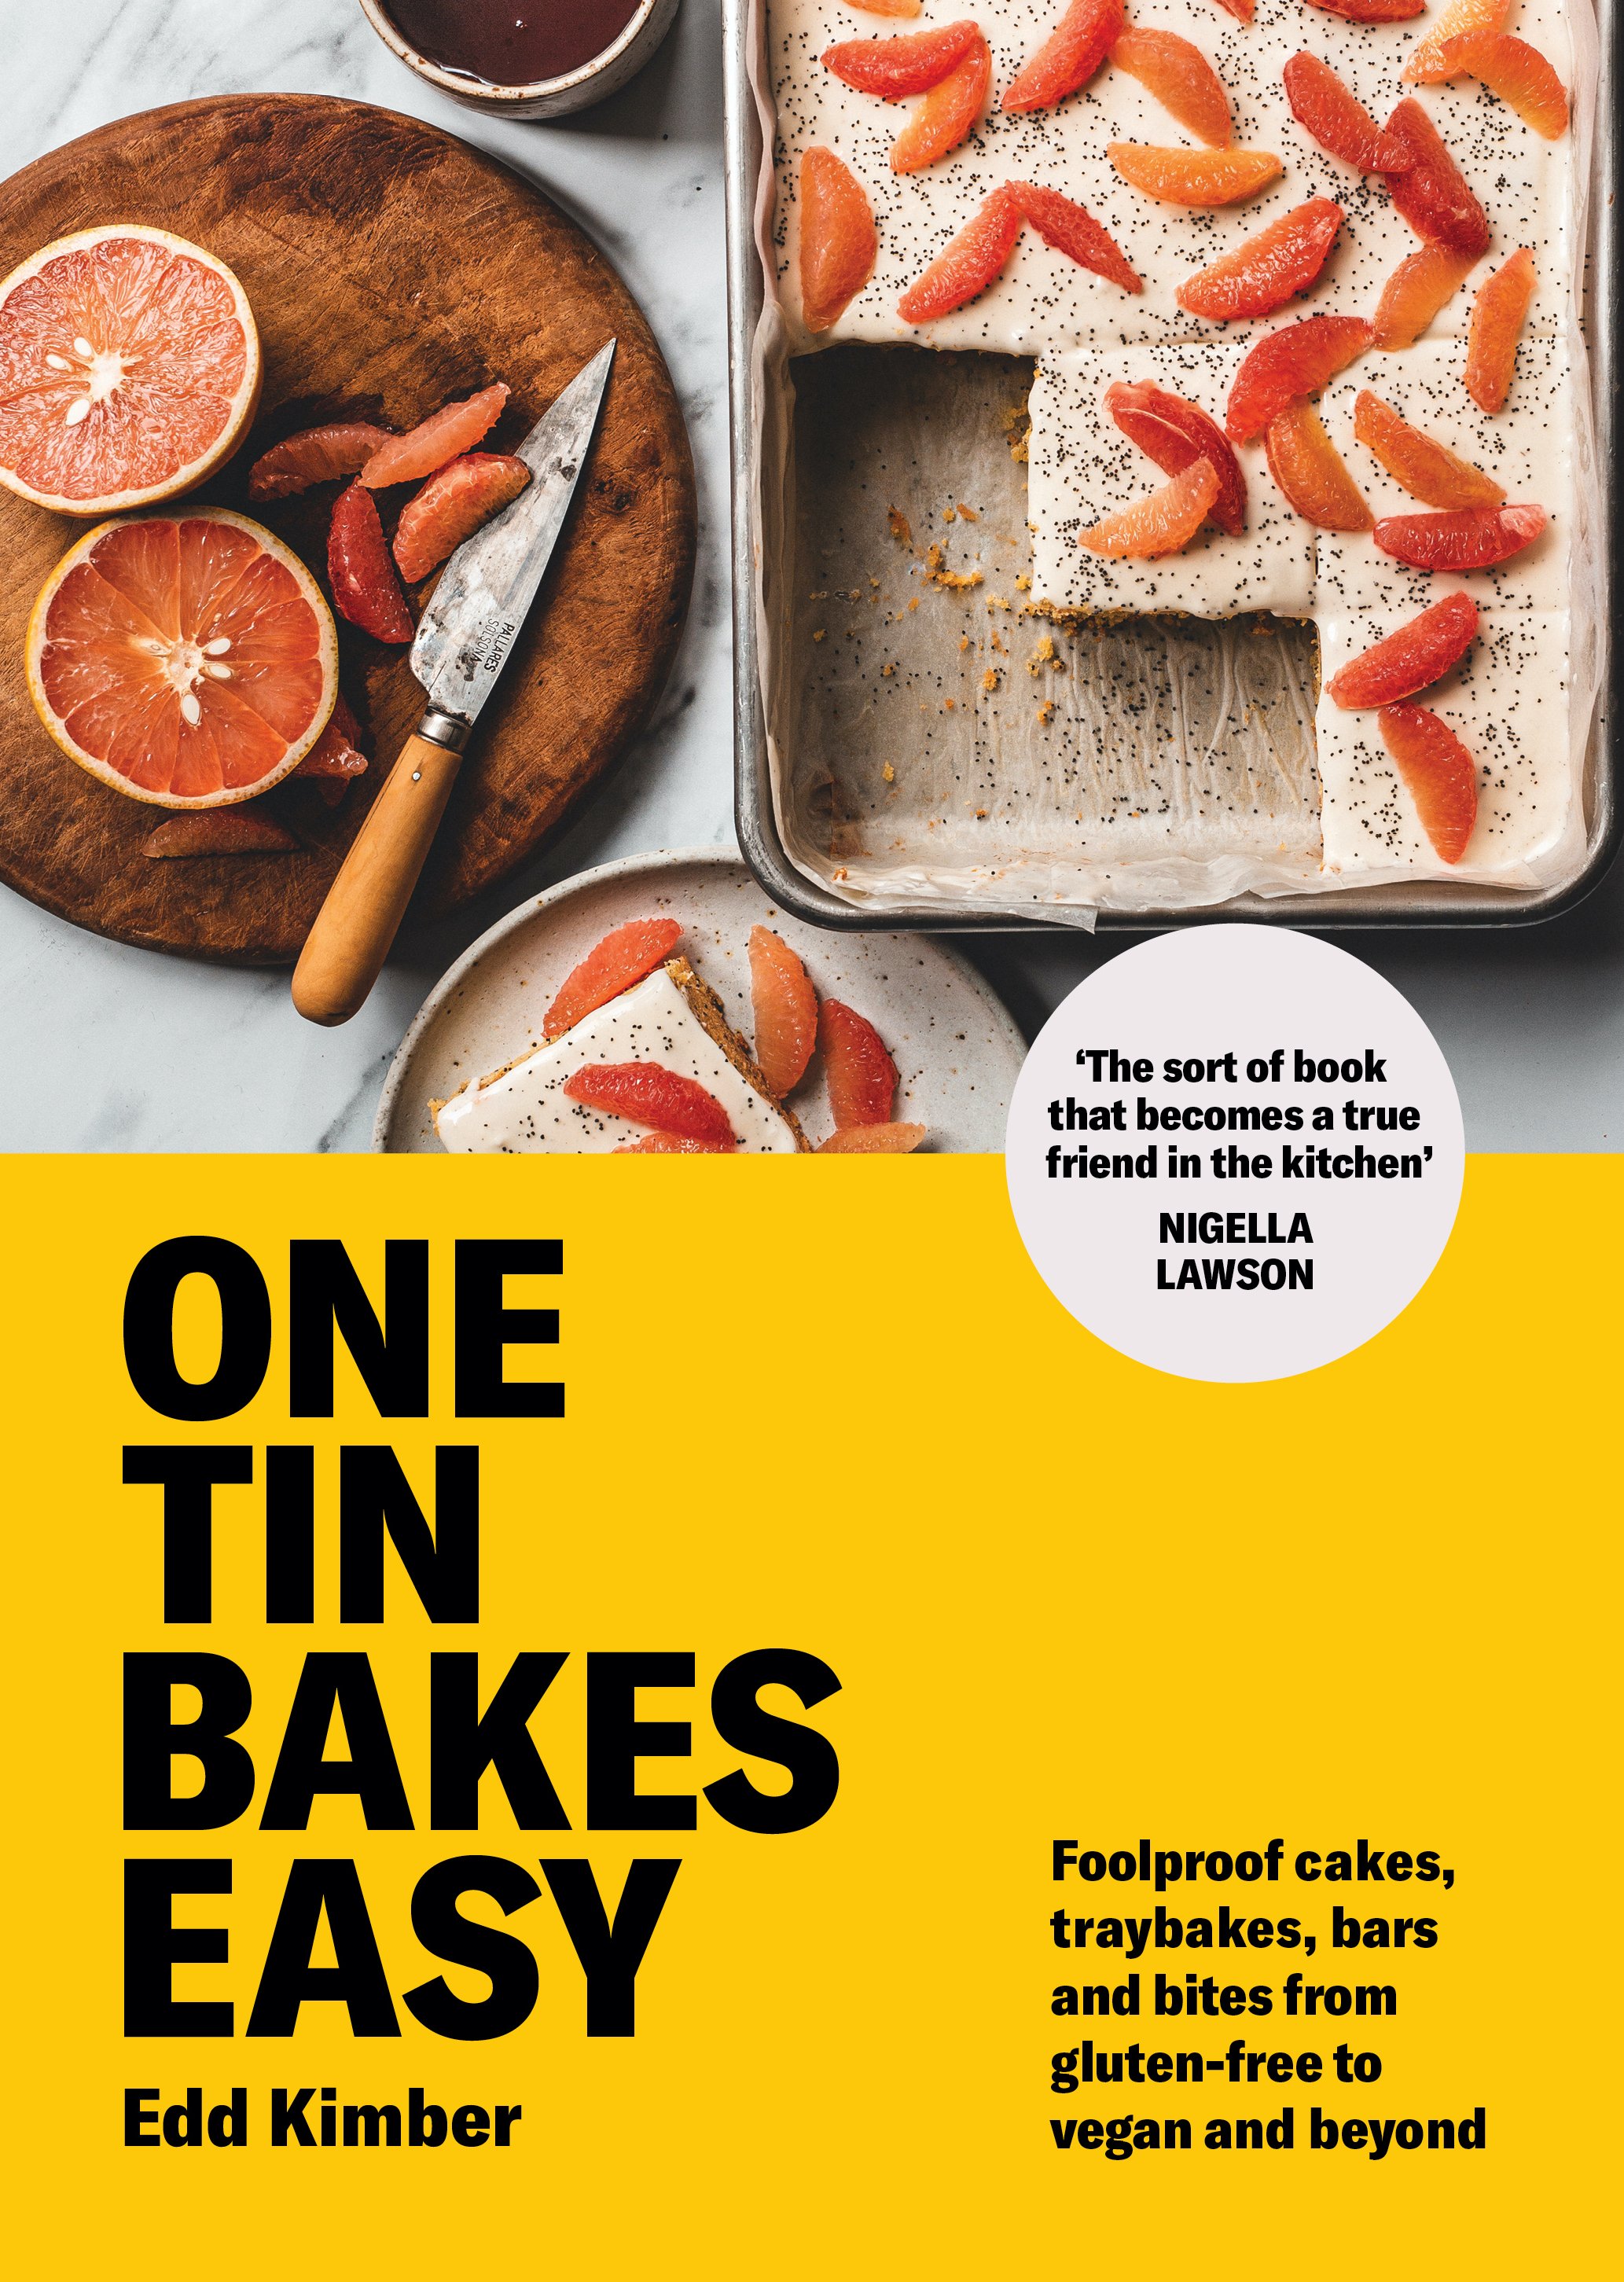
One Tin Bakes Easy shares the same DNA as One Tin Bakes but the recipes are as simple as I could possibly manage. They may be easy but the recipes never compromise on flavour, they’re easy but delicious. If that sounds like something you’d appreciate the book is now available everywhere books are sold in America, Canada, the UK, New Zealand and Australia. You can also buy copies anywhere in the world via The Book Depository.

If you are thinking you’d like to buy a copy as a present (the holiday season is upon us after all) There are a number of places you can buy signed copies. In the UK Waterstones have a stock of signed copies that you can buy online and from some stores in person (check their site for availability. In the US the Book Larder in Seattle have signed copies and they can ship anywhere in the country. I am also working on trying to get signed copies in more countries so bear with me if you’re looking to get one elsewhere. 

The recipe I have chosen to show you is my Espresso Caramel Sheet Cake. The cake is an all in one affair made with sour cream and a very healthy dose of espresso (or the strongest coffee you can make at home). The topping is a truly heavenly mix of dulce de leche, cream cheese and cream whisked until billowy and soft. It is spread over the cake and finished with a sprinkling of flaked sea salt. Trust me when I say you need to make this.

Espresso and Caramel Sheet Cake
Recipe from my new book One Tin Bakes Easy

Note: as you will see the measurements in this recipe are in both metric and imperial and this is how they appear in the book so no matter what style of measurement you prefer you are covered

170g (6oz/11⁄2 sticks) very soft unsalted butter, plus extra for greasing
320g (111⁄4oz/21⁄2 cups + 1 tablespoon) plain (all-purpose) flour
3 teaspoons baking powder 1⁄2 teaspoon fine sea salt
175g (6oz/3⁄4 cup + 2 tablespoons) caster (superfine) sugar
175g (6oz/3⁄4 cup + 2 teaspoons) light brown sugar
3 large eggs
2 teaspoons vanilla extract 100ml (31⁄2fl oz/1⁄3 cup + 4 teaspoons) cold espresso or very strong black coffee
75ml (23⁄4fl oz/5 tablespoons) sour cream Flaked sea salt, for sprinkling 

Caramel Cream Cheese Frosting

170g (6oz/3⁄4 cup) cream cheese, at room temperature
397g (14oz) can dulce de leche
240ml (81⁄2fl oz/1 cup) double (heavy) cream, chilled 

Preheat the oven to 180oC (160oC Fan) 350oF, Gas Mark 4. Lightly grease your 23 x 33cm (9 x 13in) baking tin and line it with a strip of parchment paper that overhangs the long sides, securing it in place with two metal clips. 

Place the flour, baking powder, salt and sugars in a large bowl and whisk to combine. Add the butter, eggs, vanilla, espresso and sour cream and mix until a smooth batter forms. Pour it into the prepared tin and spread evenly. 

Bake for about 35–40 minutes, or until the cake springs back to a light touch. Set aside to cool in the tin for 15 minutes before using the parchment paper to lift the cake onto a wire rack to cool completely. 

For the frosting, place the cream cheese and dulce de leche in a large bowl and whisk until smooth. Add the cream and whisk until the mixture holds soft peaks. Spread the frosting all over the cold cake and sprinkle with flaked sea salt just before serving. 

The cake can be made a couple days in advance if stored in a sealed container, but the frosting needs to be made and served on the same da

In Cakes Tags one tin bakes easy, one tin bakes, sheet cake, caramel, espresso, coffee, all in one, easy
2 Comments

Salted Peanut Caramel Chocolate Chip Cookies

Edd Kimber November 20, 2020

I’ve recently moved into a new house and whilst I’ve made a loaf of bread, some brownies and banana bread, nothing makes me feel at home in a new kitchen like making a batch of cookies. This particular batch is based on my best ever chocolate chip cookies, which means browned butter and egg yolks for a fudgy texture. The flavours however took a very special turn in this batch. They have chocolate, of course, but also salted peanuts and caramel all together making for a very tasty cookie.

Before we start with the cookie dough we need to make the caramel. When thinking about how to get that caramel flavour into the cookies I thought about chopping up some chewy caramels but truth be told, I couldn’t be bothered to make any. Thankfully I remembered that in the past, when I used to make kitchen sink cookies, where my kitchen cupboards were raided for mix-ins, I used to add chunks of hard caramel instead. This caramel gives texture to the cookie plus it adds an intense caramel flavour with just a hint of bitterness which helps it stand up to the other ingredients without making the cookies too sweet.

Salted Peanut Caramel Chocolate Chip Cookies
Makes about 22

200g caster sugar
225g unsalted butter
150g caster sugar
150g light brown sugar
2 large eggs 
2 large egg yolks
1 tsp vanilla bean paste
350g plain flour
3/4 tsp baking powder
3/4 tsp bicarbonate of soda
1 tsp fine sea salt
300g dark chocolate (I used 66% wafers but a roughly chopped bar will also work)
125g roughly chopped salted peanuts
Flaked sea salt, for sprinkling

caramel peanut cookies-3.jpg

To make the caramel line a baking tray with either parchment paper or a silicon matt. Place the caster sugar into a saucepan set over medium heat and cook until the sugar has fully melted and the caramel is a deep brown colour, that of an old penny. Immediately pour it out onto the prepared baking tray, spreading out a little so thats it not too thick. Set aside for 30 minutes or until it hardens like glass.

To make the cookie dough place the butter into a saucepan and over low/medium heat cook until the butter has melted and then, stirring occasionally, cook until the butter has browned. At first the butter will bubble and splatter, this is the water cooking out from the fat, and then it will foam. When it foams stir the butter more frequently and look for signs the browning has happened. You should be able to smell the change, the aroma will become nutty and toasty. The milk solids will also turn a golden brown. Remove from the heat and pour into a large bowl and set aside for 10 minutes to cool. When browning the butter be careful as this process happens very quickly and if you don’t keep an eye on the pan the butter can go from perfectly browned to burnt in the matter of seconds. 

Once the butter has cooled add the sugars and using an electric mixer with the beater attached beat together for a couple minutes to combine. Add the eggs and yolks and beat on medium speed for about 3-4 minutes or until the mixture is pale. Add the vanilla and mix in briefly to combine. 

In a separate bowl whisk together the flour, baking powder, bicarbonate of soda and salt. Add this mixture to the butter mixture and mix on low speed just until a dough if formed. Add the peanuts and chocolate. Take a wooden spoon and bash the caramel into little pieces a cm or two wide. Tip this into the bowl with the chocolate and peanuts and mix briefly until everything is evenly distributed. Refrigerate the dough for two hours.

Just a quick note on refrigeration, these cookies contain hard caramel and excessive refrigeration or freezing will cause issues, the caramel will start to liquify and so whilst I would normally encourage you to freeze the dough for future use, with these its more of a case of make, bake and share. 

Preheat the oven to 180ºC (160ºC Fan)

Once the dough is chilled form into cookies about 70g in size. One word of caution when shaping these is that the caramel can be a little sharp. You can roll these into balls, just be careful not to stab yourself with caramel, or you can use a cookie scoop so you don’t have to touch the dough itself. Place the cookies onto parchment lined baking trays, leaving plenty of space for spread (6 cookies per tray is good for regular sized baking trays). Sprinkle with a little salt, leave off of course if you prefer, and bake for about 14-16 minutes or until golden brown around the edges and just a touch paler in the middle. You may find when baking these that they come out of the oven an unusual shape and this is down to the caramel. When the cookies bake the caramel liquifies and sets again on cooling but the melting can mean it makes the cookies spread a little randomly. To correct this I take the cookies out a few minutes before they’re done baking and use large round cookie cutter to scoot them back into shape, and then I repeat this once the cookies are baked. 

Remove the cookies from the oven and allow to cool on the baking tray for 10 minutes before transferring to a wire rack to cool completely. 

Kept in a sealed container the cookies will keep for 4 days. 

In Biscuits and Cookies Tags chocolate chip cookies, browned butter, burr noisette, peanuts, dark chocolate, chocolate chips, caramel
11 Comments
flan-5.jpg

Coffee Caramel Flan

Edd Kimber March 18, 2020

I feel like throwing recipes out into the void of the internet is a bit strange right now, it feels at once both redundant and hopeful. Baking is my job, and that includes this site, so to stop working risks my livelihood and my future. Having already lost a significant portion of work I feel like I have to keep pushing, even if it feels a bit weird right now. Does that make sense? I’ve also tried to have a dialogue with you guys over on instagram to see what you’re thinking and what you need right now. Overwhelmingly you told me that you’re baking through your stress and that watching my regular stories on baking is a nice little escape, so I am going to continue posting new recipes and try and make this a happy place for you to come and lose yourself for a little bit. I will also try and develop recipes that are easy, use minimal ingredients and can be made without issue right now. One of the main things you wanted was a sourdough bake-a-long so thats going to start on Saturday morning. If you want to get prepared you can of course read the guides I already have on here, come Saturday the only thing you will need is a jar with a lid and a bag of bread flour. So come join me every morning on instagram for a little social baking.

Todays recipe was obviously developed before this virus became as big of a deal as it now is so if you cant get all of the ingredients right now maybe bookmark it and come back for something else another time.

Comfort is a word I throw around a lot. Baking seems to have comfort inherently built in for me, for you too I’d wager. It’s a treat, a thing for special occasions or even that thing we do to boost our spirits. Some recipes do seem to have an abundance of comfort and flan, creme caramel, purin or whatever you want to call this style of set custard seems to be at the height of comfort. I can’t quite place my finger on why though, maybe it’s because it’s familiar and something from childhood, maybe its because its custard and custard is just a mainstay of comforting desserts, maybe it’s the soft wobbly texture, who knows. Whatever the reason, it’s a dish that can warm the soul and right now that’s all that matters to me.

For my version I wanted to add a coffee element so there is one additional step compared to the classic recipe, the dairy is first steeped with freshly ground coffee. If you prefer to keep the custards more classic feel free to skip this step but I love the extra flavour it adds.

Coffee Caramel Flan
Makes 6

Caramel
150g caster sugar
25ml water 

Coffee Custard
550ml whole milk
175ml double cream
1 tsp vanilla bean paste
30g freshly ground coffee
125g caster sugar
5 large eggs
1/4 tsp salt

For this recipe I used 6 round moulds, which are sold as small pie tins. It makes wide flat custards that are about 4 inches wide. You can also make these in classic dariole moulds or ramekins. If making them in dariole moulds (small pudding basins) you may get 1 or 2 extra flans. Spray each mould with a little spray oil or lightly grease with a little softened butter.

Place the sugar and water for the caramel into a small saucepan and place over medium heat and cook, swirling occasionally but definitely not stirring, until the sugar has dissolved, the mixture is bubbling and eventually turns to a rich golden brown. For this style of custard I like to take the custard to a pretty dark colour so it has that identifiable edge to it I expect from flan. Once at the desired colour add an extra tablespoon of hot water to thin the caramel a little (be careful, the water will make the caramel bubble violently). Divide the caramel evenly between the prepared moulds and set aside for the moment.

To make the flan we need to first infuse the coffee flavour into the dairy. Add the milk, cream, vanilla and half of the sugar into a medium sized saucepan and add the coffee. Place the pan over medium heat and bring to a simmer. Remove the pan from the heat, cover, and set aside for about 30 minutes to allow to infuse. 

Note: for the coffee you can use any form of real coffee, whether you grind it fresh or whether you have ready ground in your pantry. Ideally you want the coffee medium ground so it can be strained out but even if you use coffee finely ground for espresso (like I did with the version in the pictures) it’ll taste delicious you may just have a few smaller grains in the end product, which I actually don’t mind. If you only have instant you will be able to use it but it wont need infusing, just bring the dairy to a simmer and mix in coffee a lit bit at a time, adding enough until it tastes as  strong as you prefer.

flan-2.jpg

Preheat the oven to 150ºC.

Bring the coffee mixture back to a simmer. Once at temperature pour the dairy through a fine mesh sieve to remove as much of the ground coffee as poissible. Place the eggs, salt and remaining sugar into a large bowl and whisk together just to combine. Your aim here is to combine everything without adding any air, bubbles are the enemy of a silky smooth custard. Pour the infused dairy into the eggs, as you stir constantly to prevent the eggs from scrambling. 

Divide the custard evenly between the moulds. If there are bubbles on the surface of the custard you can help them disappear by lightly waving a kitchen blowtorch over the surface and you’ll see any visible bubbles pop. 

Cover each mould with a small piece of foil and place the custards into a large roasting tray (I use a 9x13 brownie tin) with a kitchen towel lining the base of the tin. Place the tin into the oven and carefully pour boiling water into the tin, adding enough to go about 1/2 way up the sides of the moulds. Bake in the oven for about 40 minutes or until the custards are set around the outside with just a little wobble in the middle. Remove the tin from the oven and allow the custards to cool in the water for 30 minutes before removing and allowing to cool to room temperature. Once room temperature place the custards in the fridge for at least 4 hours.

To serve, dip each mould in hot water for 5-10 seconds to loosen. Use a very thin knife to loosen the sides of the custard from the moulds and then invert onto a plate to serve. 

Once made they can be kept in the fridge for a couple days before turning out of the moulds to serve. 

In Dessert Tags coffee caramel flan, coffee, flan, caramel, creme caramel, purin
1 Comment
chocoalte caramel tart.jpg

Peanut Butter and Pretzel Caramel Tart

Edd Kimber August 6, 2019

I am currently working away on a project that I am super excited about but it is taking up a lot of my time so I am currently going through my archive to find recipes to share with you guys, to tie you over until the project is finished. Whilst looking for recipes I remembered this tart that I never got around to sharing. It was initially included in a pitch for a big piece of work I wanted to do around chocolate that ended up never getting a green light and sadly I forgot about it. Sadly because seeing the pictures reminded me just how wonderful this dish is. So enjoy it, finally!

Sweet and salty isn’t unusual these days, it’s to be expected. We all now generally understand that just like savoury food sweet things need seasoning and with ingredients like chocolate and caramel sometimes a little salt can help to enhance and highlight flavour whilst balancing the sweetness. This simple tart takes this idea and dials it up to eleven. The crust uses a simple biscuit style base, think the type of base you’d make for a cheesecake. The difference though is egg white. I love the texture of biscuit bases but find them a little tricky when you want nice neat slices, they’re just two crumbly. The addition of an egg white helps to bind the mixture together and makes it a lot easier to work with. Peanut butter and chocolate are a classic combo and anyone who’s ever opened a pack of peanut butter cups will know, a dangerously addictive one at that. The ganache used in this tart is made with a mixture of dark and milk chocolates, milk for the creamy sweetness that goes wonderfully with peanut butter but dark chocolate from preventing the tart from being too sweet.

chocoalte caramel tart-3.jpg


Serves 12

Peanut Pretzel Biscuit Base
50g salted peanuts
100g salted pretzels
75g digestive biscuits (or graham crackers)
100g unsalted butter, melted
1 tbsp light brown sugar
1 large egg white

Peanut Butter Caramel
225g caster sugar
180ml double cream
20g unsalted butter
1/2 tsp salt
2 heaped tbsp smooth peanut butter

Ganache Topping
140g dark chocolate, 65%-75% cocoa solids, finely chopped
140g milk chocolate, 40%-50% cocoa solids, finely chopped
20g unsalted butter
150ml double cream

For the biscuit base finely crush the peanuts, pretzels and digestives into a fine crumb then mix together with the butter, brown sugar and the egg white. Press into a loose bottomed 9 inch round tart tin, using your hands or a flat bottomed glass to compact into the base and up the sides of the pan. Bake in an oven preheated to 180C (160C fan) for about 10-12 minutes just until the biscuit base is set and starting to brown slightly. Remove from the oven and set aside to cool.

To make the caramel filling place the sugar into a medium sized saucepan and cook over medium heat until the sugar has melted and caramelised, turning the colour of an old rusty penny. Carefully pour in the cream, stirring gently until the caramel is smooth then add the butter and salt and mix until combined. Remove from the heat and allow to cool down for 10 minutes before stirring in the peanut butter. Pour the caramel into the cooled tart, spreading into an even layer. Refrigerate for an hour or so until the caramel is firm.

Meanwhile place the chocolates for the ganache into a heatproof bowl, set over a pan of simmering water and heat, stirring occasionally, until the chocolate is fully melted. Place the butter and cream into a small saucepan and bring to a simmer. Remove the pan from the heat and pour the cream over the chocolate and set aside for a couple minutes before stirring to form the ganache. Set the bowl aside until the ganache has thickened into the consistency of whipped cream. Dollop the ganache onto the tart and spread out, almost to the edges. Set aside at room temperature for a couple hours to allow the ganache to fully set. When ready to serve sprinkle the ganache with a little flaked sea salt.

Best served on the day made but can be refrigerated for up to 4 days just allow to come to room temperature before serving.

chocoalte caramel tart-2.jpg
In Pastry, Chocolate Tags peanut butter, caramel, pretzel, press in crust, salted caramel, chocolate, ganache, tart
6 Comments

Twitter

  • Was 8 original films, 3 spin off films, a two part play not enough. Can we have something new. https://t.co/cBZdGEGeyv
    Apr 4, 2023, 1:46 PM
  • RT @deliciousmag: Cacio e pepe, but make it buns! These seriously cheesy bread rolls from @TheBoyWhoBakes are inspired by his favouri… https://t.co/oDZlaDgnN2
    Apr 2, 2023, 11:08 AM
  • RT @TheDailyShow: Congrats to Donald Trump on finally winning a majority of votes! https://t.co/ezP55HZgl0
    Mar 31, 2023, 12:43 AM

Instagram

This weeks bonus recipe, for subscribers to my newsletter, is this gorgeous sour cherry and coconut gateau basque. The crust is a buttery cross between pastry and cake, think a cakey cookie. The filling is a layer of sour cherry topped with a rich coconut custard. A real fun one to make too! Link to my newsletter can be found in my bio - #gateaubasque #pastrycream #coconut #sourcherry
In this months @olivemagazine (out today) the team came and photographed my petit kitchen and we talked about how we put our stamp on the place, without spending a fortune. We hated the bland kitchen that we inherited but, as it was relatively new an
In this months @olivemagazine (out today) the team came and photographed my petit kitchen and we talked about how we put our stamp on the place, without spending a fortune. We hated the bland kitchen that we inherited but, as it was relatively new and in good condition, it felt a waste to rip it out and we also didn’t want to spend the money it would take to rip out the whole thing and replace it (it’s a howdens shell so we could have done something cheaper like @plykeakitchens @holte.studio @madebyhusk) so instead I painted all of the cabinets, using @makeitrustoleum kitchen cabinet paint, to give it some personality and lighten the whole thing. Check out the magazine for the full run down. - #kitchendesign #kitchenremodel #rustoleumcabinettransformations #rustoleumkitchencupboardpaint #kitcheninspiration #theboywhobakes #olivemagazine
Are you making scones all wrong? Maybe, maybe not? But I do want to show you how I make them! This recipe is based on the method I learnt at @belmondlemanoir 12 years ago when I did a stage, and it makes the absolute lightest scones. And shock horror, it involves kneading the dough, albeit very lightly. You can get the full recipe in this weeks newsletter (free) linked in my bio. - #scones #bakingday #worldbakingday #afternoontea #hightea #englishscones #clottedcream #creamtea #theboywhobakes
facebook
  • Contact

The Boy Who Bakes

Edd Kimber

facebook