The Boy Who Bakes

Edd Kimber
  • Home
  • Recipes
  • My Books
  • Blog
  • Recipe Index
  • About
  • Home
  • Recipes
  • My Books
  • Blog
  • Recipe Index
  • About

Recipes

  • All
  • baking
  • Biscuits and Cookies
  • Breads and Quickbreads
  • Bundts
  • Cakes
  • Chocolate
  • Dessert
  • drinks
  • Holidays
  • Pastry
  • Scones and Quickbreads

Salted Peanut Caramel Chocolate Chip Cookies

Edd Kimber November 20, 2020

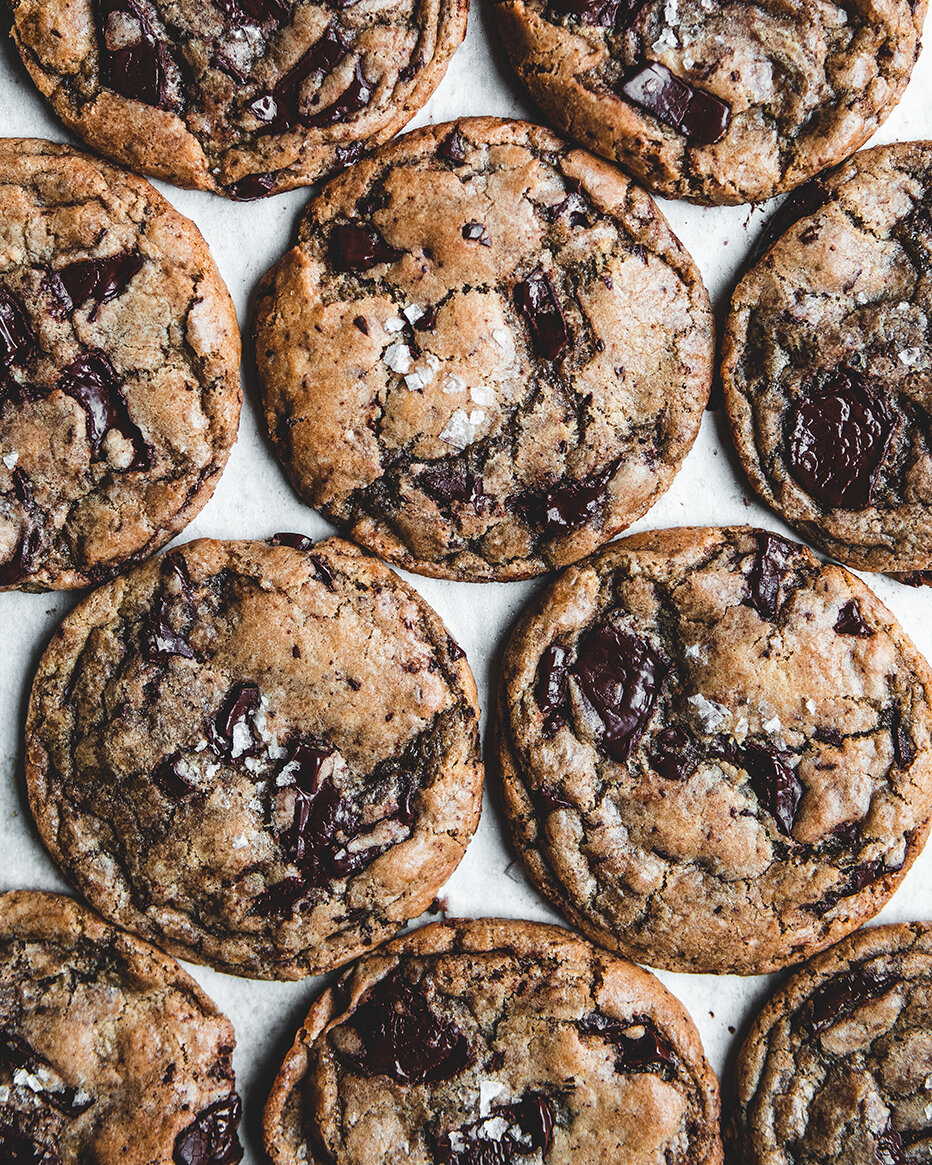
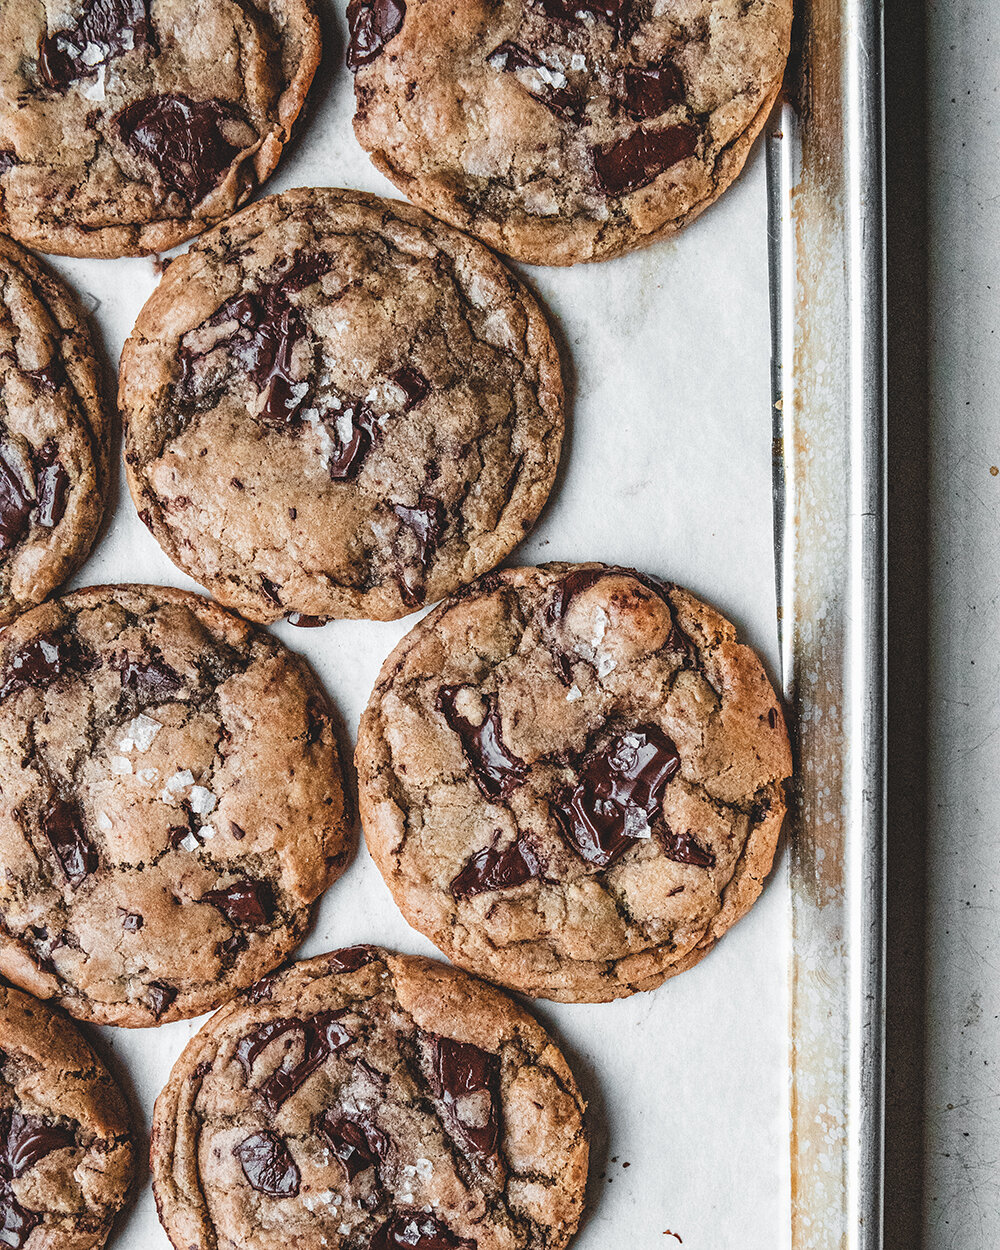
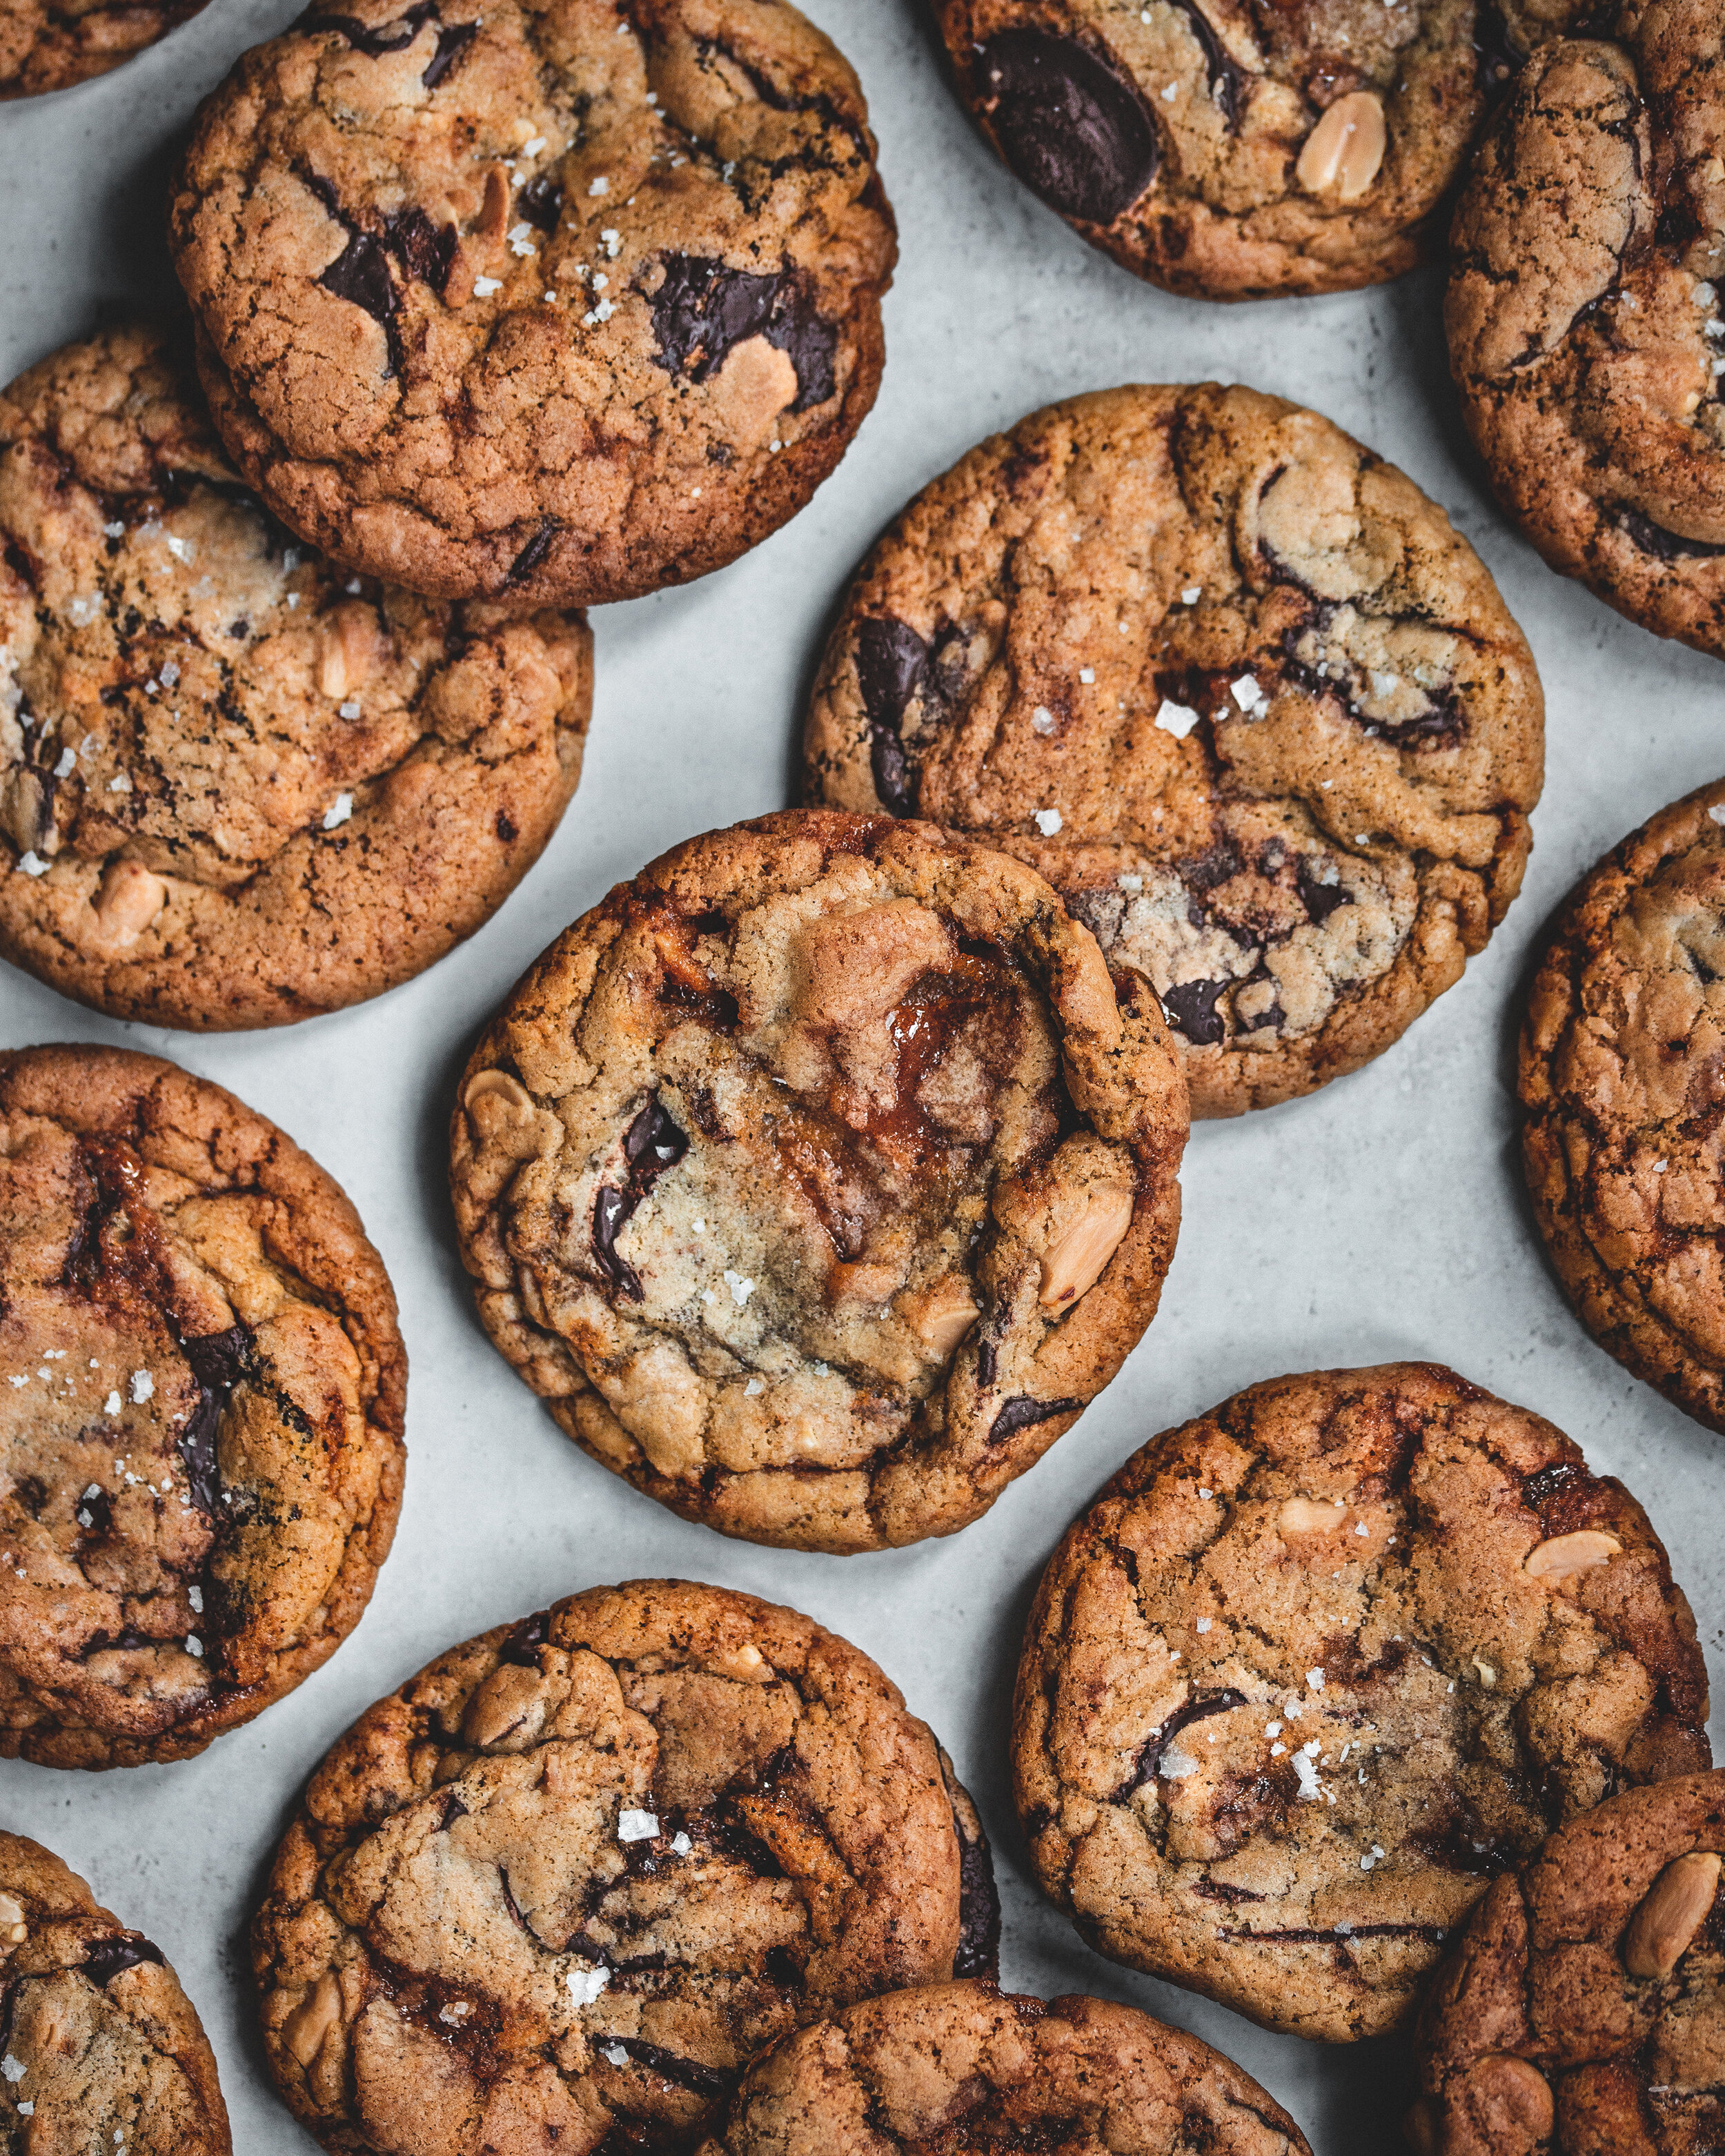
I’ve recently moved into a new house and whilst I’ve made a loaf of bread, some brownies and banana bread, nothing makes me feel at home in a new kitchen like making a batch of cookies. This particular batch is based on my best ever chocolate chip cookies, which means browned butter and egg yolks for a fudgy texture. The flavours however took a very special turn in this batch. They have chocolate, of course, but also salted peanuts and caramel all together making for a very tasty cookie.

Before we start with the cookie dough we need to make the caramel. When thinking about how to get that caramel flavour into the cookies I thought about chopping up some chewy caramels but truth be told, I couldn’t be bothered to make any. Thankfully I remembered that in the past, when I used to make kitchen sink cookies, where my kitchen cupboards were raided for mix-ins, I used to add chunks of hard caramel instead. This caramel gives texture to the cookie plus it adds an intense caramel flavour with just a hint of bitterness which helps it stand up to the other ingredients without making the cookies too sweet.

Salted Peanut Caramel Chocolate Chip Cookies
Makes about 22

200g caster sugar
225g unsalted butter
150g caster sugar
150g light brown sugar
2 large eggs 
2 large egg yolks
1 tsp vanilla bean paste
350g plain flour
3/4 tsp baking powder
3/4 tsp bicarbonate of soda
1 tsp fine sea salt
300g dark chocolate (I used 66% wafers but a roughly chopped bar will also work)
125g roughly chopped salted peanuts
Flaked sea salt, for sprinkling

caramel peanut cookies-3.jpg

To make the caramel line a baking tray with either parchment paper or a silicon matt. Place the caster sugar into a saucepan set over medium heat and cook until the sugar has fully melted and the caramel is a deep brown colour, that of an old penny. Immediately pour it out onto the prepared baking tray, spreading out a little so thats it not too thick. Set aside for 30 minutes or until it hardens like glass.

To make the cookie dough place the butter into a saucepan and over low/medium heat cook until the butter has melted and then, stirring occasionally, cook until the butter has browned. At first the butter will bubble and splatter, this is the water cooking out from the fat, and then it will foam. When it foams stir the butter more frequently and look for signs the browning has happened. You should be able to smell the change, the aroma will become nutty and toasty. The milk solids will also turn a golden brown. Remove from the heat and pour into a large bowl and set aside for 10 minutes to cool. When browning the butter be careful as this process happens very quickly and if you don’t keep an eye on the pan the butter can go from perfectly browned to burnt in the matter of seconds. 

Once the butter has cooled add the sugars and using an electric mixer with the beater attached beat together for a couple minutes to combine. Add the eggs and yolks and beat on medium speed for about 3-4 minutes or until the mixture is pale. Add the vanilla and mix in briefly to combine. 

In a separate bowl whisk together the flour, baking powder, bicarbonate of soda and salt. Add this mixture to the butter mixture and mix on low speed just until a dough if formed. Add the peanuts and chocolate. Take a wooden spoon and bash the caramel into little pieces a cm or two wide. Tip this into the bowl with the chocolate and peanuts and mix briefly until everything is evenly distributed. Refrigerate the dough for two hours.

Just a quick note on refrigeration, these cookies contain hard caramel and excessive refrigeration or freezing will cause issues, the caramel will start to liquify and so whilst I would normally encourage you to freeze the dough for future use, with these its more of a case of make, bake and share. 

Preheat the oven to 180ºC (160ºC Fan)

Once the dough is chilled form into cookies about 70g in size. One word of caution when shaping these is that the caramel can be a little sharp. You can roll these into balls, just be careful not to stab yourself with caramel, or you can use a cookie scoop so you don’t have to touch the dough itself. Place the cookies onto parchment lined baking trays, leaving plenty of space for spread (6 cookies per tray is good for regular sized baking trays). Sprinkle with a little salt, leave off of course if you prefer, and bake for about 14-16 minutes or until golden brown around the edges and just a touch paler in the middle. You may find when baking these that they come out of the oven an unusual shape and this is down to the caramel. When the cookies bake the caramel liquifies and sets again on cooling but the melting can mean it makes the cookies spread a little randomly. To correct this I take the cookies out a few minutes before they’re done baking and use large round cookie cutter to scoot them back into shape, and then I repeat this once the cookies are baked. 

Remove the cookies from the oven and allow to cool on the baking tray for 10 minutes before transferring to a wire rack to cool completely. 

Kept in a sealed container the cookies will keep for 4 days. 

In Biscuits and Cookies Tags chocolate chip cookies, browned butter, burr noisette, peanuts, dark chocolate, chocolate chips, caramel
11 Comments

Sourdough Chocolate Chip Cookie

Edd Kimber May 7, 2020

We’ve been in lockdown almost six weeks now and whilst its looking like restrictions might be loosened a little in the coming weeks the internets new obsession with sourdough shows no signs of abating. As more and more of you join the sourdough bandwagon there is one question that raises it head regularly, and that is how to prevent waste. Sourdough starters are hungry little beasts and they eat flour like they don’t realise its like gold dust right now. Throwing out that discarded starter really feels like a waste right now and surely there is something we can do to reduce that. 

Reducing Waste
If you’re not going to be baking with the starter more than once a week, which is normal for most people, feeding the starter daily is going to produce the most possible amount of waste. Thankfully there is a few ways we can reduce the amount of feedings the starter needs to survive. The easiest of these, and what I would suggest you do, is simply refrigerate the starter when its not in use. As you will have learnt fermentation needs a warm environment to happen, or at least happen at the speed we like to happen, and simply reducing its ambient temperature slows it down. Placing it in the fridge slows the process down enough that it doesn’t need anywhere near as many feeds. Some people advise taking the starter out for a feed once a week, some every other week and some monthly. My guideline is when you remember give the starter a feed, trying not to leave it too long between each feeds. The process to do these feeds is simple, take the starter out of the fridge and discard and feed as normal. Before you put the starter back in the fridge leave it at room temperature for a couple hours to let the fermentation get a head start and then refrigerate until you either want to bake with it or you think it needs another feed. When you want to bake with it I take out the starter and give it a couple rounds of feeds to bring it back to full strength. The other ways you can reduce feeding is reducing the temperature of water used for the feeds to slow down the fermentation, you can also keep back less than 25g of starter when you feed. Both of these methods slow down the starter meaning it will likely only need one feed a day instead of the two a healthy starter normally needs. 

Discard Recipes
The other thing you can do to prevent waste is of course use that discard in a recipe. If you think about it the starter is 50% flour and 50% water so it should be easy to use in recipes that call for flour and some sort of liquid. You can turn the discard into a whole manner of recipes, including crackers, crumpets and a whole host of simple recipes like pancakes, waffles and even banana bread muffins. When you feed the starter and scrape the starter into a separate container and pop it in the fridge until you have enough for your recipe. Dont leave it in there for longer than a few days, if you want to store it for longer some people even freeze the discard so they can bake with it later. The general rule is take the weight of the starter discard you have and divide this number by two, substituting it for an equal amount of flour and liquid in your recipe. Whilst this works easily in lots of recipes a chocolate chip cookie might not be the first thing that springs to mind but let me tell you, it may be my favourite way to use the sourdough discard. 

Chocolate Chip Cookies
If we follow the above rules for baking with sourdough discard we run into a issue straight away just looking at the ingredients. Chocolate chip cookies include flour but they don’t normally include any liquid so to use the discard we need to creative. We need to find the water in the recipe to remove. Thankfully cookies include two ingredients that contain significant water, butter and eggs. Butter in the Europe is generally around 82% fat and the remaining 18% is water. Removing that water is actually easy, all we need to do is brown it. You can tell you’ve removed the water by weighing the finished brown butter. This recipe is based on the one in my first book and it uses 225g of butter, so if we have cooked off all the water the finished butter will weigh 185g, meaning we have lost 40g of water. 40g of water loss means we can use 80g of starter reducing the flour weight called for in the recipe by 40g to match the water. To reduce the amount fo water even further we can remove the egg whites. UK size large egg whites are 40g and this recipe originally called for 2 large eggs so by simply removing the yolks we’ve removed another 80g of water weight (I used the whole egg white as the weight to keep things simple) meaning in total we can use 240g of sourdough discard in the recipe. This is great for two reasons. One, 240g is a good amount of discard (about 2.5 days worth if you’re following my recipe) and two, its enough discard to add a decent amount of flavour. In this recipe the tang from the starter goes brilliantly with the chocolate and adds a new dimension of flavour to the recipe. Talking of chocolate for these cookies I was lucky enough to have a bag of Pump St’s brilliant Jamaica 75% chocolate feves on hand, which they’ve just started selling to the public in 1kg sized bags, and which made for exceedingly good cookies.


Sourdough Chocolate Chip Cookies
Makes 25 cookies

225g unsalted butter, diced
380g plain flour
1 tsp baking powder
1 tsp baking soda
1 tsp flaked sea salt
220g caster sugar
220g light brown sugar
3 large egg yolks
240g sourdough starter discard (100% hydration)
1 tsp vanilla extract
500g dark chocolate, roughly chopped

To make the cookies we first need to brown the butter. Don’t be tempted to skip this because this isn’t just done for flavour it also removes the water content from the butter which is being replaced by the stater, if you skip this step the resulting recipe will have a very different texture. Place the butter into a saucepan and over medium/high heat cook until the butter melts, bubbles and then foams. Keep a close eye on it as it can burn quickly, when the milk solids have browned the water will have been evaporated off so remove from the heat and set aside for 30 minutes or so, to cool slightly. Once browned you should have 185g unsalted butter left (thats if using butter with an 82% fat content). Whilst the butter is browning place the flour, baking powder, baking soda and salt into a large bowl and whisk together to combine.

When ready to make the cookies place the butter and sugars into a large bowl and using an electric mixer, fitted with the whisk attachment, whisk for a couple minutes to combine and to break up any lumps. Add the egg yolks and whisk for 2-3 minutes on medium/high. Don’t worry if this looks separated or greasy at the moment, it will come together once we’ve added the starter. Place the bowl on your scale and measure in the required sourdough discard, adding the vanilla as well. Mix in for a few minutes or until the mixture becomes smooth and fully combined, it should look a little like a thick cake batter. Add in the flour mixture and mix in on low speed, just until everything comes together as a dough. Finally, switch to the paddle attachment and add the chocolate, mixing briefly until evenly distributed. Press a sheet of clingfilm onto the surface of the cookie dough and refrigerate for at least 4 hours before baking (my preferred time frame to bake these is between 4-24 hours). 

Note: With my regular cookie recipes I will leave the dough in the fridge for up to three days but with these remember that even though the discard may be less active than your usual starter you are adding sourdough to fresh flour so overtime the dough will ferment a little more, so the longer you leave the dough the stronger the finished flavour. 

When ready to bake preheat the oven to 180C (160C Fan) and line a couple baking trays with parchment paper. Roll the cookies into balls roughly 70g in size, placing 6 per baking tray, with plenty of space between each one as these will spread. Sprinkle the cookies with a little flaked sea salt. 

Bake in the preheated over for about 16-18 minutes or until the cookies are lightly browned around the outside. If the cookies come out a little puffy looking give the baking tray and firm tap on the counter to help them flatten a little. Allow to cool on the baking tray for 10 minutes before transferring to a wire rack to cool completely. Stored in a sealed container these will keep for 4-5 days. You can also freeze these balls of cooke dough for up to a month, baking straight from frozen with just a minute or two of extra bake time. 

Lockdown Tips

This recipe makes 25 cookies which is a lot, so you can happily reduce the recipe by half (using just 1 egg yolk).

Once the dough is chilled and you’ve rolled them into balls you can freeze these for up to a month. To freeze place the balls onto a parchment lined baking tray that will fit in the freezer. Freeze the cookies until frozen solid, at this point the cookies wont stick together so you can add them to a freezer bag or Tupperware to save on space. 

For the chocolate I normally like a high quality dark chocolate but you can really use whatever you have, be that a milk or dark, bars, chips or wafers. Each one will make a slightly different cookie with different textures and tastes but they’ll all be great.

In Biscuits and Cookies Tags sourdough, sourdough discard, sourdough cookies, chocolate chip cookies, sourdough starter, baking with discard
370 Comments

Twitter

  • Was 8 original films, 3 spin off films, a two part play not enough. Can we have something new. https://t.co/cBZdGEGeyv
    Apr 4, 2023, 1:46 PM
  • RT @deliciousmag: Cacio e pepe, but make it buns! These seriously cheesy bread rolls from @TheBoyWhoBakes are inspired by his favouri… https://t.co/oDZlaDgnN2
    Apr 2, 2023, 11:08 AM
  • RT @TheDailyShow: Congrats to Donald Trump on finally winning a majority of votes! https://t.co/ezP55HZgl0
    Mar 31, 2023, 12:43 AM

Instagram

This weeks bonus recipe, for subscribers to my newsletter, is this gorgeous sour cherry and coconut gateau basque. The crust is a buttery cross between pastry and cake, think a cakey cookie. The filling is a layer of sour cherry topped with a rich coconut custard. A real fun one to make too! Link to my newsletter can be found in my bio - #gateaubasque #pastrycream #coconut #sourcherry
In this months @olivemagazine (out today) the team came and photographed my petit kitchen and we talked about how we put our stamp on the place, without spending a fortune. We hated the bland kitchen that we inherited but, as it was relatively new an
In this months @olivemagazine (out today) the team came and photographed my petit kitchen and we talked about how we put our stamp on the place, without spending a fortune. We hated the bland kitchen that we inherited but, as it was relatively new and in good condition, it felt a waste to rip it out and we also didn’t want to spend the money it would take to rip out the whole thing and replace it (it’s a howdens shell so we could have done something cheaper like @plykeakitchens @holte.studio @madebyhusk) so instead I painted all of the cabinets, using @makeitrustoleum kitchen cabinet paint, to give it some personality and lighten the whole thing. Check out the magazine for the full run down. - #kitchendesign #kitchenremodel #rustoleumcabinettransformations #rustoleumkitchencupboardpaint #kitcheninspiration #theboywhobakes #olivemagazine
Are you making scones all wrong? Maybe, maybe not? But I do want to show you how I make them! This recipe is based on the method I learnt at @belmondlemanoir 12 years ago when I did a stage, and it makes the absolute lightest scones. And shock horror, it involves kneading the dough, albeit very lightly. You can get the full recipe in this weeks newsletter (free) linked in my bio. - #scones #bakingday #worldbakingday #afternoontea #hightea #englishscones #clottedcream #creamtea #theboywhobakes
facebook
  • Contact

The Boy Who Bakes

Edd Kimber

facebook