The Boy Who Bakes

Edd Kimber
  • Home
  • Recipes
  • My Books
  • Blog
  • Recipe Index
  • About
  • Home
  • Recipes
  • My Books
  • Blog
  • Recipe Index
  • About

Recipes

  • All
  • baking
  • Biscuits and Cookies
  • Breads and Quickbreads
  • Bundts
  • Cakes
  • Chocolate
  • Dessert
  • drinks
  • Holidays
  • Pastry
  • Scones and Quickbreads

Winter Coffee Brioche Buns

Edd Kimber November 17, 2023

This post is sponsored by Ozone Coffee UK

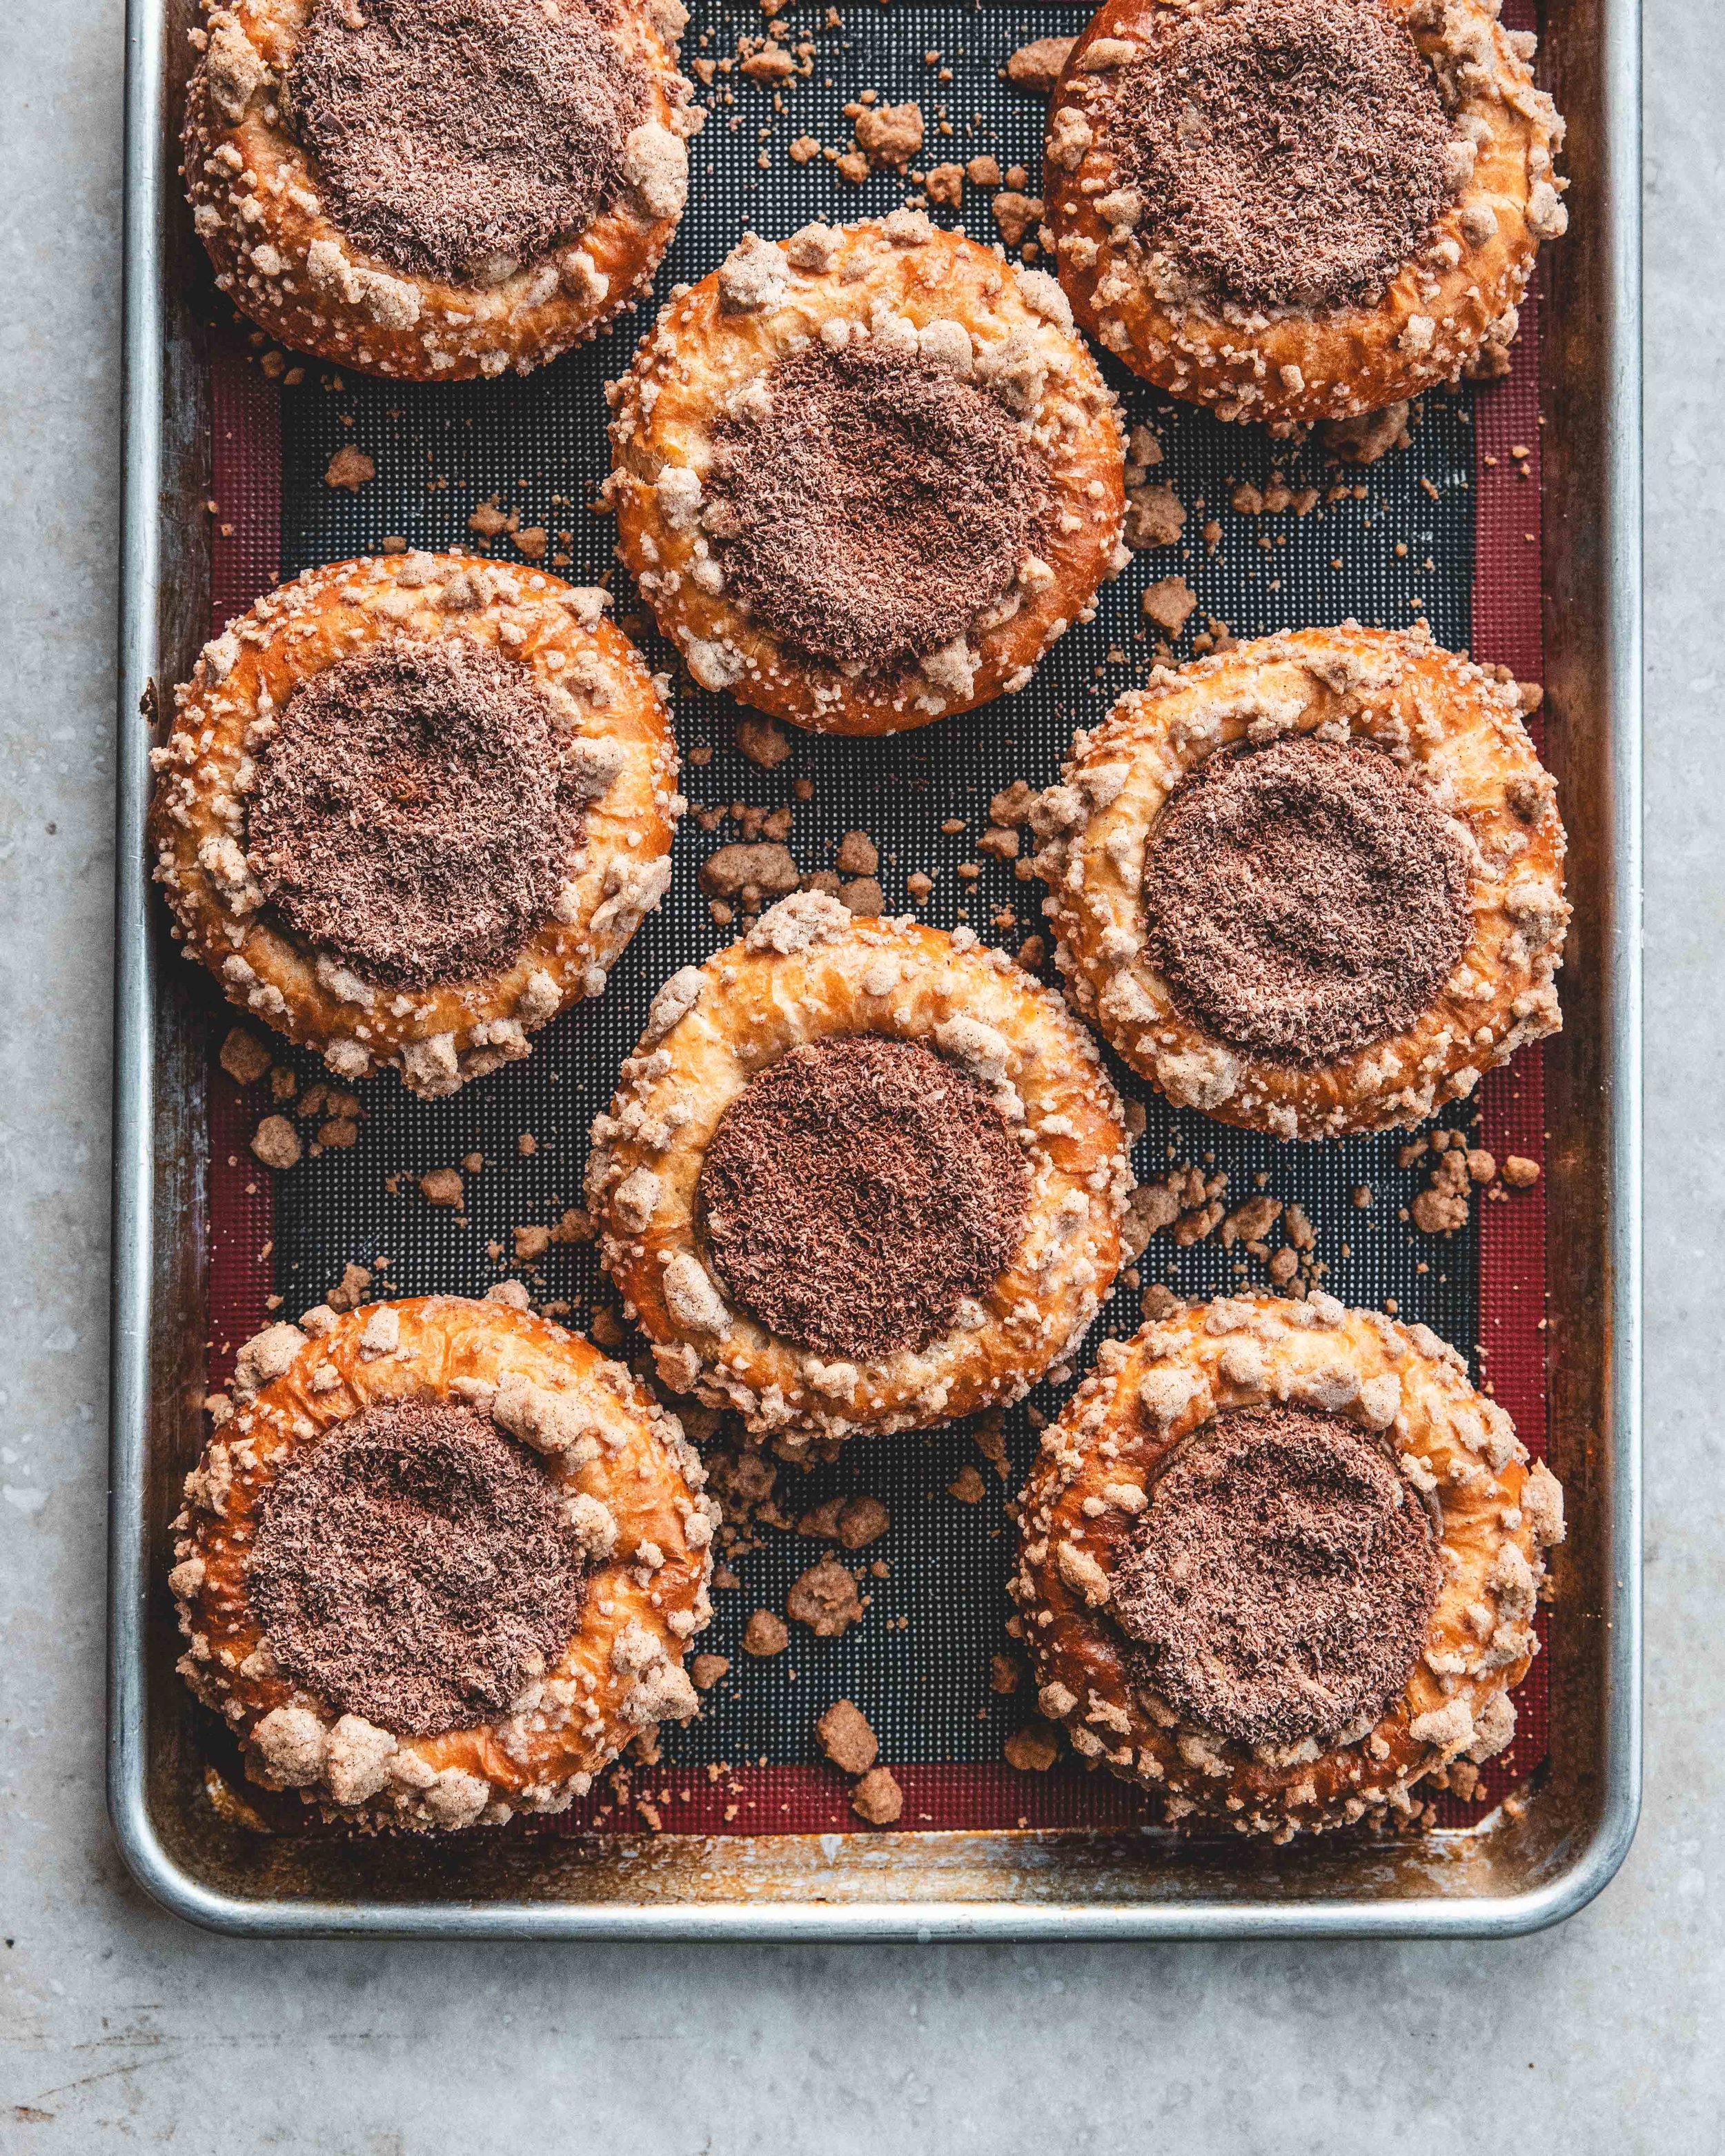
It’s time for Brunch. I’m not talking eggs Benedict, or avocado on toast, but coffee absolutely does make an appearance. This weeks recipe is a fabulous layering of flavours and textures and a coffee lovers dream. It starts with a classic brioche, which is treated almost like pastry, to make a tart base which is filled with a coffee custard and surrounded by a lightly spiced crumb. To finish, the custard is covered with a thin layer of grated chocolate. Brioche, coffee custard, spiced crumb and chocolate, sounds like a brilliant brunch dish if you ask me.

The centrepiece of this dish is a rich coffee custard and to get the perfect flavour I have partnered with Ozone Coffee and am using their brilliant Festive Blend. Ozone, one of my favourite London coffee roasters, have been releasing an annual festive blend for a couple years now and not only is it a brilliant coffee it also makes a great stocking stuffer; the beautiful packaging is even designed to be gifted. If you don’t know Ozone they are originally from New Zealand but have also been in London for over 10 years now. They have 4 locations across the city and at their two East London locations, Shoreditch and, my personal favourite, London Fields they also serve a mean brunch. If you’re in the area you should absolutely go and check out their new winter menu which launched this week.

Flavour-wise the coffee blend is inspired by mince pies and has tasting notes of sweet pastry, dried fruits and brown sugar. The flavours in the dish were designed to pair beautifully with the coffee; the spicing in the crumb is wintery and festive and the crunch reminds you of pastry. If you want to push the mince pie comparison even more you could even add a little alcohol to the custard, some rum or brandy would be perfect.

You can buy the Ozone Festive Blend in all of their locations and online on their website here.

Brioche Tips

Making brioche is not difficult but there are some things to bear in mind. When trying to develop gluten, fat can prevent that. This is why the butter isn’t added straight away. If the butter is added at the start of mixing, the flour becomes coated in fat, and the liquid in the bread cant team up with the flour as easily to develop gluten. Building up the gluten, before adding the butter is added, helps create a properly kneaded dough but adding the butter almost pulls this back a little and more kneading is required to ensure a properly elastic dough. You might think the kneading times are a little overblown but this is what you need to properly develop the dough. The reason for all of this kneading is a finished brioche with the proper texture, an under-kneaded dough will end up as dense brioche, too bready in texture. Well developed brioche, that is also properly proofed, will be incredibly light and fluffy, and will almost melt in the mouth.

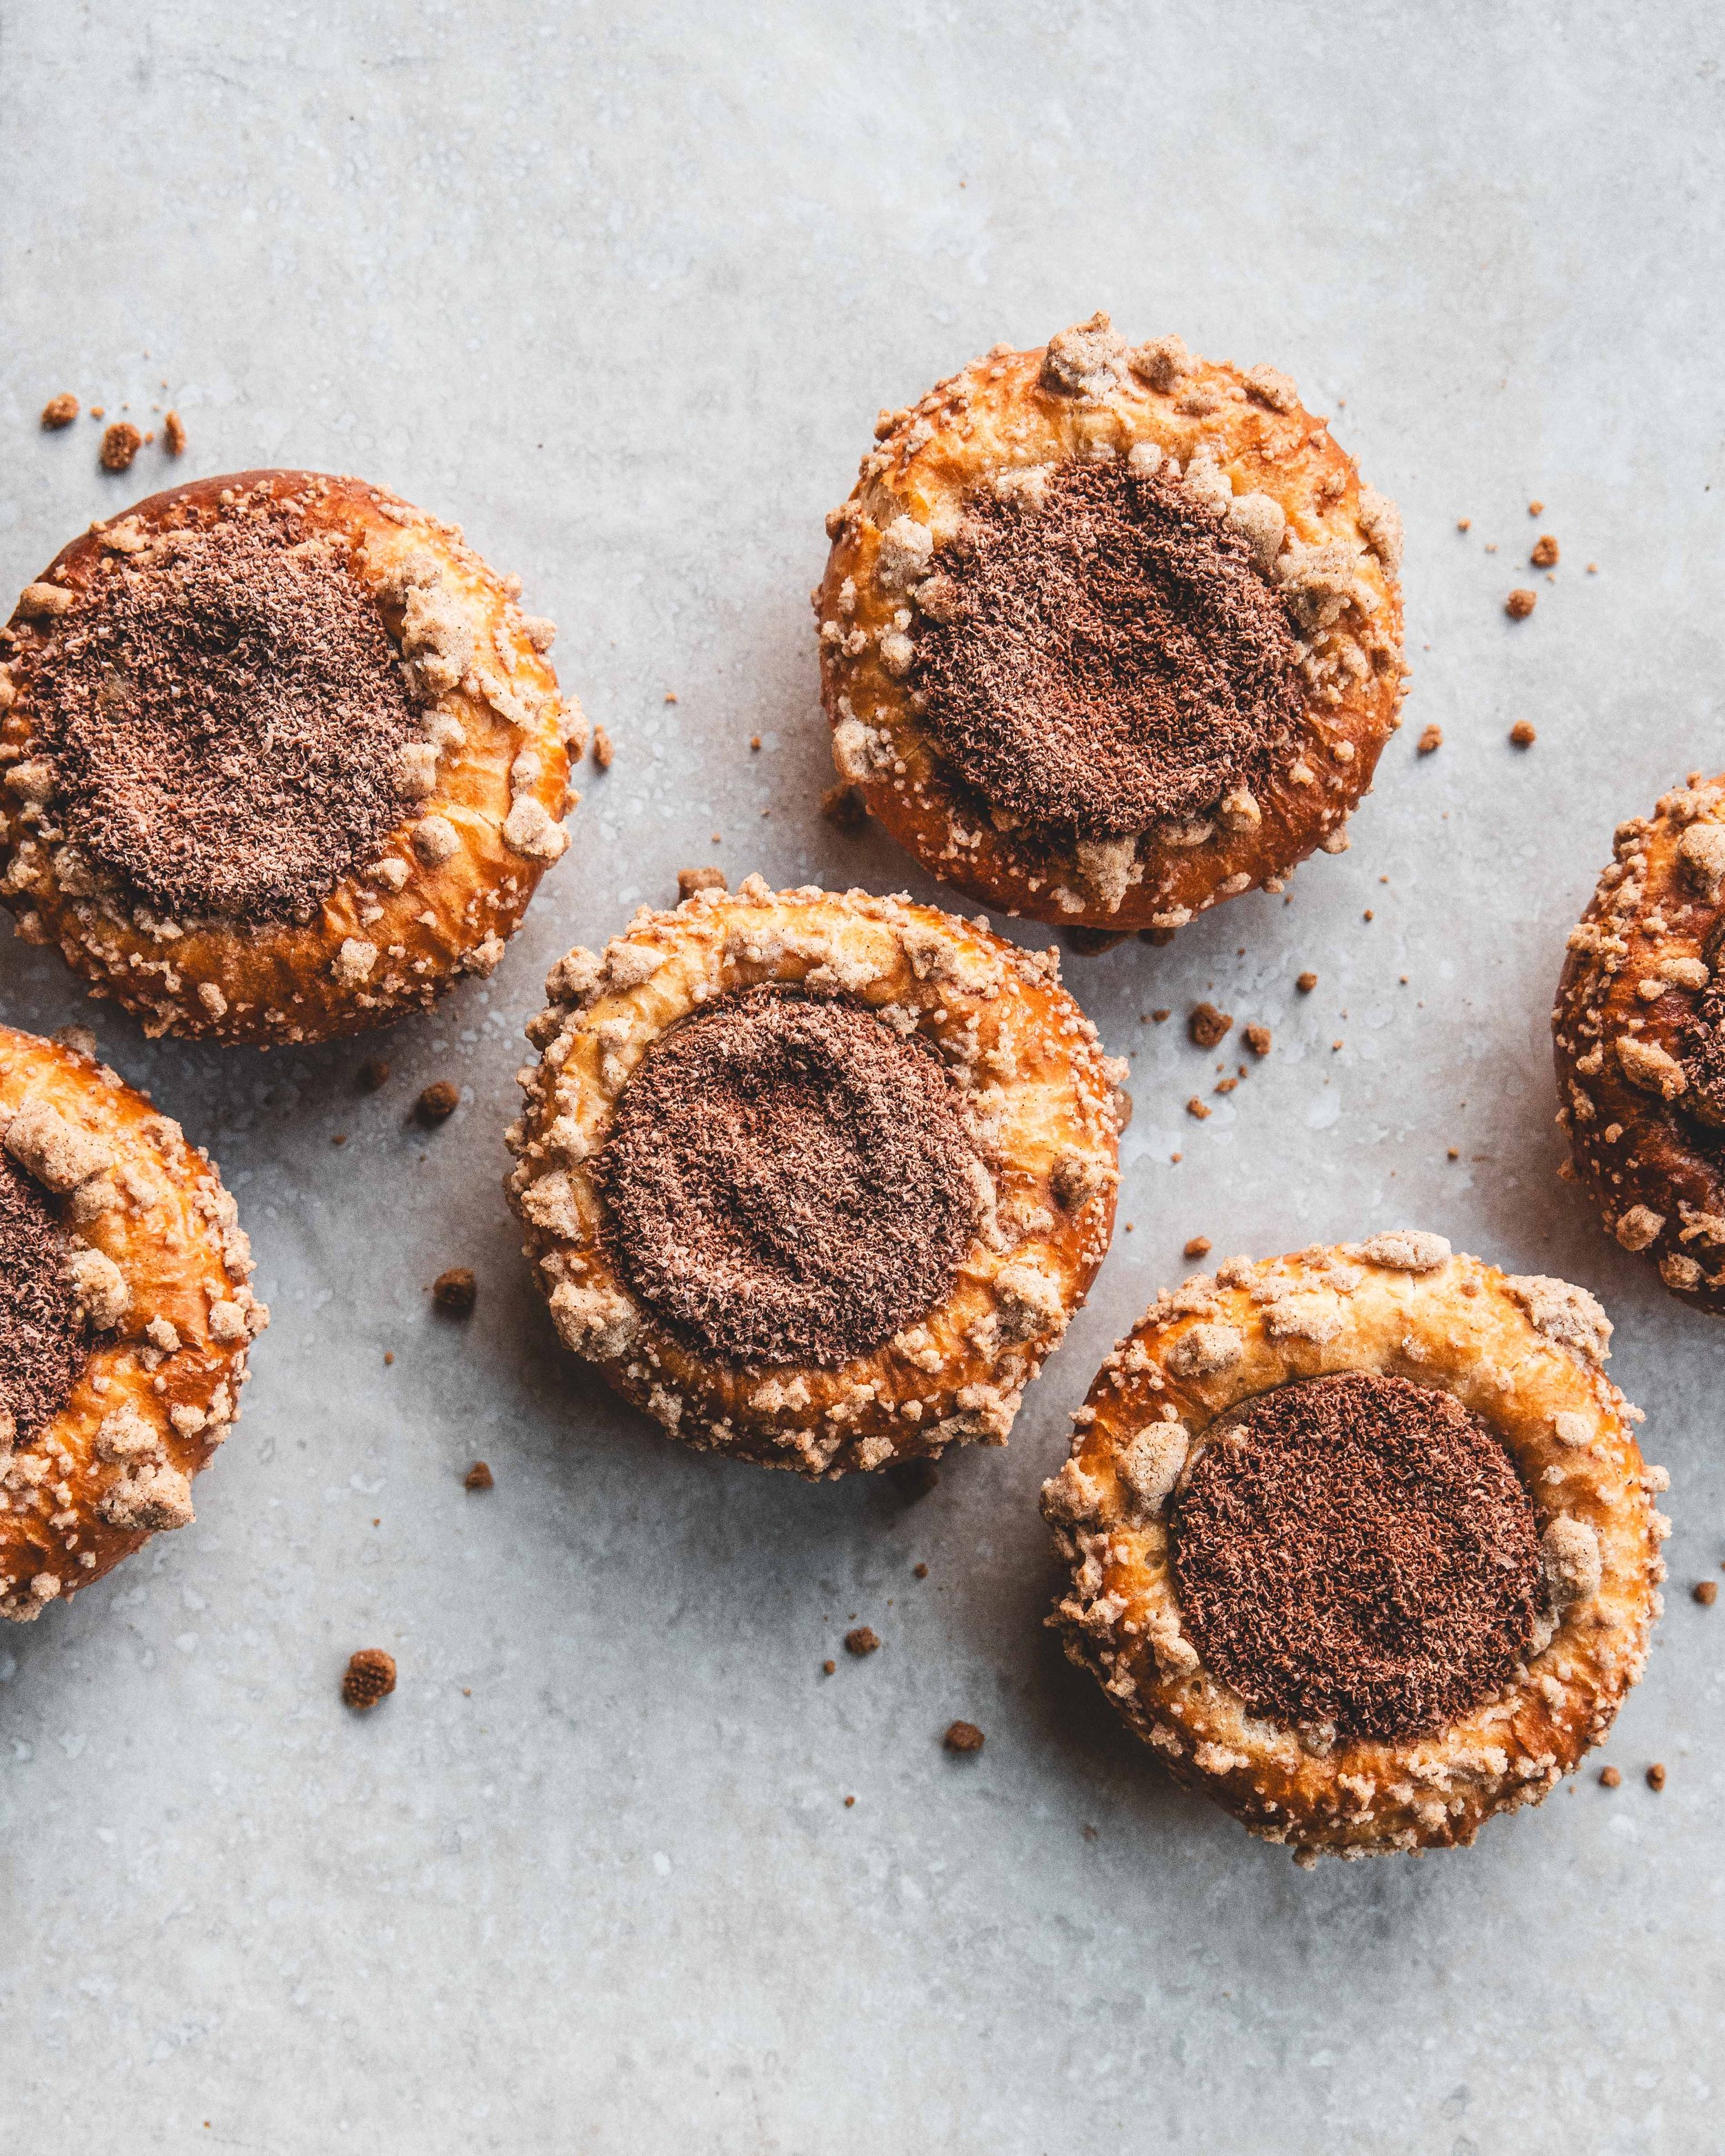
Winter Coffee Brioche Tarts
Makes 8

Brioche

180g plain flour
180g strong white bread flour
20g caster sugar
1 tsp fine sea salt
7g fast action dried yeast
85ml whole milk
3 large eggs, plus one for egg wash
150g unsalted butter, room temperature

Coffee Custard

200ml whole milk
50ml double cream
2 tbsp coffee beans, roughly ground.
1 large egg
2 large egg yolks
100g caster sugar
25g cornflour
25g butter, diced
50g milk chocolate, grated, for garnish

Spiced Crumb

50g plain flour
50g caster sugar
1/4 tsp ground cardamom
1/4 tsp ground cinnamon
1/8 tsp freshly ground nutmeg
Pinch of fine sea salt
40g unsalted butter

To make the brioche add the two flours, the sugar, salt and yeast to a large bowl and whisk to combine. Add the milk and eggs and using an electric stand mixer knead for about 10-15 minutes or until the dough is smooth, elastic and no longer sticking to the sides of the bowl. Add the diced butter and continue mixing until fully combined. Once the butter has been incorporated into the dough continue kneading until, once again, the dough is smooth and silky and no longer sticking to the sides of the bowl, this should take another 10-15 minutes. Tip the dough out onto your work surface and form into a ball. Place the dough into a lightly greased bowl and cover with clingfilm. Allow the dough to rest at room temperature for 30 minutes before moving to the fridge and chilling overnight.

For the coffee custard place the milk and cream into a large saucepan along with the ground coffee and bring to a simmer. Once at temperature turn off the heat, cover and set aside for about an hour to infuse the flavour of the coffee. Once the hour is up, bring the milk mixture back to a simmer then pour through a fine mesh sieve, into a measuring jug, to strain out the ground coffee. The coffee can absorb a little of the liquid so top up with extra milk if needed. Whilst the milk is coming to a simmer add the egg, yolks, sugar and cornflour to a large bowl and whisk together. Pour the strained milk mixture onto the egg mixture, whisking as you pour to prevent the eggs from scrambling. Pour the custard mixture back into the saucepan and place over medium heat and cook, whisking constantly, until the mixture bubbles and thickens. Cook for another minute before scraping into a bowl. Add the butter and mix until combined. Cover with clingfilm and refrigerate until needed.

To assemble the brioche remove the dough from the fridge and tip out onto a lightly floured worksurface. Press flat and then divide into 8 equally sized pieces. Form each piece of dough into a neat round and then roll out into an 11cm circle. Lightly grease eight 10cm loose bottomed tart tins and use the discs of brioche to line the tart tin as if using pastry. Place the brioche tarts onto a large baking tray and cover lightly with clingfilm and set aside until the brioche has doubled in size, this should take about 2 hours.

Whilst the brioche is rising make the crumb topping. Add the flour, sugar, spices and salt to a mixing bowl and whisk to combine. Add the butter to a small pan and melt. Pour the melted butter into the flour mixture and use a fork to stir to combine, making a crumble like topping. Refrigerate until the brioche has finished proofing.

When almost ready to bake preheat the oven to 190ºC (170ºC Fan).

To assemble the tarts remove the custard from the fridge and beat until smooth and silky. Using your lightly floured fingers, gently reinforce the depression in the middle of the brioche tarts (as the brioche proofs the depression starts to fill in). Brush the outside of the brioche with egg wash and spoon, or pipe the custard into the middle of the brioche buns. Sprinkle the crumb around the outside of the brioche.

Bake in the preheated oven for about 20-25 minutes or until the brioche is golden brown. When removed from the oven the custard will have puffed up but as it cools will sink lightly. Set aside until the brioche is cooled.

To finish the brioche scatter the grated chocolate over the custard. To make this neat I place a small cookie cutter on the top of brioche, so that the entire custard is covered, and spoon in the chocolate so it forms a neat circle.

The brioche is best served on the day it is made but can be covered and stored for a further day.

In Breads and Quickbreads Tags brioche, coffee, crumb, streusel, ozone coffee, bread, buns, winter
5 Comments
Choux bun with craquelin filled with a coffee cream

Coffee Choux Buns

Edd Kimber January 31, 2022

Happy New Year! I know I am a month late whisking you all a happy 2022 but I unexpectedly ended up having a a slow start to the year. No, not covid related thankfully. I simply had finished a big project, which had get me busy most of the previous year, and I was a little burnt out, I needed a break. What pulled me back to the kitchen was however something simple, a petit little choux bun. Scrolling through instagram I stumbled across someone enjoying a week in Paris, and of course I was following along wishing I could be there too. They had posted a picture of a choux bun, topped with craquelin and a simple disc of chocolate for decoration. It was incredibly simple but beautiful and it reminded me just how much I love this type of choux pastry. So here we are.

Choux is the only twice cooked pastry, cooked first on the hob and then baked in the oven. Depending on how it’s cooked it can be soft or crisp and it can be used in both sweet and savoury applications. In my mind it is the easiest pastry to make but a tricky one to perfect, there are a lot of key little details which are key to a successful bake. If you’ve ever tried to make a picture perfect eclair that is straight and without cracks you’ll understand what I’m talking about. Thankfully, so long as you don’t burn the choux pastry, it will always taste the same no matter how ill-shaped it may be. To get a perfectly formed choux bun there are a number of tips and tricks that can be employed, the one I want to talk about today is craquelin, a crumble like dough that is rolled out thin and frozen before cutting into discs and placing atop the choux. As the pastry bakes the craquelin melts and covers the pastry. This does three things. Firstly it adds an additional crisp texture to the buns, like a thin crisp cookie coating the pastry, secondly it allows the pastry to expand as much as it possibly can, resulting in hollow choux ready to be filled. Finally, the craquelin helps the pastry keeps it shape. If you bake a choux bun or eclair with craquelin on top the pastry you will keep them neat and evenly shaped. It’s a little bit of a miracle worker. Thankfully it is also super easy to make. 

These choux buns are simple but I cant tell you how much I love them. The pastry is light and crisp but the filling, oh the filling! An easy whipped cream flavoured strongly with coffee and sweetened with condensed milk. The resulting flavour is like the best coffee ice cream you’ve ever had. 

If you like the look of this recipe and want to take it to the next level, over on my Patreon this week there is a fabulous rhubarb and custard choux bun that I am in love with.

Coffee Choux Buns
Makes 12-14

Coffee Cream Filling
300ml double cream
2 tbsp ground coffee
100ml condensed milk
1 tsp vanilla bean paste

Craquelin
50g unsalted butter, diced and at room temperature
50g caster sugar
50g plain flour

Choux Pastry
70ml water
70ml whole milk
1/2 tsp fine sea salt
1/2 tsp sugar
70g unsalted butter, diced
70ml plain flour
2 large eggs

To make the coffee cream filling place the cream and ground coffee into a saucepan and place over a medium heat. Bring to a simmer then remove from the heat, cover with a lid and set aside for an hour. Pour the cream into a sealable container and refrigerate overnight. This long infusion helps to draw out a lot of flavour, resulting in a very strong coffee flavour.

To make the craquelin beat the butter in a bowl until soft and creamy. Add the sugar and beat until smooth and combined. Add the flour and mix to form a crumble-esque dough. Use your hands to press together into a dough and press flat. Place the dough between two sheets of parchment and roll out until about a couple mm thick, it wants to be nice and thin. Place onto a baking tray and freeze while you make the pastry. 

Preheat the oven to 190º (170ºC Fan).

For the choux pastry place the water and milk into a saucepan and mix in the salt and sugar. Place over low/medium heat and cook until the butter has melted. Turn up the heat and bring the liquid to a rolling boil. Remove the pan from the heat and pour in the flour in one go, mixing immediately forming a soft dough. Place the pan back on the heat and cook for 1-2 minutes more until the dough leaves a fine film on the base of the pan. A tip I learnt from pastry chef Francisco Migoya is that you can also check the pastry is ready by checking its temperature. The point of cooking the choux pastry in this manner is to gelatinise the flour. This happens to the flour when the dough hits between 74-79ºC. At this point scrape the dough into a bowl and beat for a few minutes to cool enough that the dough wont cook the eggs. 

Add the eggs to a small bowl and whisk together to combine. Pour a little of the eggs into the pastry and beat together until fully combined. It may look a little separated or like cottage cheese but keep beating, it will eventually come together. Repeat adding more of the egg until the dough has a sheen is smooth. When lifted from the bowl using a wooden spoon or spatula the dough  should easily fall from the spoon forming a v-shape when it does. You can also draw your finger or the handle of a wooden spoon through dough, it should leave a channel that stays put for at least 5 seconds. 

Scrape the pastry into a piping bag fitted with a plain round piping tip. 

Line two baking trays with parchment paper and on the back of the paper use a 5cm round cookie cutter to draw circles to use as a template. The choux buns will expand so leave plenty of space between each ring. Turn the paper over so the templates are on the back of the paper (if you forget to do this the ink/pencil can transfer onto the choux, trust me I have done this far too may times to count). Pipe rounds of the pastry onto the baking tray, piping to edges of the templates you have drawn. 

Remove the craquelin from the freezer and peel of the top layer of parchment paper. Use the same cookie cutter to cut out discs of the topping. Place the discs onto the choux pastry, pressing very lightly to secure it in place.

Bake in the oven for about 30 minutes or until the craquelin is golden brown. Turn off the oven and allow the choux to sit in the cooling over for half an hour. This helps ensure the pastry remains crisp.

After 30 minutes remove the buns from the oven and allow to cool fully. To assemble, pierce a small hole in the base of each bun with a pairing knife. Remove the cream mixture from the fridge and pass through a fine mesh sieve to remove the coffee grounds (some very fine grains of coffee will remain in the cream). Pour in the condensed milk and vanilla and whisk until the cream holds soft peaks. Scrape the filling into a piping bag fitted with a plain round tip and use to fill each choux bun. Dust the finished buns with a little icing sugar.

Once assembled the buns are best on the day made when the pastry will remain crisp. You can serve them up to three days later, keeping them refrigerated. As they sit the pastry will lose its crisp texture and become soft.


In Pastry Tags choux, choux buns, coffee, craquelin, choux a la creme
1 Comment

Espresso Caramel Sheet Cake

Edd Kimber November 16, 2021

Today I have a fabulous treat for you, a sneak peek at a seriously delicious recipe from my new book One Tin Bakes Easy which has now been out in the UK, Aus and NZ for a month and from today is also on sale in the USA and Canada.

If you haven’t heard about the book yet let me give a quick 30 second explanation. Last year I released my book One Tin Bakes, a collection of 70 recipes that are all made in the same 9x13 tin. I was blown away by the response, the book became a bestseller and even a year later I still see you guys baking from it every single day. The book came out in the midst of the pandemic and right in the middle of lockdowns all over the world. People were stuck at home and baking became one the things they relaxed with, everyone and their grandmother was making banana bread or turning out loaves of sourdough. When people picked up a copy One Tin Bakes it became really clear to me, through the emails and instagram DM’s I was receiving, that so many people baking last year were doing so for the very first time. Even though the recipes in One Tin Bakes are relatively simple there was still some nervousness with new bakers around many basics of baking. Because of this and the success of the book I decided to write a second volume in the series, a collection of 70 brand new recipes that were even easier than the original book. I am talking one bowl cakes that use the all in one method, treats that are no-bake, recipes that only use 5 ingredients. 

One Tin Bakes Easy shares the same DNA as One Tin Bakes but the recipes are as simple as I could possibly manage. They may be easy but the recipes never compromise on flavour, they’re easy but delicious. If that sounds like something you’d appreciate the book is now available everywhere books are sold in America, Canada, the UK, New Zealand and Australia. You can also buy copies anywhere in the world via The Book Depository.

If you are thinking you’d like to buy a copy as a present (the holiday season is upon us after all) There are a number of places you can buy signed copies. In the UK Waterstones have a stock of signed copies that you can buy online and from some stores in person (check their site for availability. In the US the Book Larder in Seattle have signed copies and they can ship anywhere in the country. I am also working on trying to get signed copies in more countries so bear with me if you’re looking to get one elsewhere. 

The recipe I have chosen to show you is my Espresso Caramel Sheet Cake. The cake is an all in one affair made with sour cream and a very healthy dose of espresso (or the strongest coffee you can make at home). The topping is a truly heavenly mix of dulce de leche, cream cheese and cream whisked until billowy and soft. It is spread over the cake and finished with a sprinkling of flaked sea salt. Trust me when I say you need to make this.

Espresso and Caramel Sheet Cake
Recipe from my new book One Tin Bakes Easy

Note: as you will see the measurements in this recipe are in both metric and imperial and this is how they appear in the book so no matter what style of measurement you prefer you are covered

170g (6oz/11⁄2 sticks) very soft unsalted butter, plus extra for greasing
320g (111⁄4oz/21⁄2 cups + 1 tablespoon) plain (all-purpose) flour
3 teaspoons baking powder 1⁄2 teaspoon fine sea salt
175g (6oz/3⁄4 cup + 2 tablespoons) caster (superfine) sugar
175g (6oz/3⁄4 cup + 2 teaspoons) light brown sugar
3 large eggs
2 teaspoons vanilla extract 100ml (31⁄2fl oz/1⁄3 cup + 4 teaspoons) cold espresso or very strong black coffee
75ml (23⁄4fl oz/5 tablespoons) sour cream Flaked sea salt, for sprinkling 

Caramel Cream Cheese Frosting

170g (6oz/3⁄4 cup) cream cheese, at room temperature
397g (14oz) can dulce de leche
240ml (81⁄2fl oz/1 cup) double (heavy) cream, chilled 

Preheat the oven to 180oC (160oC Fan) 350oF, Gas Mark 4. Lightly grease your 23 x 33cm (9 x 13in) baking tin and line it with a strip of parchment paper that overhangs the long sides, securing it in place with two metal clips. 

Place the flour, baking powder, salt and sugars in a large bowl and whisk to combine. Add the butter, eggs, vanilla, espresso and sour cream and mix until a smooth batter forms. Pour it into the prepared tin and spread evenly. 

Bake for about 35–40 minutes, or until the cake springs back to a light touch. Set aside to cool in the tin for 15 minutes before using the parchment paper to lift the cake onto a wire rack to cool completely. 

For the frosting, place the cream cheese and dulce de leche in a large bowl and whisk until smooth. Add the cream and whisk until the mixture holds soft peaks. Spread the frosting all over the cold cake and sprinkle with flaked sea salt just before serving. 

The cake can be made a couple days in advance if stored in a sealed container, but the frosting needs to be made and served on the same da

In Cakes Tags one tin bakes easy, one tin bakes, sheet cake, caramel, espresso, coffee, all in one, easy
2 Comments
flan-5.jpg

Coffee Caramel Flan

Edd Kimber March 18, 2020

I feel like throwing recipes out into the void of the internet is a bit strange right now, it feels at once both redundant and hopeful. Baking is my job, and that includes this site, so to stop working risks my livelihood and my future. Having already lost a significant portion of work I feel like I have to keep pushing, even if it feels a bit weird right now. Does that make sense? I’ve also tried to have a dialogue with you guys over on instagram to see what you’re thinking and what you need right now. Overwhelmingly you told me that you’re baking through your stress and that watching my regular stories on baking is a nice little escape, so I am going to continue posting new recipes and try and make this a happy place for you to come and lose yourself for a little bit. I will also try and develop recipes that are easy, use minimal ingredients and can be made without issue right now. One of the main things you wanted was a sourdough bake-a-long so thats going to start on Saturday morning. If you want to get prepared you can of course read the guides I already have on here, come Saturday the only thing you will need is a jar with a lid and a bag of bread flour. So come join me every morning on instagram for a little social baking.

Todays recipe was obviously developed before this virus became as big of a deal as it now is so if you cant get all of the ingredients right now maybe bookmark it and come back for something else another time.

Comfort is a word I throw around a lot. Baking seems to have comfort inherently built in for me, for you too I’d wager. It’s a treat, a thing for special occasions or even that thing we do to boost our spirits. Some recipes do seem to have an abundance of comfort and flan, creme caramel, purin or whatever you want to call this style of set custard seems to be at the height of comfort. I can’t quite place my finger on why though, maybe it’s because it’s familiar and something from childhood, maybe its because its custard and custard is just a mainstay of comforting desserts, maybe it’s the soft wobbly texture, who knows. Whatever the reason, it’s a dish that can warm the soul and right now that’s all that matters to me.

For my version I wanted to add a coffee element so there is one additional step compared to the classic recipe, the dairy is first steeped with freshly ground coffee. If you prefer to keep the custards more classic feel free to skip this step but I love the extra flavour it adds.

Coffee Caramel Flan
Makes 6

Caramel
150g caster sugar
25ml water 

Coffee Custard
550ml whole milk
175ml double cream
1 tsp vanilla bean paste
30g freshly ground coffee
125g caster sugar
5 large eggs
1/4 tsp salt

For this recipe I used 6 round moulds, which are sold as small pie tins. It makes wide flat custards that are about 4 inches wide. You can also make these in classic dariole moulds or ramekins. If making them in dariole moulds (small pudding basins) you may get 1 or 2 extra flans. Spray each mould with a little spray oil or lightly grease with a little softened butter.

Place the sugar and water for the caramel into a small saucepan and place over medium heat and cook, swirling occasionally but definitely not stirring, until the sugar has dissolved, the mixture is bubbling and eventually turns to a rich golden brown. For this style of custard I like to take the custard to a pretty dark colour so it has that identifiable edge to it I expect from flan. Once at the desired colour add an extra tablespoon of hot water to thin the caramel a little (be careful, the water will make the caramel bubble violently). Divide the caramel evenly between the prepared moulds and set aside for the moment.

To make the flan we need to first infuse the coffee flavour into the dairy. Add the milk, cream, vanilla and half of the sugar into a medium sized saucepan and add the coffee. Place the pan over medium heat and bring to a simmer. Remove the pan from the heat, cover, and set aside for about 30 minutes to allow to infuse. 

Note: for the coffee you can use any form of real coffee, whether you grind it fresh or whether you have ready ground in your pantry. Ideally you want the coffee medium ground so it can be strained out but even if you use coffee finely ground for espresso (like I did with the version in the pictures) it’ll taste delicious you may just have a few smaller grains in the end product, which I actually don’t mind. If you only have instant you will be able to use it but it wont need infusing, just bring the dairy to a simmer and mix in coffee a lit bit at a time, adding enough until it tastes as  strong as you prefer.

flan-2.jpg

Preheat the oven to 150ºC.

Bring the coffee mixture back to a simmer. Once at temperature pour the dairy through a fine mesh sieve to remove as much of the ground coffee as poissible. Place the eggs, salt and remaining sugar into a large bowl and whisk together just to combine. Your aim here is to combine everything without adding any air, bubbles are the enemy of a silky smooth custard. Pour the infused dairy into the eggs, as you stir constantly to prevent the eggs from scrambling. 

Divide the custard evenly between the moulds. If there are bubbles on the surface of the custard you can help them disappear by lightly waving a kitchen blowtorch over the surface and you’ll see any visible bubbles pop. 

Cover each mould with a small piece of foil and place the custards into a large roasting tray (I use a 9x13 brownie tin) with a kitchen towel lining the base of the tin. Place the tin into the oven and carefully pour boiling water into the tin, adding enough to go about 1/2 way up the sides of the moulds. Bake in the oven for about 40 minutes or until the custards are set around the outside with just a little wobble in the middle. Remove the tin from the oven and allow the custards to cool in the water for 30 minutes before removing and allowing to cool to room temperature. Once room temperature place the custards in the fridge for at least 4 hours.

To serve, dip each mould in hot water for 5-10 seconds to loosen. Use a very thin knife to loosen the sides of the custard from the moulds and then invert onto a plate to serve. 

Once made they can be kept in the fridge for a couple days before turning out of the moulds to serve. 

In Dessert Tags coffee caramel flan, coffee, flan, caramel, creme caramel, purin
1 Comment

Twitter

  • Was 8 original films, 3 spin off films, a two part play not enough. Can we have something new. https://t.co/cBZdGEGeyv
    Apr 4, 2023, 1:46 PM
  • RT @deliciousmag: Cacio e pepe, but make it buns! These seriously cheesy bread rolls from @TheBoyWhoBakes are inspired by his favouri… https://t.co/oDZlaDgnN2
    Apr 2, 2023, 11:08 AM
  • RT @TheDailyShow: Congrats to Donald Trump on finally winning a majority of votes! https://t.co/ezP55HZgl0
    Mar 31, 2023, 12:43 AM

Instagram

This weeks bonus recipe, for subscribers to my newsletter, is this gorgeous sour cherry and coconut gateau basque. The crust is a buttery cross between pastry and cake, think a cakey cookie. The filling is a layer of sour cherry topped with a rich coconut custard. A real fun one to make too! Link to my newsletter can be found in my bio - #gateaubasque #pastrycream #coconut #sourcherry
In this months @olivemagazine (out today) the team came and photographed my petit kitchen and we talked about how we put our stamp on the place, without spending a fortune. We hated the bland kitchen that we inherited but, as it was relatively new an
In this months @olivemagazine (out today) the team came and photographed my petit kitchen and we talked about how we put our stamp on the place, without spending a fortune. We hated the bland kitchen that we inherited but, as it was relatively new and in good condition, it felt a waste to rip it out and we also didn’t want to spend the money it would take to rip out the whole thing and replace it (it’s a howdens shell so we could have done something cheaper like @plykeakitchens @holte.studio @madebyhusk) so instead I painted all of the cabinets, using @makeitrustoleum kitchen cabinet paint, to give it some personality and lighten the whole thing. Check out the magazine for the full run down. - #kitchendesign #kitchenremodel #rustoleumcabinettransformations #rustoleumkitchencupboardpaint #kitcheninspiration #theboywhobakes #olivemagazine
Are you making scones all wrong? Maybe, maybe not? But I do want to show you how I make them! This recipe is based on the method I learnt at @belmondlemanoir 12 years ago when I did a stage, and it makes the absolute lightest scones. And shock horror, it involves kneading the dough, albeit very lightly. You can get the full recipe in this weeks newsletter (free) linked in my bio. - #scones #bakingday #worldbakingday #afternoontea #hightea #englishscones #clottedcream #creamtea #theboywhobakes
facebook
  • Contact

The Boy Who Bakes

Edd Kimber

facebook