The Boy Who Bakes

Edd Kimber
  • Home
  • Recipes
  • My Books
  • Blog
  • Recipe Index
  • About
  • Home
  • Recipes
  • My Books
  • Blog
  • Recipe Index
  • About

Recipes

  • All
  • baking
  • Biscuits and Cookies
  • Breads and Quickbreads
  • Bundts
  • Cakes
  • Chocolate
  • Dessert
  • drinks
  • Holidays
  • Pastry
  • Scones and Quickbreads

No Bake Chocolate Tarts

Edd Kimber February 14, 2022

This post is sponsored by Lizi’s Granola

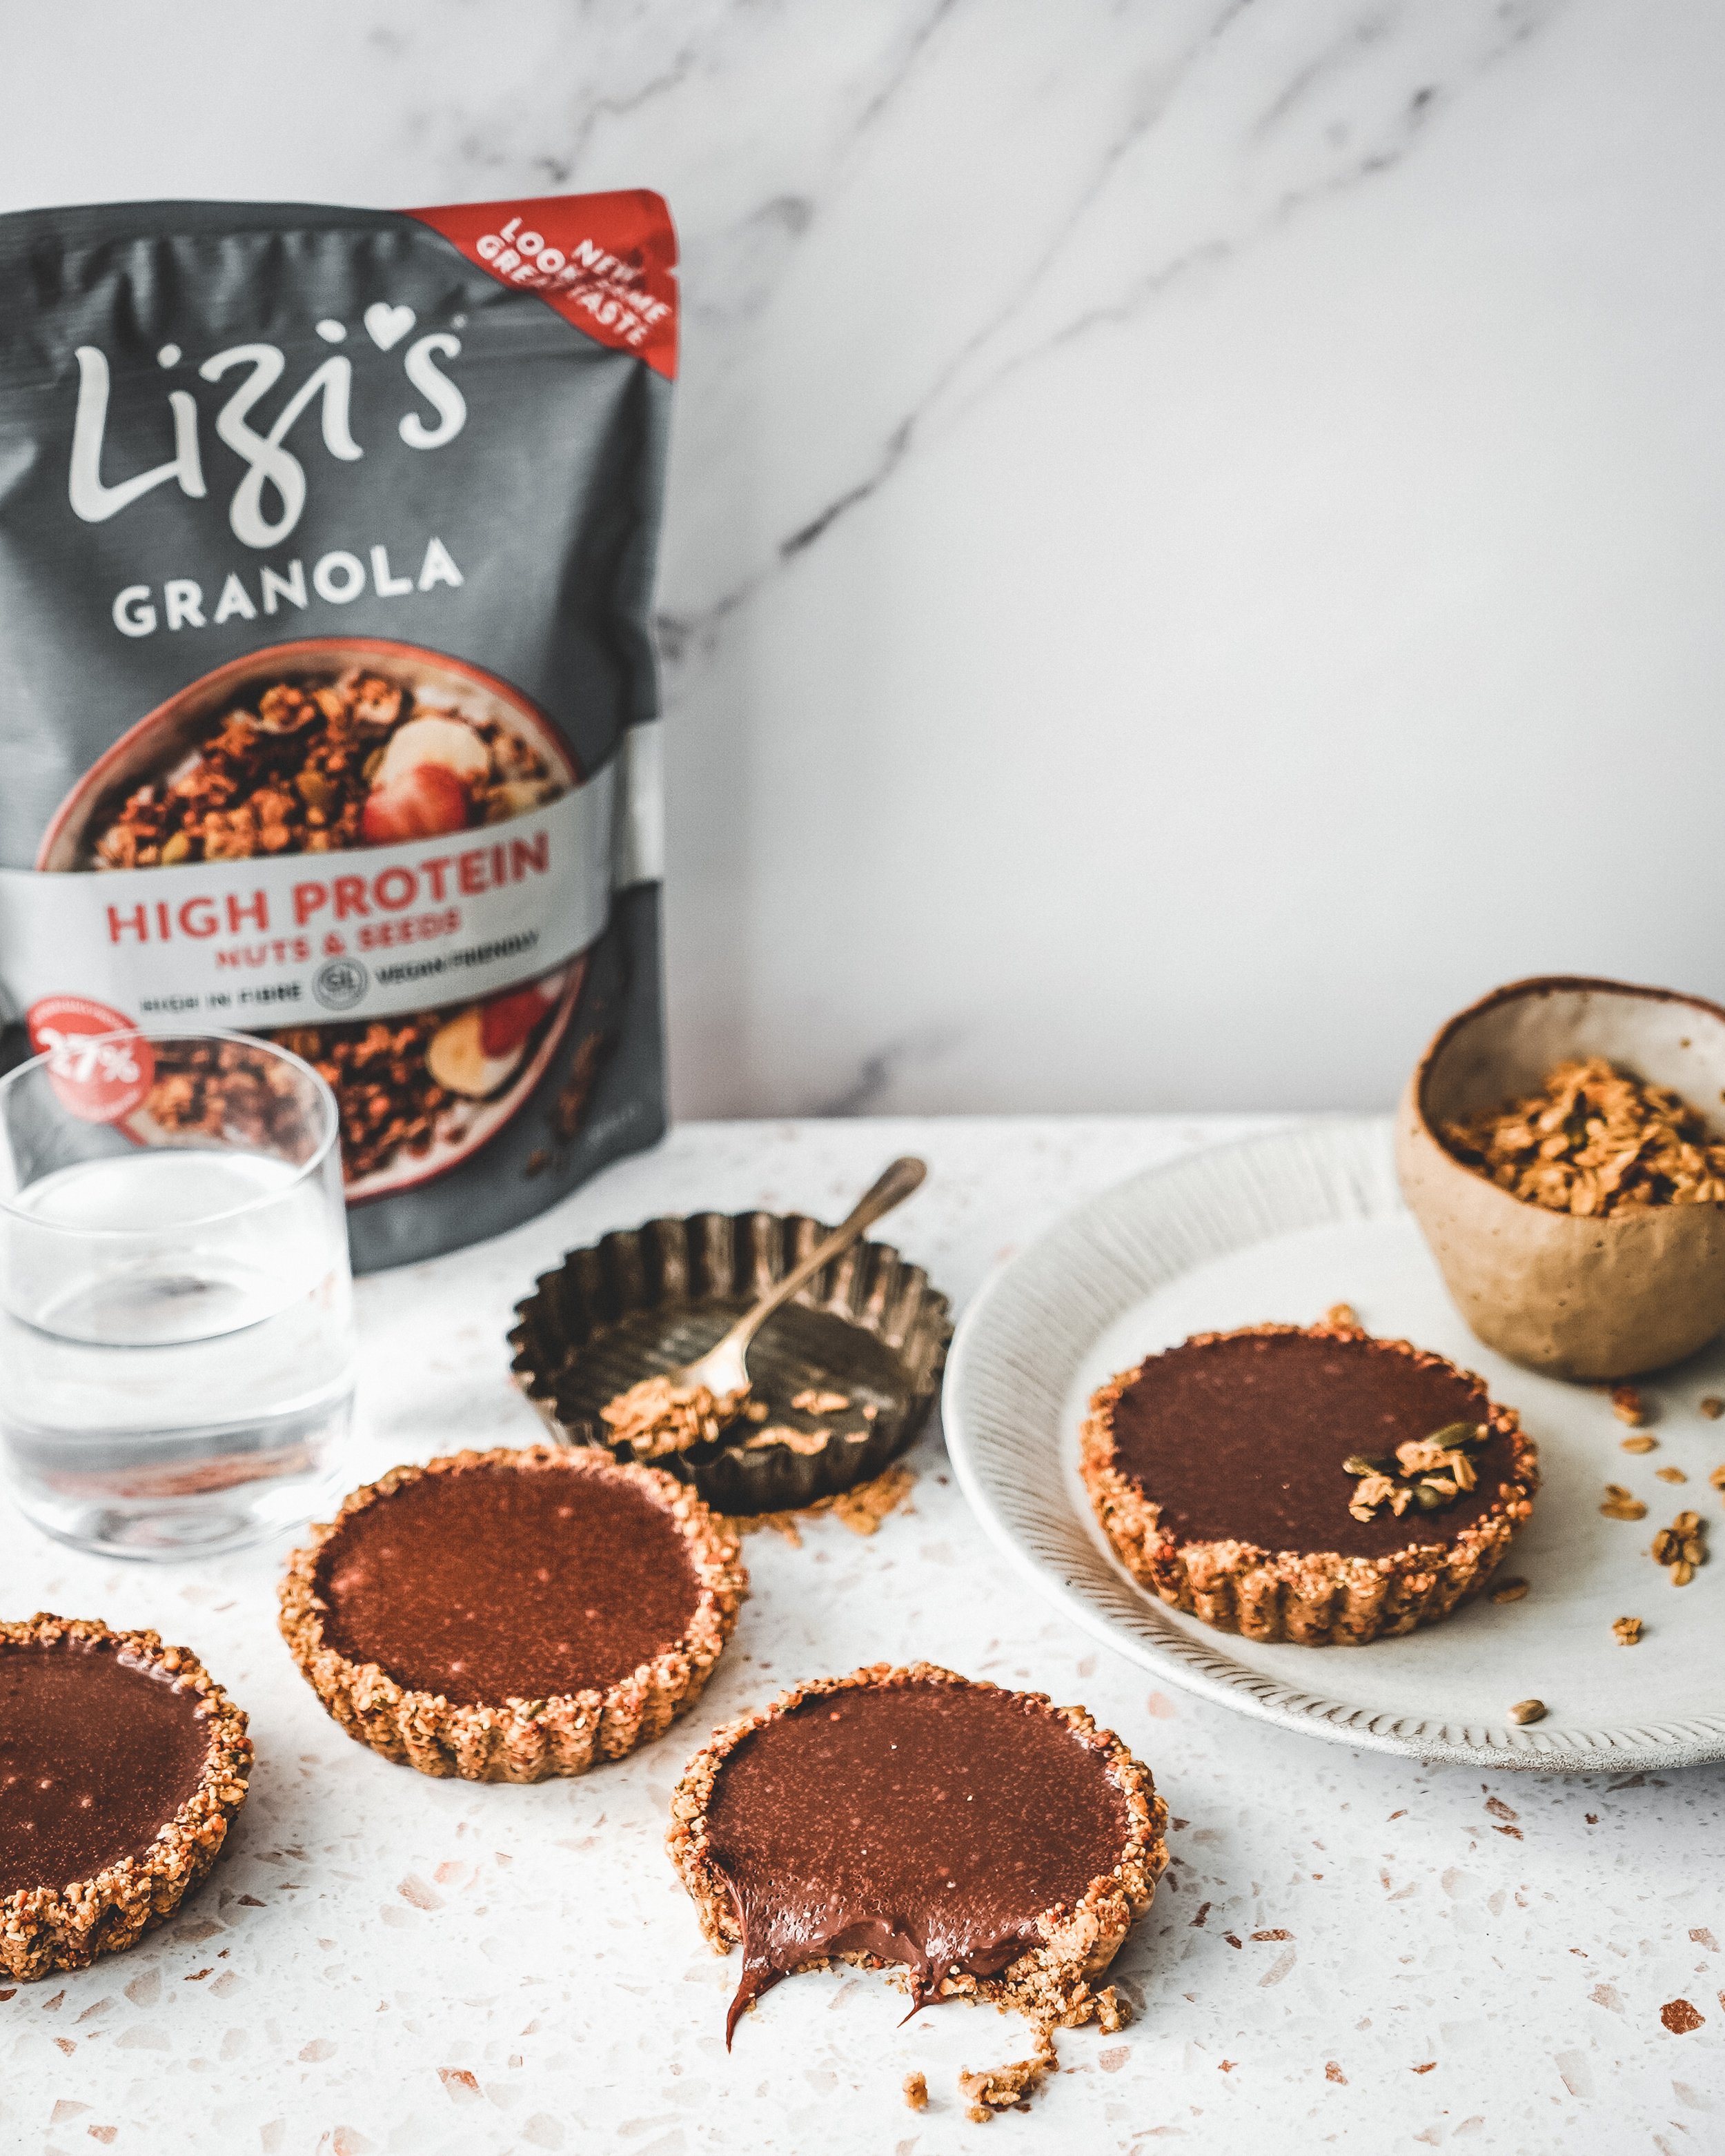
A well made chocolate tart is a thing of beauty, elegant and perfect for a valentines day treat. Made with a silky smooth chocolate filling and a thin crisp pastry base, it’s a delicious classic dessert. But what if you don’t have the time to make pastry or a baked chocolate filling? You make these no bake chocolate tarts, of course. In the place of the pastry a no-bake tart crust is made, with Lizi’s Granola, which adds both ease and speed but also a whole load of texture which is just fabulous to eat. For this particular recipe I chose the Lizi’s Original Nuts and Seeds Granola as the texture it provides made for a great tart base and most importantly a delicious flavour. The filling is a simple ganache made with almond milk and brown sugar for a warm toasty note that goes great with the chocolate and granola.

As you’ll see from the ingredients the recipe is vegan and whilst you could make swaps and switch in dairy if you’re not vegan I would encourage you to try it as written anyway. For the crust I like to use virgin coconut oil which has the flavour of coconut and adds a great layer of flavour to the whole dish. For the ganache I use an almond milk that has a hint of bitter almonds that adds to the nutty complexion of the dish. Dairy has stronger flavours so using a something more subtle like almond milk allows the full flavour of the chocolate shine through in the ganache.

When making the ganache it is important that the chocolate mixture ends up incredibly smooth and silky and to that end there a couple of guidelines to follow to ensure the perfect end result. Chop your chocolate nice and fine, this way the milk doesn’t need to be as hot to melt big chunks of chocolate. Bring the milk to a steam or just to a simmer but do not let it boil. Firstly some plant based milks do not like being boiled and they can split if they become too hot but most importantly the chocolate wont appreciate the milk being too hot. Ganache is an emulsion and the heat from the milk can cause the cocoa butter to separate leading to a split ganache. Once you have properly heated the milk you want to pour to over the chocolate and set aside for a few minutes before stirring together. This pause allows the chocolate to melt and the milk to cool down slightly so that when stirred together it forms a silky emulsified texture and you get the best possible texture for your tarts filling.

Whilst these tarts are incredibly easy to make they do need a little refrigeration time to get everything set so they are perfect made for a dinner party, or half the recipe to make a date night dessert perfect for you valentine. 

Note: to get 15% off your next order of Lizi’s Granola use the code theboywhobakes15 on lizs.co.uk 

No Bake Granola Chocolate Tarts
Makes 4

Tart Crust 
175g Lizi’s Original Nuts and Seeds Granola
80g coconut oil, room temperature
Pinch of fine sea salt

Vegan Ganache
265g dark chocolate, finely chopped
50g light brown sugar
115ml almond milk* 

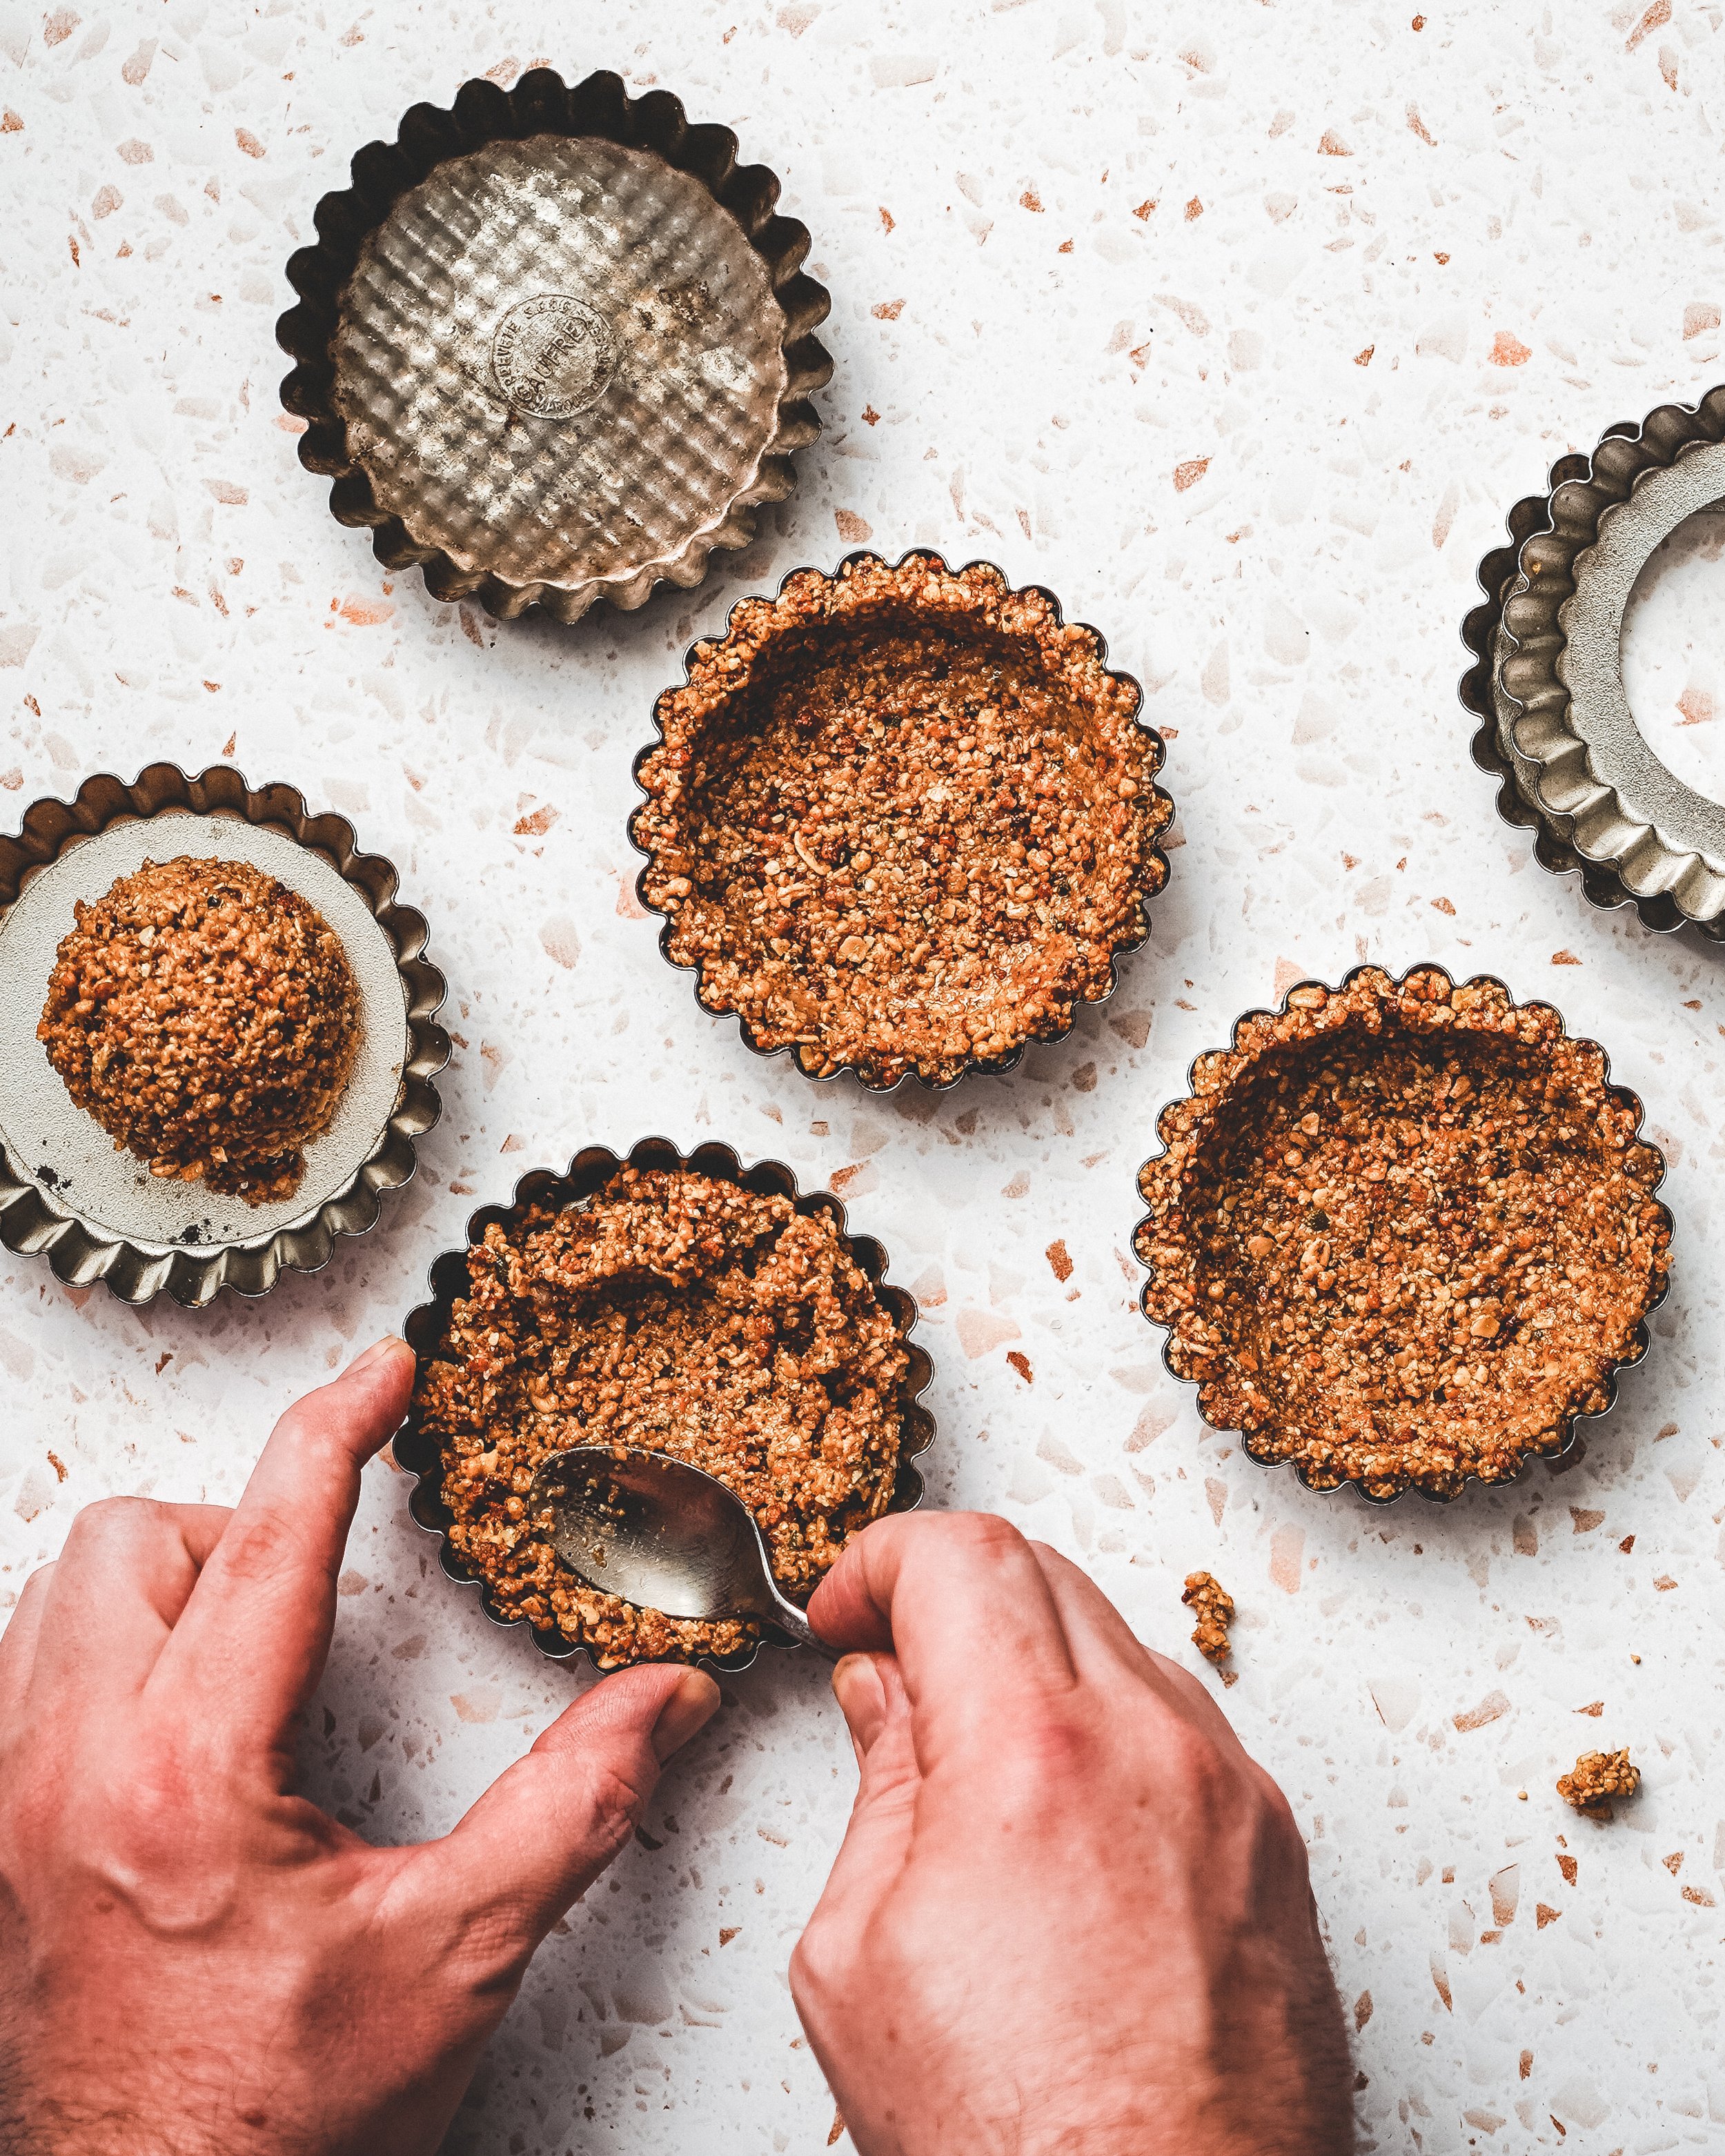
To make the crust place the about 2/3 of the granola into a food processor, with the blade attached, and process until fine and crumbly. Add in the remaining granola, the oil and salt and process until everything is evenly combined and the mixture is clumped together. Divide this mixture equally between four loose bottomed 10cm tart tins and press firmly into the base and up the sides of the tin. 

Place the tart cases in the fridge whilst you work on the ganache. 

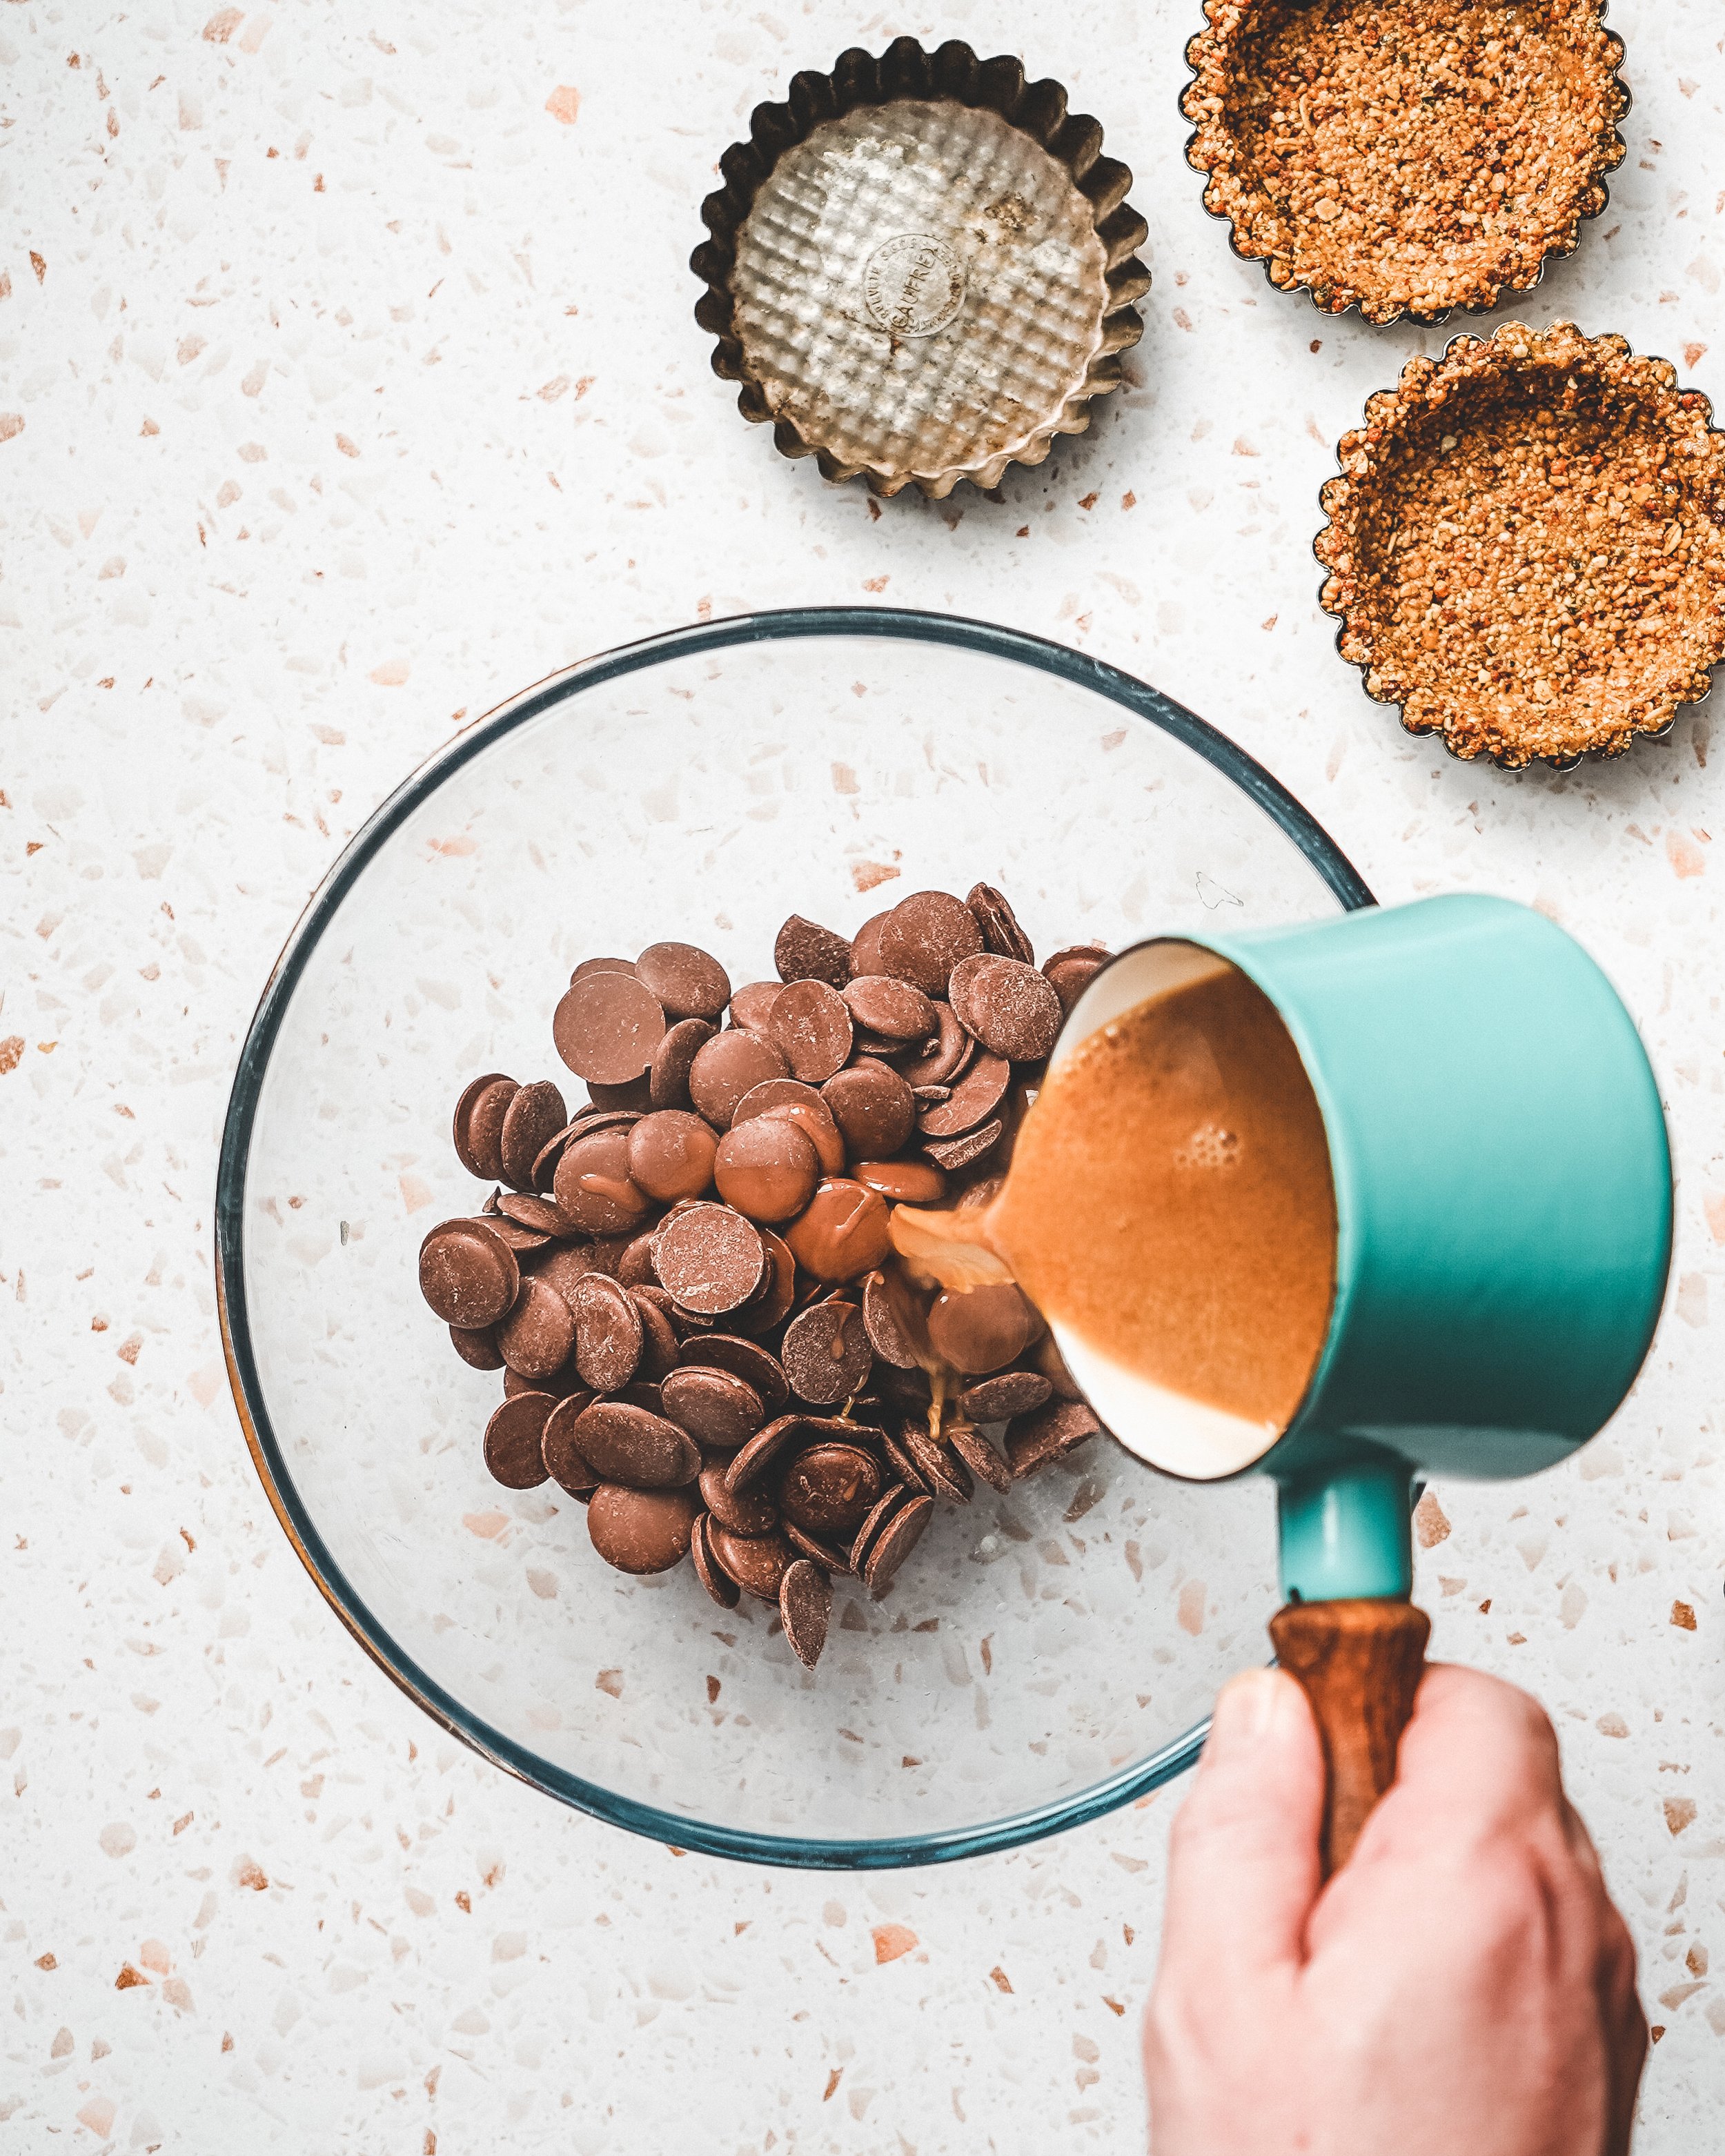
Ganache is most commonly made with chocolate and cream but for a vegan ganache I typically turn to a water ganache, a simple mixture of water and chocolate. Because the water has no flavour of its own the flavour of the chocolate is pure and unadulterated so with this style ganache its best to use a chocolate you absolutely love. For this particular recipe I am using a kind of hallway house between cream and water, almond milk which (depending on the brand you use) can add a subtle almond flavour to the ganache.

Place the chocolate into a bowl and set aside. Add the almond milk and sugar to the pan and gently heat until just steaming then pour over the chocolate and set aside for a couple minutes before stirring with a whisk until a silky smooth ganache is formed.

Pour the ganache into the chilled tart cases and place into the fridge until the ganache has set, a couple hours. 

Serve with a little vegan whipped cream or sour cream if you're not vegan.

Kept refrigerated these will keep for 3-4 days.

*you can you use any plant based milk for this recipe but I like using an almond or coconut version as both have flavours that can compliment chocolate.

In Chocolate, Dessert Tags no bake, tarts, granola, ganache, vegan baking, vegan
1 Comment
black cocoa pb cookies-1.jpg

Black Cocoa Peanut Sandwich Cookies

Edd Kimber May 24, 2021

These cookies are so ridiculously simple and so delicious. The cookie element is based around my melting moment recipe, a melt in the mouth, incredibly tender cookie. I use black cocoa but you can also use a regular dutched cocoa powder if thats what you have on hand. The balls of cookie dough are rolled in salted peanuts and pressed into flat discs and then baked. The filling is a simple white chocolate ganache mixed with peanut butter. Its the sort of cookie you want mid morning with a strong cup of coffee. 

Before we get to the recipe lets talk about cocoa powder for a second. Cocoa powder comes from the cocoa pods and specifically the beans inside those pods, so far so obvious. The beans are fermented and then dried. Generally they are then roasted (unless the product is destined to be used for ‘raw’ chocolate or cocoa powder but I wont be talking about that process here). The beans are then cracked open and the nibs are ground into what is called cocoa liquor and then, using a hydraulic press, the liquor is pressed under great pressure to extract most of the cocoa butter leaving behind a product known as a cocoa cake. This cake is dried once again and then ground into cocoa powder. 

Why then is there such a variety in cocoa powders, what is the difference between natural, dutched and black? Natural is the cocoa powder made as above with no additional processing, it is a light almost dusty brown colour and is bright and acidic in flavour. Dutched cocoa goes through an alkalisation process which lessens the acidity and makes a deeper richer tasting cocoa powder with a darker colour. In the UK and Europe this is traditionally the main type of cocoa powder available although natural and raw cocoa have become more popular over the last few years. Black cocoa, with its characteristic charcoal black colour, is a variation of dutched cocoa powder, the process of alkalisation taken to its limit to make an intensely dark and slightly bitter cocoa powder, if you’ve ever eaten an oreo you’ve had black cocoa. I like black cocoa for its colour and its flavour but its not suitable for everything, the flavour isn’t a pronounced chocolate flavour its much more roasted than that so if you want classic chocolate flavours I would a traditional dutched powder.

Whenever I use black cocoa I am always asked where to buy it as in the UK it is a relatively unknown product, at least until recently. I would always bring some home from the US when there on holiday or for work, King Arthur Baking sell my go-to version. Someone imports that brand into the UK but it is criminally expensive so I am thankful that a few new brands have sprung up to make it easier, and cheaper, to buy. Van Houten was the first brand more widely available, selling on Amazon, but I am yet to test this brand out. When I buy the cocoa myself I get it from De Zaan, a commercial cocoa powder producer that have recently started selling in a more direct to customer facing way. You can find there cocoa powder on Amazon and on from HB ingredients. 

Before we get to the recipe a brief note on peanut butter. When baking with peanut butter you need to be careful about what style you use. Generally you want to be using a commercial peanut butter and this is for the simple reason that it is less likely to split creating odd textures in the finished recipes. By all means you can use a natural peanut butter but be aware the result might not look like you envisioned or like the images of the recipe. 

Black Cocoa Peanut Melting Moments with Peanut Butter Ganache
Makes 15 Sandwich Cookies

Cocoa Melting Moments
250g unsalted butter, room temperature
1/2 tsp vanilla extract
200g plain flour
60g black cocoa powder
85g icing sugar
30g cornflour
175g salted peanuts, roughly chopped

Peanut Butter Ganache
100ml double cream
125g white chocolate
75g smooth peanut butter 

Preheat the oven to 160ºC (140ºC Fan) and line a couple baking sheets with parchment paper.

For the cookies place the butter into a large bowl and use an electric mixer to beat until soft and creamy. Add the vanilla and beat briefly to combine. In a separate bowl whisk together the flour, cocoa, icing sugar and cornflour. Add the flour mixture to thee butter mixture and mix on slow speed just until a dough is formed. 

Divide the dough into 20g portions and roll them into balls. Roll the balls in the chopped peanuts, your not looking to fully coat the balls just get a decent amount of peanuts on each cookie. Place the balls onto parchment lined baking trays leaving a little space between each cookie. Using a glass or measuring cup press each ball into a flat disc. Spraying the glass with a little oil can help prevent them sticking. 

black cocoa pb cookies-1-2.jpg

Bake the cookies in the preheated oven for about 20-25 minutes or until the edges are set and dry.

Remove the trays from the oven and allow the cookies to cool fully. 

To make the ganache place the chocolate and cream into a small saucepan and place over low heat. Stir constantly, making sure to scrape the bottom of the pan to prevent anything from scorching, until the chocolate has melted. Pour the ganache into a small bowl and stir to make sure everything is combined. Set aside for 10 minutes before adding the peanut butter and using a small whisk to combine into the ganache. The ganache needs to be a little cool before adding the peanut butter as the heat can make the mixture split. Refrigerate the ganache until thickened enough to hold its shape but still spreadable, 60-90 minutes. Pipe or spread a small amount of ganache onto half of the cookies and sandwich together with a second cookie. Refrigerate for 30 minutes or until the ganache has fully set. 

Kept in a sealed container these will keep for 3-4 days.

In Biscuits and Cookies, Chocolate Tags black cocoa, melting moments, sandwich cookies, ganache, white chocolate, peanut butter, peanuts, easy, easy baking
4 Comments
chocoalte caramel tart.jpg

Peanut Butter and Pretzel Caramel Tart

Edd Kimber August 6, 2019

I am currently working away on a project that I am super excited about but it is taking up a lot of my time so I am currently going through my archive to find recipes to share with you guys, to tie you over until the project is finished. Whilst looking for recipes I remembered this tart that I never got around to sharing. It was initially included in a pitch for a big piece of work I wanted to do around chocolate that ended up never getting a green light and sadly I forgot about it. Sadly because seeing the pictures reminded me just how wonderful this dish is. So enjoy it, finally!

Sweet and salty isn’t unusual these days, it’s to be expected. We all now generally understand that just like savoury food sweet things need seasoning and with ingredients like chocolate and caramel sometimes a little salt can help to enhance and highlight flavour whilst balancing the sweetness. This simple tart takes this idea and dials it up to eleven. The crust uses a simple biscuit style base, think the type of base you’d make for a cheesecake. The difference though is egg white. I love the texture of biscuit bases but find them a little tricky when you want nice neat slices, they’re just two crumbly. The addition of an egg white helps to bind the mixture together and makes it a lot easier to work with. Peanut butter and chocolate are a classic combo and anyone who’s ever opened a pack of peanut butter cups will know, a dangerously addictive one at that. The ganache used in this tart is made with a mixture of dark and milk chocolates, milk for the creamy sweetness that goes wonderfully with peanut butter but dark chocolate from preventing the tart from being too sweet.

chocoalte caramel tart-3.jpg


Serves 12

Peanut Pretzel Biscuit Base
50g salted peanuts
100g salted pretzels
75g digestive biscuits (or graham crackers)
100g unsalted butter, melted
1 tbsp light brown sugar
1 large egg white

Peanut Butter Caramel
225g caster sugar
180ml double cream
20g unsalted butter
1/2 tsp salt
2 heaped tbsp smooth peanut butter

Ganache Topping
140g dark chocolate, 65%-75% cocoa solids, finely chopped
140g milk chocolate, 40%-50% cocoa solids, finely chopped
20g unsalted butter
150ml double cream

For the biscuit base finely crush the peanuts, pretzels and digestives into a fine crumb then mix together with the butter, brown sugar and the egg white. Press into a loose bottomed 9 inch round tart tin, using your hands or a flat bottomed glass to compact into the base and up the sides of the pan. Bake in an oven preheated to 180C (160C fan) for about 10-12 minutes just until the biscuit base is set and starting to brown slightly. Remove from the oven and set aside to cool.

To make the caramel filling place the sugar into a medium sized saucepan and cook over medium heat until the sugar has melted and caramelised, turning the colour of an old rusty penny. Carefully pour in the cream, stirring gently until the caramel is smooth then add the butter and salt and mix until combined. Remove from the heat and allow to cool down for 10 minutes before stirring in the peanut butter. Pour the caramel into the cooled tart, spreading into an even layer. Refrigerate for an hour or so until the caramel is firm.

Meanwhile place the chocolates for the ganache into a heatproof bowl, set over a pan of simmering water and heat, stirring occasionally, until the chocolate is fully melted. Place the butter and cream into a small saucepan and bring to a simmer. Remove the pan from the heat and pour the cream over the chocolate and set aside for a couple minutes before stirring to form the ganache. Set the bowl aside until the ganache has thickened into the consistency of whipped cream. Dollop the ganache onto the tart and spread out, almost to the edges. Set aside at room temperature for a couple hours to allow the ganache to fully set. When ready to serve sprinkle the ganache with a little flaked sea salt.

Best served on the day made but can be refrigerated for up to 4 days just allow to come to room temperature before serving.

chocoalte caramel tart-2.jpg
In Pastry, Chocolate Tags peanut butter, caramel, pretzel, press in crust, salted caramel, chocolate, ganache, tart
6 Comments

Twitter

  • Was 8 original films, 3 spin off films, a two part play not enough. Can we have something new. https://t.co/cBZdGEGeyv
    Apr 4, 2023, 1:46 PM
  • RT @deliciousmag: Cacio e pepe, but make it buns! These seriously cheesy bread rolls from @TheBoyWhoBakes are inspired by his favouri… https://t.co/oDZlaDgnN2
    Apr 2, 2023, 11:08 AM
  • RT @TheDailyShow: Congrats to Donald Trump on finally winning a majority of votes! https://t.co/ezP55HZgl0
    Mar 31, 2023, 12:43 AM

Instagram

This weeks bonus recipe, for subscribers to my newsletter, is this gorgeous sour cherry and coconut gateau basque. The crust is a buttery cross between pastry and cake, think a cakey cookie. The filling is a layer of sour cherry topped with a rich coconut custard. A real fun one to make too! Link to my newsletter can be found in my bio - #gateaubasque #pastrycream #coconut #sourcherry
In this months @olivemagazine (out today) the team came and photographed my petit kitchen and we talked about how we put our stamp on the place, without spending a fortune. We hated the bland kitchen that we inherited but, as it was relatively new an
In this months @olivemagazine (out today) the team came and photographed my petit kitchen and we talked about how we put our stamp on the place, without spending a fortune. We hated the bland kitchen that we inherited but, as it was relatively new and in good condition, it felt a waste to rip it out and we also didn’t want to spend the money it would take to rip out the whole thing and replace it (it’s a howdens shell so we could have done something cheaper like @plykeakitchens @holte.studio @madebyhusk) so instead I painted all of the cabinets, using @makeitrustoleum kitchen cabinet paint, to give it some personality and lighten the whole thing. Check out the magazine for the full run down. - #kitchendesign #kitchenremodel #rustoleumcabinettransformations #rustoleumkitchencupboardpaint #kitcheninspiration #theboywhobakes #olivemagazine
Are you making scones all wrong? Maybe, maybe not? But I do want to show you how I make them! This recipe is based on the method I learnt at @belmondlemanoir 12 years ago when I did a stage, and it makes the absolute lightest scones. And shock horror, it involves kneading the dough, albeit very lightly. You can get the full recipe in this weeks newsletter (free) linked in my bio. - #scones #bakingday #worldbakingday #afternoontea #hightea #englishscones #clottedcream #creamtea #theboywhobakes
facebook
  • Contact

The Boy Who Bakes

Edd Kimber

facebook