The Boy Who Bakes

Edd Kimber
  • Home
  • Recipes
  • My Books
  • Blog
  • Recipe Index
  • About
  • Home
  • Recipes
  • My Books
  • Blog
  • Recipe Index
  • About

Recipes

  • All
  • baking
  • Biscuits and Cookies
  • Breads and Quickbreads
  • Bundts
  • Cakes
  • Chocolate
  • Dessert
  • drinks
  • Holidays
  • Pastry
  • Scones and Quickbreads

Oatnog aka Vegan Eggnog

Edd Kimber December 9, 2022

This post is sponsored by Wilfa

Are we in the festive spirit yet? I think I’m getting there. It definitely helps that everything I have been making the past couple weeks are decidedly festive. It also helps that I was in central London a few times this week and there is nothing like a wander through the city, taking in the lights and all the decorations, to get you in the spirit. Talking of the festive spirit I have a literal festive spirit recipe for you, a vegan take on eggnog, or Oatnog as it really should be called. Made with homemade oat and cashew milk and flavoured with cinnamon, nutmeg and of course lots of rum, it’s a truly delicious alternative to the classic dairy based drink. The drink, straight out of the bottle, is lighter than classic versions as it’s missing the richness the cream and eggs bring. I don’t mind this, as I enjoy the flavour but can normally only drink one small glass due to the richness, obviously not an issue with this version. If you miss the body of a slightly richer drink you can actually shake this with a little aquafaba. To make the oat/cashew milk I used my Wilfa Powerfuel XL blender which is incredibly powerful and broke down the nuts and oats in seconds. To ensure the milk doesn’t have a slimy texture you want to blend for shorter than you’d imagine, 20-30 seconds works well. This is shorter than other recipes might suggest but that’s simply because the Wilfa Powerfuel XL will break down the oats much quicker than other blenders. This is because the blender has a very powerful 2000 watt motor which makes the blades turn 32000 times a minute at full speed

When you’ve made the oatnog it will keep in the fridge for about 5 days but as it is homemade and doesn’t include any emulsifiers it will split as it sits, but don’t worry simply shake it before you serve it and you’ll have a delicious creamy oatnog once again.

To get 20% off the Wilfa Powerfuel XL or any other Wilfa products in my collection make sure you use the code THEBOYWHOBAKES.

Oatnog (aka Vegan Eggnog)
100g raw cashews
100g traditional rolled oats
75ml maple syrup
2 tsp ground cinnamon
1 tsp freshly grated nutmeg
1 tsp vanilla bean paste
1/4 tsp fine sea salt
750ml water
150ml dark rum

To make the oatnog first soak the cashews in cold water for a couple hours.

Drain the cashews and add the nuts, oats, maple syrup, spices, vanilla, salt and water to the jug of the Wilfa Powerfuel XL blender. Pop the lid on the blender and process for about 20-30 seconds until smooth. Over blending the mixture at this point can make for slightly slimy oat milk so don’t overdo it. Pour the milk mixture into a nut milk bag (or use a very fine cheesecloth) and allow the milk to strain through, adding gentle pressure to extract as much milk as possible. Don’t squeeze the mixture too hard or more of the starch will be extracted into the milk. Discard the sediment left behind.

Stir in the rum and then decant into a bottle. Pop in the fridge and stir for up to 5 days. To serve pour into a glass filled with ice and top with a fresh dusting of grated nutmeg.

In Holidays Tags oatnog, eggnog, christmas, cocktail, vegan, oatmilk, cashew milk, maple syrup, wilfa
Comment

Maple Chiffon Cake

Edd Kimber July 22, 2022

Lets talk sponge cake. Not in the way that cakes are often generically referred to as a sponge (Victoria I am looking at you!), but actual sponge cake. By that I mean cakes which are traditionally leavened solely through the whisking of eggs (either whole or egg whites), and now in modern times with a little help from a chemical leavener too This would include Angel Food Cake, Swiss Roll, Jaconde and of course Genoise, probably the most well known sponge. But today I want to talk about one of my personal favourite sponge cakes to make, the chiffon. Chiffon cakes are defined as a sponge cake made with whole eggs and for the fat a little oil, they are also traditionally baked in tube pans although they do not need to be. It differs from, the very similar, angel food cake because the latter is made only with egg whites and made without any additional fat. I have a strong preference for chiffon because the oil and egg yolks add fat, making for a moister cake. I also like that once you’ve learnt to make a chiffon batter you can also use the cake for all manner of recipes. The sponge can be used as a roll cake, a layer cake, a sheet cake or of course, as is traditional, baked into a tube pan. The lightness of the cake means this style works great for summer recipes, when butter-rich cakes may not be the thing you are craving.

This particular chiffon recipe is inspired by a trip to Japan my boyfriend and I took about 5 years ago. If you’ve ever visited Japan you’ll likely know that in the basement of most department store you’ll find incredible food halls. The fancier department stores have high end French patisseries and Japanese chocolatiers and fine Spanish Jamon purveyors but even the more everyday department stores have the most incredible offerings. In one of the many Tokyo depāto’s, we were offered a small sample of a very plain looking cake, no frosting, no decoration, just very plain looking sponge. The flavour belied the look however, as it had the most intense maple flavour. It was incredible and I was sorely tempted to buy the entire cake right there and then, but my brain had more sense than my stomach and I very sadly passed up on the opportunity. The idea and flavour has stuck with me all these years and this was my first attempt at recreating it. I will offer this caveat before we get started, I do not know quite how they got such a strong flavour from maple without using artificial extracts and as I don’t ever have maple extract on hand my version has a more gentle maple flavour but it’s a delightful cake nonetheless. To get as much maple flavour into the cake as possible I used both maple syrup and maple sugar. Maple sugar is a granulated sugar maple from early season maple syrup, and because it’s early season syrup the flavour is more mild. Because of this, if you don’t want to go to the expense of buying this type of sugar you can replace it with either white sugar, golden sugar or a light brown version, the choice is yours.

To serve I like to cut a wedge of the cake and serve it alongside whipped cream and roasted strawberries, making a light but wonderfully flavourful summer dessert. Because the cake is low in fat you want to make sure it is always covered because once sliced it can dry out quickly.

Maple Chiffon Cake
Serves 12-15

8 large eggs, separated
65g maple sugar (or alternatives, see above)
3/4 tsp fine sea salt
1 tsp vanilla bean paste
120ml whole milk
2 1/2 tbsp maple syrup
80ml vegetable oil
135g plain flour
1/2 tsp cream of tartar
90g maple sugar

Preheat the oven to 170ºC (150ºC Fan).

Add the egg yolks, maple sugar, salt and vanilla to a large bowl and using an electric mixer whisk on high speed for about 3-5 minutes or until light and pale. Continue whisking on low speed whilst you pour in the milk, maple syrup and the oil. Once fully combined sieve in the flour and mix together until you have a smooth batter.

Clean the whisk from your mixer and make sure the bowl is spotlessly clean. Add the egg whites and the cream or tartar to the mixer bowl and whisk on medium/high speed until the mixture has started to form a dense looking foam. With the mixer still running slowly pour in the second amount of maple sugar, a little at a time. Once all of the sugar has been added, continue whisking until the meringue holds medium peaks. The meringue should be glossy but not dry, it still needs to have a little fluidity otherwise it can be hard to combine into the batter without losing lots of volume.

Add a quarter of the egg whites to the egg yolk batter and use a balloon whisk to fold the two mixtures together. I like to use a balloon whisk for this task as it the most effective tool for folding these two batters together without overly deflating the meringue. Repeat this process, adding a quarter of the meringue at a time. Once all of the meringue has been added and the batter is streak free it is ready to be baked.

Pour the batter into a 10-inch two-piece tube pan. It is important that the pan is made of two parts, the outer tin and the base with the central column. If you have a tube pan without a removable base it is close to impossible to remove the cake. It is also important that the pan not be greased or lined with parchments as to allow the cake to rise to its full potential it needs to cling to the sides of the tin so it can hold itself up. Once the batter is in the pan gently level it out and then give the pan a few firm taps on the worksurface to knock out any large airpockets. To further ensure the cake batter is free of air pockets I like to swirl a skewer through the batter a couple times to make sure the batter is smooth.

Bake in the preheated oven for about 60 minutes or until a skewer inserted in the cake comes out clean and the cake springs back to a light touch. Remove the cake from the oven and invert the cake upside down. This will sound peculiar if you’ve never done it but trust me, it helps to retain the shape and height of the cake. Most tube pans have feet around the edge of the pan to elevate it when the cake is cooling upside down but, if yours does not and the central tube is similarly level to the height of the pan, you can simply invert the cake so the tube sits atop a wine bottle as it cools.

After an hour the cake should be full cool and you can remove it from the pan. To do so you need to run a thin flat knife or palette knife around the outside of the cake to separate the sponge from the pan. You can then push the base with the cake attached out from the pan and use the knife to repeat the process for the base of the cake. Invert the cake onto a serving platter and serve as you wish. It can be served simply with a dusting of icing sugar or, as I prefer, with a dollop of whipped cream and some oven roasted strawberries.

The cake is best within a couple days of baking.

Tags mpale, maple, maple syrup, maple sugar, chiffon cake, chiffon, tube pan, sponge cake, japanese, japan
3 Comments

Maple Baked Pears with Granola Crumb

Edd Kimber April 28, 2022

Sponsored by Lizi’s Granola

Do you need an idea for a super quick and easy dessert for when anything more involved sends you running from the kitchen? Well today I have just that recipe. The prep time is super quick, you can be curled up on the sofa with in a couple minutes with dessert taking care of itself in the kitchen. 

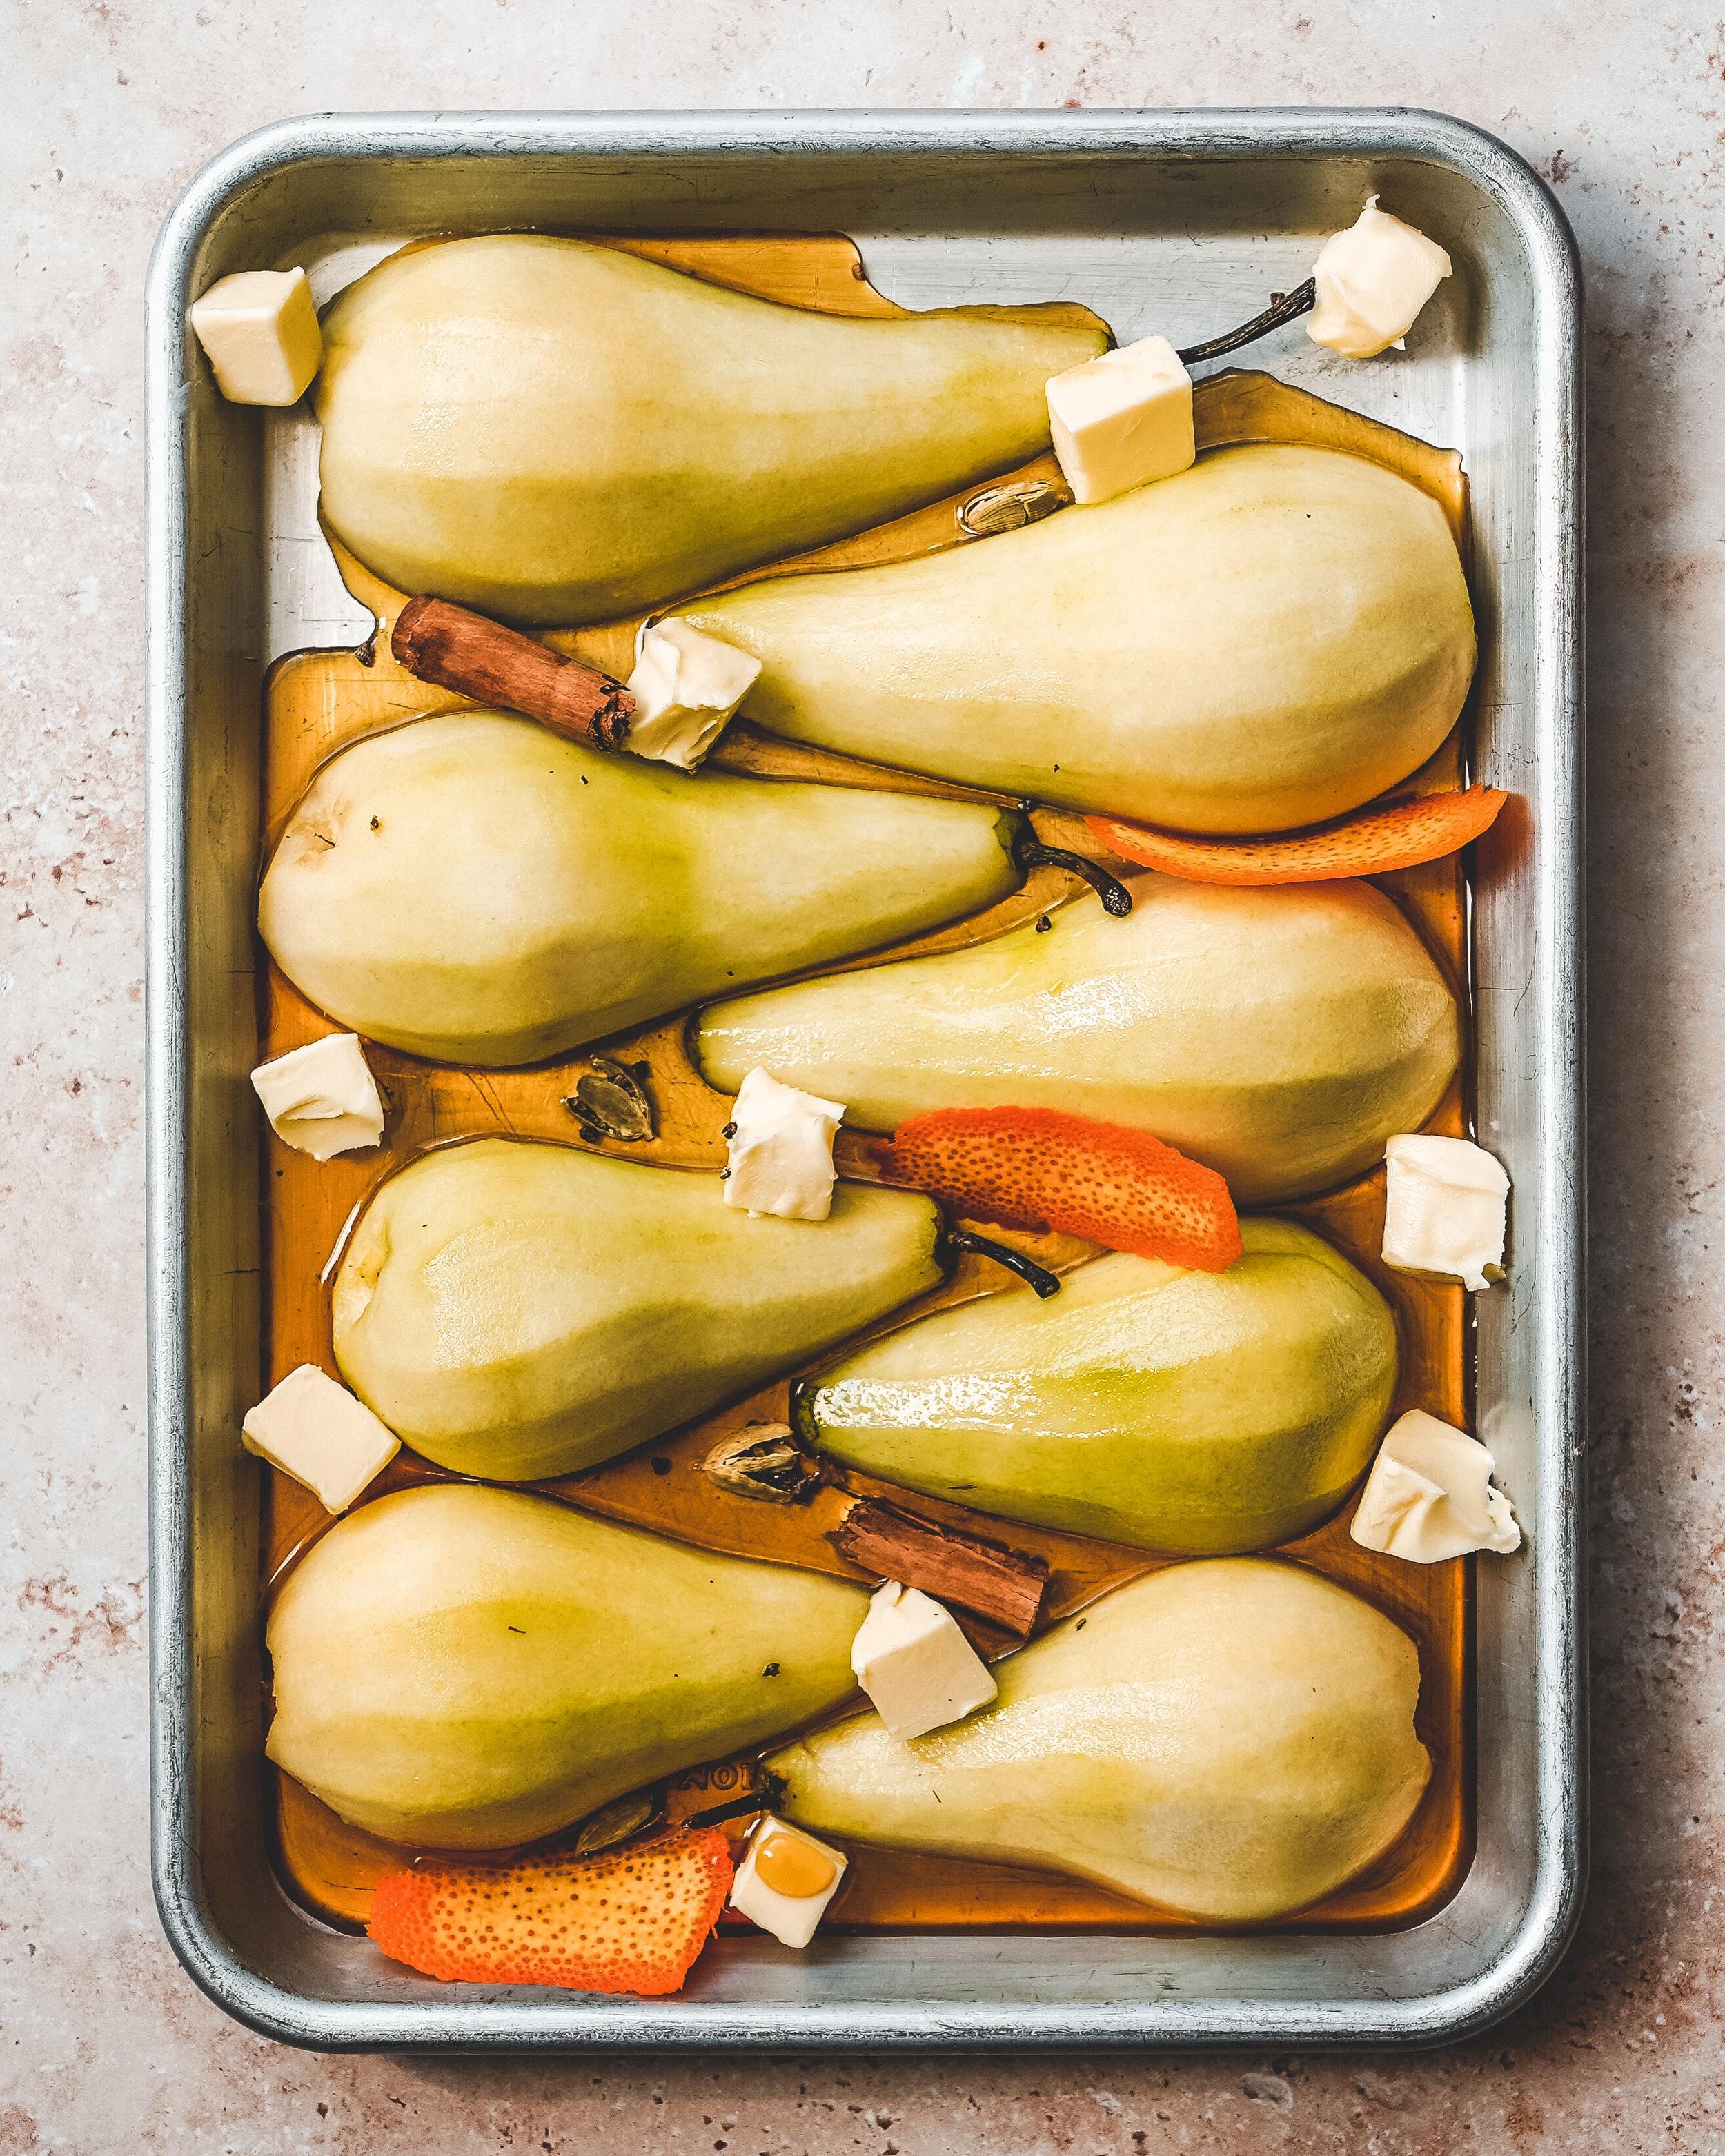
If you had a childhood at all similar to me, then baked apples were a regular dessert, served hot from the oven with lots of thick custard. Cored apples were filled with dried fruit and baked until squishy, almost to the point of collapsing. At the time I found the dessert boring but now something simple like this is pure comfort for me. For this version I have opted for pears and I don’t roast them for so long that they are devoid of texture, I like them tender but not so soft they could be baby food. And talking of texture, to add an extra layer of crunch and an extra layer of flavour, I like to serve these pears with a scattering of Lizi’s High Protein Nuts and Seeds Granola. The granola adds a ton of interest to a very simple dessert and makes it something a little fancier. This particular granola is made with pumpkin seeds, walnuts and almonds and sweetened with a mix of apple juice and black treacle for a wonderful flavour that goes brilliant on this dessert. To roast the pears I like to use maple syrup and butter plus a little spice in the form of cardamom, cinnamon and orange zest. Whilst these flavours are a little autumnal you can adapt them to suit whatever you are fancying in the moment. You can also make similar desserts with summer fruits like peaches and plums, serving it with a little drizzle of double cream or a dollop of creme fraiche.

Maple Baked Pears with Granola Crumb
Serves 4

4 large pears, ripe but a little firm
100ml maple syrup
50g unsalted butter, diced
4 cardamom pods
1 cinnamon stick
3 strips orange zest
50g Lizi’s High Protein Nuts and Seeds Granola

Preheat the oven to 190C (170C fan).

Peel the pears, cut in half and then scoop out the cores. Into a rimmed baking tray pour the maple syrup and place the pears, cut side down, into the tray. Add the diced butter to the tray and scatter over the cardamom pods, the cinnamon stick and orange zest. 

Bake the pears in the oven for about 25 minutes or until tender, turning the pears halfway through cooking. To test the pears are cooked, pierce with a knife, they should present almost no resistance. By the time the pears are cooked the maple syrup and butter should have formed a syrupy sauce. 

To serve place two pear halves into a bowl scatter over a couple tbsp of the granola and a generous drizzle of the sauce. Serve with a dollop of creme fraiche or sour cream

In Dessert Tags pears, baked pears, maple syrup, maple, granola, Lizi's granola, dessert, easy dessert
Comment

Twitter

  • Was 8 original films, 3 spin off films, a two part play not enough. Can we have something new. https://t.co/cBZdGEGeyv
    Apr 4, 2023, 1:46 PM
  • RT @deliciousmag: Cacio e pepe, but make it buns! These seriously cheesy bread rolls from @TheBoyWhoBakes are inspired by his favouri… https://t.co/oDZlaDgnN2
    Apr 2, 2023, 11:08 AM
  • RT @TheDailyShow: Congrats to Donald Trump on finally winning a majority of votes! https://t.co/ezP55HZgl0
    Mar 31, 2023, 12:43 AM

Instagram

This weeks bonus recipe, for subscribers to my newsletter, is this gorgeous sour cherry and coconut gateau basque. The crust is a buttery cross between pastry and cake, think a cakey cookie. The filling is a layer of sour cherry topped with a rich coconut custard. A real fun one to make too! Link to my newsletter can be found in my bio - #gateaubasque #pastrycream #coconut #sourcherry
In this months @olivemagazine (out today) the team came and photographed my petit kitchen and we talked about how we put our stamp on the place, without spending a fortune. We hated the bland kitchen that we inherited but, as it was relatively new an
In this months @olivemagazine (out today) the team came and photographed my petit kitchen and we talked about how we put our stamp on the place, without spending a fortune. We hated the bland kitchen that we inherited but, as it was relatively new and in good condition, it felt a waste to rip it out and we also didn’t want to spend the money it would take to rip out the whole thing and replace it (it’s a howdens shell so we could have done something cheaper like @plykeakitchens @holte.studio @madebyhusk) so instead I painted all of the cabinets, using @makeitrustoleum kitchen cabinet paint, to give it some personality and lighten the whole thing. Check out the magazine for the full run down. - #kitchendesign #kitchenremodel #rustoleumcabinettransformations #rustoleumkitchencupboardpaint #kitcheninspiration #theboywhobakes #olivemagazine
Are you making scones all wrong? Maybe, maybe not? But I do want to show you how I make them! This recipe is based on the method I learnt at @belmondlemanoir 12 years ago when I did a stage, and it makes the absolute lightest scones. And shock horror, it involves kneading the dough, albeit very lightly. You can get the full recipe in this weeks newsletter (free) linked in my bio. - #scones #bakingday #worldbakingday #afternoontea #hightea #englishscones #clottedcream #creamtea #theboywhobakes
facebook
  • Contact

The Boy Who Bakes

Edd Kimber

facebook