The Boy Who Bakes

Edd Kimber
  • Home
  • Recipes
  • My Books
  • Blog
  • Recipe Index
  • About
  • Home
  • Recipes
  • My Books
  • Blog
  • Recipe Index
  • About

Recipes

  • All
  • baking
  • Biscuits and Cookies
  • Breads and Quickbreads
  • Bundts
  • Cakes
  • Chocolate
  • Dessert
  • drinks
  • Holidays
  • Pastry
  • Scones and Quickbreads

Sourdough Focaccia

Edd Kimber July 19, 2021

I have something shameful to admit. I abandoned my sourdough starter in the back of the fridge for months, forgotten and neglected. After languishing in the fridge for so long I wondered if it could have possibly survived or if could be revived. I am a firm believer that once your starter is properly established it becomes pretty hardy and almost indestructible. Pulling it from the fridge there was a thick dark layer of hooch and underneath was a very thick floury paste, it did not look healthy and it didn’t smell healthy either. I poured off the hooch and discarded all but a tablespoon of the starter that remained. From their I fed the starter as you would normally with a 50/50 mix of flour and water, leaving a day between feeds, and after three days of feeding the starter was back with a bang, it was tripling with each feed. I have made a bunch of focaccia since then and it feels safe to say that this proves even the most neglected starter can be brought back from the brink of death.

The reason I made focaccia instead of traditional country style loaf was a little laziness and a little wanting something different. Most sourdough I make is made with a no knead method, utilising stretch and folds instead of kneading but with focaccia its even easier as there isn’t really any shaping, it really is the easiest sourdough bread. 

A word advice on the pan you use for this bread, make sure it is either very good quality non stick or make sure you line it with parchment, there is nothing worse than your hard work becoming lodged in the pan.

Sourdough Focaccia
500g strong white bread flour
425ml water (25-27ºC)
150g sourdough starter (100% hydration and its peak)
10g salt
Olive oil, lots of it

Toppings
Flaked sea salt
2-3 sprigs fresh rosemary, roughly chopped

To make the focaccia dough pour the water, reserving 25ml for later, into a large bowl and scrape in the starter, mixing briefly to dissolve it into the water. Pour in the flour and use your hands to form a shaggy dough. At this stage you are not looking to knead the dough, simply ensuring all the flour is hydrated. To do this I start by stirring with my hand and when it starts to form a more uniform mass I squeeze the dough between my fingers, doing so until it feels like there is no dry spots. Cover the bowl and set aside for about 30 minutes. At this stage, and until the dough goes into the fridge, I like to keep the dough somewhere warm which helps with the fermentation of the dough.

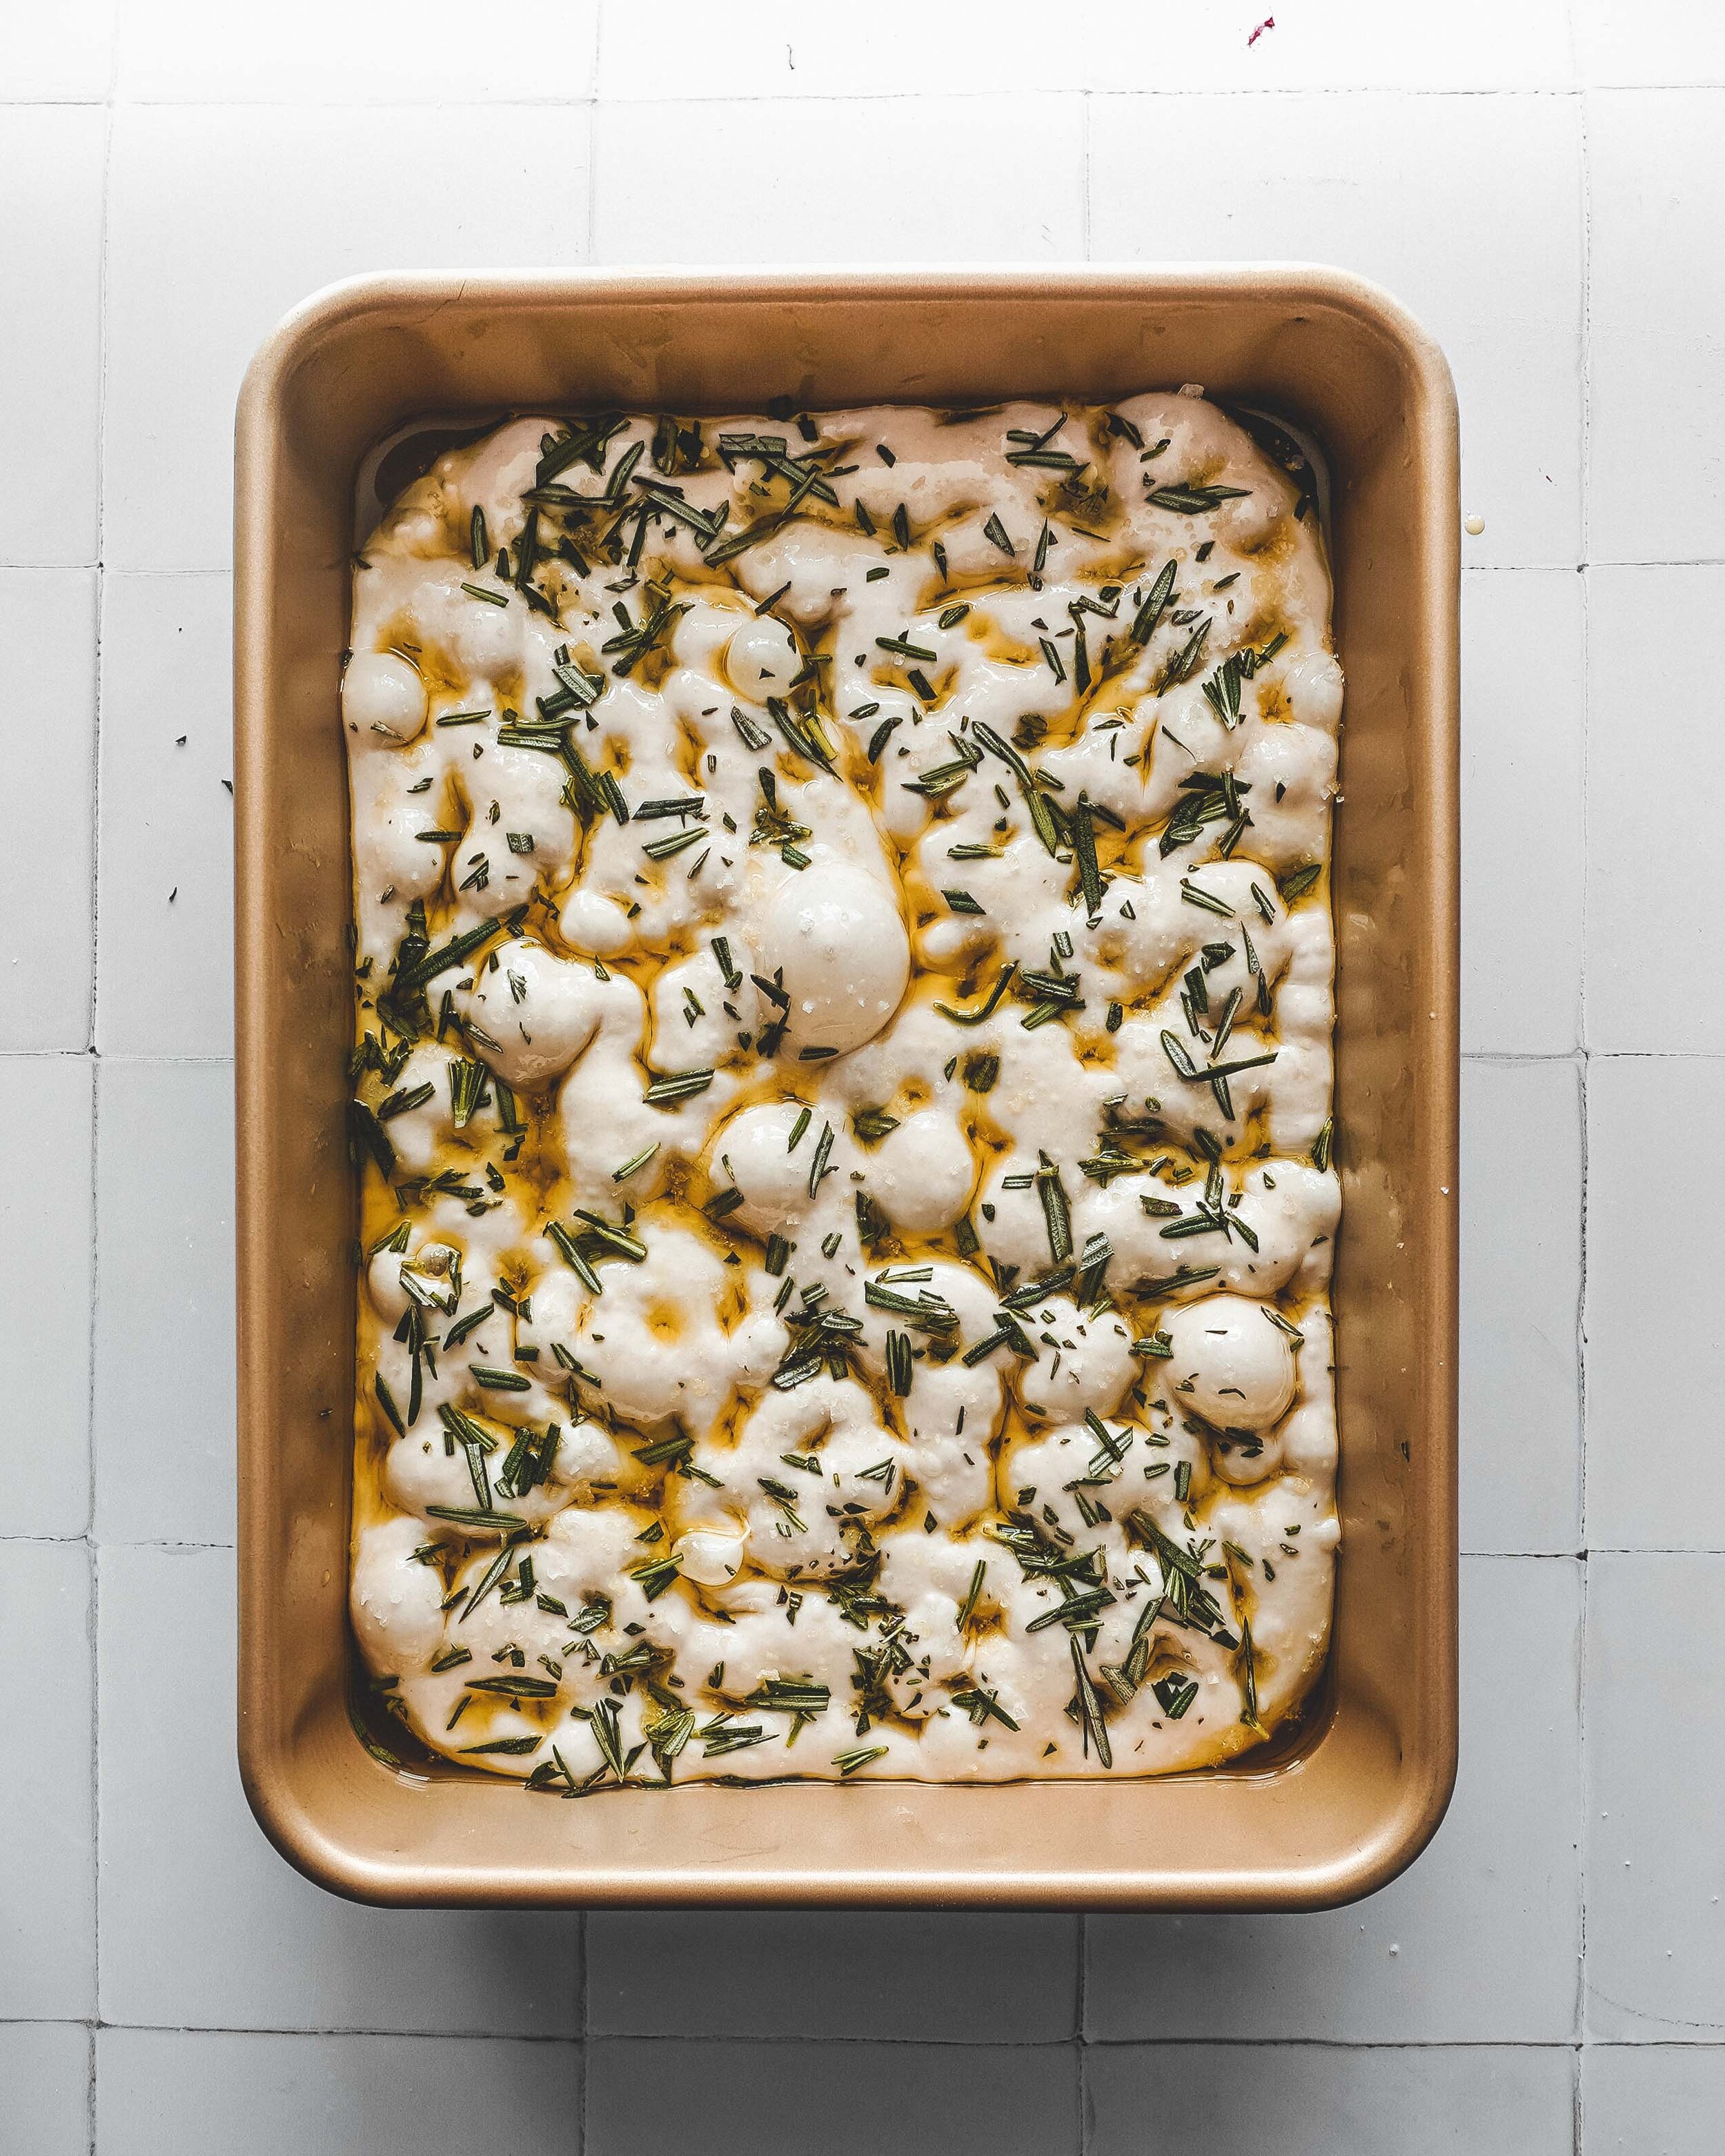
Sprinkle the salt on top of the dough and pour over the last 25ml water. Dimple the dough, squeeze it through your fingers, fold it over on itself, generally working the dough until the water and salt have been combined. During this process the dough can look separated but just keep working it until it comes back into a uniform mass. Cover and rest again for 30 minutes. 

After 30 minutes we now do our first set of stretch and folds, which is our alternative to kneading and builds strength into the dough. Using a wet hand go under the dough pull a portion and then stretch it up and over the dough, repeating this four times around the bowl. Cover and rest for 30 minutes, repeating this process 3 more times. At this stage I then leave the dough for about 1-2 hours until the dough has risen around 40-50% and the dough is showing signs of fermentation. The dough should have a jiggle and have lots of bubbles on the surface of the dough. Grease a non-stick 9x13 pan (or a traditional 9x13 pan lined with parchment paper) with 3 tablespoons of extra virgin olive oil. Carefully transfer the dough to the tin and top with a little oil to prevent it drying out. Cover the pan and refrigerate for 18-24 hours. 

To bake the focaccia the dough needs brining back to room temperature so remove the tin from the fridge and let it rest for 1-3 hours or until the dough has a jiggle to it. When almost ready preheat the oven to 240ºC (220ºC Fan)

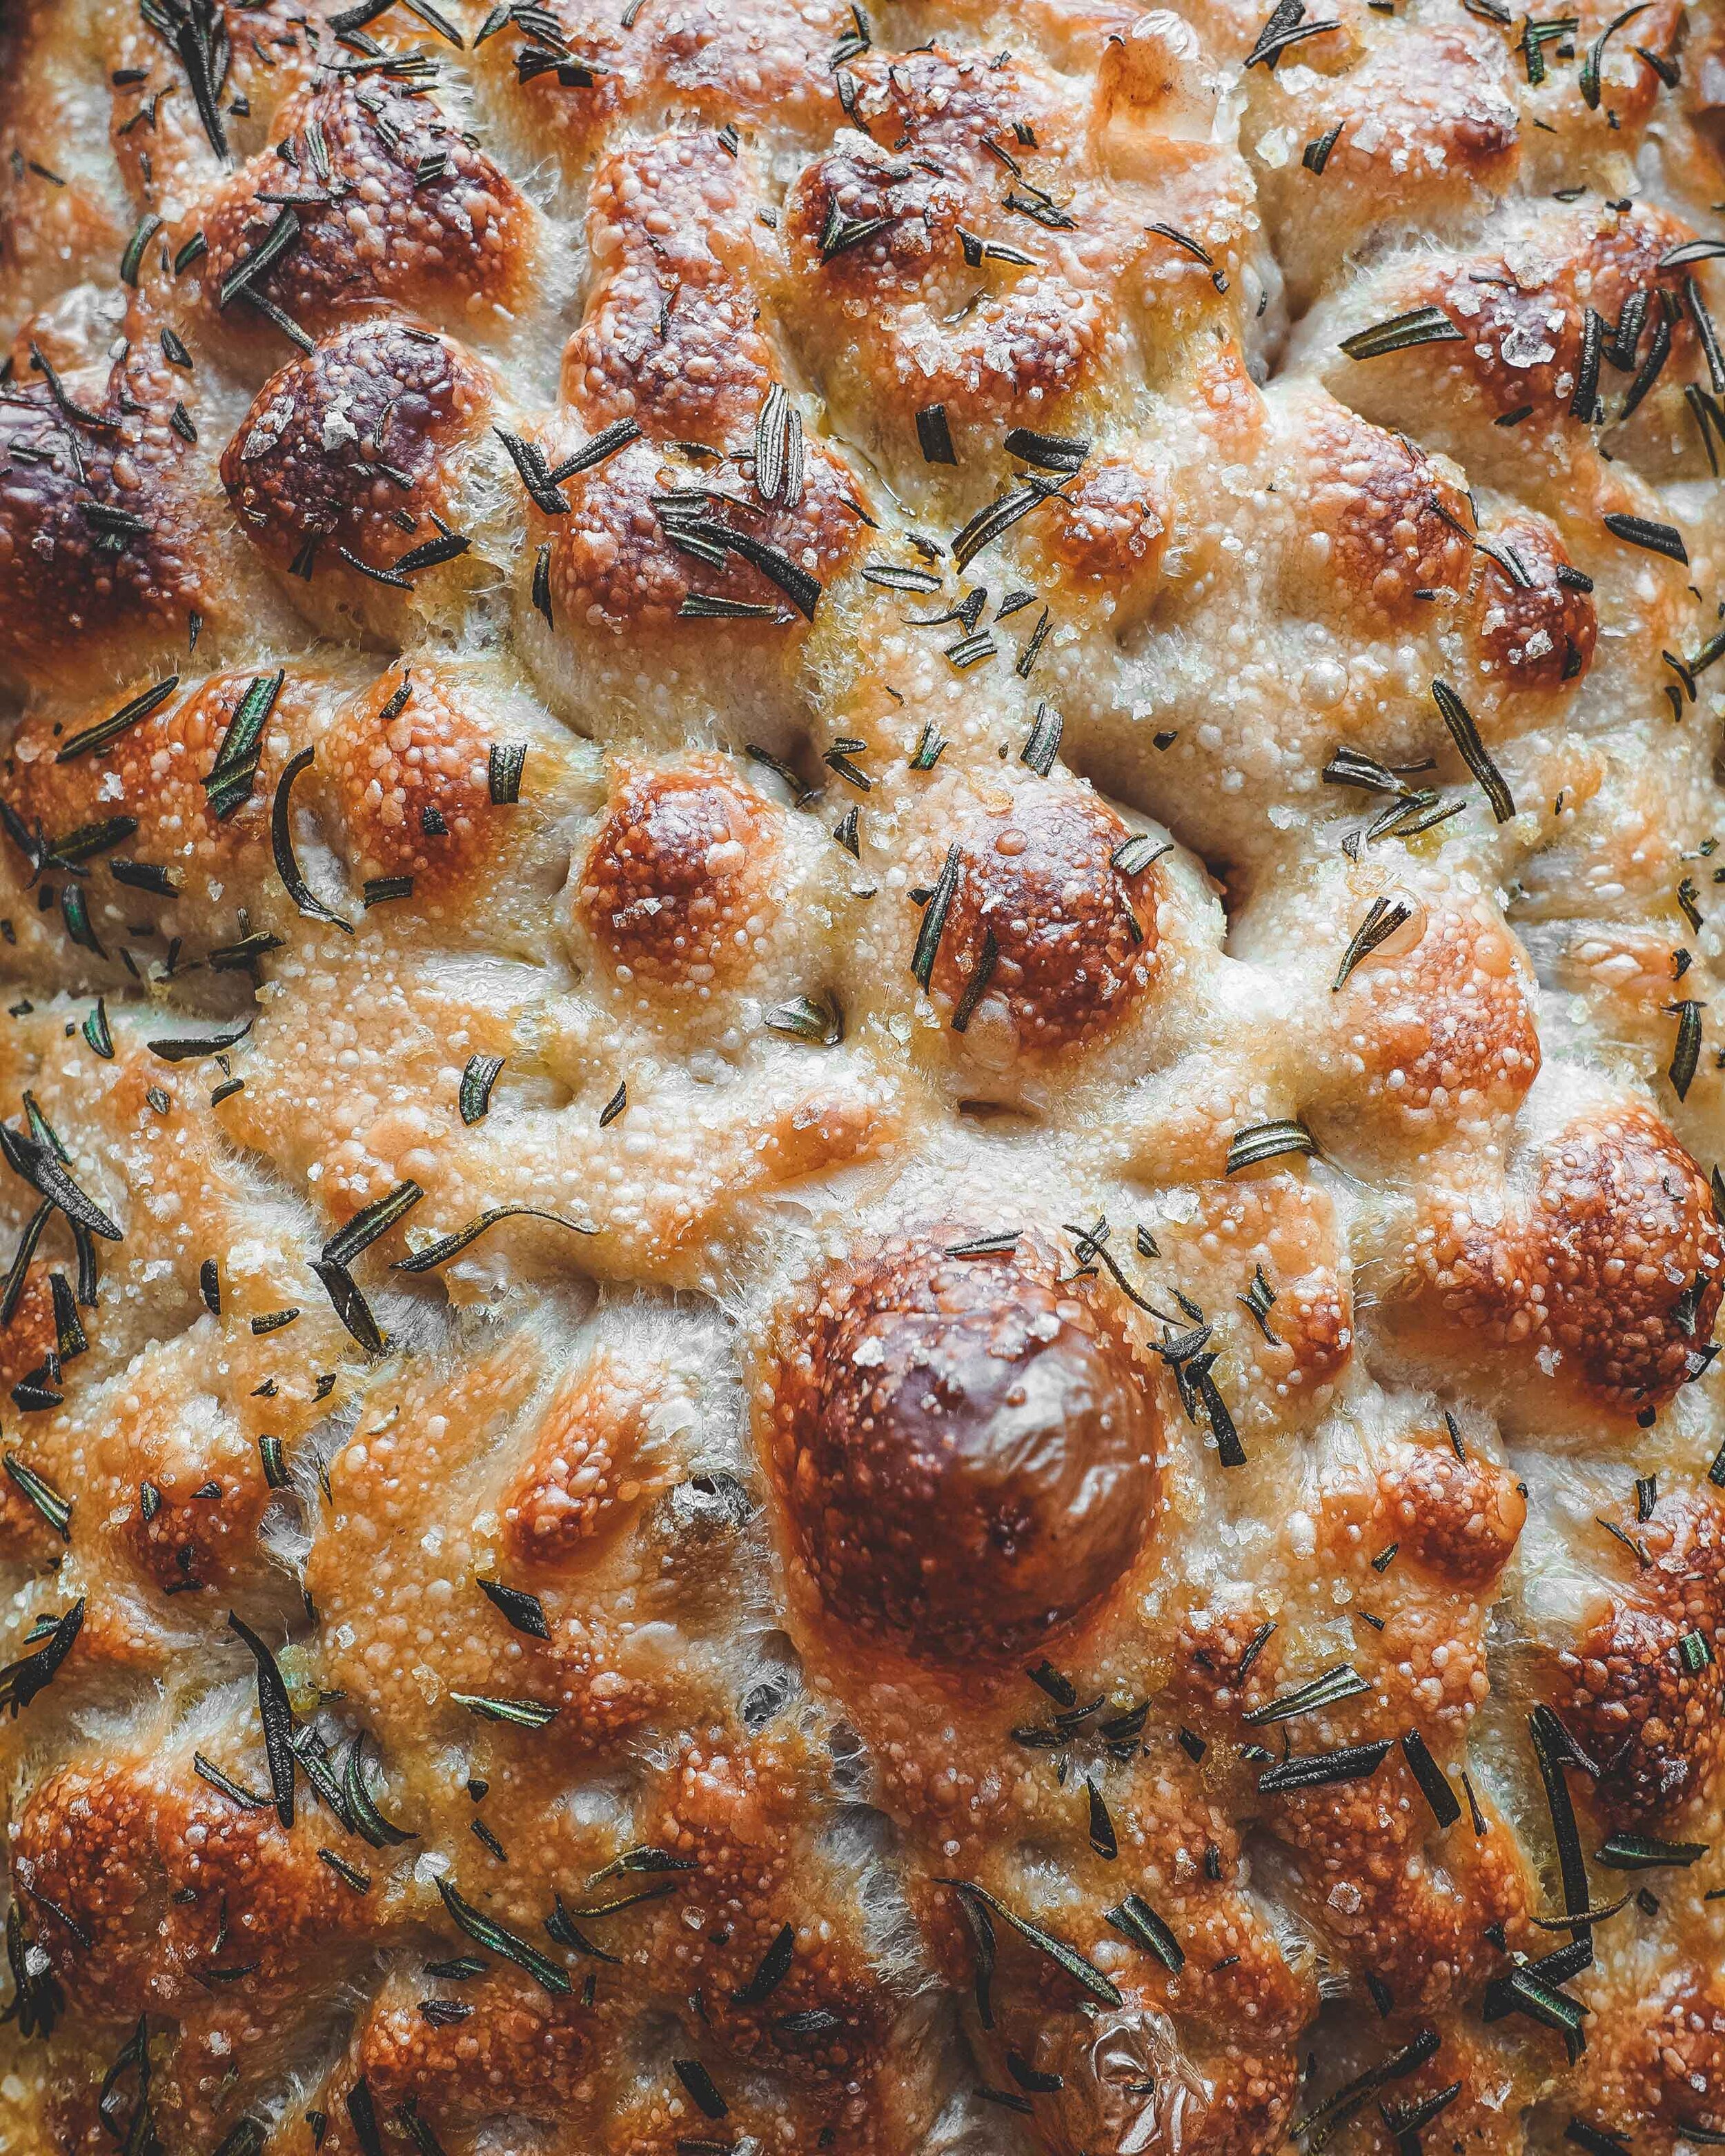
Drizzle the focaccia generously with extra virgin olive oil and then using oiled fingers, dimple the dough all over. Sprinkle generously with flaked sea salt and chopped rosemary, if using. Bake in the preheated oven for 15 minutes then reduce the temperature to 210ºC (190ºC Fan) and bake for a further 15 minutes or until the focaccia is golden brown. 

Remove from the oven and carefully transfer the bread from the tin to a wire rack to cool. 

Focaccia is best on the day made but is also great for a few days after baking. As with most breads focaccia also freezes brilliantly 

In Breads and Quickbreads Tags sourdough, focaccia, no knead, rosemary, bread
17 Comments
Focaccia Feed Post 1.jpg

No-Knead Za'atar Focaccia

Edd Kimber March 4, 2021

Post Sponsored by AEG

If you haven’t guessed it already, I am currently a little obsessed with all things no-knead. Now look, I love sourdough but life has been a bit manic recently and my attention span is spent. No knead recipes gives you the ability to make excellent bread with almost no work. This focaccia is maybe the easiest of all no knead breads, I can’t see how you eliminate any more of the work because really there isn’t any. No knead breads work because they are risen very slowly and as they do so the gluten develops without the need for kneading. It’s an incredible technique that is widely credited to Jim Lahey a baker from NYC that help promote the technique and published the first widely popular recipe for it in the New York Times in 2006. Whilst this was the start of the techniques popularity for a new generation of bread bakers, the idea of no-knead breads actually go back much further than the early 2000’s. There is evidence that similar methods were used as far back as the 1800’s, but there is no doubt Lahey’s method brought the bread to popularity for a new generation. 

For this particular recipe I wanted to make something with za’atar, one of my favourite seasoning blends. Confusingly za’atar is both a specific herb and a herb blend, the latter being what you’re likely to have heard of before. The herb za’atar is grown across the middle east and both the herb itself and the blend are incredibly important to Levantine cooking. Traditionally the blend would be made from za’atar and mixed with sesame seeds, sumac and salt, although this blend will vary a lot depending on where it is made. These days most shop-bought blends outside of the Middle East are made with thyme, oregano and sometimes marjoram. 

Focaccia Feed Post 2.jpg

One of my favourite dishes made with za’atar is probably its most famous use, man’oushe, a thin flatbread spread with a mixture of oil and za’atar. Because I wanted to make another no knead recipe and it to be a loaf rather than individual flatbreads I settled on a focaccia, a bread made with lots of olive oil already I thought it would be the perfect pairing up, and I am thrilled with the finished recipe, its delicious. You get the wonderful flavour from the olive oil and za’atar and the chewy spongy texture of the focaccia, a match made in heaven. 

As you may also know no-knead breads are very often made inside a cast iron dutch oven, the heat of the pot helps with oven spring and crust development and a lot of this is down to steam. The pot traps the steam released from the bread which helps the bread open up fully and helps to create a light crisp crust. With focaccia a pot isn’t an option of course so instead I introduced steam using my oven. After moving in my new house and finding a disaster of an oven I needed a replacement and I settled on the AEG Steam Bake (BPS556020M), and I chose that model because of bread. The oven has all the classic functionality you’d beed but it also includes a stem bake function where water is added to a reservoir at the bottom of the oven and it creates a steamy environment which is brilliant for bread. I tested this recipe multiple times and on the occasions I used the steam function the bread rose higher and had a more crisp crust, a win-win. The oven also comes with a food sensor which you can use to check the internal temperature of your roast, or even your baked custards or breads. More importantly, because I hate cleaning my oven, it is Pyrolytic meaning it self cleans!

IMG_2435.jpg

No Knead Za’atar Focaccia

Focaccia
500g strong white bread flour
7g fast action dried yeast
2 tsp fine sea salt
2 tsp caster sugar
450ml cold water
3 tbsp extra virgin olive oil

Topping
2 tbsp za’atar
4 tbsp extra virgin olive oil, plus extra for the tin
roasted sesame seeds (optional)

To make the dough add the flour, yeast, salt and sugar to a large bowl. Pour in the water and use your hands or a wooden spoon to mix together until everything is hydrated, just making sure there are no packets of flour. Add 2 tbsp of the olive oil and mix briefly to combine, drizzle over the last of the olive oil. Thats it. Thats the entirety of the work. Cover the bowl with clingfilm and refrigerate for 12-24 hours. 

When you want to bake the loaf remove the dough from the fridge and generously oil a 9x13 tin. I’m not a big fan of non-stick bakeware but if you have one it can be helpful for this recipe as they dough can sometimes stick to the base of the tin. To prevent this you can also line the base with parchment paper. 

Deflate the dough by folding the edges of the dough away from the bowl and into the middle of the dough. Tip the ball of dough out into the prepared tin and gently press and stretch it out the corners, not worrying that it perfectly fills the tin, it will spread out as it rises. Cover the tin and set the focaccia aside until it has doubled and is visibly bubbly on the surface with a generous wobble, this will take about 2-3 hours at room temperature. 

Using the AEG Steam Bake oven add 200ml water to the reservoir in the bottom of the oven, set the oven to True Fan Cooking and press the Plus Steam Button. Set the temperature to 200ºC. Using a different oven preheat the oven to 220ºC (200ºC Fan).

For the topping mix together the za’atar and oil to make a thin paste. Drizzle this all over the risen dough and gently spread with your hands to cover the entire loaf. At this point your fingers should be nice and oiled up, but if not rub a little oil over your fingers to lubricate. Use your fingers to dimple the loaf all over. Finish by sprinkling the dough generously with flaked sea salt. The za’atar blend will already include sesame seeds but I like to sprinkle a little extra but this is optional.

Bake in the preheated oven for about 20-25 minutes or until golden brown. Remove from the oven and carefully remove from the tin, setting onto a wire rack to cool completely. 

In Breads and Quickbreads Tags no knead, focaccia, zaatar, sesame, bread, easy, simple
8 Comments

No-Knead Everything Bagel Bread

Edd Kimber February 2, 2021

Ok look, I know during the first lockdown last year we all loved sourdough, it was the banana bread for hipsters (I guess that makes me a hipster), we all gave our starters names and we baked a few loaves. I also know that of the many people who learnt to make a starter following my guides here and on instagram, many of you will have let your starter wither and die, and I get it, commitment is hard, sourdough is easy to forget. But now that we are back in lockdown once again, should we be reviving our lacklustre, tired starters? You absolutely can but, if you’re like me and life is a bit much right now, I have a great alternative. No knead bread made in the style of sourdough. 

No knead bread is certainly not a new idea, it was pioneered by baker Jim Lahey and there are recipes for it all over the internet. My version follows the same basic idea I just make it with the addition of stretch and folds, building in strength to the dough but without any labour intensive kneading. It gives an ‘artisan’ style loaf, with a nice open crumb, but without the tricky element of sourdough. 

For this loaf I went with that cliche millennial flavouring of ‘everything bagel seasoning’ because, look it might be a cliche but, it’s great and I love it, and yes I sprinkle it on my avocado toast. You can make the seasoning yourself (I have a recipe for that here) or you can buy your own, your choice. 

No Knead Everything Bagel Bread

No Knead Bread
250g plain flour
250g strong white bread flour
400ml lukewarm water (see note)
2g fast action dried yeast
10g salt
2 tbsp everything bagel seasoning

Topping
4 tbsp everything bagel seasoning

Note - some people have found this dough tricky to handle as it is high hydration, if this is something you haven’t worked with before you can reduce the level of hydration to 350-375ml water which will make the dough easier to handle

To make the dough add the flours to a large bowl and mix together to combine. Pour in the water and use your hands to mix to a shaggy dough, making sure there are no dry pockets of flour. Cover the bowl and set aside somewhere warm for 30 minutes to hydrate. 

Sprinkle the yeast and salt over the dough and use a wet hand to mix together. To do this I first dimple the dough with my fingers, fold the dough a few times and then squish the whole thing through my fingers, making sure everything is well incorporated. Cover and rest for 30 minutes, again doing so somewhere warm.

Sprinkle the bagel seasoning onto the dough and do your first set of stretch and folds. If you’ve ever made sourdough you’ll know this process well, its a low effort alternative to kneading. To stretch and fold use a wet hand to go under the dough and pull it up and over itself, stretching as you do so. This is done at multiple points around the dough, 4 or 5 times. The video below shows the process when I make sourdough breads and it will look very similar for this recipe. After the first stretch and fold we are going to repeat the process 3 more times, resting for 30 minutes between each set in your warm spot. 

Once all your stretch and folds have been done we need to let the dough rest until doubled in size. This should take another 60-90 minutes depending on the temperature of the kitchen or warm spot your resting the dough. Personally I like using the oven with light turned on, just careful as some ovens can become a little too warm for this. 

Once doubled scrape the dough out onto a lightly floured work surface. Stretch out slightly and form into a rough ball. This is just a pre-shaping so do this briefly and don’t worry about making it perfect. Cover the dough with a kitchen towel and leave for 30 minutes to relax. Lightly flour the top of the dough and flip over and shape. The easiest way to do this is fold the outside edge the dough into the middle, working your way around the dough to make a nice tight ball. At this stage I then flip the dough, so the seam is on the bottom, and roll the dough on the surface creating tension and make the shape a little tighter. 

Spritz the ball of dough with water and sprinkle generously with your everything bagel seasoning. Carefully lift up and transfer to either a proving basket or bowl lined with a kitchen towel. Whichever you are using, dusting the inside with rice flour will help the dough release after proving. 

Cover the basket/bowl and refrigerate the dough for 8-14 hours (you should be able to leave it for 24 hours but 14 hours is the longest I have tested it so far). 

An hour before baking preheat the oven to 250ºC or as high as your oven will go. Place a large cast iron dutch oven to heat up as well. Once preheated remove the dough from the fridge and carefully turn it out onto a round of scrunched up parchment paper. Use a razor blade or sharp knife to slash the bread and carefully transfer it to the cast iron pot. Cover the pot with the lid and bake in the oven for 20 minutes. After the time is up reduce the temperature to 220ºC and bake for a further 20-25 minutes or until the bread is well browned. Remove from the oven and allow to cool for at least an hour before slicing. 

Example Baking Schedule
5pm - Mix the flour and water

5.30pm - Mix in the yeast and salt

6pm - Add the everything seasoning and do set 1 of stretch and folds

6.30pm - 2nd set of stretch and folds

7pm - 3rd set

7.30pm - 4th set

9pm - Pre-shape the loaf

9.30pm - Shape the loaf and refrigerate

8am - Preheat the oven

9am - Bake the bread

In Breads and Quickbreads Tags everything bagel, bread, no knead, bagel, sourdough, easy
33 Comments

Twitter

  • Was 8 original films, 3 spin off films, a two part play not enough. Can we have something new. https://t.co/cBZdGEGeyv
    Apr 4, 2023, 1:46 PM
  • RT @deliciousmag: Cacio e pepe, but make it buns! These seriously cheesy bread rolls from @TheBoyWhoBakes are inspired by his favouri… https://t.co/oDZlaDgnN2
    Apr 2, 2023, 11:08 AM
  • RT @TheDailyShow: Congrats to Donald Trump on finally winning a majority of votes! https://t.co/ezP55HZgl0
    Mar 31, 2023, 12:43 AM

Instagram

This weeks bonus recipe, for subscribers to my newsletter, is this gorgeous sour cherry and coconut gateau basque. The crust is a buttery cross between pastry and cake, think a cakey cookie. The filling is a layer of sour cherry topped with a rich coconut custard. A real fun one to make too! Link to my newsletter can be found in my bio - #gateaubasque #pastrycream #coconut #sourcherry
In this months @olivemagazine (out today) the team came and photographed my petit kitchen and we talked about how we put our stamp on the place, without spending a fortune. We hated the bland kitchen that we inherited but, as it was relatively new an
In this months @olivemagazine (out today) the team came and photographed my petit kitchen and we talked about how we put our stamp on the place, without spending a fortune. We hated the bland kitchen that we inherited but, as it was relatively new and in good condition, it felt a waste to rip it out and we also didn’t want to spend the money it would take to rip out the whole thing and replace it (it’s a howdens shell so we could have done something cheaper like @plykeakitchens @holte.studio @madebyhusk) so instead I painted all of the cabinets, using @makeitrustoleum kitchen cabinet paint, to give it some personality and lighten the whole thing. Check out the magazine for the full run down. - #kitchendesign #kitchenremodel #rustoleumcabinettransformations #rustoleumkitchencupboardpaint #kitcheninspiration #theboywhobakes #olivemagazine
Are you making scones all wrong? Maybe, maybe not? But I do want to show you how I make them! This recipe is based on the method I learnt at @belmondlemanoir 12 years ago when I did a stage, and it makes the absolute lightest scones. And shock horror, it involves kneading the dough, albeit very lightly. You can get the full recipe in this weeks newsletter (free) linked in my bio. - #scones #bakingday #worldbakingday #afternoontea #hightea #englishscones #clottedcream #creamtea #theboywhobakes
facebook
  • Contact

The Boy Who Bakes

Edd Kimber

facebook