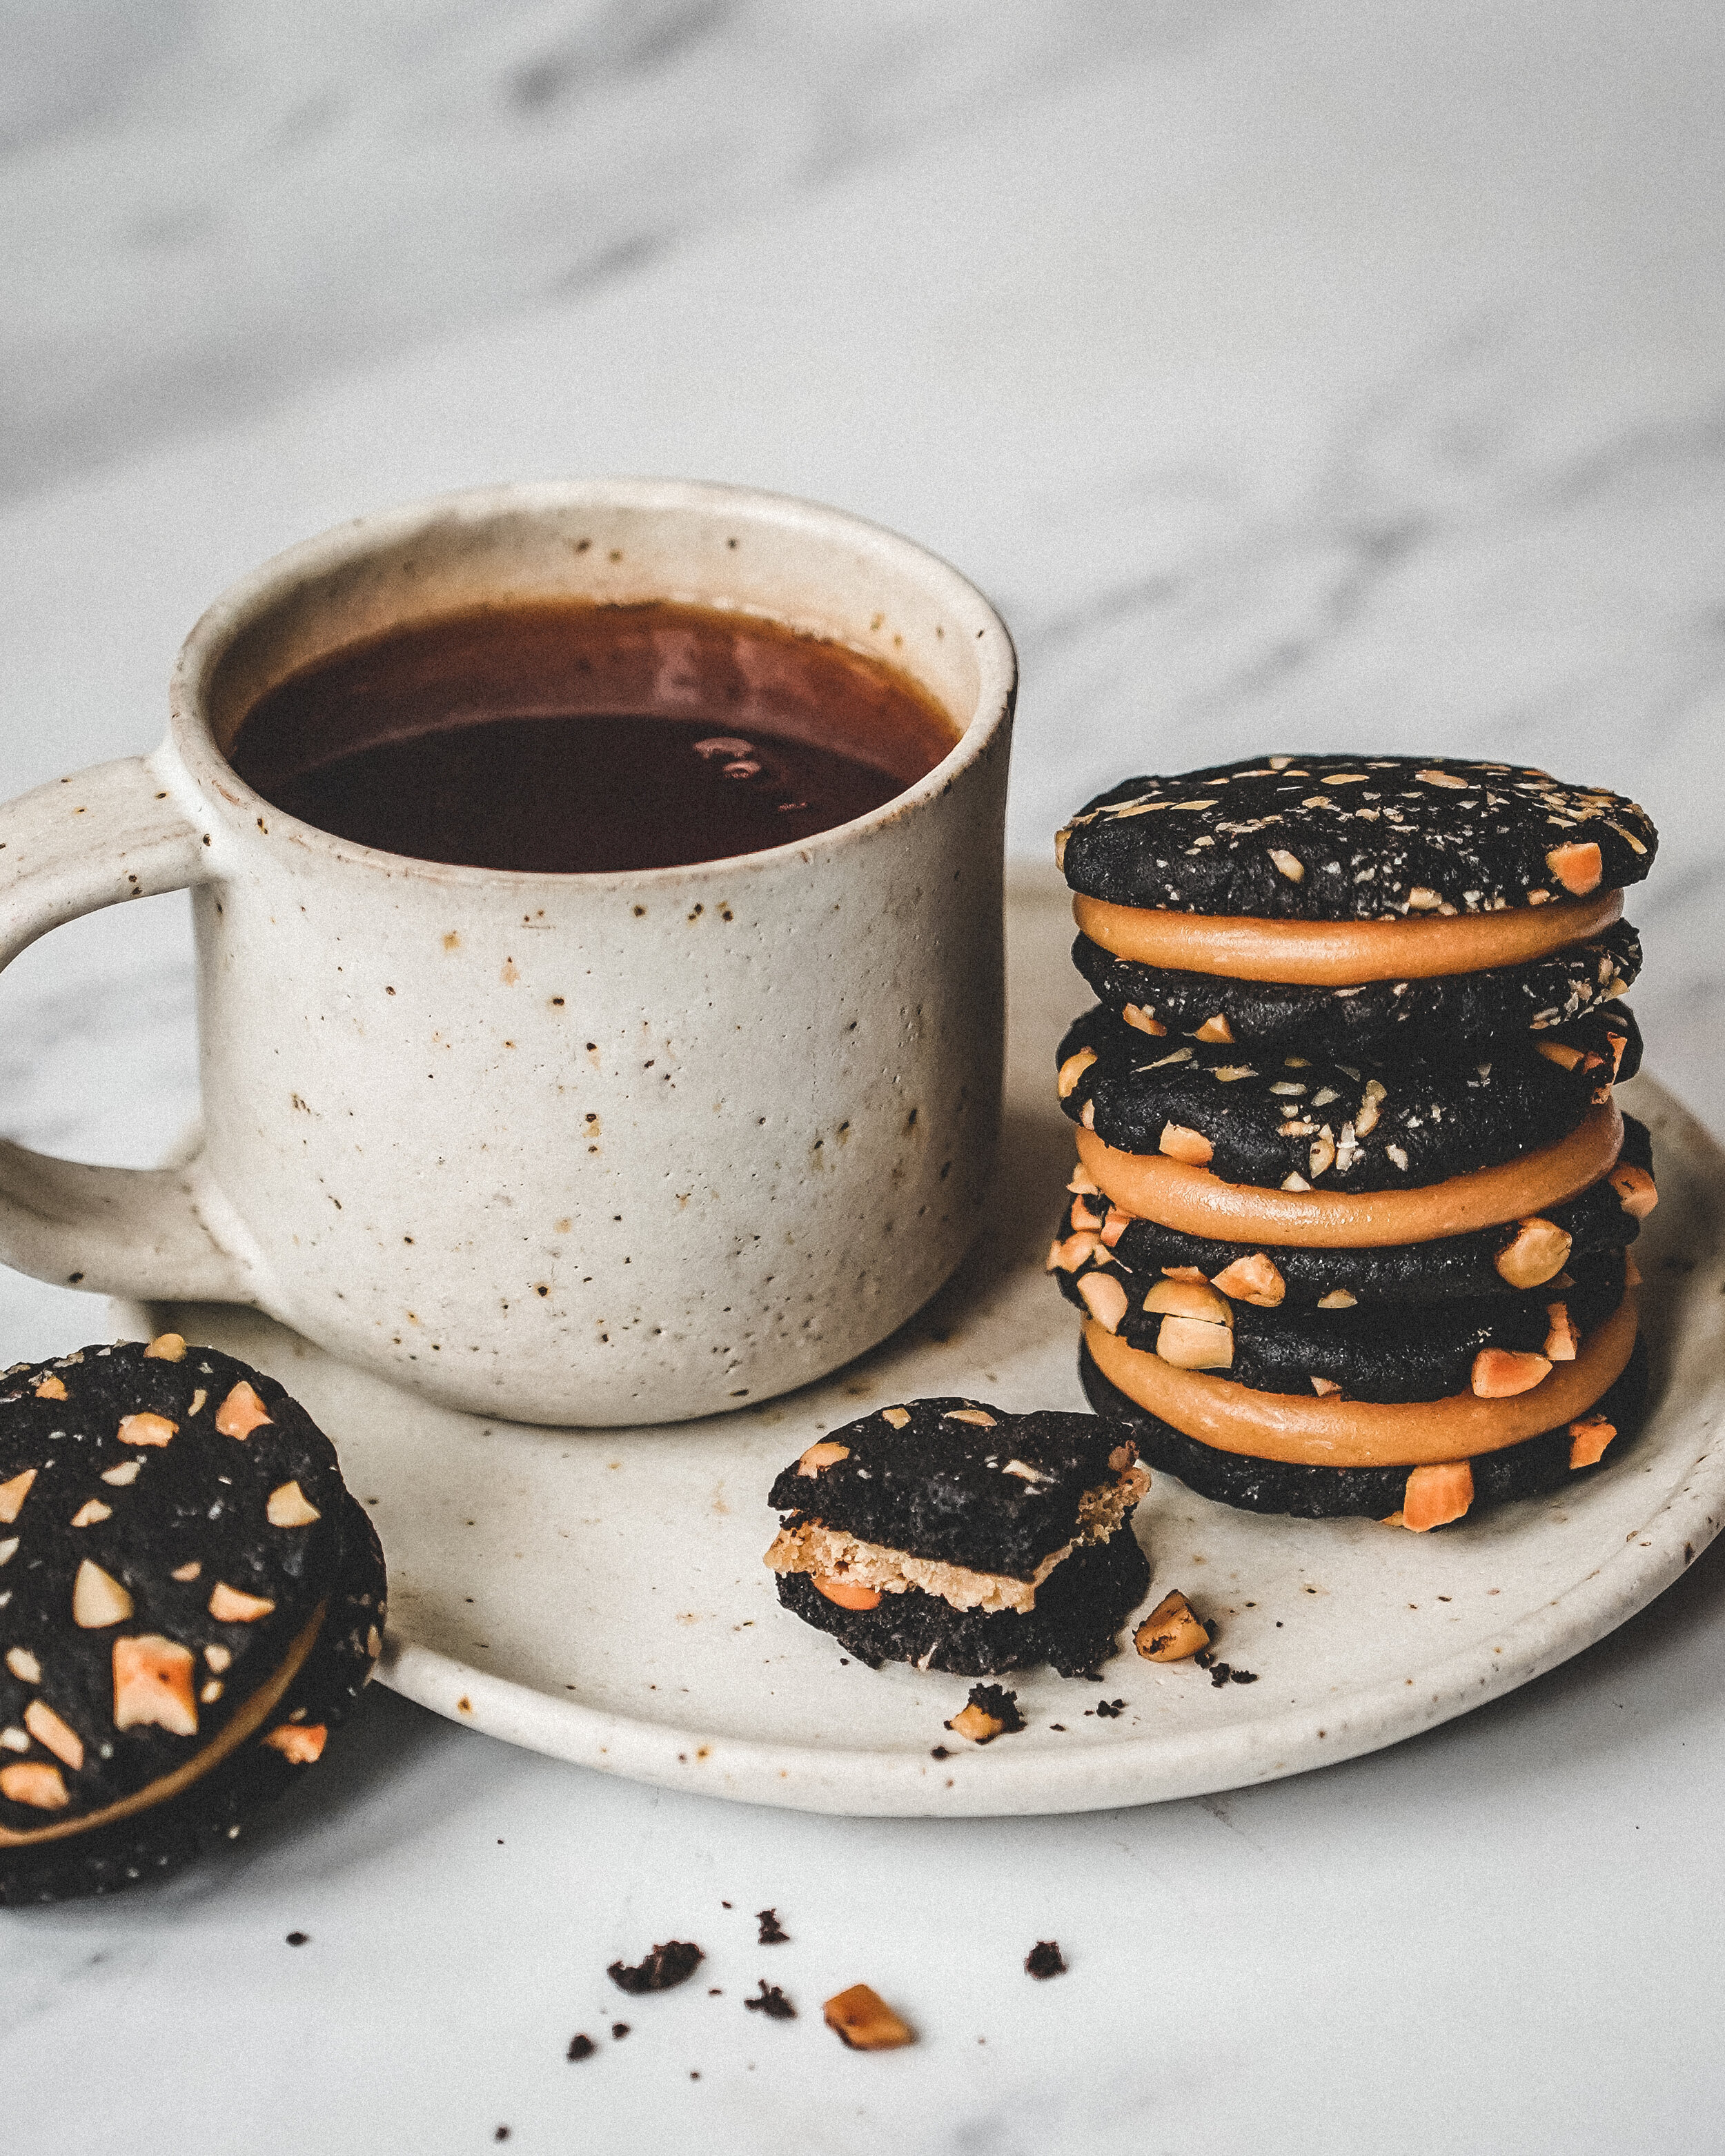
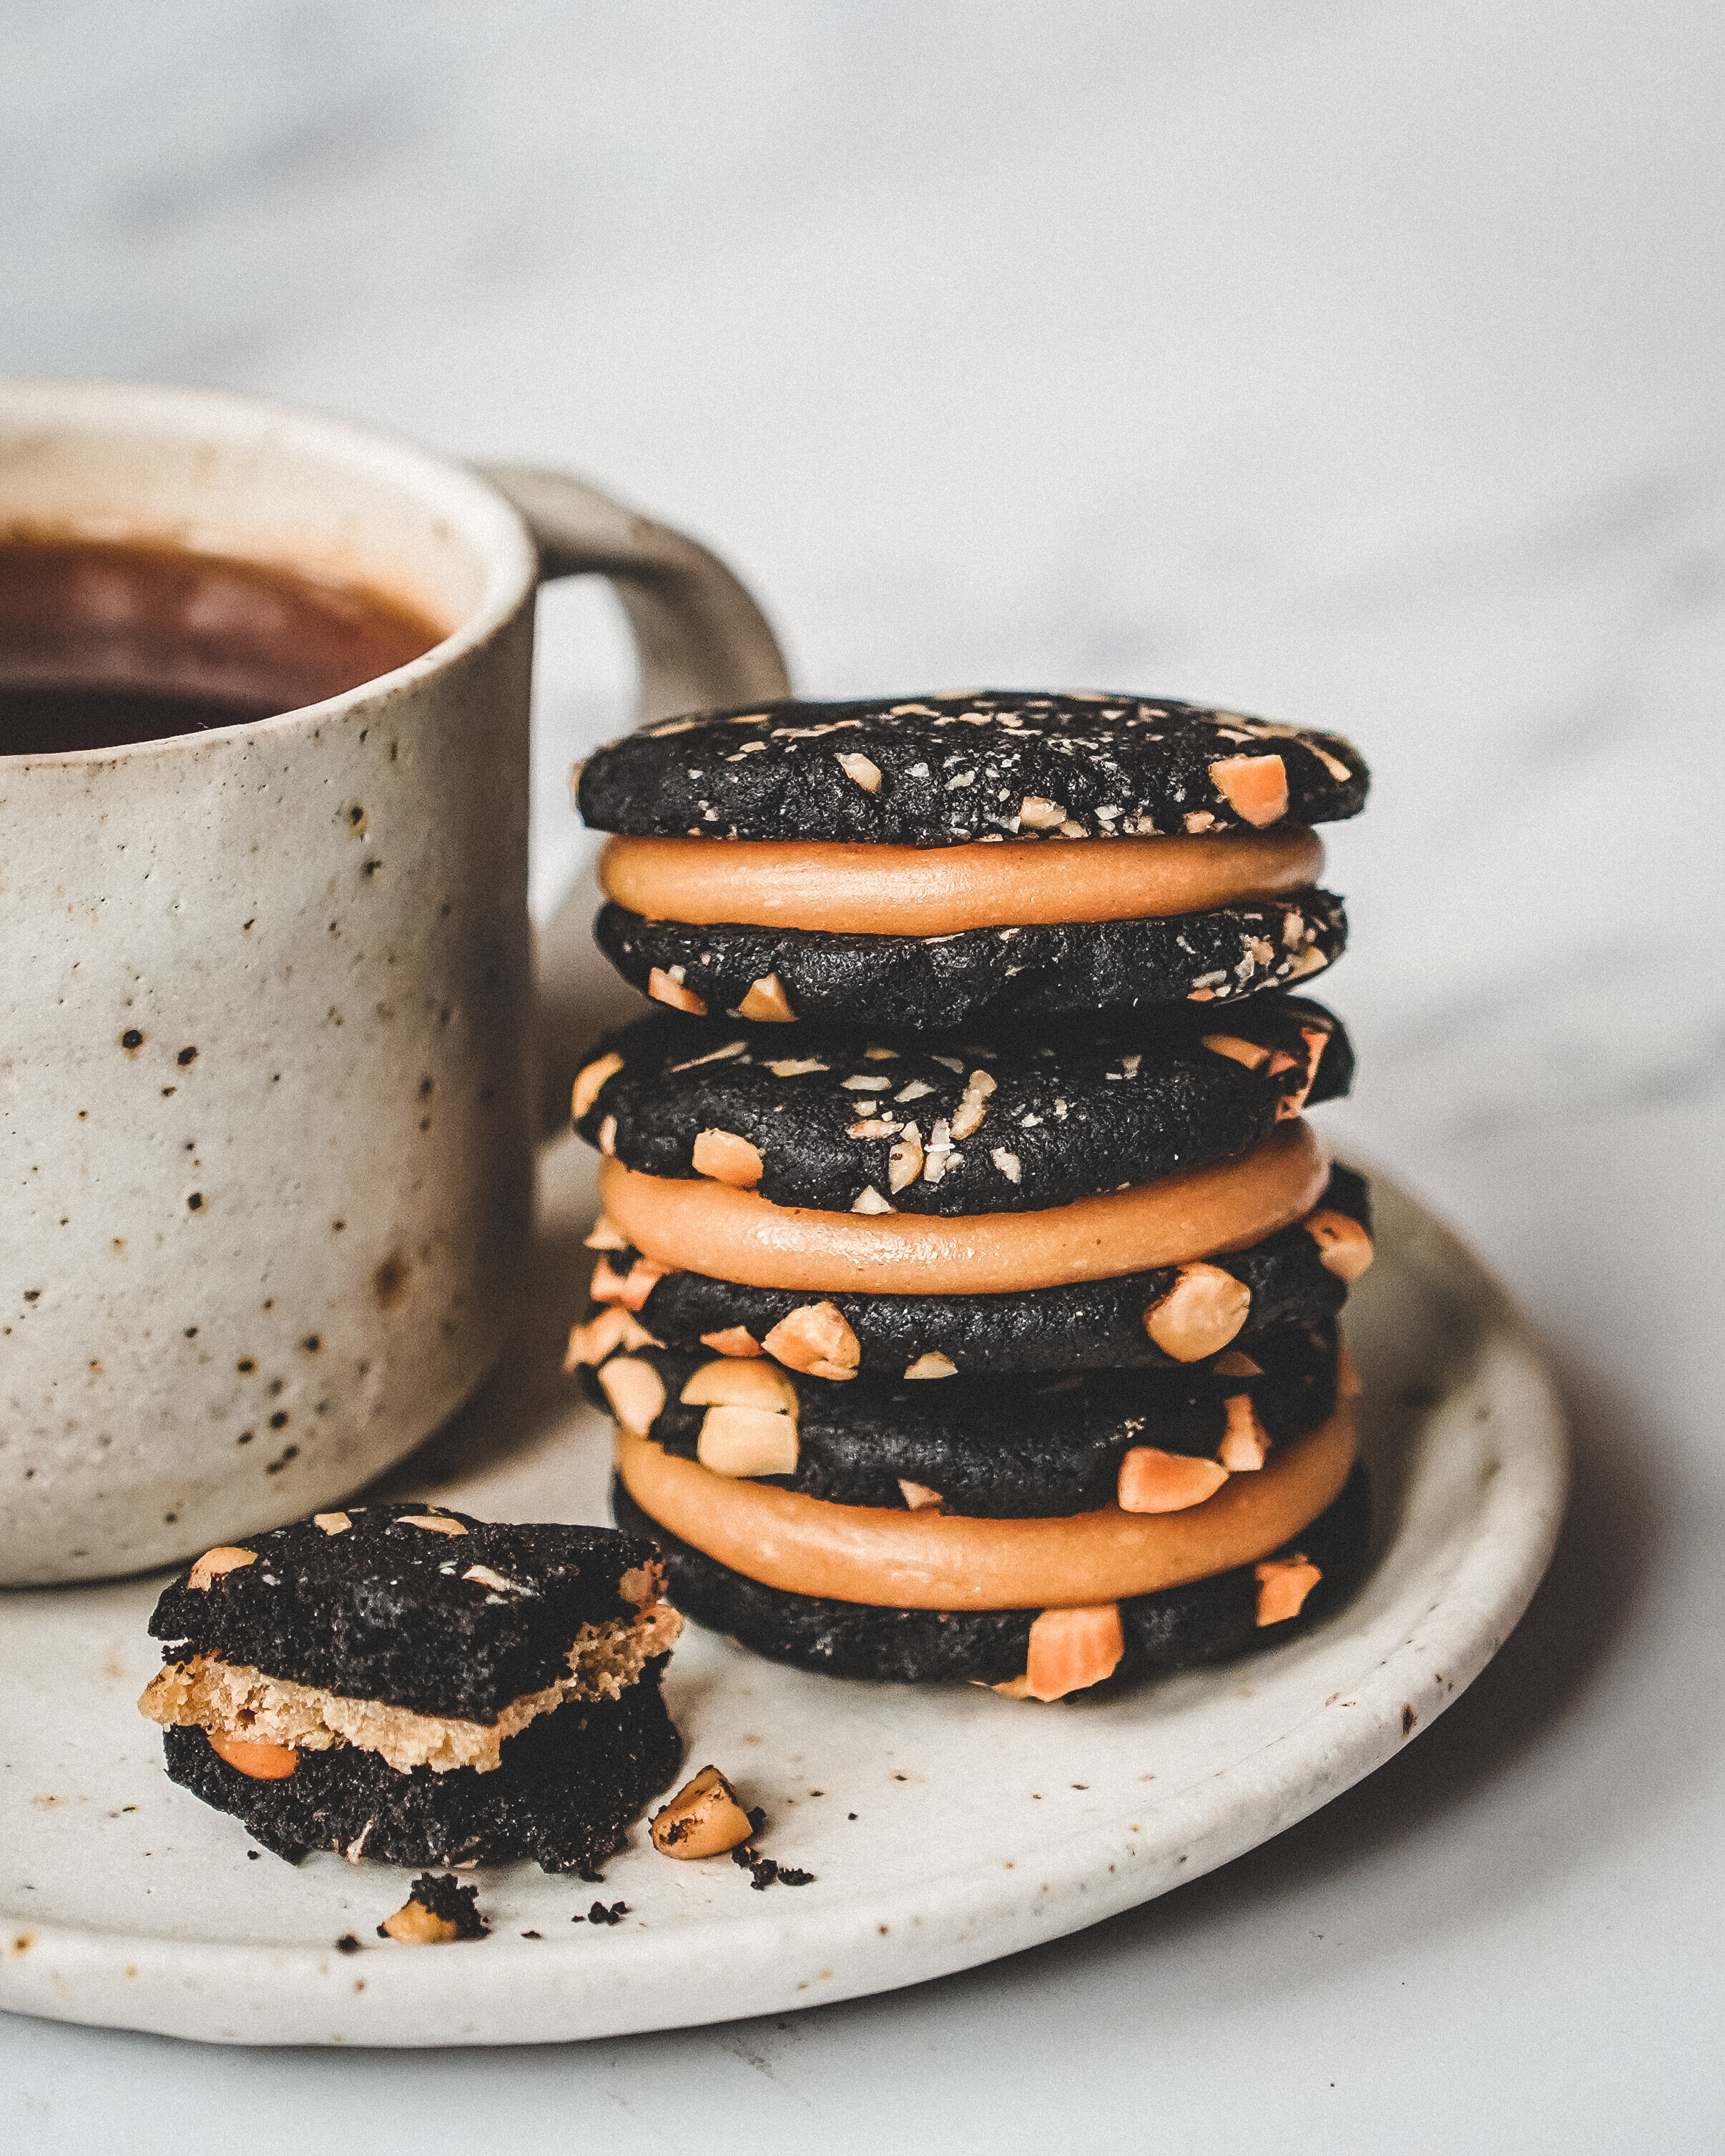
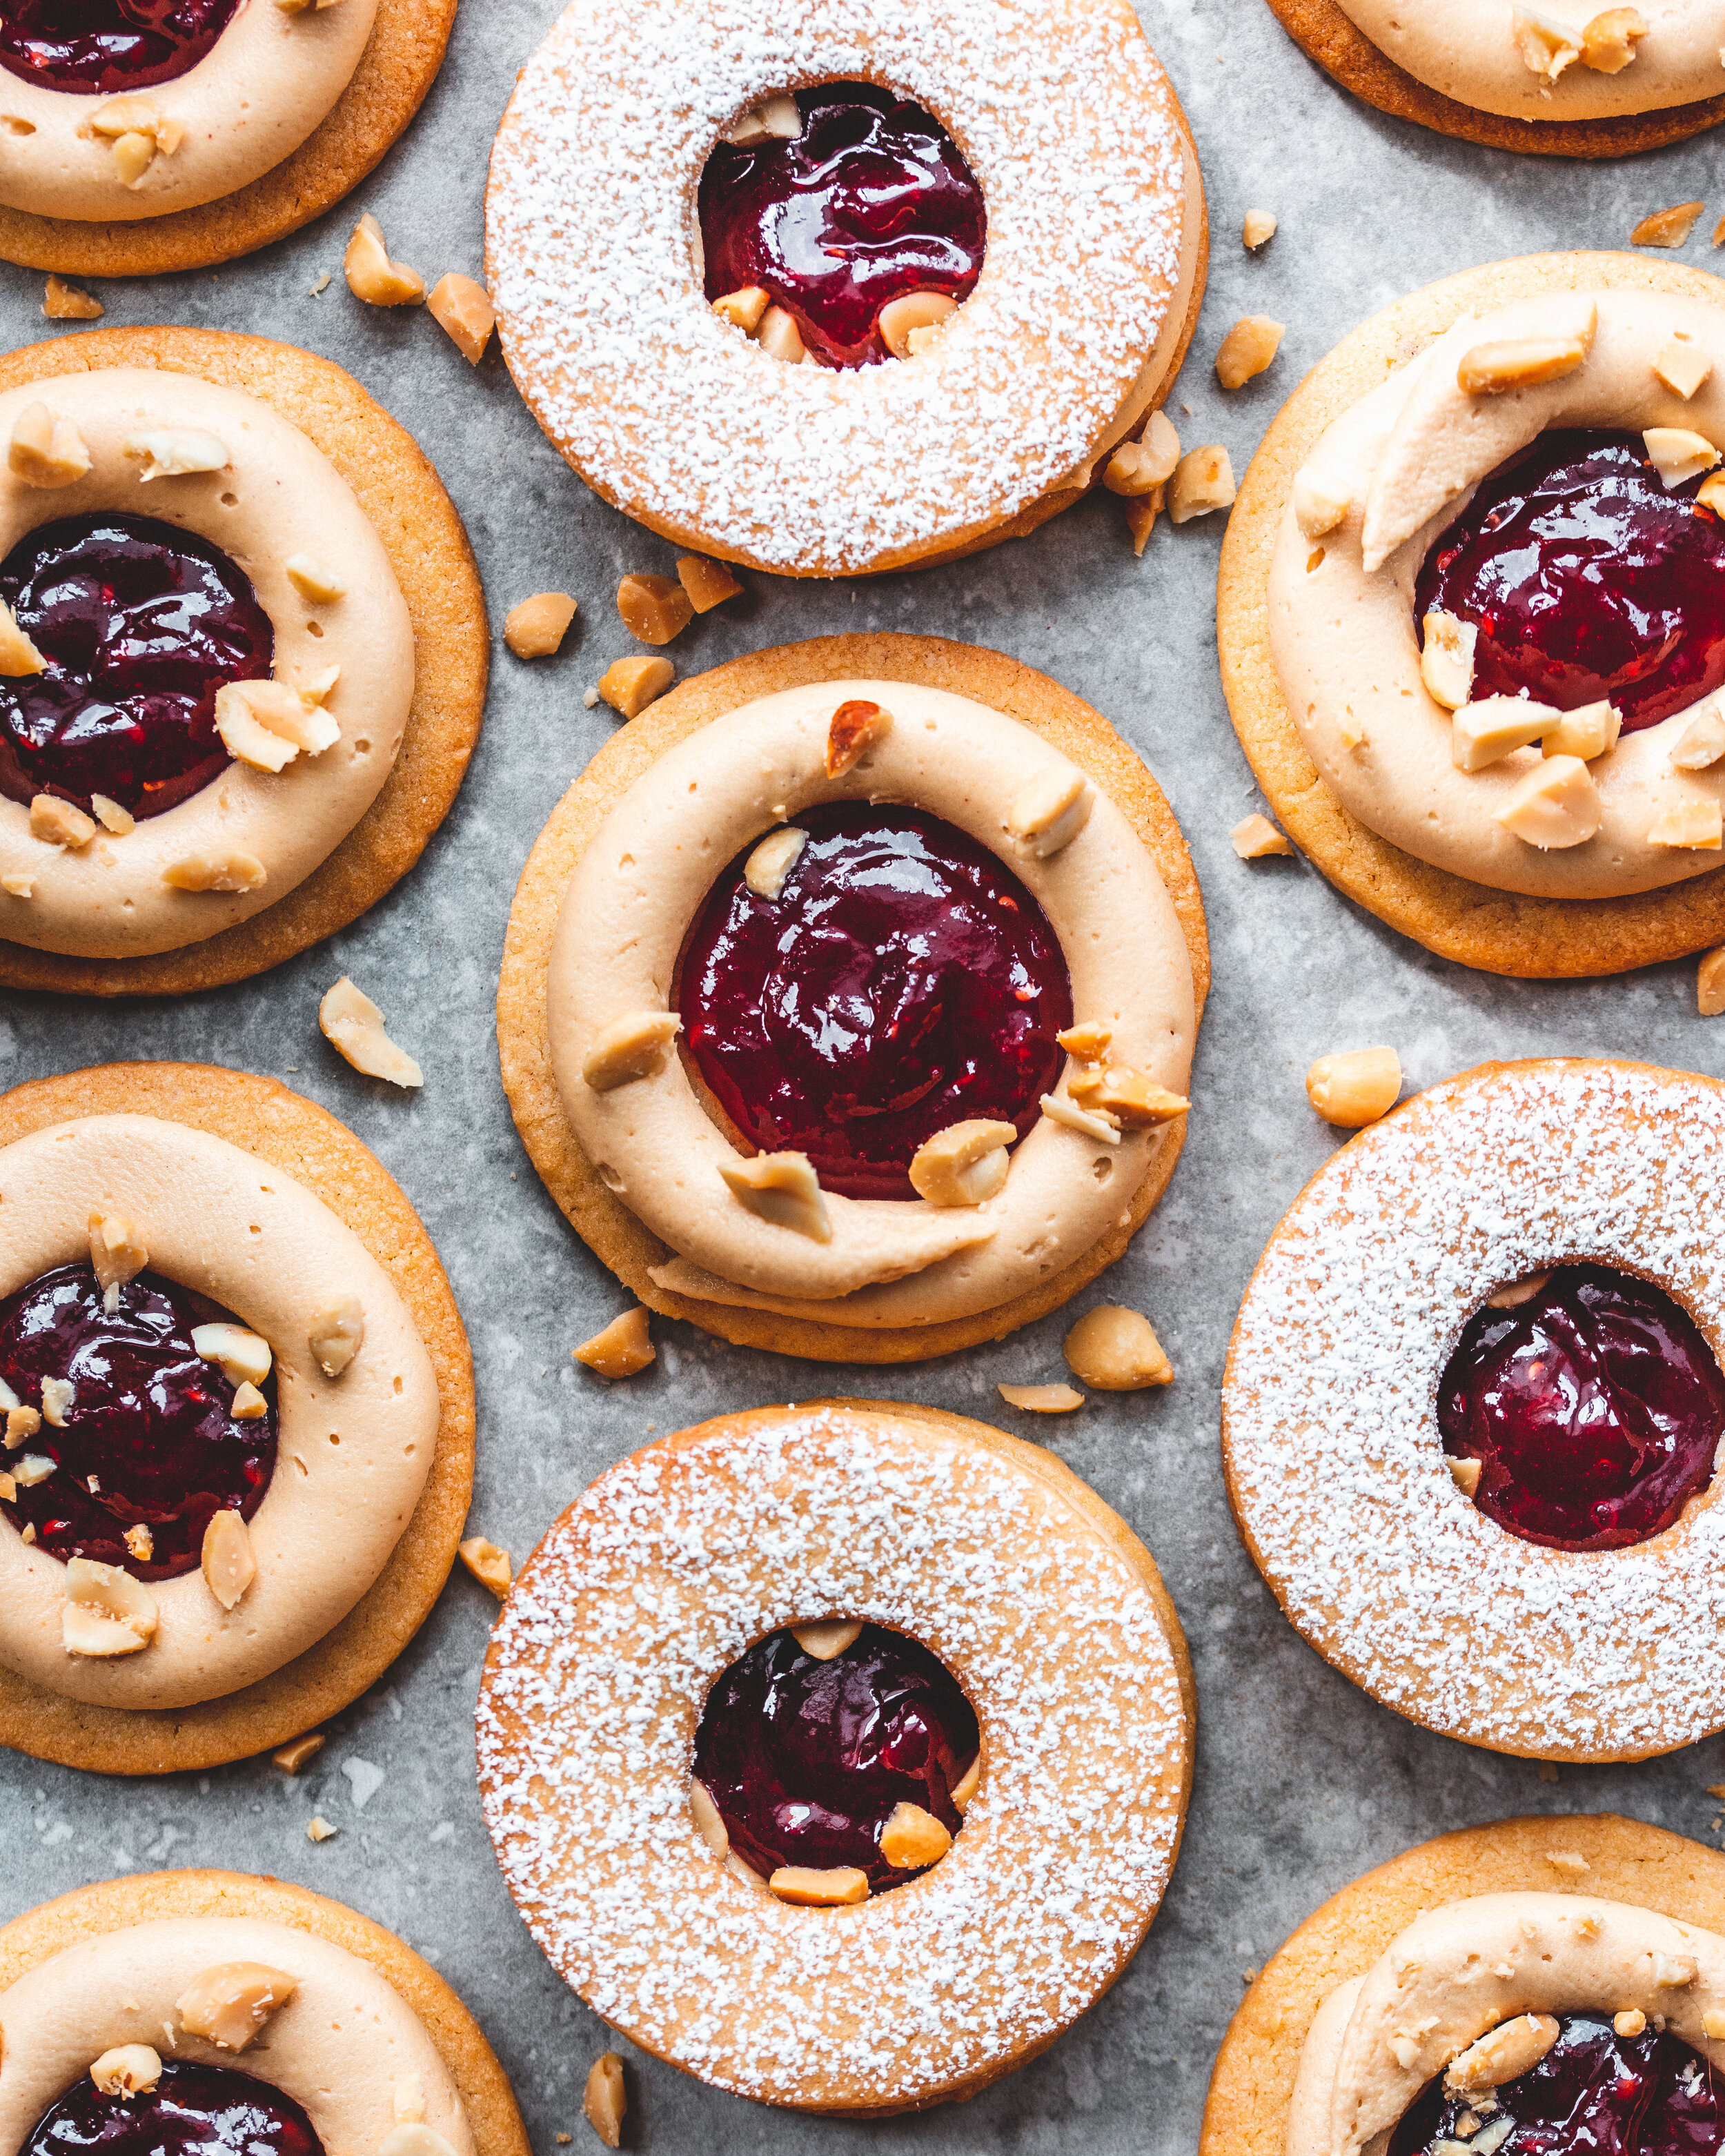
The Boy Who Bakes

Edd Kimber
  • Home
  • Recipes
  • My Books
  • Blog
  • Recipe Index
  • About
  • Home
  • Recipes
  • My Books
  • Blog
  • Recipe Index
  • About

Recipes

  • All
  • baking
  • Biscuits and Cookies
  • Breads and Quickbreads
  • Bundts
  • Cakes
  • Chocolate
  • Dessert
  • drinks
  • Holidays
  • Pastry
  • Scones and Quickbreads
PBJ Dodgers-6.jpg

PBJ Jammy Dodgers

Edd Kimber September 28, 2021

PBJ Jammy Dodgers
Sponsored By Lyle’s Golden Syrup

Jammy Dodger, a supermarket classic, a favourite of the biscuit tin. Two crisp biscuits sandwiched together with jam, simple, nostalgic, delicious. I say delicious but a shop bought biscuit like this can almost always be made better at home, using better tasting ingredients and less industrial textures. This recipe is clearly not for a classic dodger but is in the form of and inspired by the classic biscuits. The cookie itself has added flavour and texture in the form of salted peanuts. The dough also uses a little Lyle’s Golden Syrup which adds a warm caramel tone to the biscuit which goes wonderfully with the peanuts.

The filling is a classic jam but with added jazz hands in the form of a peanut butter buttercream. The flavour is balanced nicely again with the addition of the Lyle’s Golden Syrup which also adds a really nice creamy texture to the filling. 

Do These Freeze?

Sandwich cookies like this are not the best candidates for freezing once baked but the dough itself can be frozen for up to a couple months.

Do you have to use peanuts?

I know some people are allergic to peanuts or just don’t like them and the good news is you can happily change the nut to a different flavour in the cookie and for the filling you could either make a traditional buttercream or simply use jam without a secondary filling.

What Type of peanut butter should you use to bake with?

Generally when it comes to baking it is better to use a commercial smooth peanut butter, unless otherwise advised. Natural peanut butter, the type that sometimes separates and has a layer of oil on top, can cause issues with texture and doesn’t always blend with other ingredients very well.

PBJ Dodgers-9.jpg

Tips on Rolling

This a dough with a high percentage of butter which can mean the dough is a little tricky to handle. To get around this make sure the dough has been thoroughly chilled before using. When you take the dough out of the fridge it will be cold and firm and hard to roll. Instead of leaving it for 10 minutes and then rolling (which can lead to a soft and sticky dough) simply bash it a little with a rolling pin. This might seem counter intuitive but this action makes the dough pliable without warming it up too much, making it easier to roll before the butter softens too much. If you are worried about the dough becoming too sticky or warm you can also roll the dough between parchment paper and transfer to the fridge if it becomes too hard to handle

PBJ Dodgers-12.jpg

PBJ Jammy Dodgers
Makes 25-30

Peanut Biscuit
325g plain flour
75g salted peanuts
150g caster sugar
225g unsalted butter, diced and chilled
1 large egg
1 large egg yolk
50g Lyle’s Golden Syrup

Peanut Butter Filling
100g unsalted butter, room temperature
100g smooth peanut butter
150g icing sugar
50g Lyle’s Golden Syrup
150g raspberry jam

To make the biscuit dough add a little of the flour and the peanuts to the bowl of a food processor and pulse until the peanuts are finely ground. Add the remaining flour and salt and process briefly to combine. Add the butter and pulse until the mixture resembles breadcrumbs. In a jug whisk together the egg, yolk and the Lyle’s Golden Syrup, whisking together until the syrup has dissolved into the egg. Pour this into the food processor and pulse just until the dough starts to clump together.

Turn the dough out onto a lightly floured work surface and use your hands to gently form into a uniform dough. Divide into two equal portions and press into discs, wrapping in cling film and then refrigerating until firm.

PBJ Dodgers-10.jpg
PBJ Dodgers-11.jpg

When you’re ready to roll out the cookies preheat the oven to 160C (140C fan) and line a couple baking sheets with parchment paper. On a lightly floured work surface roll out a portion of dough until it is about 3mm thick and then using a 7cm round cookie cutter cut as many cookies as possible, setting the scraps aside. Place the cookies onto the prepared baking trays and refrigerate for 15 minutes. Repeat this process with the second portion of dough. Take the cookies from the fridge and use a 3cm round cookie cutter to remove the middle from half of the cookies. Gently reform the scraps of dough into a ball and then refrigerate as before whilst you bake off the cookies. This dough can be rolled out again for more cookies.

Bake in the preheated oven for about 15-18 minutes or until just starting to turn golden on the edges. I bake the cookies lower than usual as it crisps the cookies evenly throughout without over browning them. Allow to cool on the baking tray for a couple minutes before transferring to a wire rack to cool completely.

To make the peanut butter filling place the butter and peanut butter into a large bowl and using an electric mixer beat together until smooth and creamy. Add the icing sugar and Lyle’s Golden Syrup along with a small pinch of salt and beat together until light and fluffy. If the mixture feels a little stiff add a tablespoon or so of double cream.

PBJ Dodgers-7.jpg

To assemble the cookies pipe a ring of the peanut butter filling around the edge of each base cookie and spoon a little jam into the centre. If you like a little added texture you can also sprinkle with a little extra chopped peanuts. Dust all the ring cookies with icing sugar then place one on top of each bottom cookie, sandwiching together. Once assembled the cookies are best within a day or two.

In Biscuits and Cookies Tags sandwich cookie, jammy dodger, linzer cookie, pbj, peanut butter, sable, golden syrup
Comment
black cocoa pb cookies-1.jpg

Black Cocoa Peanut Sandwich Cookies

Edd Kimber May 24, 2021

These cookies are so ridiculously simple and so delicious. The cookie element is based around my melting moment recipe, a melt in the mouth, incredibly tender cookie. I use black cocoa but you can also use a regular dutched cocoa powder if thats what you have on hand. The balls of cookie dough are rolled in salted peanuts and pressed into flat discs and then baked. The filling is a simple white chocolate ganache mixed with peanut butter. Its the sort of cookie you want mid morning with a strong cup of coffee. 

Before we get to the recipe lets talk about cocoa powder for a second. Cocoa powder comes from the cocoa pods and specifically the beans inside those pods, so far so obvious. The beans are fermented and then dried. Generally they are then roasted (unless the product is destined to be used for ‘raw’ chocolate or cocoa powder but I wont be talking about that process here). The beans are then cracked open and the nibs are ground into what is called cocoa liquor and then, using a hydraulic press, the liquor is pressed under great pressure to extract most of the cocoa butter leaving behind a product known as a cocoa cake. This cake is dried once again and then ground into cocoa powder. 

Why then is there such a variety in cocoa powders, what is the difference between natural, dutched and black? Natural is the cocoa powder made as above with no additional processing, it is a light almost dusty brown colour and is bright and acidic in flavour. Dutched cocoa goes through an alkalisation process which lessens the acidity and makes a deeper richer tasting cocoa powder with a darker colour. In the UK and Europe this is traditionally the main type of cocoa powder available although natural and raw cocoa have become more popular over the last few years. Black cocoa, with its characteristic charcoal black colour, is a variation of dutched cocoa powder, the process of alkalisation taken to its limit to make an intensely dark and slightly bitter cocoa powder, if you’ve ever eaten an oreo you’ve had black cocoa. I like black cocoa for its colour and its flavour but its not suitable for everything, the flavour isn’t a pronounced chocolate flavour its much more roasted than that so if you want classic chocolate flavours I would a traditional dutched powder.

Whenever I use black cocoa I am always asked where to buy it as in the UK it is a relatively unknown product, at least until recently. I would always bring some home from the US when there on holiday or for work, King Arthur Baking sell my go-to version. Someone imports that brand into the UK but it is criminally expensive so I am thankful that a few new brands have sprung up to make it easier, and cheaper, to buy. Van Houten was the first brand more widely available, selling on Amazon, but I am yet to test this brand out. When I buy the cocoa myself I get it from De Zaan, a commercial cocoa powder producer that have recently started selling in a more direct to customer facing way. You can find there cocoa powder on Amazon and on from HB ingredients. 

Before we get to the recipe a brief note on peanut butter. When baking with peanut butter you need to be careful about what style you use. Generally you want to be using a commercial peanut butter and this is for the simple reason that it is less likely to split creating odd textures in the finished recipes. By all means you can use a natural peanut butter but be aware the result might not look like you envisioned or like the images of the recipe. 

Black Cocoa Peanut Melting Moments with Peanut Butter Ganache
Makes 15 Sandwich Cookies

Cocoa Melting Moments
250g unsalted butter, room temperature
1/2 tsp vanilla extract
200g plain flour
60g black cocoa powder
85g icing sugar
30g cornflour
175g salted peanuts, roughly chopped

Peanut Butter Ganache
100ml double cream
125g white chocolate
75g smooth peanut butter 

Preheat the oven to 160ºC (140ºC Fan) and line a couple baking sheets with parchment paper.

For the cookies place the butter into a large bowl and use an electric mixer to beat until soft and creamy. Add the vanilla and beat briefly to combine. In a separate bowl whisk together the flour, cocoa, icing sugar and cornflour. Add the flour mixture to thee butter mixture and mix on slow speed just until a dough is formed. 

Divide the dough into 20g portions and roll them into balls. Roll the balls in the chopped peanuts, your not looking to fully coat the balls just get a decent amount of peanuts on each cookie. Place the balls onto parchment lined baking trays leaving a little space between each cookie. Using a glass or measuring cup press each ball into a flat disc. Spraying the glass with a little oil can help prevent them sticking. 

black cocoa pb cookies-1-2.jpg

Bake the cookies in the preheated oven for about 20-25 minutes or until the edges are set and dry.

Remove the trays from the oven and allow the cookies to cool fully. 

To make the ganache place the chocolate and cream into a small saucepan and place over low heat. Stir constantly, making sure to scrape the bottom of the pan to prevent anything from scorching, until the chocolate has melted. Pour the ganache into a small bowl and stir to make sure everything is combined. Set aside for 10 minutes before adding the peanut butter and using a small whisk to combine into the ganache. The ganache needs to be a little cool before adding the peanut butter as the heat can make the mixture split. Refrigerate the ganache until thickened enough to hold its shape but still spreadable, 60-90 minutes. Pipe or spread a small amount of ganache onto half of the cookies and sandwich together with a second cookie. Refrigerate for 30 minutes or until the ganache has fully set. 

Kept in a sealed container these will keep for 3-4 days.

In Biscuits and Cookies, Chocolate Tags black cocoa, melting moments, sandwich cookies, ganache, white chocolate, peanut butter, peanuts, easy, easy baking
4 Comments
PB&J Doves small 1.jpg

Peanut Butter & Jelly Sandwich Cookies

Edd Kimber August 14, 2020

This post is sponsored by Doves Farm Organic Flour

Can something be nostalgic if you never actually experienced said thing when you were younger? I’m sure it’s not true nostalgia but anything flavoured with peanut butter and jelly just screams childhood to me. Maybe it was the American films and TV I watched as a kid, where the pb&j sandwich was ubiquitous, who knows really. What I do know is that combination of a rich peanut butter and a fruity jam is a brilliant one and lends itself so perfectly to so many baked ideas. This recipe is another in my collaboration series with Doves Farm Organic Flours and these super simple cookies are made with their Wholemeal Spelt Flour, a brilliant alternative to regular plain flour. Doves Farm recently relaunched their packing in a fun new range of colours and designs so if you’re looking for them in the supermarket keep an eye out for the new style, and don’t forget if you’re still struggling to find flour and yeast, Doves Farm have also launched an ‘Organic Flour Baking Box’ (£11 plus delivery), available to purchase on their website and delivered direct to your door, whichcontains a great selection of their organic flours - including plain, self raising, bread and specialty flours - plus yeast for making bread, you can find out more here.  

The cookies couldn’t be much easier if you tried, this is absolutely a perfect recipe to make with the kids (big kids too) and can be whipped up in no-time. The nice thing about these cookies is they don’t need chilling before baking, you whip up the dough and get them in the oven straight away so they’re perfect for cookie emergencies, when you need something quickly.

Spelt is maybe one of the easiest grains to use when you want to swap out regular wheat flour and because of this, and its nuttier flavour, it has become an incredibly popular ancient grain. When we talk about ‘ancient grains’ it is easy to think this means we’ve been using it for hundreds of years but the truth is much more impressive. It is said that spelt has been cultivated since around 5,000/6,000 BC. Over the years, wheat became the dominant grain which we bake with and spelt was, for many years, relegated to animal feed. Since the 1970s ancient grains have been re-introduced to UK soils and thankfully now it is among one of the more popular ancient grains. Milling historic, heritage grains since 1978, Doves Farm has led the way in this and was the first in the UK to grow and produce flour from spelt.

Spelt isn’t a gluten free grain, but the gluten it does contain is different from what regular wheat flour contains. The gluten in spelt can be easier to digest for those with an intolerance to gluten (not coeliac or allergic reactions). Flavour wise, I like to compare the grain to wholemeal flour, but sweeter - no real bitterness is present, it’s a great taste that suits a wide variety of flavours. As it is also a soft flour, it makes for particularly tender recipes, just be careful not to overmix recipes made with spelt, unlike recipes made with wheat which become tough when over-worked, spelt recipes can become crumbly, so only mix as much as needed.

Doves Farm Organic Stoneground Wholemeal Spelt Flour is available from ASDA, Morrisons, Ocado and Sainsburys

PB&J Doves small 3.jpg

Spelt Peanut Butter and Jelly Sandwich Cookies
Makes 10 sandwich cookies

60g unsalted butter, room temperature
150g light brown sugar
1 tbsp golden syrup/honey
1 large egg
1 tsp vanilla extract
150g smooth peanut butter 
150g Doves Farm Organic Stoneground Wholemeal Spelt Flour 
85g rolled oats
1/4 tsp baking powder
1/2 tsp baking soda
1/2 tsp fine sea salt

Filling
30g unsalted butter, room temperature
120g smooth peanut butter
50g icing sugar
125g raspberry jam

Preheat the oven to 180ºC (160ºC Fan) and line a couple trays with parchment paper.

To make the cookies place the butter, sugar and golden syrup into a large bowl and using an electric mixer beat until fluffy and lightened in colour, 3-4 minutes. Add the egg and mix briefly until combined. Add in the vanilla and peanut butter and mix together until you have a smooth uniform mixture. Add in the Doves Farm Wholemeal Spelt, oats, baking powder, baking soda and salt and mix briefly until a uniform dough is formed. Roll the dough into small balls (if you want to weigh them the balls of dough should be about 30g or so each) and place onto the prepared baking trays. Using the base of a flat drinking glass, thats been dipped in flour, press the balls flat into pucks. 

Bake in the preheated oven for about 12 minutes. The cookies should have a lightly browned edge and be paler in the middle. Allow to cool on the trays for a couple minutes before transferring to a wire rack to cool completely. The finished cookies will be crisp on the outside with a chew in the middle. 

For the filling place the butter into a medium sized bowl and beat together until smooth and creamy. Add in the peanut butter and beat until combined and fully combined. Add in the icing sugar and beat together until smooth and combined. 

To assemble the cookies spread a small amount of the frosting onto half the cookies and top with a small spoonful of jam. Sandwich together with a second cookie. Kept in a sealed container these will keep for about 3 days.

PB&J Doves small 2.jpg
In Biscuits and Cookies Tags pbj, peanut butter, jelly, raspberry, cookie, oatmeal, oats, sandwich cookie, sandwich cookies, doves farm, spelt flour, easy baking
2 Comments
chocoalte caramel tart.jpg

Peanut Butter and Pretzel Caramel Tart

Edd Kimber August 6, 2019

I am currently working away on a project that I am super excited about but it is taking up a lot of my time so I am currently going through my archive to find recipes to share with you guys, to tie you over until the project is finished. Whilst looking for recipes I remembered this tart that I never got around to sharing. It was initially included in a pitch for a big piece of work I wanted to do around chocolate that ended up never getting a green light and sadly I forgot about it. Sadly because seeing the pictures reminded me just how wonderful this dish is. So enjoy it, finally!

Sweet and salty isn’t unusual these days, it’s to be expected. We all now generally understand that just like savoury food sweet things need seasoning and with ingredients like chocolate and caramel sometimes a little salt can help to enhance and highlight flavour whilst balancing the sweetness. This simple tart takes this idea and dials it up to eleven. The crust uses a simple biscuit style base, think the type of base you’d make for a cheesecake. The difference though is egg white. I love the texture of biscuit bases but find them a little tricky when you want nice neat slices, they’re just two crumbly. The addition of an egg white helps to bind the mixture together and makes it a lot easier to work with. Peanut butter and chocolate are a classic combo and anyone who’s ever opened a pack of peanut butter cups will know, a dangerously addictive one at that. The ganache used in this tart is made with a mixture of dark and milk chocolates, milk for the creamy sweetness that goes wonderfully with peanut butter but dark chocolate from preventing the tart from being too sweet.

chocoalte caramel tart-3.jpg


Serves 12

Peanut Pretzel Biscuit Base
50g salted peanuts
100g salted pretzels
75g digestive biscuits (or graham crackers)
100g unsalted butter, melted
1 tbsp light brown sugar
1 large egg white

Peanut Butter Caramel
225g caster sugar
180ml double cream
20g unsalted butter
1/2 tsp salt
2 heaped tbsp smooth peanut butter

Ganache Topping
140g dark chocolate, 65%-75% cocoa solids, finely chopped
140g milk chocolate, 40%-50% cocoa solids, finely chopped
20g unsalted butter
150ml double cream

For the biscuit base finely crush the peanuts, pretzels and digestives into a fine crumb then mix together with the butter, brown sugar and the egg white. Press into a loose bottomed 9 inch round tart tin, using your hands or a flat bottomed glass to compact into the base and up the sides of the pan. Bake in an oven preheated to 180C (160C fan) for about 10-12 minutes just until the biscuit base is set and starting to brown slightly. Remove from the oven and set aside to cool.

To make the caramel filling place the sugar into a medium sized saucepan and cook over medium heat until the sugar has melted and caramelised, turning the colour of an old rusty penny. Carefully pour in the cream, stirring gently until the caramel is smooth then add the butter and salt and mix until combined. Remove from the heat and allow to cool down for 10 minutes before stirring in the peanut butter. Pour the caramel into the cooled tart, spreading into an even layer. Refrigerate for an hour or so until the caramel is firm.

Meanwhile place the chocolates for the ganache into a heatproof bowl, set over a pan of simmering water and heat, stirring occasionally, until the chocolate is fully melted. Place the butter and cream into a small saucepan and bring to a simmer. Remove the pan from the heat and pour the cream over the chocolate and set aside for a couple minutes before stirring to form the ganache. Set the bowl aside until the ganache has thickened into the consistency of whipped cream. Dollop the ganache onto the tart and spread out, almost to the edges. Set aside at room temperature for a couple hours to allow the ganache to fully set. When ready to serve sprinkle the ganache with a little flaked sea salt.

Best served on the day made but can be refrigerated for up to 4 days just allow to come to room temperature before serving.

chocoalte caramel tart-2.jpg
In Pastry, Chocolate Tags peanut butter, caramel, pretzel, press in crust, salted caramel, chocolate, ganache, tart
6 Comments

Twitter

  • Was 8 original films, 3 spin off films, a two part play not enough. Can we have something new. https://t.co/cBZdGEGeyv
    Apr 4, 2023, 1:46 PM
  • RT @deliciousmag: Cacio e pepe, but make it buns! These seriously cheesy bread rolls from @TheBoyWhoBakes are inspired by his favouri… https://t.co/oDZlaDgnN2
    Apr 2, 2023, 11:08 AM
  • RT @TheDailyShow: Congrats to Donald Trump on finally winning a majority of votes! https://t.co/ezP55HZgl0
    Mar 31, 2023, 12:43 AM

Instagram

This weeks bonus recipe, for subscribers to my newsletter, is this gorgeous sour cherry and coconut gateau basque. The crust is a buttery cross between pastry and cake, think a cakey cookie. The filling is a layer of sour cherry topped with a rich coconut custard. A real fun one to make too! Link to my newsletter can be found in my bio - #gateaubasque #pastrycream #coconut #sourcherry
In this months @olivemagazine (out today) the team came and photographed my petit kitchen and we talked about how we put our stamp on the place, without spending a fortune. We hated the bland kitchen that we inherited but, as it was relatively new an
In this months @olivemagazine (out today) the team came and photographed my petit kitchen and we talked about how we put our stamp on the place, without spending a fortune. We hated the bland kitchen that we inherited but, as it was relatively new and in good condition, it felt a waste to rip it out and we also didn’t want to spend the money it would take to rip out the whole thing and replace it (it’s a howdens shell so we could have done something cheaper like @plykeakitchens @holte.studio @madebyhusk) so instead I painted all of the cabinets, using @makeitrustoleum kitchen cabinet paint, to give it some personality and lighten the whole thing. Check out the magazine for the full run down. - #kitchendesign #kitchenremodel #rustoleumcabinettransformations #rustoleumkitchencupboardpaint #kitcheninspiration #theboywhobakes #olivemagazine
Are you making scones all wrong? Maybe, maybe not? But I do want to show you how I make them! This recipe is based on the method I learnt at @belmondlemanoir 12 years ago when I did a stage, and it makes the absolute lightest scones. And shock horror, it involves kneading the dough, albeit very lightly. You can get the full recipe in this weeks newsletter (free) linked in my bio. - #scones #bakingday #worldbakingday #afternoontea #hightea #englishscones #clottedcream #creamtea #theboywhobakes
facebook
  • Contact

The Boy Who Bakes

Edd Kimber

facebook