The Boy Who Bakes

Edd Kimber
  • Home
  • Recipes
  • My Books
  • Blog
  • Recipe Index
  • About
  • Home
  • Recipes
  • My Books
  • Blog
  • Recipe Index
  • About

Recipes

  • All
  • baking
  • Biscuits and Cookies
  • Breads and Quickbreads
  • Bundts
  • Cakes
  • Chocolate
  • Dessert
  • drinks
  • Holidays
  • Pastry
  • Scones and Quickbreads

Turkish Sesame Simit Bread

Edd Kimber July 14, 2022

Simit is a quintessentially Turkish recipe, sold everywhere, it is a very popular bread, commonly served at breakfast or as a snack. The shaped bread is coated with a pomegranate molasses slurry before being coated generously in sesame seeds. The shaping of the bread may look daunting but the process is not as complicated than you may think. My favourite way to serve it is alongside another classic dish, Menemen, a Turkish style scrambled egg, its the perfect breakfast dish.

Simit
Makes 6

500g strong white bread flour
7g fast action dried yeast
15g fine sea salt
20g caster sugar
30ml olive oil
280ml whole milk

To Coat
75ml pomegranate molasses
25ml water
1/2 tbsp plain flour
100g sesame seeds

To make the dough place the flour, yeast, salt and sugar into the bowl of a stand mixer, fitted with the dough hook, and mix briefly to combine. Pour in the oil and whole milk and mix to form a shaggy dough. Once combined continue kneading the dough on a low/medium speed until the dough is smooth and elastic. This dough is relatively low hydration so if your stand mixer struggles with stiffer doughs you may want to knead this by hand, it should take about 15 minutes until the dough is ready. Form the dough into a ball and place into a lightly oiled bowl. Cover and set aside for 60-90 minutes or until doubled in size.

Whilst the dough is rising prep the topping, whisk together the molasses, water and flour. Place the sesame seeds into a shallow tray.

Divide the dough into 12 equal sized pieces and form each into a ball. Forming the dough into balls will make the dough tight so cover them with a damp kitchen towel and leave to rest for 15-20 minutes. Working with two balls of dough at a time, roll each piece of dough into long ropes, roughly 45-50cm long. Twist the two ropes of dough together, then form in a circle and press the ends together. You can lightly moisten the ends with water to ensure the ends stick together, but with enough pressure you shouldn’t need it. Carefully dip the simit into the molasses mixture, coating both sides, then transfer to the sesame seeds, coating both sides entirely with the seeds.

Place the simit onto one of two large parchment lined baking trays. Repeat with the remaining dough. Cover the trays lightly with kitchen towels or clingfilm and set aside for 45 minutes or until puffy and risen but not yet doubled in size. Whilst the bread is rising preheat the oven to 210ºC (190ºC Fan). Once risen bake in the preheated oven for about 15-18 minutes or until a deep golden brown. Remove and set aside to cool.

Kept covered the Simit will keep for 2 days but can also be frozen for up to a month.

In Breads and Quickbreads Tags simit, bread, turkish, sesame, sesame seeds, menemen
7 Comments
challah-3.jpg

Salted Sesame Challah

Edd Kimber April 7, 2021

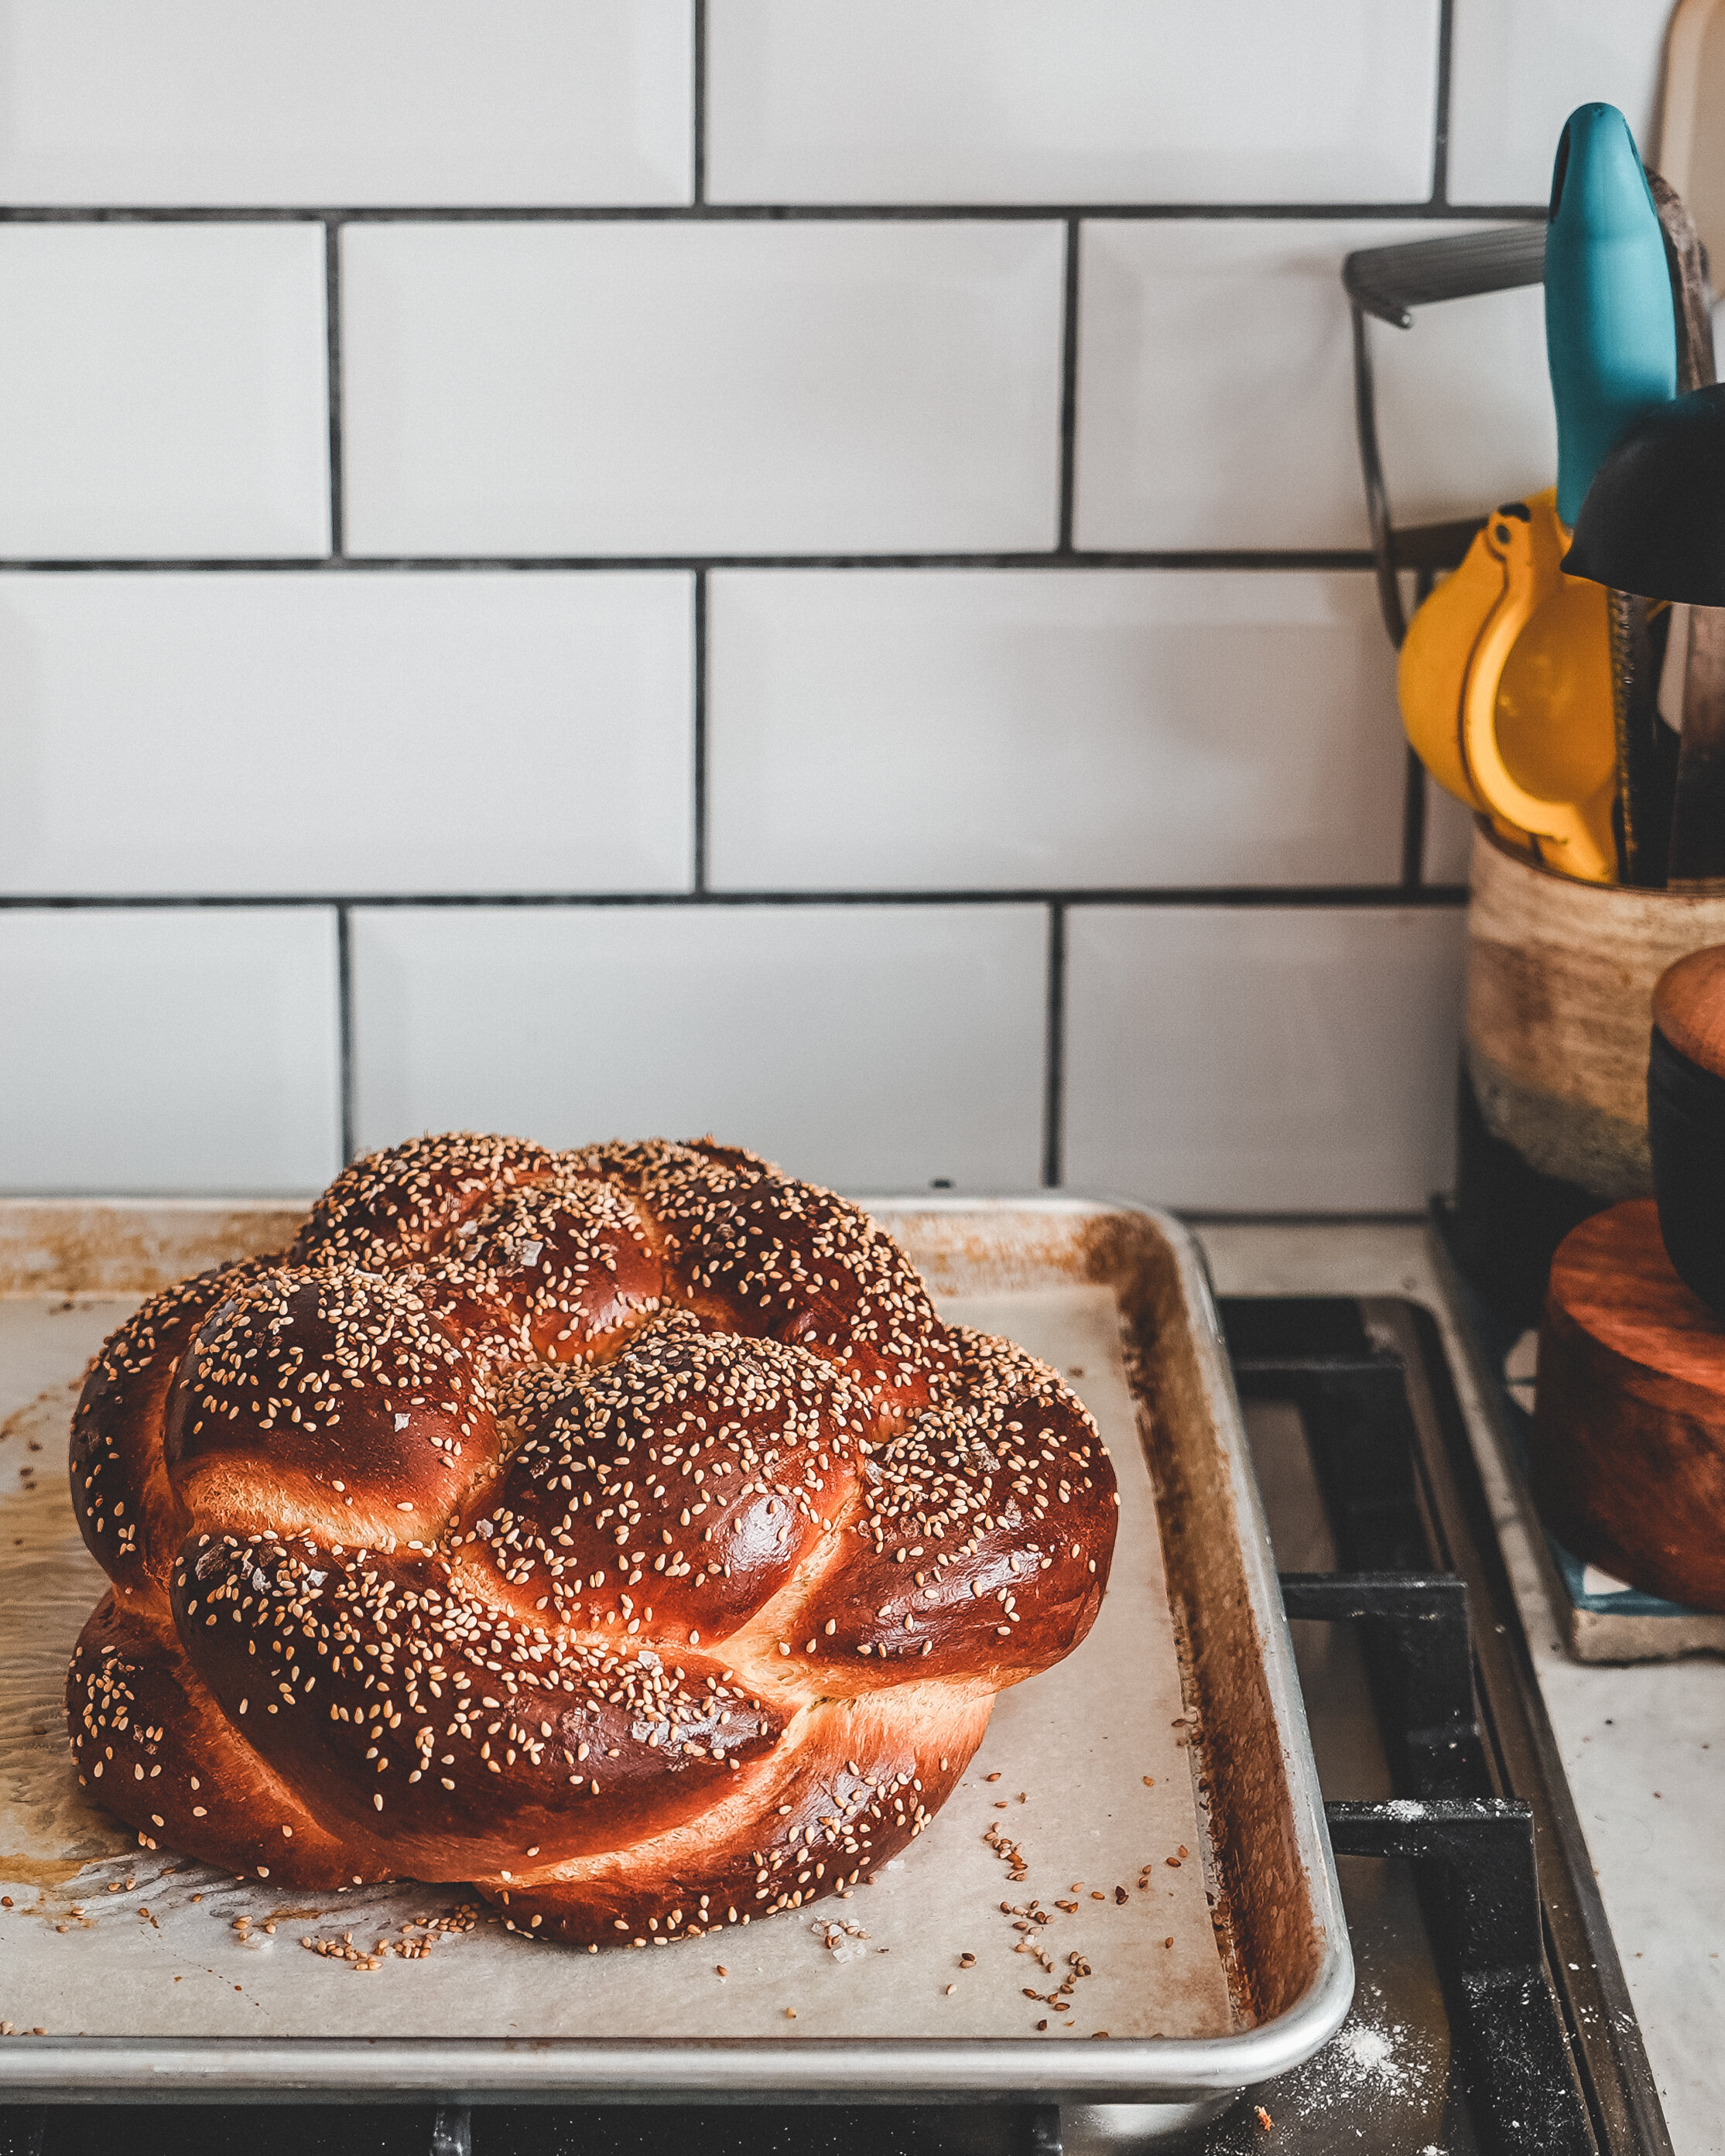
I rarely get a chance to bake for the fun of it anymore, every recipe is for a job, a book, or some other project. I miss it. I miss the joy of waking up and deciding today is a chocolate chip cookie day. It’s not that I don’t love my job and its not as if there isn’t enough baked goods in my life, its just the spontaneity. These last weeks have been a blur of deadlines as I try and get all the projects I have on the go past the line, so that I have the time to spend with my puppy when he gets here at the end of the week (I can barely contain my excitement) but thankfully I got everything finished a little early and instead of taking it quietly for a few days, I woke up with the desire to bake something, specifically I wanted to make a loaf of Challah. 

Challah is a bread of Jewish origin, commonly served on Friday nights in Jewish households to celebrate the sabbath. In keeping with Jewish traditions and religious beliefs the bread is made without dairy, so no milk or butter as found in the similar French bread, Brioche. The reasons for wanting to make a loaf were two fold. Firstly I had been seeing so many loaves over on tiktok (yes I am on tiktok now, follow me if you’re on the app) and it got me itching to make one. Secondly I had been wanting to play around with a braided crown loaf for a long time but never found the excuse. Whilst any loaf of bread can be braided in this manner a crown braided Challah is often served on Rosh Hashanah, the round shape representing either community, the passing of the seasons or a spiral of upwards progress. 

The recipe I loosely based my loaf on comes from Tel Aviv based baker Uri Scheft and his book Breaking Breads. My adaption takes into account the flours of the UK, making a dough for a single loaf and flavouring it with honey, sesame and salt. 

Salted Sesame Challah
250g plain flour
250g strong white bread flour
7g fast action dried yeast
10g fine sea salt
185ml lukewarm water
1 large egg
1 large egg yolk
4 tbsp honey
3 tbsp vegetable oil
Flaked sea salt and sesame seeds, for sprinkling

For the dough place the two flours, the salt and the yeast into a large bowl and mix together. In a jug whisk together the remaining ingredients, whisking until the honey dissolves into the water. Make a well in the dry goods and pour in the wet goods. Mix together to form a shaggy dough and then tip out onto the work surface and knead until smooth and elastic, about 10 minutes. The finished dough should be smooth and supple and a little firm. Challah dough isn’t sticky like brioche, it should be easy to handle. 

challah-4.jpg

Form the dough into a ball and place into a lightly oiled bowl. Cover and set aside until doubled in size, about an hour. Once risen tip the dough out onto the work surface and knock back before dividing into four equal sized pieces. Working with one piece of dough at a time press into a flat rectangle and roll up like a small Swiss roll (watch the video to get a better visual of this process). Roll each piece of dough into a strand that is roughly 40-45cm long.

Braiding the four strands into a loaf of challah is not as difficult as it looks but to make it easier I encourage you to watch the video on this page, watch it a few times, get familiar with the process as it is very easy to get lost in the process once you start. When I braid the loaf I basically say to myself ‘under goes over’ repeatedly and that keeps me on the right track. If you want a slower, step by step, guide to this particular braid this video from Jamie Gellar is also very helpful.

challah-2.jpg

Once the loaf is braided and you’ve tucked the ends under the loaf, carefully lift the challah onto a parchment lined baking tray. Lightly cover and set aside or until almost doubled in size, about 45-60 minutes. Whilst the bread is proving preheat the oven to 220C (220C Fan).

When ready to bake brush the bread with a lightly beaten egg white and sprinkle liberally with flaked sea salt and sesame seeds. Place the baking tray into the oven and bake the challah for about 25 minutes or until golden brown. Remove from the oven and set onto a wire rack and leave until fully cooled.

The challah will keep for 2-3 days.

In Breads and Quickbreads Tags challah, jewish, bread, kosher, dairy free, braided, sesame, salted, crown braid, crown braided challah
2 Comments
Focaccia Feed Post 1.jpg

No-Knead Za'atar Focaccia

Edd Kimber March 4, 2021

Post Sponsored by AEG

If you haven’t guessed it already, I am currently a little obsessed with all things no-knead. Now look, I love sourdough but life has been a bit manic recently and my attention span is spent. No knead recipes gives you the ability to make excellent bread with almost no work. This focaccia is maybe the easiest of all no knead breads, I can’t see how you eliminate any more of the work because really there isn’t any. No knead breads work because they are risen very slowly and as they do so the gluten develops without the need for kneading. It’s an incredible technique that is widely credited to Jim Lahey a baker from NYC that help promote the technique and published the first widely popular recipe for it in the New York Times in 2006. Whilst this was the start of the techniques popularity for a new generation of bread bakers, the idea of no-knead breads actually go back much further than the early 2000’s. There is evidence that similar methods were used as far back as the 1800’s, but there is no doubt Lahey’s method brought the bread to popularity for a new generation. 

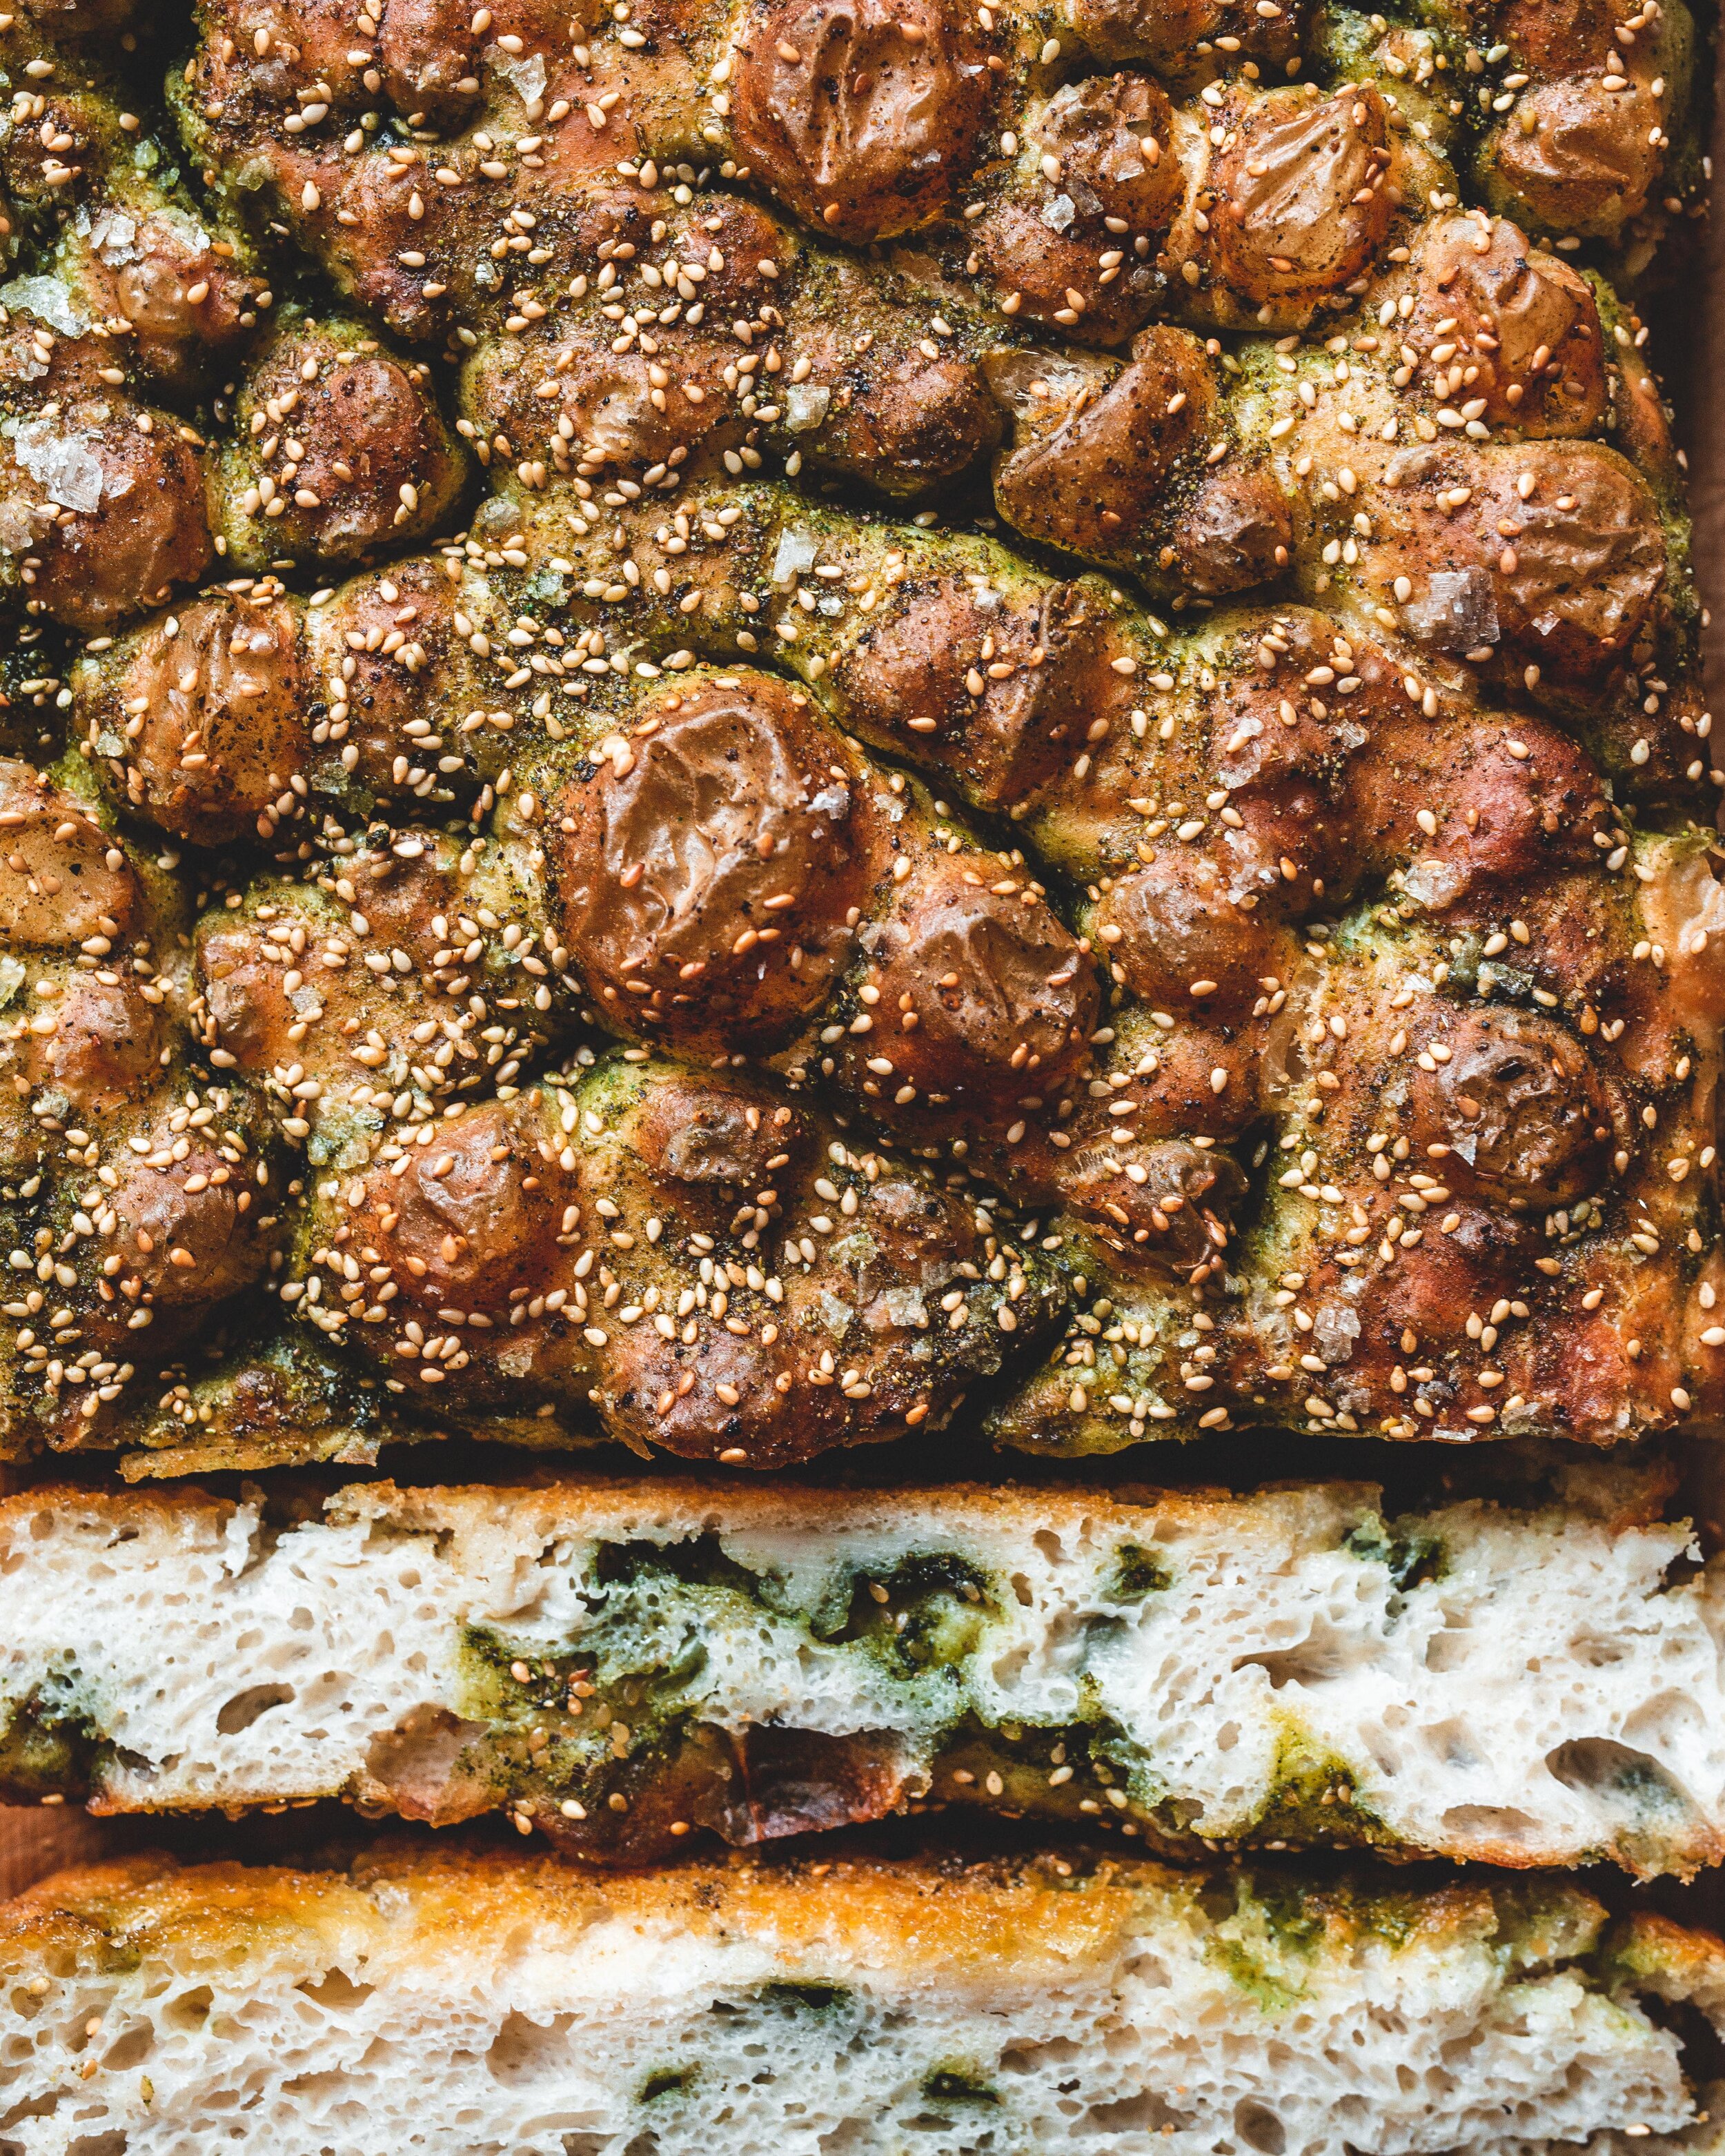
For this particular recipe I wanted to make something with za’atar, one of my favourite seasoning blends. Confusingly za’atar is both a specific herb and a herb blend, the latter being what you’re likely to have heard of before. The herb za’atar is grown across the middle east and both the herb itself and the blend are incredibly important to Levantine cooking. Traditionally the blend would be made from za’atar and mixed with sesame seeds, sumac and salt, although this blend will vary a lot depending on where it is made. These days most shop-bought blends outside of the Middle East are made with thyme, oregano and sometimes marjoram. 

Focaccia Feed Post 2.jpg

One of my favourite dishes made with za’atar is probably its most famous use, man’oushe, a thin flatbread spread with a mixture of oil and za’atar. Because I wanted to make another no knead recipe and it to be a loaf rather than individual flatbreads I settled on a focaccia, a bread made with lots of olive oil already I thought it would be the perfect pairing up, and I am thrilled with the finished recipe, its delicious. You get the wonderful flavour from the olive oil and za’atar and the chewy spongy texture of the focaccia, a match made in heaven. 

As you may also know no-knead breads are very often made inside a cast iron dutch oven, the heat of the pot helps with oven spring and crust development and a lot of this is down to steam. The pot traps the steam released from the bread which helps the bread open up fully and helps to create a light crisp crust. With focaccia a pot isn’t an option of course so instead I introduced steam using my oven. After moving in my new house and finding a disaster of an oven I needed a replacement and I settled on the AEG Steam Bake (BPS556020M), and I chose that model because of bread. The oven has all the classic functionality you’d beed but it also includes a stem bake function where water is added to a reservoir at the bottom of the oven and it creates a steamy environment which is brilliant for bread. I tested this recipe multiple times and on the occasions I used the steam function the bread rose higher and had a more crisp crust, a win-win. The oven also comes with a food sensor which you can use to check the internal temperature of your roast, or even your baked custards or breads. More importantly, because I hate cleaning my oven, it is Pyrolytic meaning it self cleans!

IMG_2435.jpg

No Knead Za’atar Focaccia

Focaccia
500g strong white bread flour
7g fast action dried yeast
2 tsp fine sea salt
2 tsp caster sugar
450ml cold water
3 tbsp extra virgin olive oil

Topping
2 tbsp za’atar
4 tbsp extra virgin olive oil, plus extra for the tin
roasted sesame seeds (optional)

To make the dough add the flour, yeast, salt and sugar to a large bowl. Pour in the water and use your hands or a wooden spoon to mix together until everything is hydrated, just making sure there are no packets of flour. Add 2 tbsp of the olive oil and mix briefly to combine, drizzle over the last of the olive oil. Thats it. Thats the entirety of the work. Cover the bowl with clingfilm and refrigerate for 12-24 hours. 

When you want to bake the loaf remove the dough from the fridge and generously oil a 9x13 tin. I’m not a big fan of non-stick bakeware but if you have one it can be helpful for this recipe as they dough can sometimes stick to the base of the tin. To prevent this you can also line the base with parchment paper. 

Deflate the dough by folding the edges of the dough away from the bowl and into the middle of the dough. Tip the ball of dough out into the prepared tin and gently press and stretch it out the corners, not worrying that it perfectly fills the tin, it will spread out as it rises. Cover the tin and set the focaccia aside until it has doubled and is visibly bubbly on the surface with a generous wobble, this will take about 2-3 hours at room temperature. 

Using the AEG Steam Bake oven add 200ml water to the reservoir in the bottom of the oven, set the oven to True Fan Cooking and press the Plus Steam Button. Set the temperature to 200ºC. Using a different oven preheat the oven to 220ºC (200ºC Fan).

For the topping mix together the za’atar and oil to make a thin paste. Drizzle this all over the risen dough and gently spread with your hands to cover the entire loaf. At this point your fingers should be nice and oiled up, but if not rub a little oil over your fingers to lubricate. Use your fingers to dimple the loaf all over. Finish by sprinkling the dough generously with flaked sea salt. The za’atar blend will already include sesame seeds but I like to sprinkle a little extra but this is optional.

Bake in the preheated oven for about 20-25 minutes or until golden brown. Remove from the oven and carefully remove from the tin, setting onto a wire rack to cool completely. 

In Breads and Quickbreads Tags no knead, focaccia, zaatar, sesame, bread, easy, simple
8 Comments
Tahini Babka Buns WEb small.jpg

Chocolate Tahini Babka Buns

Edd Kimber June 20, 2020

The countdown is on, with only a few days left until One Tin Bakes is finally out in the world. After waiting well over a year my new book is finally published and to say I am excited is an understatement. I can’t wait for you guys to see it, to bake from it and to have it in your kitchens. Always the impatient baker, I couldn’t wait until publication to share a recipe from the book with you, so today I am sharing one of my favourites, the Chocolate Tahini Babka Buns. I am also telling you that the book is out NEXT THURSDAY and if you want it on the day there is still time to preorder, hint there is a link here.

Think of these buns as the meeting of cinnamon buns and babka with tahini thrown in for good measure. The story I tell in the book is how these were inspired after spending the afternoon in the kitchen with Uri Scheft, the baker who led the recent rise in popularity of babka, in the United States and around the world. The traditional babka, of Eastern European Jewish origin, is made with leftover challah dough rolled up with jam or cinnamon, It’s a world away from the babka that most people are making these days, it also lacks the adoration the modern version receives, it seems to have a love it or hate it quality, denser and drier than its modern counterpart. So, what changed the babka’s fortunes? Well, the answer seems to be simple…butter. Traditional Jewish breads would have been made with oil to keep them parve, but when non-jewish or non-parve chefs took on the babka in the early 2000’s they started making them with butter, the doughs became more brioche in style and the fillings became richer with more and more chocolate added. The one modern recipe that can fairly claim the crown, for pushing the babka into a wider public consciousness, is the one served at Breads Bakery in New York. The bakery was founded with Israeli baker Uri Scheft, of Lehamim Bakery (the partnership has since dissolved), and the babka that the bakery introduced to NYC became a true media darling, it was quite literally everywhere. Every magazine, every paper, every blog, it was a bread that went viral. And more importantly, it became the standard, the version that most people now think of when they think of babka, a swirled bread made with a brioche like dough and swirled with chocolate.

Tahini Babka Buns small.jpg

I was lucky to spend the afternoon in the kitchen with Scheft early last year where he taught me his famous babka recipe, as good as I remembered when I first tried in NYC. During that trip, where babka and tahini seemed to be two daily staples, the idea of sneaking in a little tahini into a chocolate babka seemed like an obvious one. On arriving back home I tried out the idea immediately, before my bags were even unpacked, with the memory or Uri’s version still fresh in my mind. I knew immediately it was a good thing, have a second slice good. The version I am finally posting is the one I made for One Tin Bakes, adapting the idea to the form of cinnamon buns which made the recipe 9x13 friendly. If you don’t follow me online elsewhere or you have managed to miss my last few posts let me briefly explain the book. The idea is that every single recipe is baked in the same 9x13 tin (its a classic brownie tin) making the required equipment so much lower than most baking books, hopefully making it more approachable. The recipes run the gamut in terms of style, required skill, and time required to bake them. There is something for everyone and no matter whether lockdown has got you baking for the first time or you’ve baking since you were a kid you’ll find something you will love. 

COMPETITON TIME

Before we get to the recipe I have one last thing to tell you, its competition time! To celebrate the release of the book I have partnered with Nordicware, Guittard Chocolate and Belazu to create a brilliant prize package. The prize is a signed copy of the book, a One Tin Bakes tote bag, the Nordicware 9x13 tin I recommend in the book plus one of their iconic bundt pans, a whopping 3kg bag of Guittard Chocolate (they’re providing a bag of one of my favourites) and belazu are proving a selection of their tahinis (classic and their new black tahini) and oils. To enter the competition all you have to do is make one of the recipes from the book and post a picture on instagram saying that it came from my new book One Tin Bakes and tagging me using the hashtag #OneTinBakes. Obviously the book comes out halfway through the window for this competition so feel free to make these babka buns or get yourself a copy of the June issue of Olive magazine which has a bunch of other recipes from the book. Competition is only open to UK residents and the winner will be picked at random. 

Chocolate Tahini Babka Buns
Taken From my book One Tin Bakes (Kyle Books 2020)
Makes 12 

Brioche Dough
500g strong white bread flour, plus extra for dusting
25g caster sugar
1 teaspoon fine sea salt
7g fast-action dried yeast
250ml whole milk
2 large eggs
100g unsalted butter, at room temperature, diced, plus extra for greasing 

Chocolate Tahini Filling
100g dark chocolate (65–70% cocoa solids), finely chopped
100g unsalted butter, diced
55g light brown sugar
100g tahini
flaked sea salt, for sprinkling 

Vanilla Syrup
65g caster sugar
1 teaspoon vanilla extract
2 teaspoons sesame seeds 

OTB pink swirl.png

For the bread dough add the flour, sugar, salt and yeast to the bowl of an electric stand mixer with the dough hook attachment and mix briefly to combine. Add the milk and eggs and knead on medium-low speed for about 10 minutes, or until the dough is smooth, elastic and pulling away from the sides of the bowl. With the mixer still running, add the butter, a little bit at a time. Once the butter has been worked into the dough, continue kneading for a further 10 minutes or so until the dough is once again pulling away from the sides of the bowl. Place the dough in a lightly greased bowl, cover with clingfilm and refrigerate overnight or for up to 2 days. If you prefer, you can let the dough rise at room temperature, but it’s worth making this in advance as the dough is much easier to handle when thoroughly chilled.

The next day, lightly grease or line the base of the 9x13 baking tin with a piece of parchment paper. Make the filling. Place the chocolate and butter in a heatproof bowl set over a pan of simmering water (ensuring the bottom of the bowl doesn’t touch the water underneath) until melted. Remove from the heat, stir in the brown sugar and tahini, then set aside. 

Remove the dough from the refrigerator and, working on a lightly floured surface, roll out into a large 50 x 50cm (20 x 20in) square. Spread the chocolate tahini mixture evenly over the dough. At this point, the tahini mixture will be loose and glossy, so if you attempt to roll the dough up now it will be very messy, therefore, allow the mixture to sit for a couple of minutes until it goes a little tackier and loses its shine (don’t leave this too long though, because the filling will eventually set, meaning it won’t stick to the dough when it’s rolled). Sprinkle over a little flaked sea salt and roll up the dough into a tight sausage. 

Cut the sausage into 12 equal-sized slices and place them, cut-side up, into the prepared baking tin. Cover with clingfilm and set aside to prove in a warm place for 45 minutes to 1 hour, or until the rolls are touching each other and feel puffy to the touch. 

Meanwhile, preheat the oven to 190°C (375°F), Gas Mark 5. Bake the buns for 30–35 minutes, or until golden brown. 

Meanwhile, make the syrup. Place the caster (superfine) sugar and 60ml (1⁄4cup) water in a small saucepan and cook over a low heat just until the sugar has dissolved. Remove from the heat and add the vanilla. 

When the buns come out of the oven, while still hot, liberally brush them with the syrup and then sprinkle over the sesame seeds. Leave the buns to cool completely in the tin before removing and serving. 

Stored covered, these buns will keep for 2–3 days. 

In Breads and Quickbreads, Chocolate Tags babka, buns, tahini, cinnamon buns, cinnamon rolls, one tin bakes, sesame, sesame seeds
20 Comments

Twitter

  • Was 8 original films, 3 spin off films, a two part play not enough. Can we have something new. https://t.co/cBZdGEGeyv
    Apr 4, 2023, 1:46 PM
  • RT @deliciousmag: Cacio e pepe, but make it buns! These seriously cheesy bread rolls from @TheBoyWhoBakes are inspired by his favouri… https://t.co/oDZlaDgnN2
    Apr 2, 2023, 11:08 AM
  • RT @TheDailyShow: Congrats to Donald Trump on finally winning a majority of votes! https://t.co/ezP55HZgl0
    Mar 31, 2023, 12:43 AM

Instagram

This weeks bonus recipe, for subscribers to my newsletter, is this gorgeous sour cherry and coconut gateau basque. The crust is a buttery cross between pastry and cake, think a cakey cookie. The filling is a layer of sour cherry topped with a rich coconut custard. A real fun one to make too! Link to my newsletter can be found in my bio - #gateaubasque #pastrycream #coconut #sourcherry
In this months @olivemagazine (out today) the team came and photographed my petit kitchen and we talked about how we put our stamp on the place, without spending a fortune. We hated the bland kitchen that we inherited but, as it was relatively new an
In this months @olivemagazine (out today) the team came and photographed my petit kitchen and we talked about how we put our stamp on the place, without spending a fortune. We hated the bland kitchen that we inherited but, as it was relatively new and in good condition, it felt a waste to rip it out and we also didn’t want to spend the money it would take to rip out the whole thing and replace it (it’s a howdens shell so we could have done something cheaper like @plykeakitchens @holte.studio @madebyhusk) so instead I painted all of the cabinets, using @makeitrustoleum kitchen cabinet paint, to give it some personality and lighten the whole thing. Check out the magazine for the full run down. - #kitchendesign #kitchenremodel #rustoleumcabinettransformations #rustoleumkitchencupboardpaint #kitcheninspiration #theboywhobakes #olivemagazine
Are you making scones all wrong? Maybe, maybe not? But I do want to show you how I make them! This recipe is based on the method I learnt at @belmondlemanoir 12 years ago when I did a stage, and it makes the absolute lightest scones. And shock horror, it involves kneading the dough, albeit very lightly. You can get the full recipe in this weeks newsletter (free) linked in my bio. - #scones #bakingday #worldbakingday #afternoontea #hightea #englishscones #clottedcream #creamtea #theboywhobakes
facebook
  • Contact

The Boy Who Bakes

Edd Kimber

facebook