The Boy Who Bakes

Edd Kimber
  • Home
  • Recipes
  • My Books
  • Blog
  • Recipe Index
  • About
  • Home
  • Recipes
  • My Books
  • Blog
  • Recipe Index
  • About

Recipes

  • All
  • baking
  • Biscuits and Cookies
  • Breads and Quickbreads
  • Bundts
  • Cakes
  • Chocolate
  • Dessert
  • drinks
  • Holidays
  • Pastry
  • Scones and Quickbreads

Eggnog Bundt Cake

Edd Kimber December 16, 2022

This post is sponsored by Wilfa

Every year I like to create a special cake for those of you who don’t love the traditional fruit cake, who despise all things dried fruit. This years cake is, I think, something rather extra special and I think you’re going to love it! I happen to love eggnog, be it the traditional version made with eggs, dairy and rum, or an apple cider version I have been making for the past few years, or even the vegan version I came up with this year. What I am saying is that If you’re making eggnog, I’ll happily take a glass or two. This year, I have taken those classic flavours and turned them into a truly fabulous bundt cake. The cake itself is a relatively classic pound cake, rich and buttery and spiked with lots of nutmeg and a good glug of rum. The cake also has a surprise up its sleeve; when whole it will resemble a very simple pound cake with a little white chocolate glaze, but when sliced the secret is revealed. A little bit like the classic ‘tunnel o fudge’ bundt cake, this recipe has a hidden layer of eggnog whipped cream, made with rum, nutmeg and vanilla. The cake has all the warming toasty flavours of eggnog with the same creamy cosiness you’d expect with the drink.

You’ll see in the recipe I suggest using a little toasted milk powder in both the cake itself and in the whipped cream filling. If you saw my video guide on how to make this magical powder you know it has the same flavour profile as browned butter and adding small amounts to these elements really acts as a wonderful flavour enhancer. I jokingly refer to it as the MSG of baking but its probably pretty accurate, it’s like a secret baking seasoning. It adds a gentle toasted, almost caramel like, flavour and whilst you may not be able to detect it as a distinct flavour it really adds depth and character to the recipe.

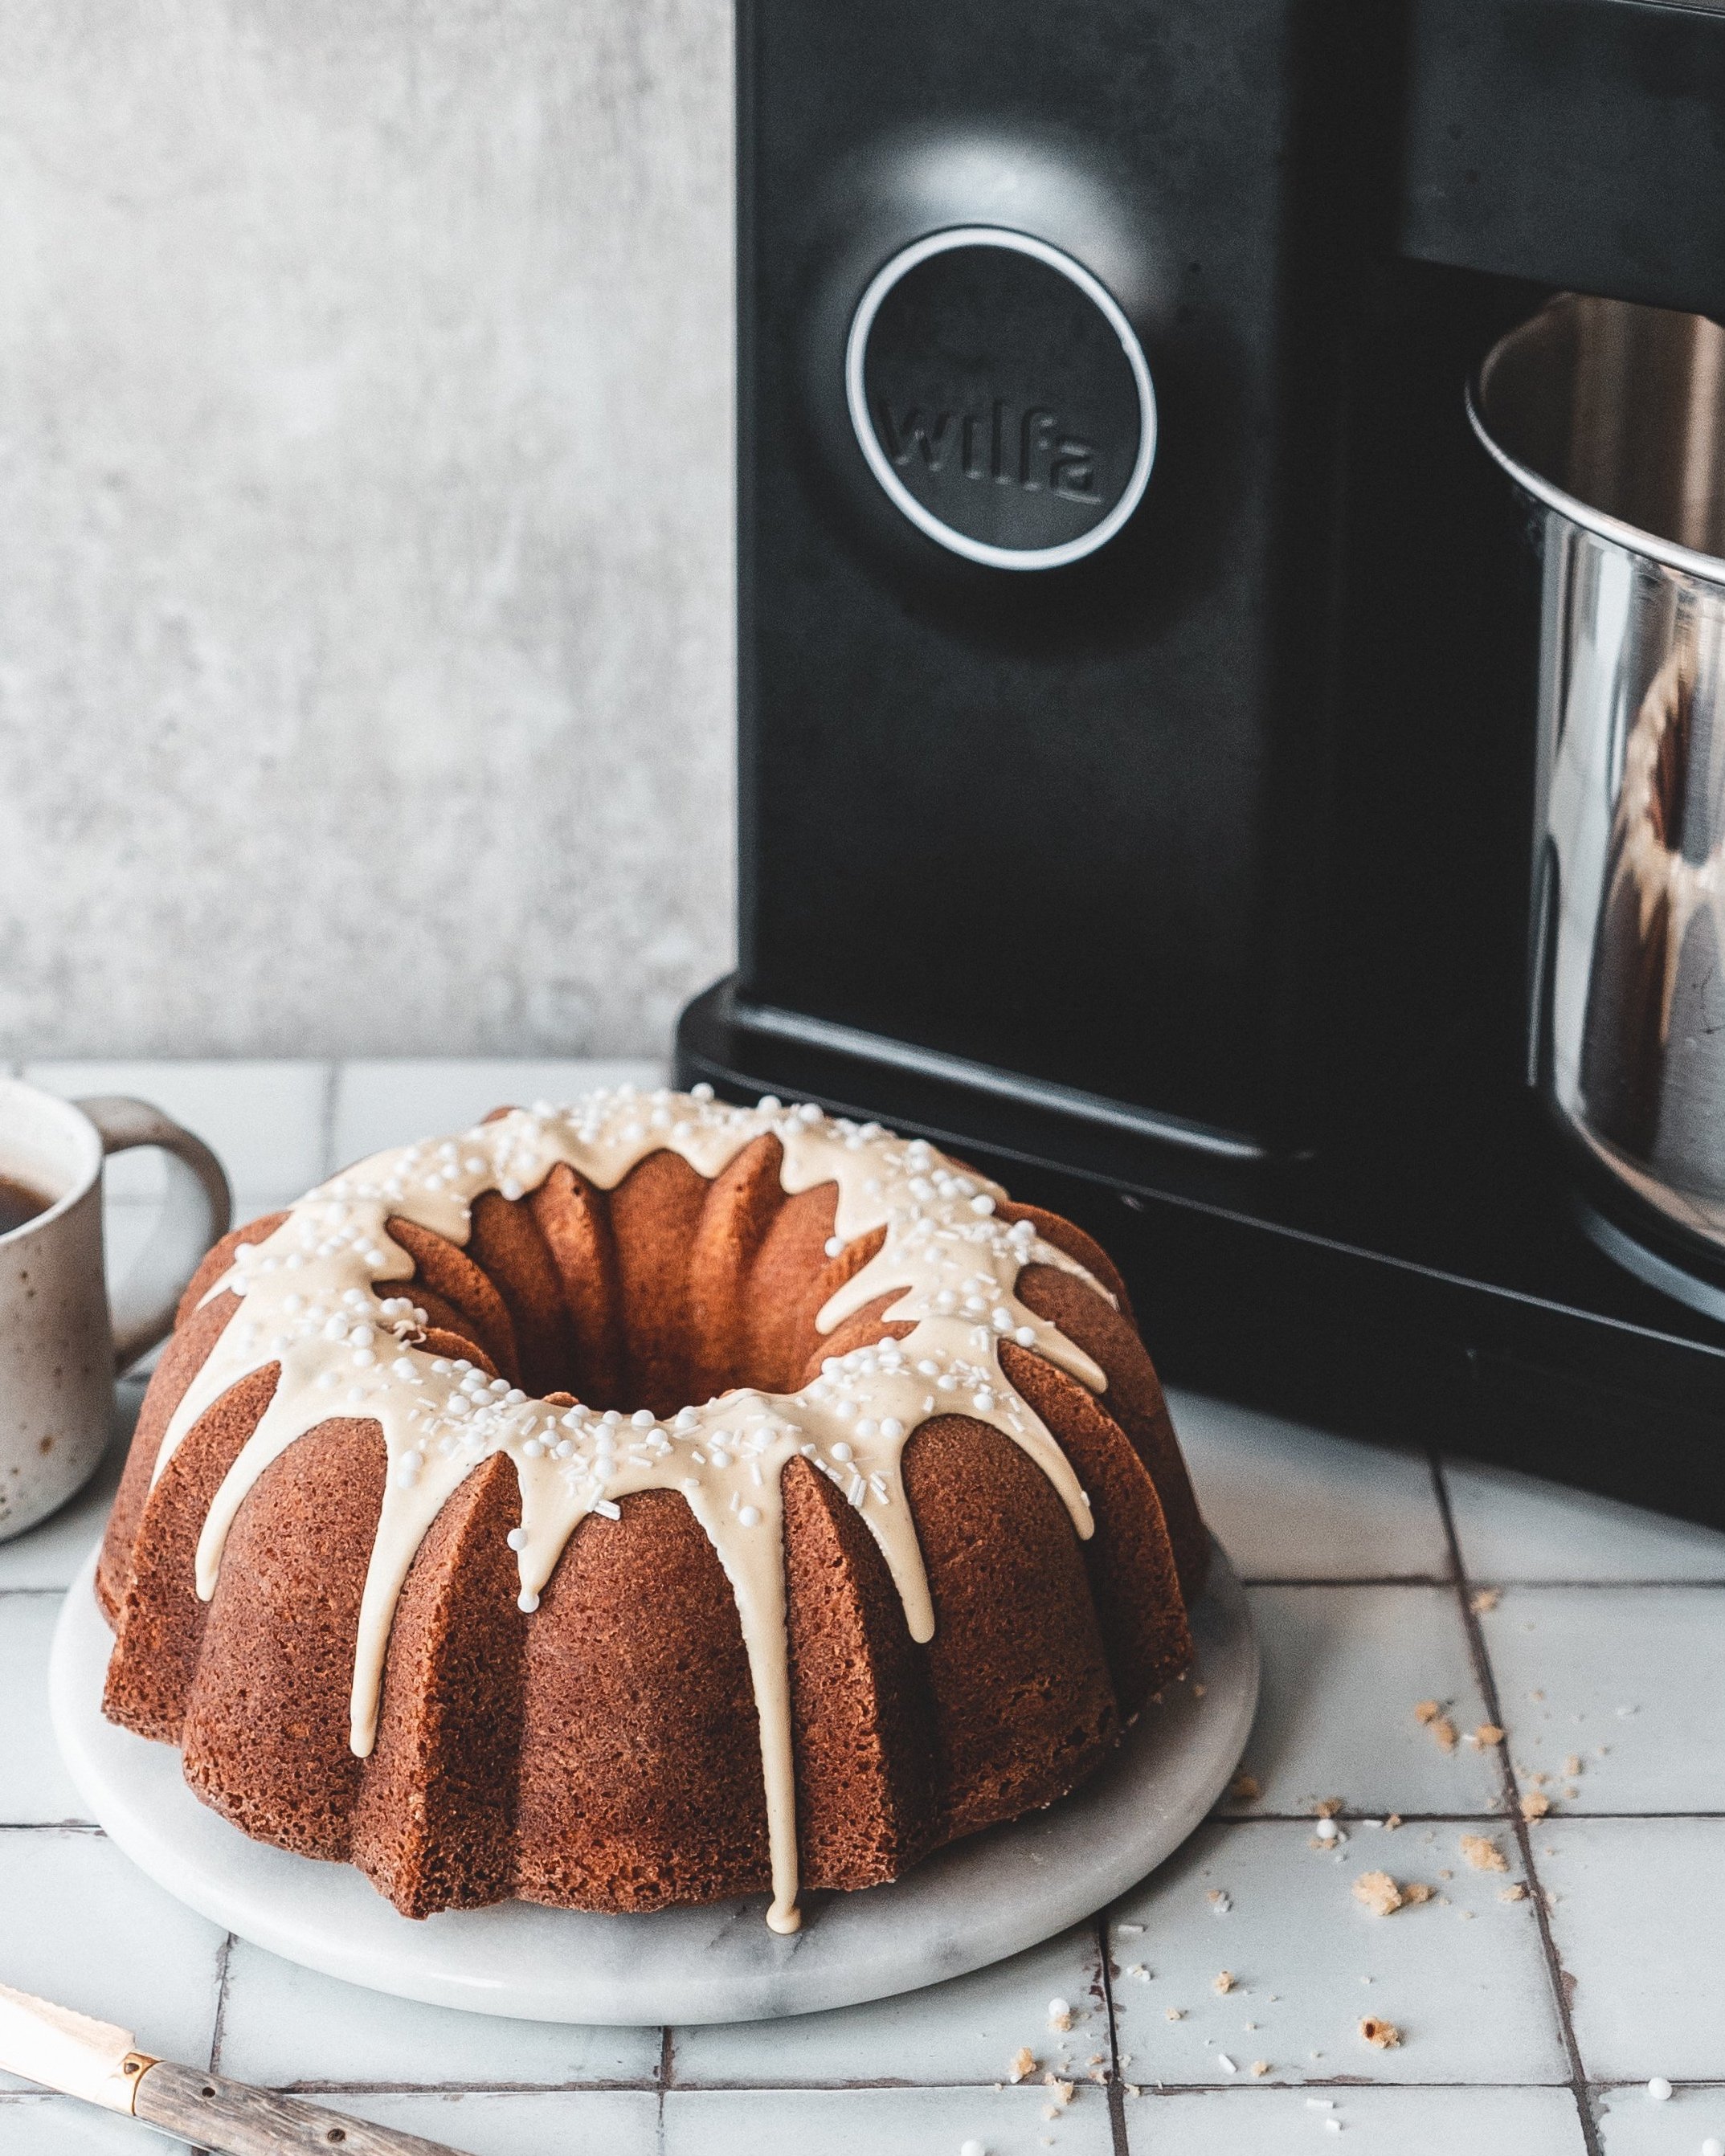
To make the cake I used my Wilfa Probaker, the amazing stand mixer I introduced to you last month. After that first post one of the main questions I received was, can it make more than bread (something it does better than any other domestic mixer I have ever tried), and the answer is of absolutely, yes! The Probaker is a multifunctional mixer, with attachments for whisking, for kneading and for beating. The other question I received multiple times was, is the mixer only good for big batches and the answer is no, this can be used as a regular domestic mixer, for single batches of cakes and cookies as well as making big batches, it is designed to work just a well making small batches as it is making big batches, its the best of both worlds. This cake was made with the flexible rubber ‘flexiVISP’ beater which scrapes both the sides and base of the mixer as it beats your ingredients together, which means it is more efficient and the bowl needs scraping down much less frequently than with a traditional metal beater. The other thing that I love this mixer for, when making cakes, is that you can have the mixer running and add dry goods into the bowl without them flying out of the bowl in a giant cloud of flour and icing sugar, a feature of the mixer that makes me very happy!

To get 20% off Wilfa products make sure to use the code THEBOYWHOBAKES at checkout.

Eggnog Bundt
Serves 12-15

340g unsalted butter, room temperature
450g caster sugar
3 tbsp toasted milk powder (optional)
2 tsp vanilla bean paste
5 large eggs, room temperature
1/2 a nutmeg, freshly grated
375g plain flour
1/2 tsp salt
3 tsp baking powder
200ml sour cream, room temperature
50ml dark rum

Filling
250ml double cream
1 tbsp light brown sugar
25ml dark rum
1 tsp vanilla bean paste
1 tbsp toasted milk powder (optional)
1/4 tsp freshly grated nutmeg

To Decorate
100g white chocolate, melted and cooled slightly

To make the Bundt preheat the oven to 180C (160C fan). Lightly grease a 12-cup capacity Bundt pan (I used this one) with softened butter and dust with flour, tapping out any excess.

Add the butter and sugar to the bowl of the Wilfa Probaker with the flexivisp (silicon edge beater) attached. On medium/high speed cream together the butter and sugar for 5 minutes or until light and fluffy. Add the milk powder and vanilla and beat briefly to combine. Add the eggs one at a time, with the mixer running on medium speed. Once each egg is fully mixed into the butter mixture, add another. Meanwhile whisk together the flour, baking powder and salt. Grate the nutmeg into the mixer bowl and then add the flour mixture in three additions, alternating with the liquid ingredients (starting and finishing with flour). When you’re adding the flour mixture keep the mixing to a minimum, you want to mix just until evenly mixed but avoiding mixing for too long and making a tough cake.

Scrape the finished batter into the prepared Bundt pan and level out. Bake in the preheated oven for 55 minutes or until a skewer inserted into the cake comes out clean. Place the Bundt pan on a wire rack to cool for 10 minutes before inverting and turning out the cake. Allow to cool fully before adding the filling; when making bundt I often make this in the evening and leave overnight before assembling.

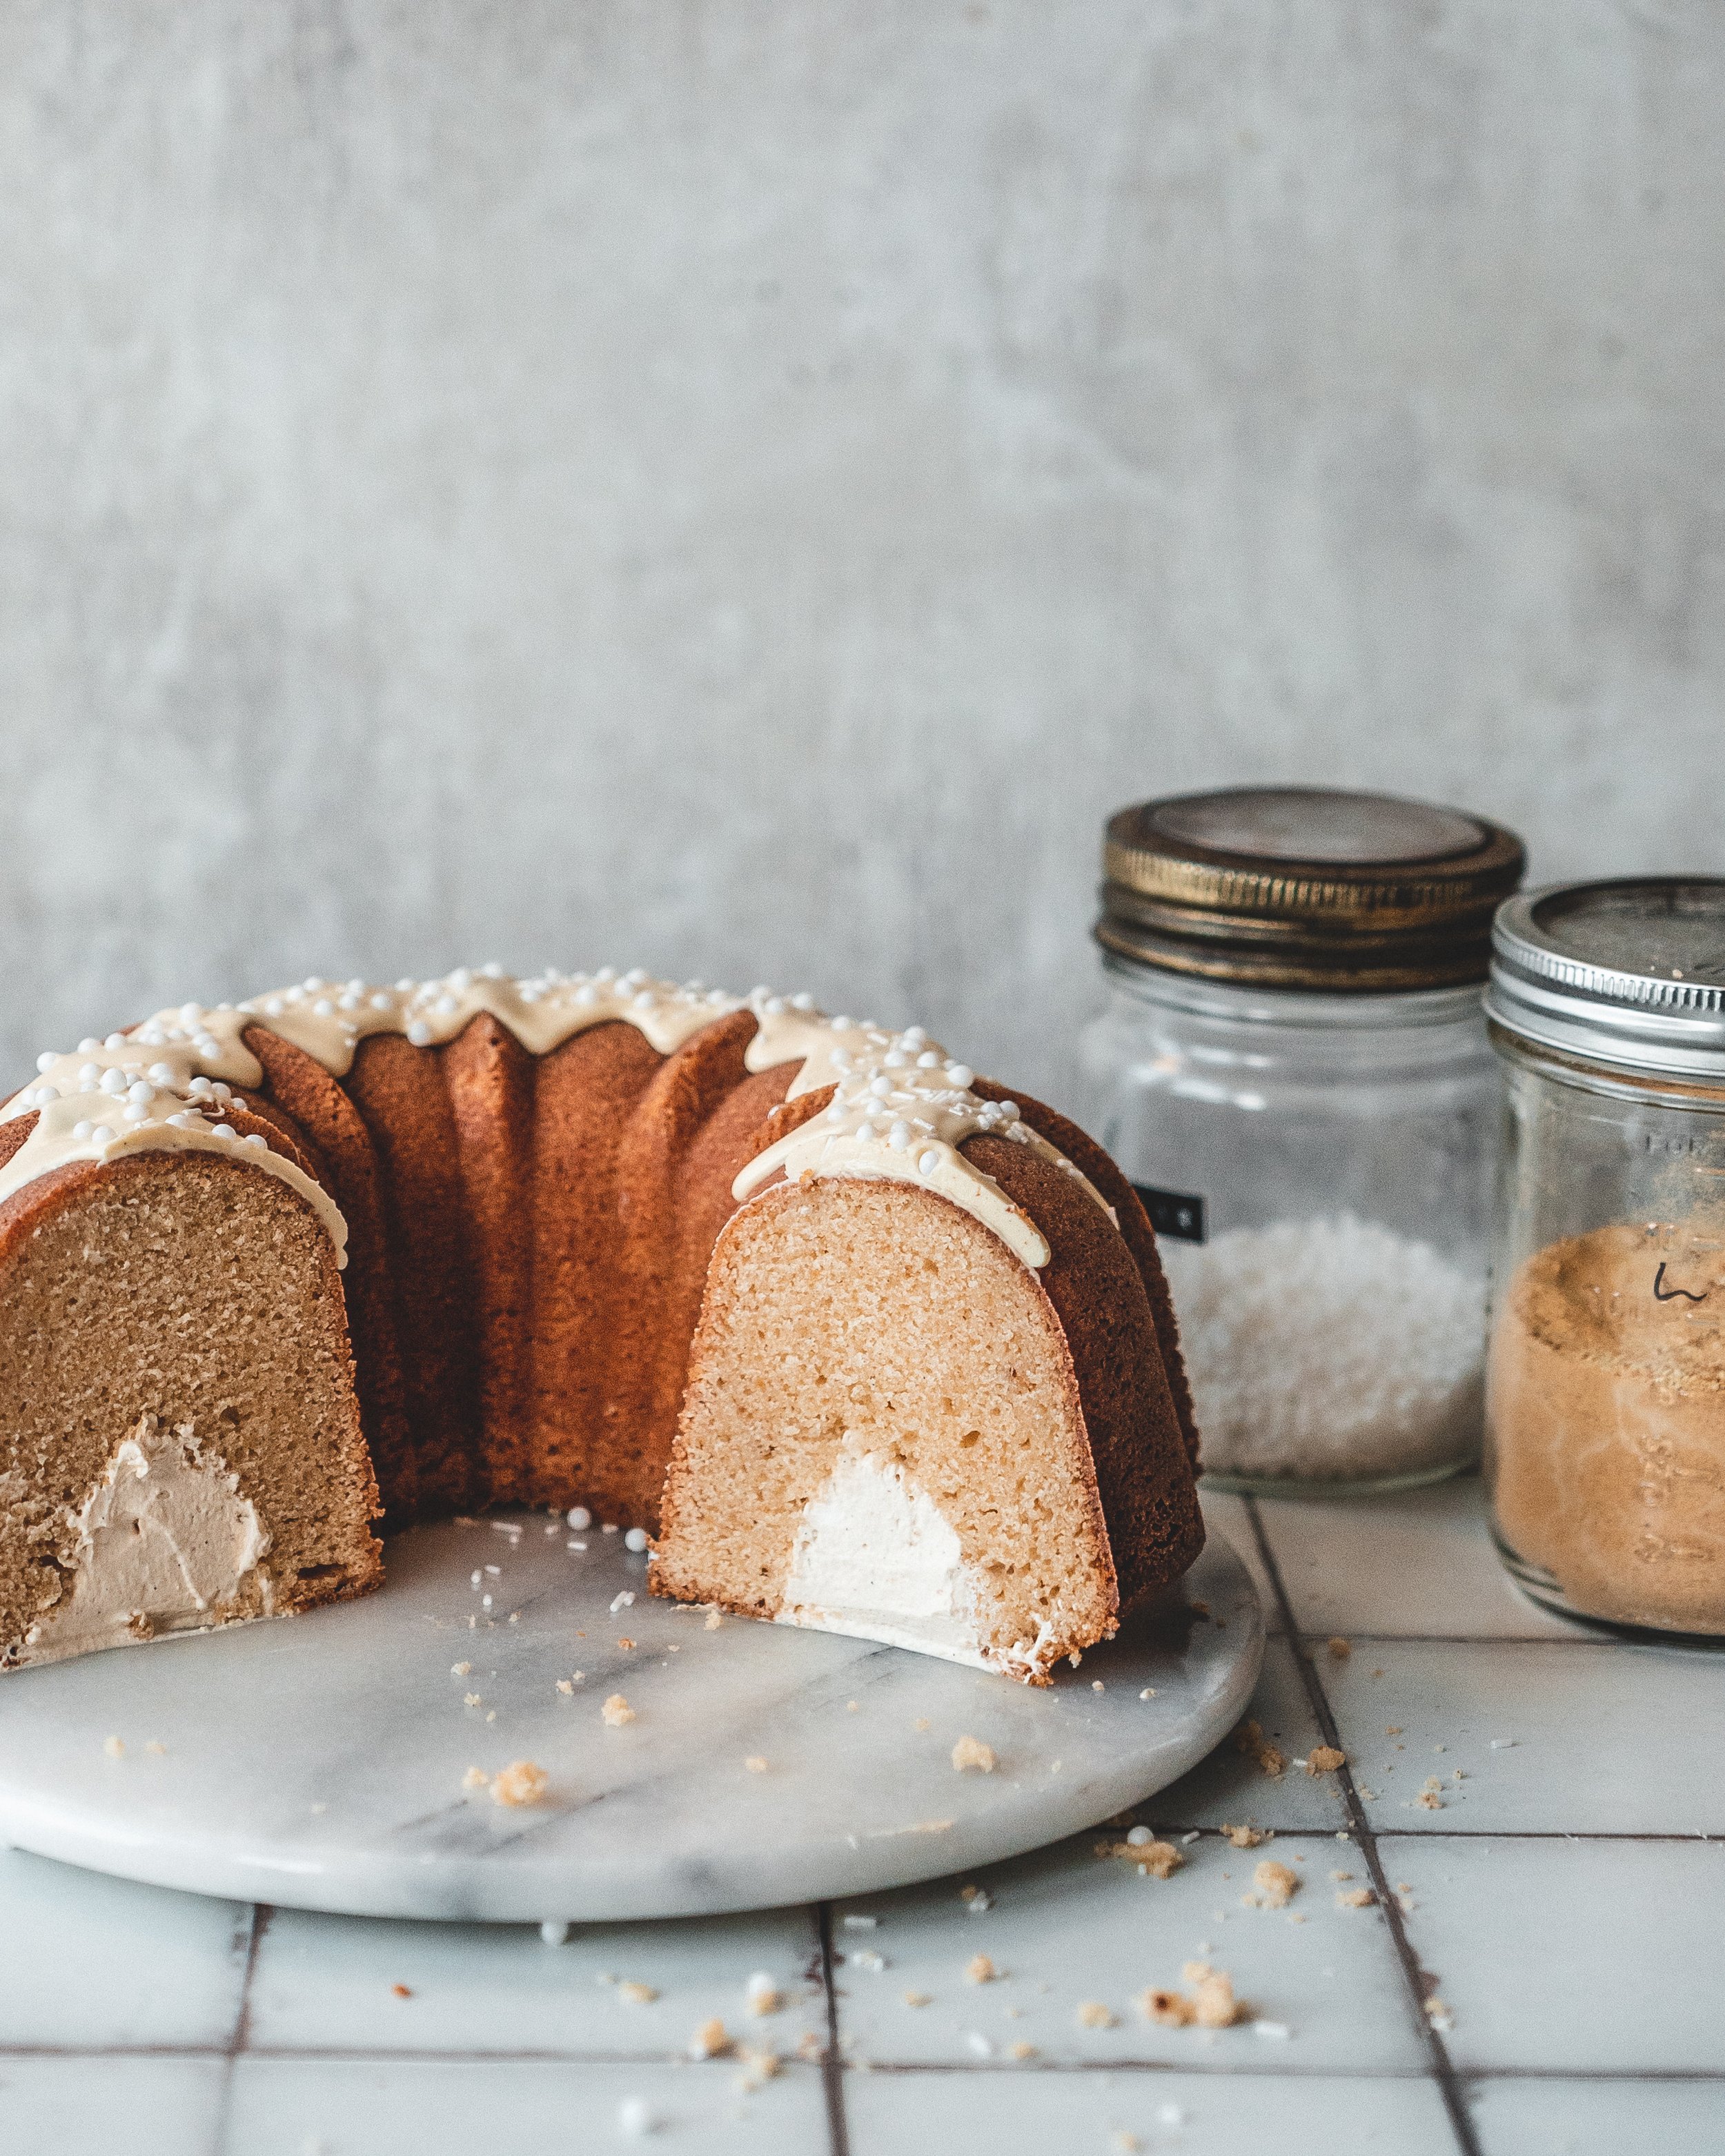
For the filling add all of the ingredients to a large bowl and whisk until medium/stuff peaks form. Place the cake back into the cleaned Bundt pan and use a pairing knife to score a channel in the base of the cake and then use a spoon to scoop out the channel making a tunnel in the base of the cake. Add the filling to this channel and smooth out so the filling sits flush with the base of the cake. Carefully turn the cake out onto a serving plate or cake stand.

To decorate pour over the melted and cooled white chocolate and finish with a few festive sprinkles. The white chocolate needs to have cooled but still be pourable, that way the chocolate doesn't just run immediately off the cake.

Once the filled the cake needs serving on the same day or refrigerating for a day or two. Unfilled the cake would keep for 3-4 days.

In Bundts, Cakes Tags wilfa, probaker, eggnog, bundt, pound cake, white chocolate, rum, nutmeg
Comment
black and white cookies made with black cocoa powder and discs of white chocolate, sprinkled with salt

Inside Out Chocolate Chip Cookies

Edd Kimber April 20, 2022

It’s a bit of a rarity these days that I actually get to enjoy making other peoples recipes (something I am trying to do a bit more of at the moment, to bake in a way that is purely about enjoyment, without it becoming work) but for the recent Bake For Ukraine bake sale I wanted to take a new cookie for my menu but I didn’t have the time to really work on anything new so instead turned to my cookbooks to find something I thought might work. The idea I wanted to go for was an inside out chocolate chip cookie, a dark chocolate cookie dough with white chocolate chunks. In the back of my head, I thought the brilliant book Sister Pie had something similar and thankfully I was right.

The cookie from the book is known as a double (okay triple) chocolate chip cookie and I thought it could easily be adapted to fit my idea. In the book the cookie has a pretty quick turnaround, the dough is baked as soon as it is made, no resting, just instant gratification. The recipe looked good to me but I needed something I could prep in advance so I did a quick test. I wanted to be able to make the dough a couple days in advance and then bake it as close to the bake sale as possible. I could either scoop the dough once chilled, as I often do with my cookie recipes, or I could roll it once made and chill it in individual portions. The chilled dough sets very firm so scooping or rolling it wasn’t an option so instead I opted to make it slice and bake style. This is pretty unusual for this type of cookie, normally being a technique you would use with something more akin to a shortbread. This technique also led to an interesting development when it came to flavour. When the cookies were sliced, and because I was using large discs of white chocolate, there was lots more chocolate peeking through the two sides of the cookie than when I made it according to the recipe. This had an unexpected benefit, the chocolate on the base of the cookie caramelised as it baked, meaning the flavour was a little less sweet and with more of a caramelised flavour, a double winner if you ask me.

If you want a cookie that has a sweet and salty contrast with just a hint of an oreo flavour, this recipe is for you. The edges become nice and crisp and the centres become the ideal form of chewy, this is a winner of a recipe and one I will surely make time and time again. 

Inside Out Chocolate Chip Cookies
Adapted from the book Sister Pie by Lisa Ludwinski

225g dark chocolate, roughly chopped
115g white chocolate, roughly chopped
225g plain flour
60g black cocoa powder*
1 1/2 tsp baking powder
1 tsp bicarbonate of soda
1 1/2 tsp fine sea salt
225g unsalted butter, room temperature
150g caster sugar
150g light brown sugar
2 large eggs
250g white chocolate*

*To achieve the intense black and white look the these cookies have you need to use black cocoa powder, a sub category of dutched cocoa powder. This type of cocoa powder is very easy to buy online (I use the brand DeZaan) but if you cant find it you can use traditional dutched cocoa powder, the look just wont quite be the same. The black cocoa is also what contributes to that hint of oreo flavour. For the white chocolate I like to large chocolate discs but if you only have access to bars chop them into irregular sized chunks and avoid using white chocolate chips. 

To make the cookie dough place the two types of chocolate into a bowl set over a pan of simmering water and heat, stirring occasionally, until fully melted. Remove from the heat and set aside for 10 minutes to allow to cool. 

In a large bowl, whisk together the flour, cocoa powder, baking powder, bicarbonate of soda and salt. If using the black cocoa a good whisk should be fine as the black cocoa is lower in fat and doesn’t tend to clump. If using a regular dutch cocoa you may want to sieve this to ensure a lump free mixture. In a large bowl, using an electric mixer, cream together the butter and sugars, beating until light and fluffy, about 5 minutes. Add the eggs one at a time, beating until fully combined before adding the second. Pour in the cooled chocolate mixture and mix until the batter is uniform. Add the flour mixture and on low speed mix together just until a dough is formed. Add the second amount of white chocolate and mix until evenly distributed.

Scrape half the dough onto a large sheet of clingfilm and form into a rough log. Roll the dough in the clingfilm and use your hands to roll into a log that is about 2 inches thick. The dough is soft at this point so the shape wont be perfect. Transfer the log of dough to the fridge and repeat with the second half. Once the dough has had a little time to chill and firm up I like to take it out of the fridge and roll it to refine the shape and make it more evenly round. Chill until firm and ready to use, the dough will keep for about 3-4 days before baking. 

To bake, remove the dough from the fridge and allow to sit at room temperature whilst your oven preheats to to 180ºC (160ºC Fan). Line two large baking trays with parchment paper. 

Using a very sharp knife cut the cookie dough into pucks about 1 inch thick (the cookies should weigh around 60g each, I like to weigh my first cookie puck to ensure I am cutting them the right size). You may find the cookies break into pieces when sliced but don’t worry just press them back together and the’ll be fine. Place 6 cookies onto each of the prepared trays, spacing well apart as they spread. Sprinkle the cookies with a little flaked sea salt and bake in the oven for about 15-16 minutes. They’ll still be soft when they come out of the oven and will set up as they cool. 

After a few minutes transfer the cookies to a wire rack to cool completely. Repeat with the remaining cookie dough. 

Kept in a sealed container these will keep for 2-3 days. The dough can also be frozen for up to two months before baking. 


In Biscuits and Cookies Tags black cocoa, inside out, white chocolate, cookie, cookies, sister pie, double chocolate
2 Comments
black cocoa pb cookies-1.jpg

Black Cocoa Peanut Sandwich Cookies

Edd Kimber May 24, 2021

These cookies are so ridiculously simple and so delicious. The cookie element is based around my melting moment recipe, a melt in the mouth, incredibly tender cookie. I use black cocoa but you can also use a regular dutched cocoa powder if thats what you have on hand. The balls of cookie dough are rolled in salted peanuts and pressed into flat discs and then baked. The filling is a simple white chocolate ganache mixed with peanut butter. Its the sort of cookie you want mid morning with a strong cup of coffee. 

Before we get to the recipe lets talk about cocoa powder for a second. Cocoa powder comes from the cocoa pods and specifically the beans inside those pods, so far so obvious. The beans are fermented and then dried. Generally they are then roasted (unless the product is destined to be used for ‘raw’ chocolate or cocoa powder but I wont be talking about that process here). The beans are then cracked open and the nibs are ground into what is called cocoa liquor and then, using a hydraulic press, the liquor is pressed under great pressure to extract most of the cocoa butter leaving behind a product known as a cocoa cake. This cake is dried once again and then ground into cocoa powder. 

Why then is there such a variety in cocoa powders, what is the difference between natural, dutched and black? Natural is the cocoa powder made as above with no additional processing, it is a light almost dusty brown colour and is bright and acidic in flavour. Dutched cocoa goes through an alkalisation process which lessens the acidity and makes a deeper richer tasting cocoa powder with a darker colour. In the UK and Europe this is traditionally the main type of cocoa powder available although natural and raw cocoa have become more popular over the last few years. Black cocoa, with its characteristic charcoal black colour, is a variation of dutched cocoa powder, the process of alkalisation taken to its limit to make an intensely dark and slightly bitter cocoa powder, if you’ve ever eaten an oreo you’ve had black cocoa. I like black cocoa for its colour and its flavour but its not suitable for everything, the flavour isn’t a pronounced chocolate flavour its much more roasted than that so if you want classic chocolate flavours I would a traditional dutched powder.

Whenever I use black cocoa I am always asked where to buy it as in the UK it is a relatively unknown product, at least until recently. I would always bring some home from the US when there on holiday or for work, King Arthur Baking sell my go-to version. Someone imports that brand into the UK but it is criminally expensive so I am thankful that a few new brands have sprung up to make it easier, and cheaper, to buy. Van Houten was the first brand more widely available, selling on Amazon, but I am yet to test this brand out. When I buy the cocoa myself I get it from De Zaan, a commercial cocoa powder producer that have recently started selling in a more direct to customer facing way. You can find there cocoa powder on Amazon and on from HB ingredients. 

Before we get to the recipe a brief note on peanut butter. When baking with peanut butter you need to be careful about what style you use. Generally you want to be using a commercial peanut butter and this is for the simple reason that it is less likely to split creating odd textures in the finished recipes. By all means you can use a natural peanut butter but be aware the result might not look like you envisioned or like the images of the recipe. 

Black Cocoa Peanut Melting Moments with Peanut Butter Ganache
Makes 15 Sandwich Cookies

Cocoa Melting Moments
250g unsalted butter, room temperature
1/2 tsp vanilla extract
200g plain flour
60g black cocoa powder
85g icing sugar
30g cornflour
175g salted peanuts, roughly chopped

Peanut Butter Ganache
100ml double cream
125g white chocolate
75g smooth peanut butter 

Preheat the oven to 160ºC (140ºC Fan) and line a couple baking sheets with parchment paper.

For the cookies place the butter into a large bowl and use an electric mixer to beat until soft and creamy. Add the vanilla and beat briefly to combine. In a separate bowl whisk together the flour, cocoa, icing sugar and cornflour. Add the flour mixture to thee butter mixture and mix on slow speed just until a dough is formed. 

Divide the dough into 20g portions and roll them into balls. Roll the balls in the chopped peanuts, your not looking to fully coat the balls just get a decent amount of peanuts on each cookie. Place the balls onto parchment lined baking trays leaving a little space between each cookie. Using a glass or measuring cup press each ball into a flat disc. Spraying the glass with a little oil can help prevent them sticking. 

black cocoa pb cookies-1-2.jpg

Bake the cookies in the preheated oven for about 20-25 minutes or until the edges are set and dry.

Remove the trays from the oven and allow the cookies to cool fully. 

To make the ganache place the chocolate and cream into a small saucepan and place over low heat. Stir constantly, making sure to scrape the bottom of the pan to prevent anything from scorching, until the chocolate has melted. Pour the ganache into a small bowl and stir to make sure everything is combined. Set aside for 10 minutes before adding the peanut butter and using a small whisk to combine into the ganache. The ganache needs to be a little cool before adding the peanut butter as the heat can make the mixture split. Refrigerate the ganache until thickened enough to hold its shape but still spreadable, 60-90 minutes. Pipe or spread a small amount of ganache onto half of the cookies and sandwich together with a second cookie. Refrigerate for 30 minutes or until the ganache has fully set. 

Kept in a sealed container these will keep for 3-4 days.

In Biscuits and Cookies, Chocolate Tags black cocoa, melting moments, sandwich cookies, ganache, white chocolate, peanut butter, peanuts, easy, easy baking
4 Comments

Blood Orange White Chocolate Pound Cake

Edd Kimber February 15, 2019

Oh blood oranges, you really do brighten up a miserable wet London day. Every winter when I effectively become a hermit, locking myself away in the kitchen making bread…and pies…and cookies…and anything else that makes me feel that the cold is bearable and that a life somewhere sunny isn’t more desirable, there are a couple bright spots in a world of grey. I am obviously talking blood oranges and rhubarb. They are the joy of the season and I relish every week they still make an appearance at the market. Over the years I have managed to squeeze blood orange into as many different recipes as I can convince myself they’ll work in, todays recipe is a little more classic, back to basics, easy to make. A slight twist on a classic pound cake, it is flavoured with the zest of the oranges and a little helping of white chocolate. It is a double cream pound cake meaning it is wonderfully tender and moist, keeping fresh for about 3-4 days.


For the decoration I went back on forth on a couple different styles, trying to make it cleaner, more elegant, I tried to make it more striking, more graphic but in the end I went right back to my original version. I embraced the imperfection and the rustic nature of the cake, and ignored my boyfriend’s suggestion about cleaning up the sides, slightly messy and haphazard works fine for me. 


If you are reading this out of season and you cant find blood oranges, fear not you can happily whip this up with regular oranges but obviously the colour will be different. Regular oranges just don’t have the vibrance to create as dramatic a design so you might want to help the orange glaze a little with some colouring or if you want to replicate the pink hue, a little splash of pomegranate juice will give a very similar look. 


Blood Orange White Chocolate Pound Cake
Serves 10

215g caster sugar
100g unsalted butter, room temperature
Zest of two blood oranges
2 large eggs
150g plain flour
65g ground almonds
3/4 tsp baking powder
1/2 tsp salt
65g white chocolate, melted and cooled
125ml double cream


Syrup
120ml blood orange juice
120g caster sugar


Glaze
2 tbsp blood orange juice
2 tbsp milk
1 tsp vanilla bean paste
400-500g icing sugar

Lightly grease, and line with parchment, a deep 9-inch round cake pan. Preheat the oven to 180C / 160C Fan.

Place the butter, sugar and zest into a large bowl and using an electric mixer beat together until light and fluffy, about 5 minutes. Add the eggs a little at a time, beating in until fully combined before adding more. Mix in the cooled white chocolate until evenly combined. In another bowl mix together the flour, almonds, baking powder and salt. Starting and finishing with the flour mixture, add in three additions, alternating with the cream.  

Scrape the finished batter into the prepared cake pan and gently smooth into an even layer. Bake in the preheated oven for about 45-50 minutes or until golden brown and a skewer inserted into the middle of the cake comes out clean. Pop the pan on a wire rack and allow the cake to cool for 10 minutes before turning out onto the rack to cool completely. 


Whilst the cake is still warm make a syrup by heating the blood orange juice and sugar together in a small pan until the sugar has dissolved and the mixture just comes to a simmer. Brush the syrup all over the cake, doing so whilst the cake is still warm allows it to full soak into the cake. 

Once the cake is fully cooled make the glaze. In one bowl mix together the blood orange juice and half the sugar mixing to form a thick but just pourable glaze. Do the same with the milk, vanilla and remaining sugar. You want the glazes to be thick enough that they will hold some definition when piped but loose enough that will spread together to form a uniform glaze. If you need a visual guide check out the video of the recipe on my Youtube channel. 


Place each glaze into a piping bag and snip off the ends with a pair of scissors. Pipe alternate stripes of the glaze over the cake, allowing a little excess to drip down the sides. Set the cake aside for a couple hours to allow the glaze to set before serving. 

In Cakes Tags blood orange, cake, white chocolate
1 Comment

Twitter

  • Was 8 original films, 3 spin off films, a two part play not enough. Can we have something new. https://t.co/cBZdGEGeyv
    Apr 4, 2023, 1:46 PM
  • RT @deliciousmag: Cacio e pepe, but make it buns! These seriously cheesy bread rolls from @TheBoyWhoBakes are inspired by his favouri… https://t.co/oDZlaDgnN2
    Apr 2, 2023, 11:08 AM
  • RT @TheDailyShow: Congrats to Donald Trump on finally winning a majority of votes! https://t.co/ezP55HZgl0
    Mar 31, 2023, 12:43 AM

Instagram

This weeks bonus recipe, for subscribers to my newsletter, is this gorgeous sour cherry and coconut gateau basque. The crust is a buttery cross between pastry and cake, think a cakey cookie. The filling is a layer of sour cherry topped with a rich coconut custard. A real fun one to make too! Link to my newsletter can be found in my bio - #gateaubasque #pastrycream #coconut #sourcherry
In this months @olivemagazine (out today) the team came and photographed my petit kitchen and we talked about how we put our stamp on the place, without spending a fortune. We hated the bland kitchen that we inherited but, as it was relatively new an
In this months @olivemagazine (out today) the team came and photographed my petit kitchen and we talked about how we put our stamp on the place, without spending a fortune. We hated the bland kitchen that we inherited but, as it was relatively new and in good condition, it felt a waste to rip it out and we also didn’t want to spend the money it would take to rip out the whole thing and replace it (it’s a howdens shell so we could have done something cheaper like @plykeakitchens @holte.studio @madebyhusk) so instead I painted all of the cabinets, using @makeitrustoleum kitchen cabinet paint, to give it some personality and lighten the whole thing. Check out the magazine for the full run down. - #kitchendesign #kitchenremodel #rustoleumcabinettransformations #rustoleumkitchencupboardpaint #kitcheninspiration #theboywhobakes #olivemagazine
Are you making scones all wrong? Maybe, maybe not? But I do want to show you how I make them! This recipe is based on the method I learnt at @belmondlemanoir 12 years ago when I did a stage, and it makes the absolute lightest scones. And shock horror, it involves kneading the dough, albeit very lightly. You can get the full recipe in this weeks newsletter (free) linked in my bio. - #scones #bakingday #worldbakingday #afternoontea #hightea #englishscones #clottedcream #creamtea #theboywhobakes
facebook
  • Contact

The Boy Who Bakes

Edd Kimber

facebook