The Boy Who Bakes

Edd Kimber
  • Home
  • Recipes
  • My Books
  • Blog
  • Recipe Index
  • About
  • Home
  • Recipes
  • My Books
  • Blog
  • Recipe Index
  • About

Recipes

  • All
  • baking
  • Biscuits and Cookies
  • Breads and Quickbreads
  • Bundts
  • Cakes
  • Chocolate
  • Dessert
  • drinks
  • Holidays
  • Pastry
  • Scones and Quickbreads

Salted Peanut Butter Cookies

Edd Kimber January 25, 2019

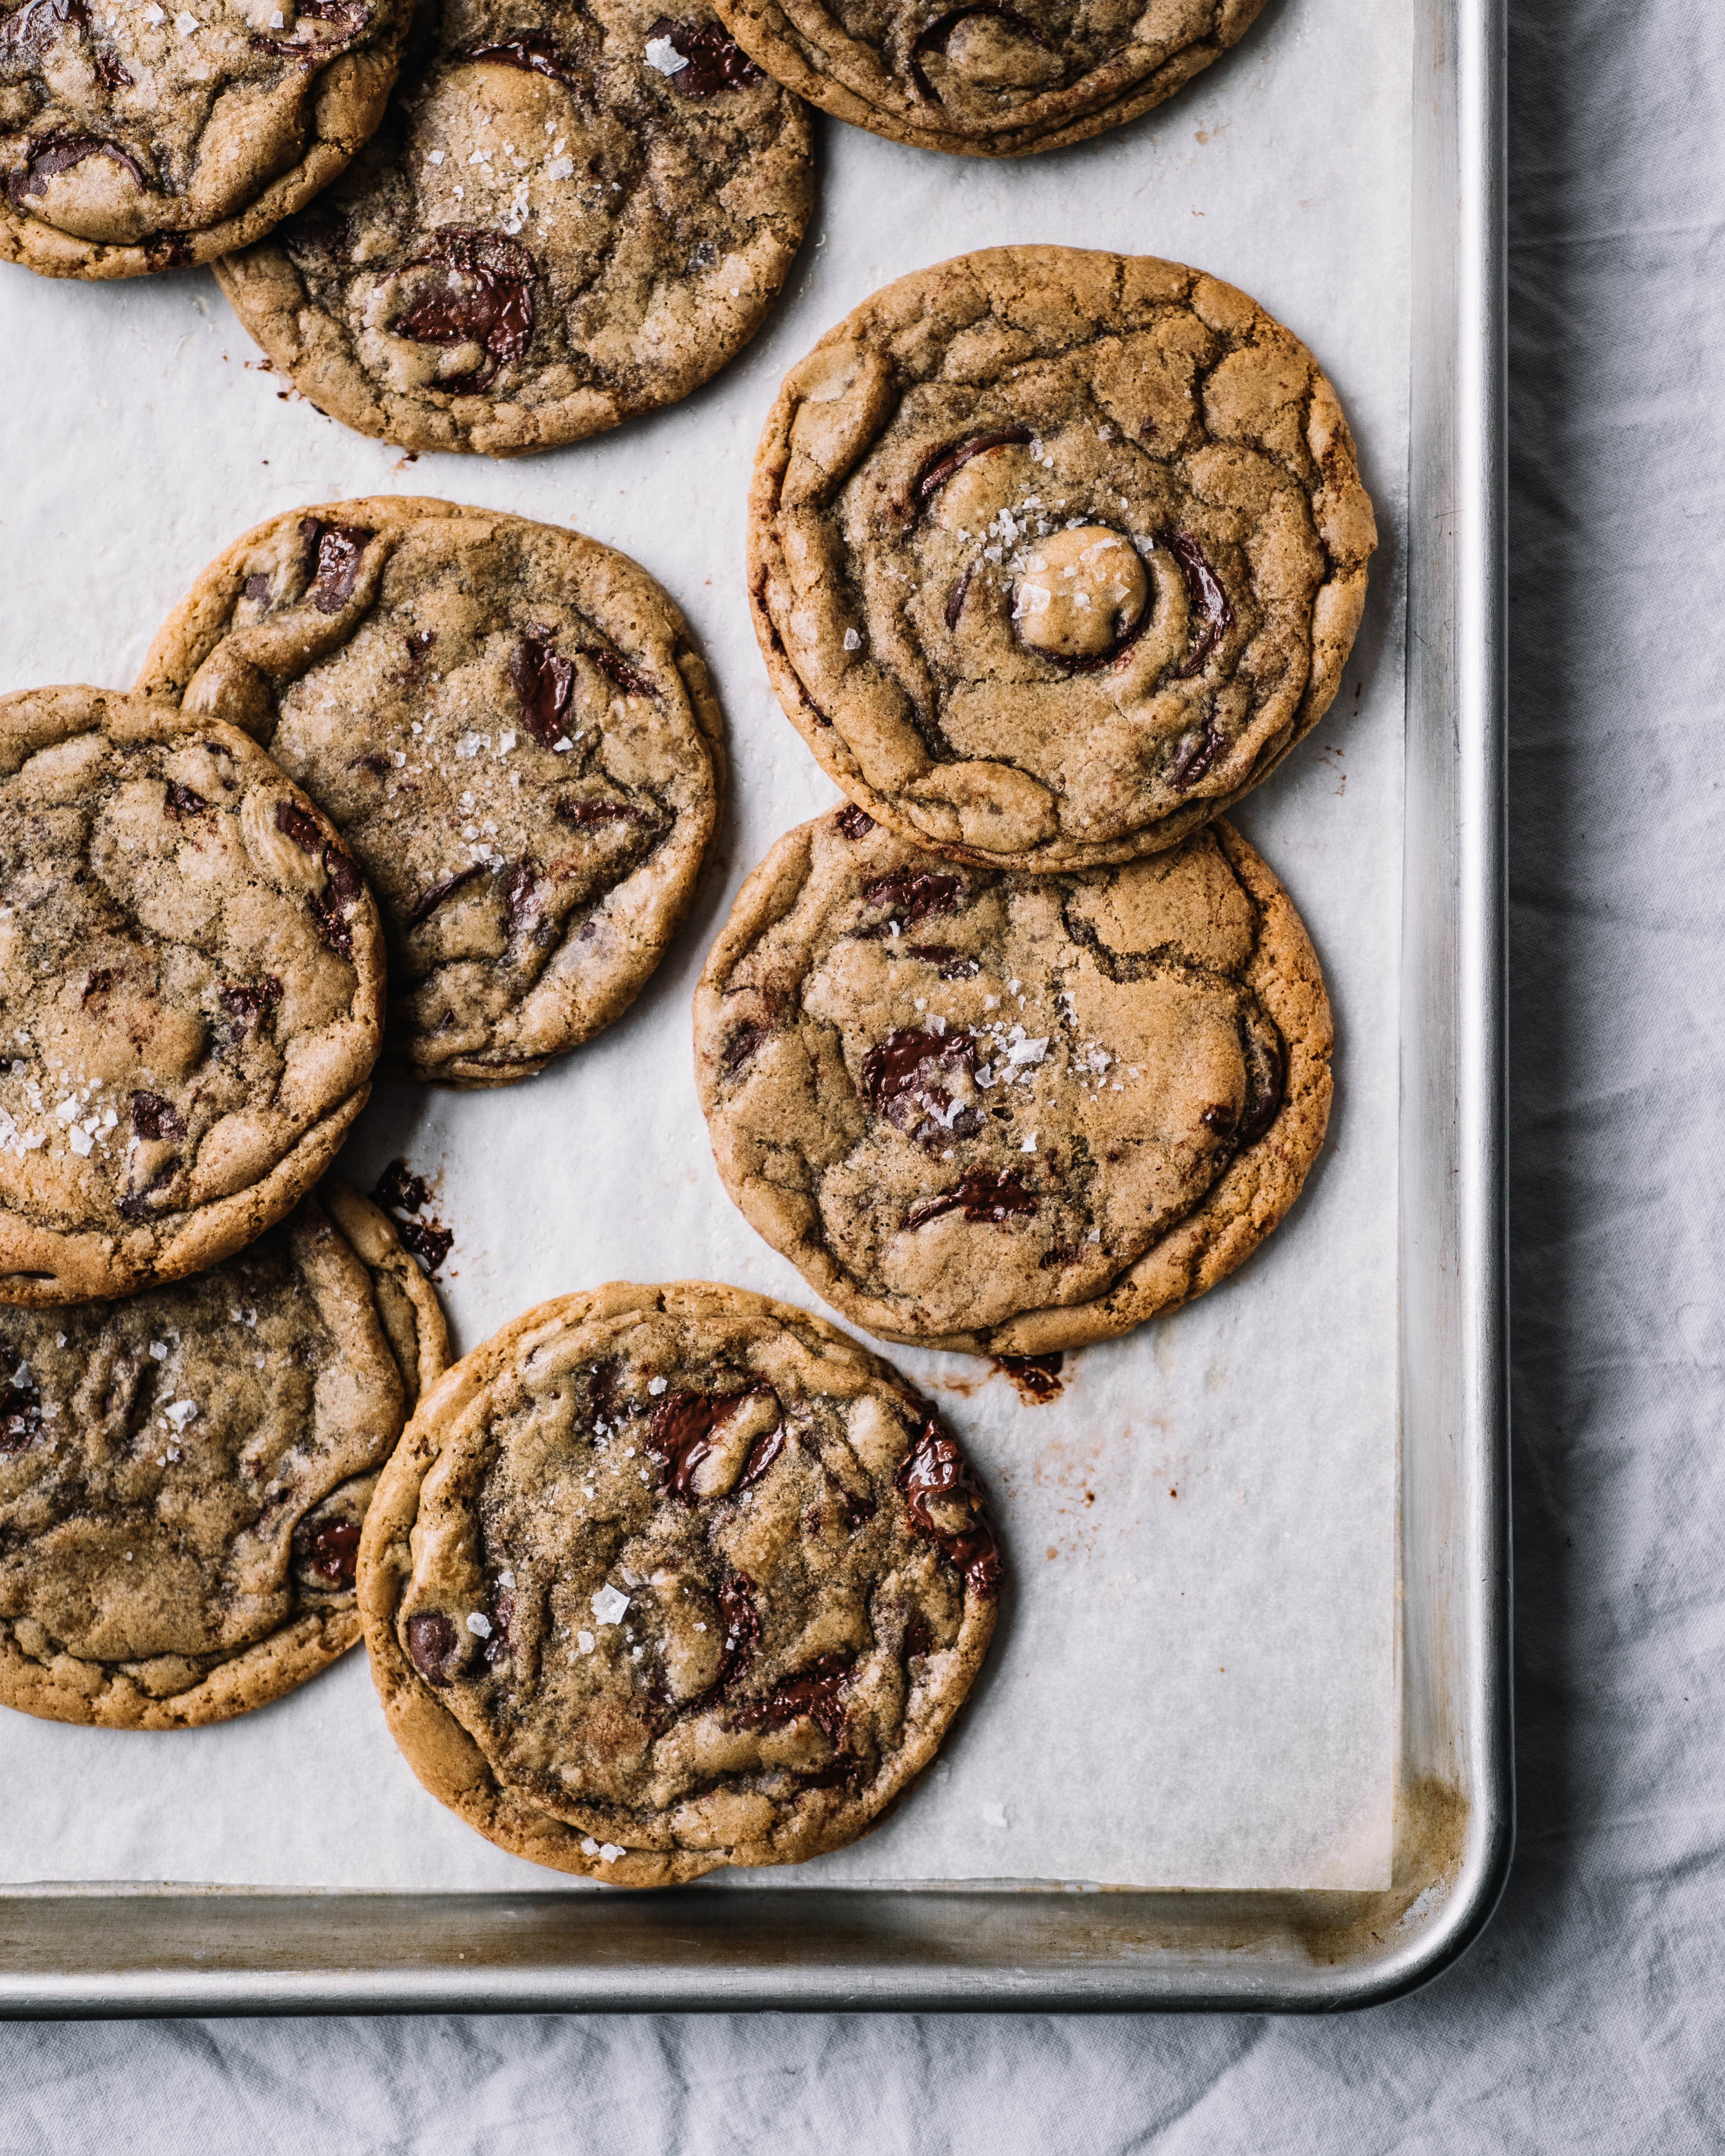
There are few things with more inherent comfort for me than a cookie, be that a chocolate chip, an oatmeal raisin, a gingersnap, I don’t discriminate, all cookies are welcome in my kitchen. Maybe it’s a nostalgic thing, a throw back to childhood. Maybe it’s simply because they’re sweet. Or maybe it’s just because I love them so much that each one is a little bit of joy. I’m a fan of tricky recipes, I like the challenge, but sometimes simpler is better and with this recipe I cant think how you could dial it back any further, it really is a ridiculously easy recipe and it delivers way more in terms of flavour and texture than it should considering its merger ingredients and distinct lack of technique. 

The recipe for these salted peanut butter cookies comes from the Brooklyn based bakery Ovenly, which I am sad to say I haven’t actually haven’t managed to visit yet. But these cookies have a life outside the bakery. On one of my recent trips to NYC, randomly filming an advert for Yahoo which somehow involved me talking to a cgi flamingo, I was wandering through the West Village and popped into Toby’s Estate for a coffee. At the counter they had this domed, crackly looking peanut butter cookie and in the moment it seemed like the exact thing I was craving without even realising it. It turned out to be the version from Ovenly and it was good, so good I bought a second and nibbled on it as I walked around the village in a jet lagged haze. When I looked into the recipe I found it hard to believe it was based on the classic three ingredient peanut butter cookie, made with just peanut butter, egg and sugar. That classic recipe is fine if a little boring and to be quite honest im not a complete lover of the texture.

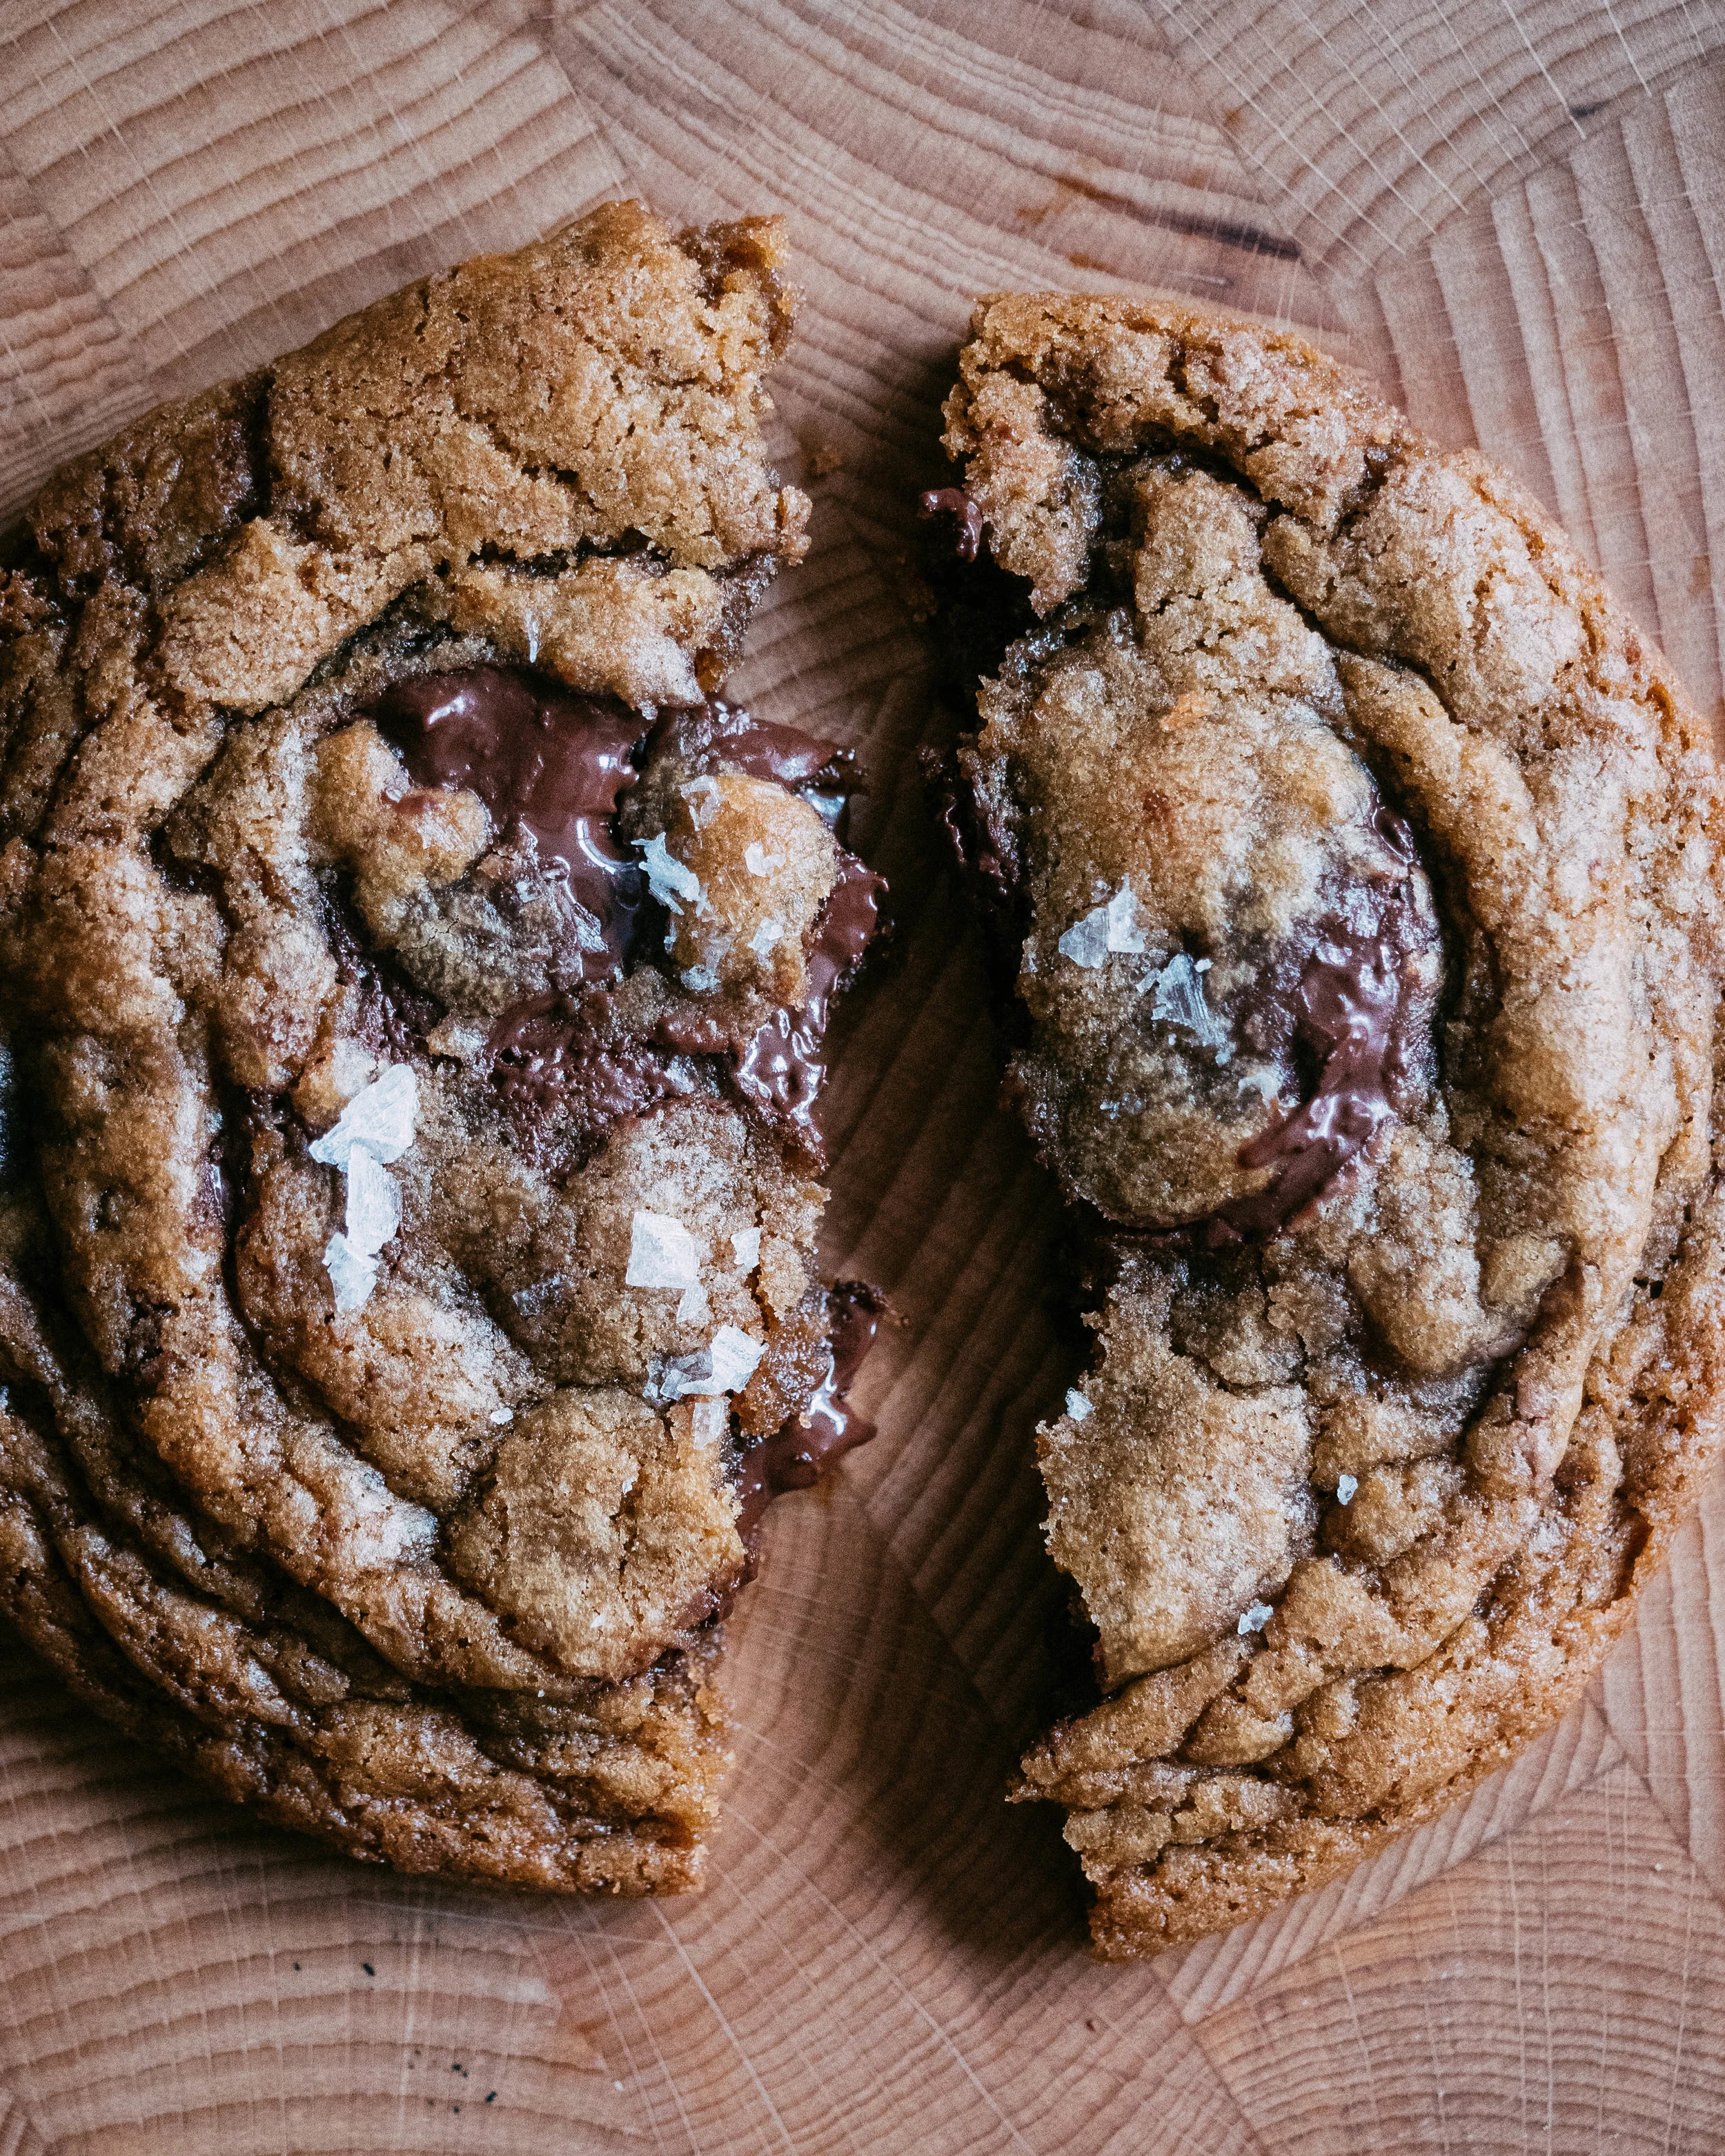
The guys at Ovenly took that idea, played with the ratios a little and added two little extras, vanilla and sea salt. Their version is so much better, with a chewy outside and an almost blondie like centre. But I forgot about the recipe until late last year when a box arrived at my door packed full of cookies from the team at the bakery. The cookies somehow survived a transatlantic journey and didn’t seem stale, or any worse for ware at all. I tried very hard to make the cookies last but between myself and my boyfriend they disappeared quick. And that’s how, with the dread of doing my taxes hanging over my head, I found myself making a big batch of them. Call it procrastibaking (can we be done with that awful saying already) or just a craving for comfort and cookies during a stressful week, these ridiculously easy cookies were exactly what the doctor, and maybe my accountant, ordered. 

Peanut Butter Cookies (1 of 1)-4.jpg
Peanut Butter Cookies (1 of 1)-2.jpg

Note about the salt. I posted a picture of some cookies recently and someone complained that they were sick of seeing cookies sprinkled with a little sea salt, calling it pretentious and without merit. Let me say this. Do Not Skip The Salt. Peanuts and salt are made to be together and the salt makes a big difference in the flavour. Think of eating blanched peanuts versus roasted salted ones. We all know which is better, so just add the salt. 

Ovenly Salted Peanut Butter Cookies
Ever so slightly adapted from the ‘Ovenly’, by Agatha Kulaga & Erin Patinkin

Makes 12 

335g (1 3/4 packed cup) light brown sugar
2 large eggs, room temperature
1/2 tsp vanilla extract
450g (1 3/4 cups) smooth peanut butter 
Flaked sea salt, for garnish

Preheat the oven to 180C and line a baking tray with parchment paper.

In a bowl vigorously whisk together the sugar and eggs until incorporated. Add the vanilla and whisk to combine. Switch to a wooden spoon and mix in the peanut butter until no streaks are visible. At this point I divert from the recipe in the book just a little. They suggest chilling the dough in the freezer after forming to help the cookie hold its shape. I find doing this step before scooping the cookies is better, because the dough firms up a little when cold and you’ll get that distinct look of the Ovenly cookie much easier when the dough is firmer. I tend to leave the dough in the fridge for an hour but I know Deb from Smitten Kitchen says a rest in the freezer for 15 mins works fine too (my freezer is tiny so the fridge is just more convenient for me). I have also made this dough and left in the fridge for a couple days and this works great too if you want to prepare ahead but bake the cookies fresh. 

Use an ice cream scoop of spoons to form the dough into roughly 2 inch balls (using the scoop is how I do it and how you replicate the look of the bakery versions, you want a 2 ounce scoop) and place the cookies onto the prepared baking tray, about an inch or so apart from one another. They spread but just a little so they can be closer than regular cookies. Sprinkle each cookie with a little flaked sea salt.

Bake in the preheated oven for about 20-22 minutes, or until the cookies are golden brown around the edges but still a teensy bit paler in the centre. Transfer to a wire rack rack to cool completely before serving. 

These cookies also keep incredibly well, I have had them up to five days after baking and they were still great. 

In Biscuits and Cookies
6 Comments
Linzer Cookies (1 of 1).jpg

Hazelnut Raspberry Linzers

Edd Kimber January 18, 2019

Todays recipe is inspired by a classic Austrian dessert, the Linzer Torte. Traditionally made with a nut rich dough and a redcurrant jam this is a cookie based version using hazelnuts and raspberry jam. Whilst I associate this with Christmas they really do suit any time of year. As it is nearing valentines day I thought the cutout would be nice as a heart, a slight nod to romance. Obviously if your heart is black, or your just making them at some other time of year you can use any shape of small cookie cutter instead.

Hazelnut Linzer Cookies
Makes about 30

300g plain flour
75g ground hazelnuts
1/2 tsp salt
200g caster sugar
225g unsalted butter, room temperature
1 large egg yolk
1 large egg
1/2 vanilla extract
raspberry jam to fill the cookies

To make the cookie dough mix together the flour, hazelnuts and salt. In a large bowl using an electric mixer beat together the butter and sugar until pale and creamy. You’re not looking for cake levels of light and fluffy but you do want to work a little lightness into the mixture to make a lighter, better textured cookie, mixing for about 2-3 minutes. Add the egg yolk and beat to until fully combined before adding in the egg. Add the vanilla extract and beat to combine. Add the flour mixture and mix on low speed until the flour is just worked into the dough. Be careful not to overmix the dough at this stage as it will make the cookies tough and chewy.

Turn the dough out onto a lightly floured work surface and use your hands to gently form into a uniform dough. Divide into two equal portions and press into discs, wrapping in clingfilm and then refrigerating until firm.

Linzer Cookies (1 of 1)-3.jpg
Linzer Cookies (1 of 1)-2.jpg

When you’re ready to roll out the cookies preheat the oven to 160C (140C fan) and line a couple baking sheets with parchment paper. On a lightly floured worksurface roll out a portion of dough until it is about 3-4mm thick and then using a 6cm round cookie cutter cut as many cookies as possible, setting the scraps aside. Place the cookies onto the prepared baking trays and refrigerate for 15 minutes. Repeat this process with the second portion of dough. Gently reform the scraps of dough into a ball and then refrigerate as before whilst you bake off the cookies. This dough can be rolled out again for more cookies.

Take the cookies from the fridge and use a small heart shaped cookie cutter to remove the middle from half of the cookies. Bake in the preheated oven for about 15-18 minutes or until just starting to turn golden on the edges. I bake the cookies lower than usual as it crisps the cookies evenly throughout without too much browning. Allow to cool on the baking tray for a couple minutes before transferring to a wire rack to cool completely.

To assemble the cookies place a teaspoon of raspberry jam onto each base cookie and spread slightly towards the edge. Dust all the top cookies with icing sugar then place one on top of each bottom cookie, sandwiching together. Once assembled the cookies are best on that day as the jam will eventually soften the cookies.

Linzer Cookies (1 of 1)-4.jpg
In Biscuits and Cookies
6 Comments
Best Chocolate Chip Cookies (1 of 1).jpg

My Best Ever Chocolate Chip Cookie Recipe - Cookie Chronicles

Edd Kimber August 23, 2018

After three weeks and five of the most popular recipes around it is time for me to put my money where my mouth is and give you my perfect chocolate chip cookie recipe. Each of the test recipes were delicious and I would definitely make them all again, but in each recipe there was that perfect something that I loved. For my final recipe, my ‘ultimate’ if you want, I thought I would take these elements, smoosh them together and see if I could make the perfect chocolate chip cookie recipe. 

Now I should probably say there is no such thing as the one perfect recipe, this just happens to be my personal favourite recipe as it has everything I love in a chocolate chip cookie. It has crisp edges but a soft and ever so slightly chewy centre, a lot of chocolate, a good balance of sweet and salty and dough that has a good flavour of its own. All of these elements are subjective but they are what I look for in my perfect cookie. When it comes to chocolate I was surprisingly stuck over my choice. Should I use chips or wafers, the chocolate style I was testing throughout this process? I expected this to be an easy choice, going with my bias and regular use of the wafers but the chips make a wonderful cookie too and I think this comes down to exposure to bad chocolate chips in the past. Over the past eight years of working in food the only chocolate chips I have had easy access to were low quality chocolate, bulked out with vegetable oil, im talking cheap supermarket chocolate chips. This style of ‘chocolate’ (not sure chocolate made with vegetable fat can actually be legally called chocolate) is the stuff I have told you to avoid because it doesn’t melt, has a waxy taste and just work properly when it comes to baking. Thankfully Guittard, who I partnered with to create this series, make a chocolate chip that is nothing but chocolate, pure and simple. There is a difference between chips and wafers and it is important to know the difference. Traditionally chocolate chips, made only of chocolate, are made with less or no added cocoa butter to make the chocolate thicker so that it holds it shape when manufactured, whereas wafers have more added cocoa butter so they fall flat when produced. This simple difference will affect the outcome of the recipe making slight differences to each recipe. The main difference I found when using chips in this recipe is that the cookie spreads a little less than when made with wafers, but unlike poor quality chips that don’t actually melt during baking these still create those beautiful pockets of melted chocolate.

When it comes to method for this cookie I basically stayed with the classic drop cookie style of the original Toll House recipe and the method used in Tara O’Brady and Bon Appetit’s recipe as it was satisfyingly simple and resulted in a delicious cookie. So melted butter it is, but taking a tip from Alison Roman we are using salted butter and taking it one step further like Bon Appetit we are going to brown it too, because why not! I also threw in Sarah Kieffer’s pan banging method because the resulting ripples in the baked cookie add texture and make for wonderful crips edges. When it comes to ingredients we are staying classic the only addition is a couple egg yolks which make for an even fudgier dough. 

My Best Ever Chocolate Chip Cookie Recipe

225g salted butter, diced
350g plain flour
3/4 tsp baking powder
3/4 tsp baking soda
200g light brown muscavado sugar
150g caster sugar
2 large eggs
2 large egg yolks
2 tsp vanilla extract
340g dark chocolate (I use Guittard 66% wafers or 63% chips)
Flaked sea salt, for sprinkling

Start by preparing the chocolate. Take about a 1/4-1/3 of the chocolate and roughly chop to break up in uneven small chunks.

To make the cookie dough we first need to brown the butter. Place the butter into a saucepan and place over medium heat and cook until first the milk solids separate, then the mixture foams, and then the milk solids brown. With salted butter you need to stir the butter as it browns to make sure the salt doesn’t clump with the milk solids, you’ll also find that the foaming doesn’t dissipate quickly so you wont be able to see the browning as easily, so watch very carefully to make sure the butter doesn’t burn.

Pour the butter into a large bowl and allow to cool for a few minutes before whisking in the sugars. Add the eggs and yolks one at a time, whisking until smooth and combined. Whisk in the vanilla. In a separate bowl whisk together the dry goods then add to the butter mixture and using a spatula or wooden spoon, mix together just until combined, there should be the odd bit of flour showing throughout the dough. Add the chocolate and mix until evenly distributed. Cover the dough with clingfilm and refrigerate for about 4 hours or until the dough is firm but not rock solid, you should still be able to scoop out portions without too much effort. 

When almost ready to bake preheat the oven to 180C (170C fan) and line two baking sheets with parchment paper. 

Form balls of cookie dough into portions roughly 85g. You can do this with a cookie scoop or you can roll in your hands. Place the cookies onto the baking sheets, a couple inches apart and sprinkle with a little flaked sea salt. 

Bake in the preheated oven for about 16-18 minutes or until golden brown at the edges but still a little paler and soft in the middle. After baking for 10 minutes remove the tray from the oven and firm bang on the work surface to collapse the cookie. Repeat this process every two minutes or so, creating a ripples effect at the edges of the cookie (this adds great texture on the finished cookies). Once baked allow to cool on the baking sheets for about 5-10 minutes before transferring to a wire rack to cool completely. 

Kept in a sealed container these cookies will keep for up to 5 days but personally I think these are best on the first couple days when the texture will be at its best. 

Note: this recipe was developed in metric measurements and with UK ingredients so if making in the US I would suggest making this with extra large eggs and european style high fat butter.

For those asking where Guittard chocolate is available in the UK it is currently stocked by Ocado, Whole Foods, Lakeland, Sous Chef and M&S

In Biscuits and Cookies, Chocolate
48 Comments
Bon Appetit (1 of 1).jpg

Bon Appetit Brown Butter and Toffee Chocolate Chip Cookies - Cookie Chronicles

Edd Kimber August 21, 2018

Its the final week of the Cookie Chronicles and for todays recipe we are going a little controversial and talking mix-ins. Do you like your chocolate chip cookies like I do? Unadulterated with nothing more than lots of glorious dark chocolate? Or do you like it with nuts, butterscotch, pretzels and whatever else you might fancy throwing in? If your in the latter camp you might like this recipe as instead of the classic chocolate it also adds in a handful of toffee, in the form of a chocolate coated toffee bar (Skor in the US and I used Daim here in the UK). I adore toffee so I was excited about this recipe. 

Whilst the recipe was published and popularised by Bon Appetit magazine it was actually a user submitted recipe, sent in by Kate Davis, you can follow her on Instagram here. 

The Breakdown

Other than the toffee there are a few key differences to the ingredients in this recipe. It uses browned butter, adding a nutty note to the dough. It also uses dark brown sugar which should add a lot more molasses flavour, which is never a bad thing.

Makes 20

2 sticks (225g) unsalted butter
2 cups (280g) all-purpose/plain flour
1 tsp baking soda
3/4 tsp salt
1 cup packed (220g) dark brown sugar
1/3 cup (65g) granulated/caster sugar
2 large eggs
2 tsp vanilla extract
2 toffee bars (Skor, Daim, Heath etc) chopped into 1/4 inch pieces
1 1/2 cups chocolate wafers, 72% cocoa
Flaky sea salt

Place the butter into a saucepan and set over medium heat and cook, stirring often, until the butter foams and then browns, about 5-8 minutes. Pour the butter into a large bowl and allow to cool slightly.

Meanwhile mix together the flour, baking soda and salt

Add the sugars into the bowl with the butter and whisk together for a few minutes to combine. Add the eggs and vanilla and mix until the mixture lightens and starts to thicken. Add the dry ingredients to the bowl and mix until just incorporated. Finally add the chocolate and the toffee bar pieces, mixing just to incorporate. 

Set the dough aside for about 30 minutes to allow the flour to hydrate, the dough will be fairly loose to start with but as it sits it will thicken. 

Preheat the oven to 375F (190C) and line a couple baking sheets with parchment paper. Using a 1 1/2 ounce ice cream scoop portion out cookies and place on the baking sheets, about 3 inches apart. Sprinkle with a little flaked sea salt.

Bake for about 9-11 minutes or until the edges are golden brown but the centres still a little soft. Allow to cool on the baking sheets for 10 minutes before transferring to a wire rack to cool completely. 


Result
First off, these cookies are fabulous, undeniably delicious and very easy to make. Saying that I find the dark brown sugar a little overwhelming for a chocolate chip cookie and it makes tasting the toffee and little hard. Now to give the recipe its credit, this is an American recipe and I believe this might be more down to the fact that British dark brown sugar is a little stronger in molasses, my cookies looked quite a bit darker than the ones in the magazine, so take that with a pinch of salt. I always love brown butter in a recipe so this is definitely a winning element for me. I would 100% make these again, I am thinking a version made with pretzels and stem ginger would be amazing.

In Chocolate, Biscuits and Cookies
4 Comments
  • Recipes
  • Older
  • Newer

Twitter

  • Was 8 original films, 3 spin off films, a two part play not enough. Can we have something new. https://t.co/cBZdGEGeyv
    Apr 4, 2023, 1:46 PM
  • RT @deliciousmag: Cacio e pepe, but make it buns! These seriously cheesy bread rolls from @TheBoyWhoBakes are inspired by his favouri… https://t.co/oDZlaDgnN2
    Apr 2, 2023, 11:08 AM
  • RT @TheDailyShow: Congrats to Donald Trump on finally winning a majority of votes! https://t.co/ezP55HZgl0
    Mar 31, 2023, 12:43 AM

Instagram

This weeks bonus recipe, for subscribers to my newsletter, is this gorgeous sour cherry and coconut gateau basque. The crust is a buttery cross between pastry and cake, think a cakey cookie. The filling is a layer of sour cherry topped with a rich coconut custard. A real fun one to make too! Link to my newsletter can be found in my bio - #gateaubasque #pastrycream #coconut #sourcherry
In this months @olivemagazine (out today) the team came and photographed my petit kitchen and we talked about how we put our stamp on the place, without spending a fortune. We hated the bland kitchen that we inherited but, as it was relatively new an
In this months @olivemagazine (out today) the team came and photographed my petit kitchen and we talked about how we put our stamp on the place, without spending a fortune. We hated the bland kitchen that we inherited but, as it was relatively new and in good condition, it felt a waste to rip it out and we also didn’t want to spend the money it would take to rip out the whole thing and replace it (it’s a howdens shell so we could have done something cheaper like @plykeakitchens @holte.studio @madebyhusk) so instead I painted all of the cabinets, using @makeitrustoleum kitchen cabinet paint, to give it some personality and lighten the whole thing. Check out the magazine for the full run down. - #kitchendesign #kitchenremodel #rustoleumcabinettransformations #rustoleumkitchencupboardpaint #kitcheninspiration #theboywhobakes #olivemagazine
Are you making scones all wrong? Maybe, maybe not? But I do want to show you how I make them! This recipe is based on the method I learnt at @belmondlemanoir 12 years ago when I did a stage, and it makes the absolute lightest scones. And shock horror, it involves kneading the dough, albeit very lightly. You can get the full recipe in this weeks newsletter (free) linked in my bio. - #scones #bakingday #worldbakingday #afternoontea #hightea #englishscones #clottedcream #creamtea #theboywhobakes
facebook
  • Contact

The Boy Who Bakes

Edd Kimber

facebook