The Boy Who Bakes

Edd Kimber
  • Home
  • Recipes
  • My Books
  • Blog
  • Recipe Index
  • About
  • Home
  • Recipes
  • My Books
  • Blog
  • Recipe Index
  • About

Recipes

  • All
  • baking
  • Biscuits and Cookies
  • Breads and Quickbreads
  • Bundts
  • Cakes
  • Chocolate
  • Dessert
  • drinks
  • Holidays
  • Pastry
  • Scones and Quickbreads
HCB-2.jpg

Vegan Hot Cross Buns

Edd Kimber March 27, 2020

It’s clear if you’ve ever read more than one recipe on this site that I am not vegan. I always say veganising a recipe is a skill I don’t necessarily posses and whilst that is true I want to try harder and include more vegan recipes and options on the site. This recipe, a slight spin on classic hot cross buns, wasn’t originally a result of that thinking though. It was through necessity. I wanted to post a really good hot cross bun recipe for easter but I was concerned in this mad world we are all living in right now that a couple of the required ingredients were on the scare side at the moment. Removing the eggs would be fine, you can make a lovely bread dough with enriching it with eggs, but flour..well flour is needed for hot cross buns. I decided to go with spelt because I had found it to be available at a couple supermarkets still, ignored by those panic buying all the bread flour. Thankfully spelt makes for wonderful breads and works particularly well in this recipe. With no eggs, turning the recipe fully vegan seemed like a no brainer, the only other ingredients were milk and butter and vegan versions of those would be very easy straight swaps. 

For the flavourings I kept everything fairly classic, lots of spice and dried fruit but I switched things up just a little using dried cranberries and pistachios instead of the traditional raisins and currants, but as always use whatever you prefer.

Since we are also in our houses with no access to friends and family right now it is worth nothing these also freeze brilliantly. Once the buns are fully cooled separate them, place them onto a tray that will fit in your freezer and freeze until solid. At this point you can put them in a ziplock bag or box and they wont stick together. Defrost them and serve them warm with butter and you’ll have an incredible breakfast waiting for you. 

The Buns
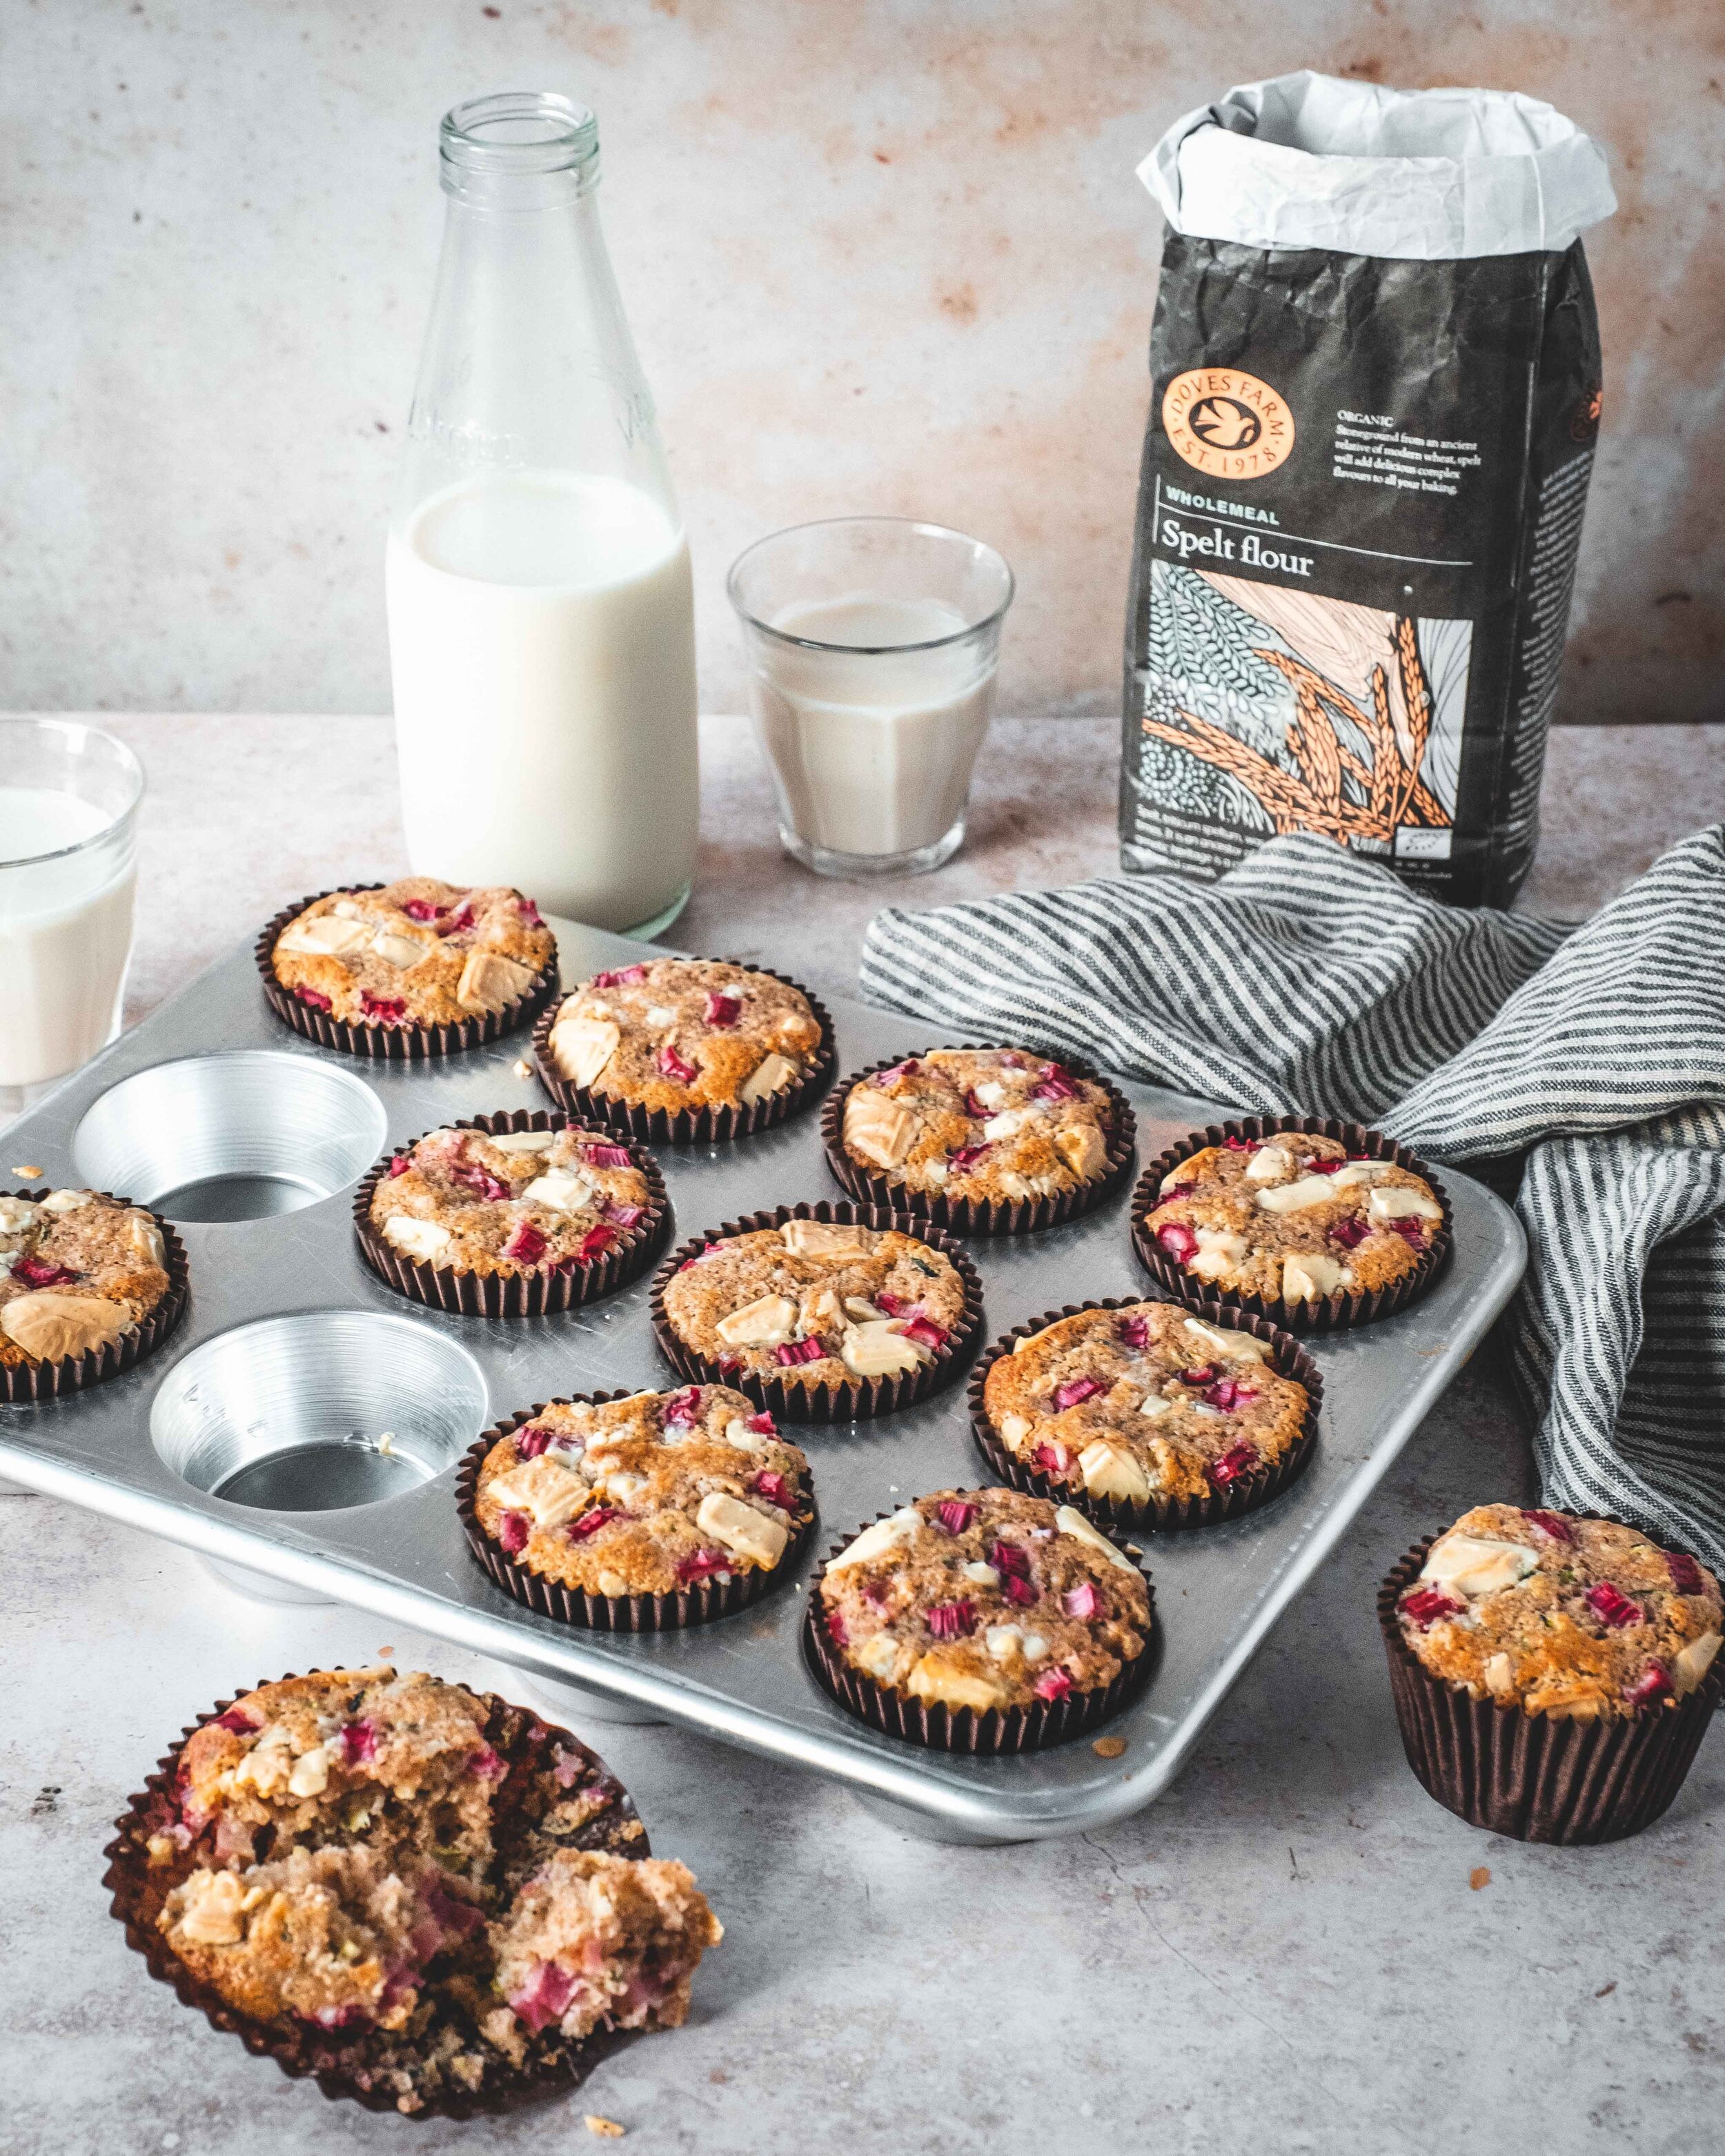
500g spelt flour (I used a mix of Doves Farm white and wholewheat spelt flours)
1 1/2 tsp fine sea salt
2 tsp mixed spice
1 tsp ground cinnamon
50g caster sugar
7g fast action dried yeast
300ml almond milk (other plant milks should also work fine)
65g vegan ‘butter’ block (I used stork block as it seems like the easiest to find in the UK)
85g dried cranberries
50g pistachios, roughly chopped

The Cross
3 tbsp spelt flour
3-4 tbsp almond milk

Apricot Glaze (optional)
2 tbsp smooth apricot jam

To make the dough place the flour, salt, spices, sugar and yeast into the bowl of a stand mixer and add in the milk and fat. With the dough shook attached mix on low speed until a shaggy dough is formed. Now at this point it is worth noting the differences when using spelt flour. The flour has gluten but it breaks down a lot easier than regular wheat flour so don’t be tempted to knead this for a long time, we’re going to do another 3-5 minutes on low speed just until the dough becomes smooth and looks a little elastic. 

Note: since we are talking about flour lets talk about availability. I know right now flour is scarce so I wrote this recipe with spelt as I noticed it was still available in some supermarkets I visited. If you have regular bread flour at home don’t worry just sub it in, kneading fully for about 10 minutes as you would with a normal bread dough. Also if I understand the situation properly you should see start seeing flour appear on supermarket shelves again soon, it wasn’t really a shortage but a supply chain issue because of the panic buying, it should start flowing back into the chain very soon.

Tip the dough out onto the worksurface and press into a flat disc. Add the cranberries and pistachios and lightly press them into the dough. Briefly knead the dough so the additions are evenly distributed. Add the dough to a lightly oiled bowl, cover and set aside to prove for about an hour or until doubled in size. 

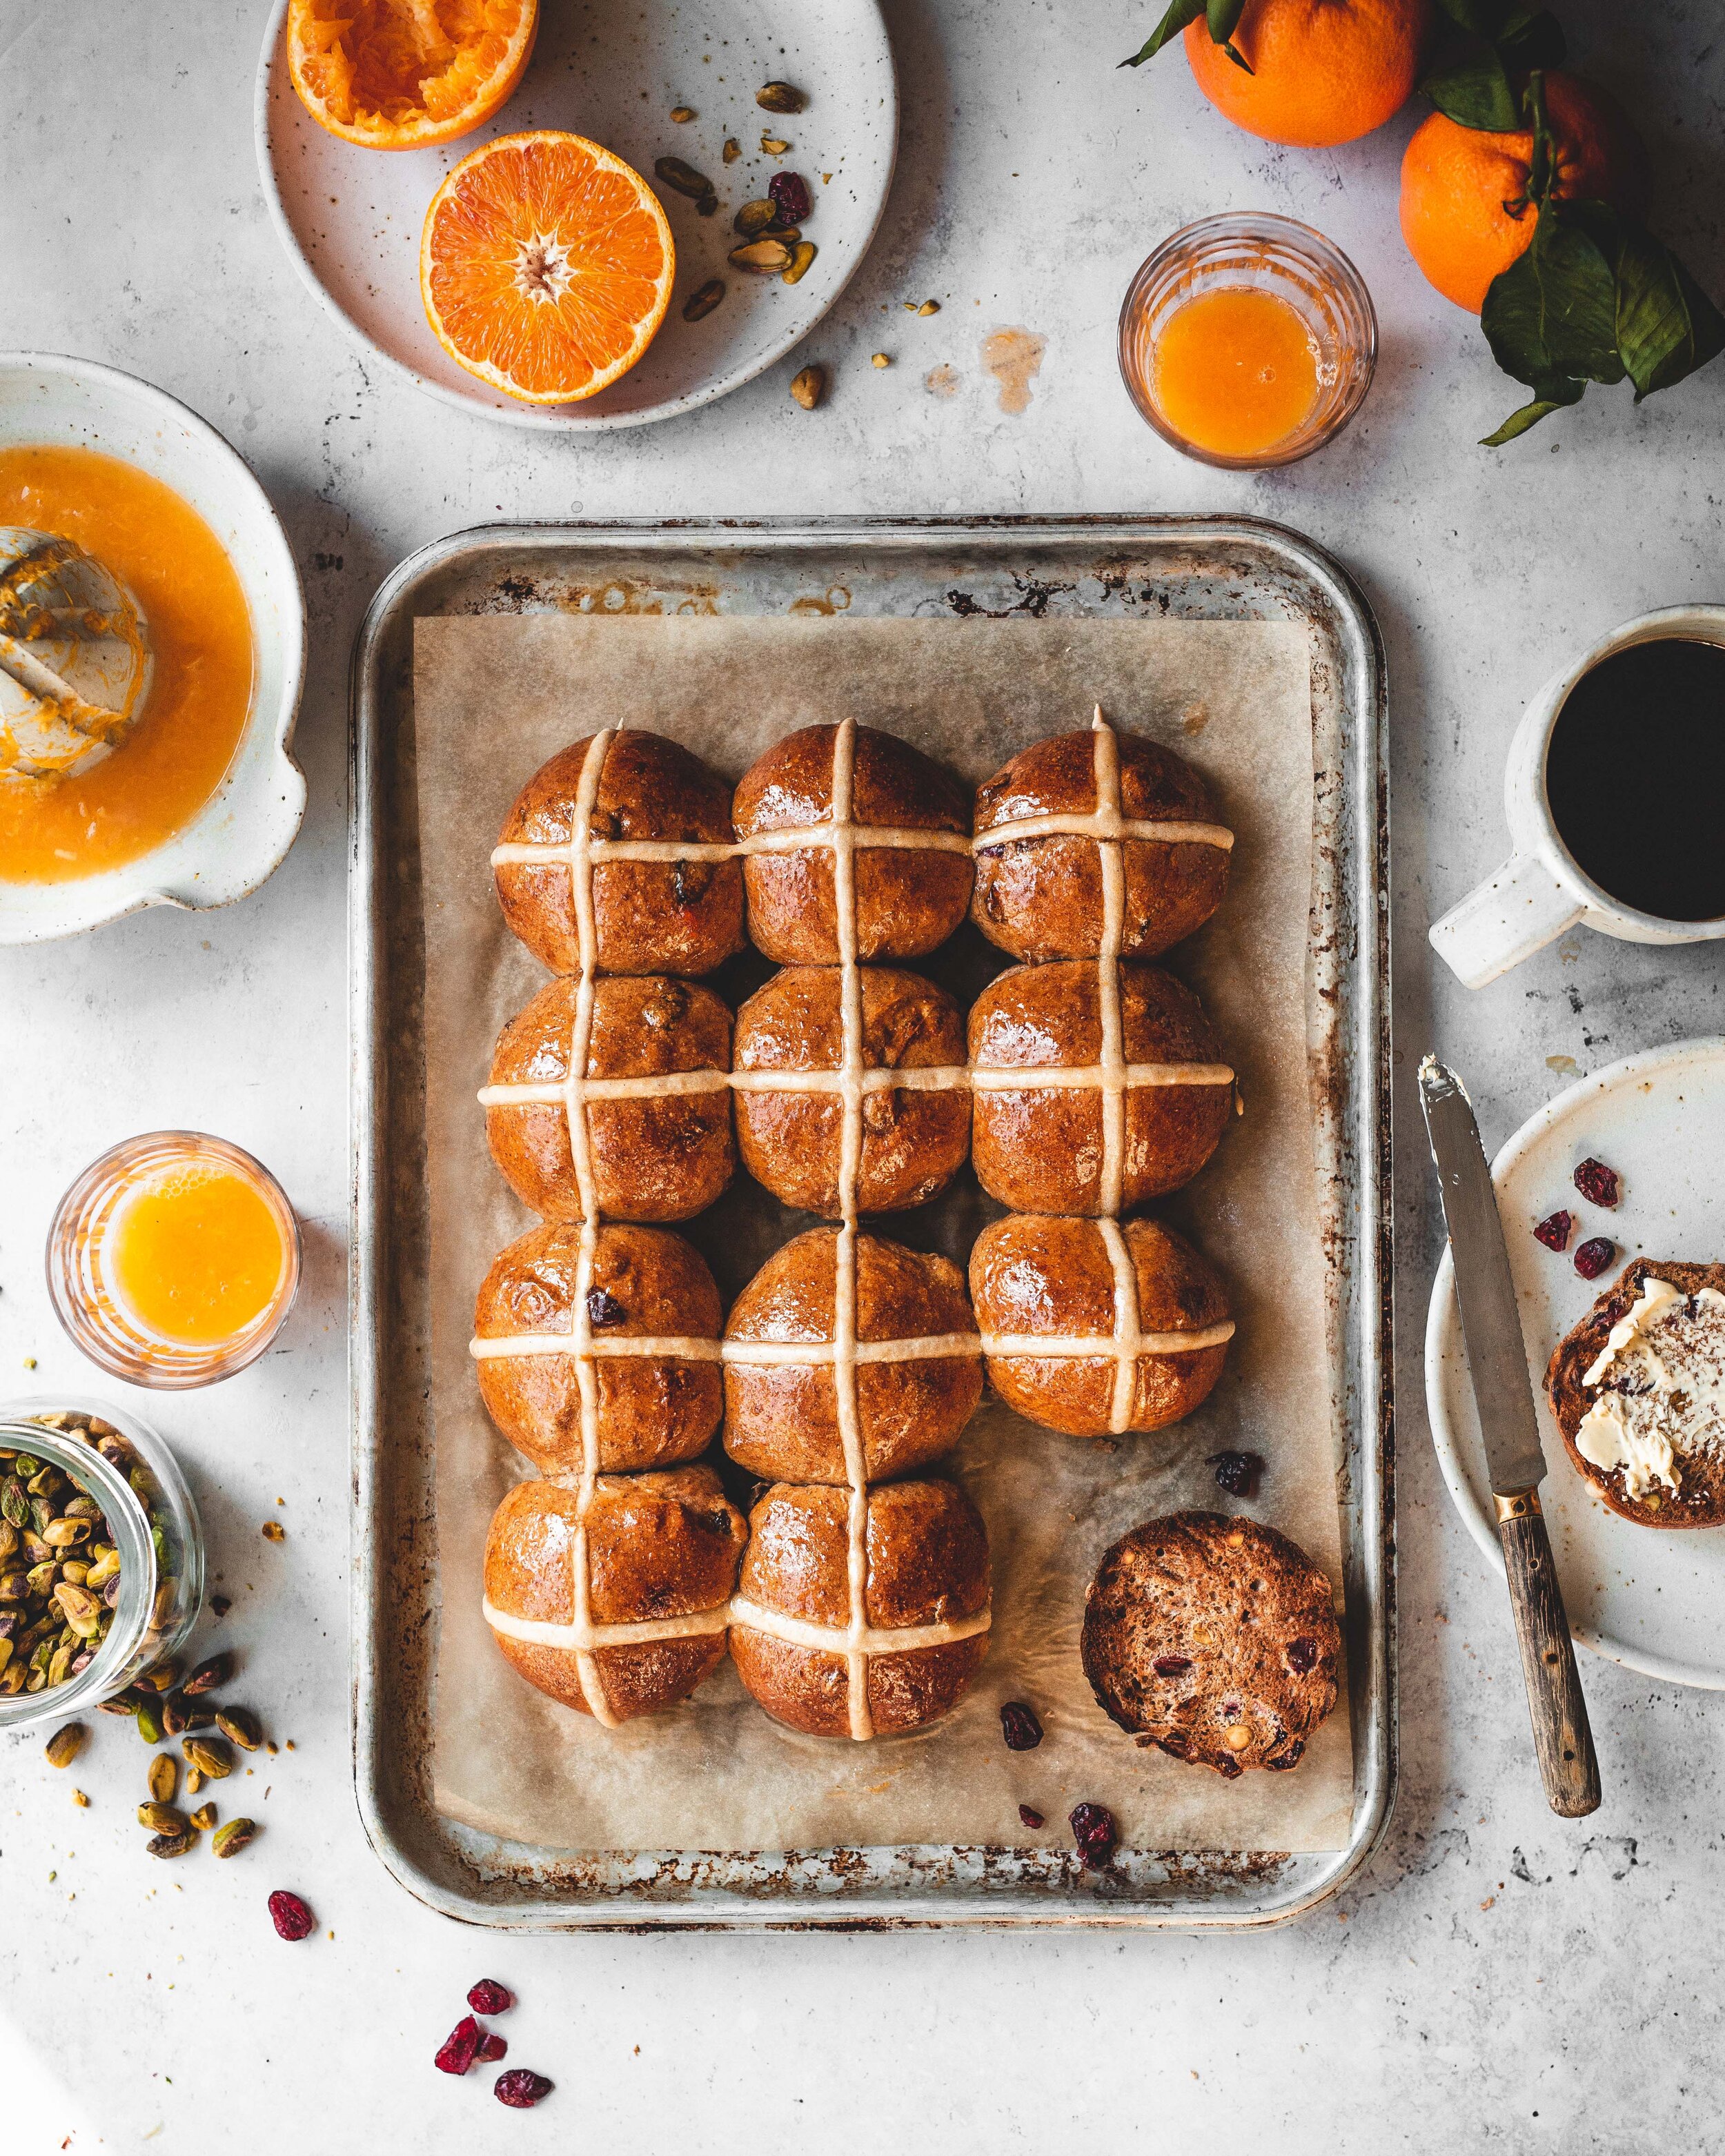
Tip the dough out onto the worksurface and divide into 12 equal sized pieces. Roll each piece into a neat ball and place onto a parchment lined baking tray, in rows of three set a couple inches apart. Lightly cover the buns and set aside for about 45 minutes to an hour or until the buns have almost doubled in size. Whilst the buns proof preheat the oven to 190C (170C fan).

When the buns have risen we need to make the cross. Simply add the flour to a small bowl and mix in enough milk to form a thick but pipeable paste. Scrape the mixture into a piping bag. At this stage we would normally add an egg wash which you can of course do if keeping the buns vegan is not a concern but if it is you have a couple options. The dough has sugar so the crust will naturally brown, so you can just leave it off, but if you want something that more closely resembles traditional buns you can make a simple plant milk/syrup mixture. Take 2 tbsp of plant milk (I used almond) and to that add about 1 tsp of agave or maple syrup, I think even brown sugar would work, and mix together to combine. Brush a thin layer onto the buns.

Cut off the end of the piping bag to make a small opening and pipe a cross onto each bun. Bake in the oven for about 25 minutes or until golden brown. Remove and allow to cool before serving. Kept in a sealed container these will keep for a couple days but they can also br frozen for up to a month.

For the optional glaze place the jam and an equal amount of water in a small saucepan and bring to a boil until syrupy in consistency. Brush over the buns whilst still warm. The jam mixture will give the buns a wonderful shine and that characteristic sticky crust. 

In Breads and Quickbreads Tags hot cross buns, vegan, easter
4 Comments

Rhubarb, White Chocolate and Spelt, Courgette Muffins

Edd Kimber February 7, 2020

This post is sponsored by Doves Farm Organic Flour

I have been writing about food, and specifically baking, for 10 years now and if I am correct I don’t think I have ever published a recipe for a muffin. It’s not that I don’t like them, I think they can be wonderful. Truth be told I have no idea, no excuse, no reason why but here we are, 10 years in, and this is the first muffin recipe I have posted. Thankfully it was worth the wait, these spelt rhubarb muffins are incredibly easy but also jam packed with flavour. 

What is Spelt Flour

This is another recipe in my series on baking with ‘Ancient Grains’ with Doves Farm Organic Flour and in this recipe I am using their ‘Stoneground Wholemeal Spelt Flour’. Now spelt is maybe one of the easiest grains to use when you want to swap out regular wheat flour and because of this and its flavour it has become an incredibly popular ancient grain. When we talk about ‘ancient grains’ it is easy to think this means we’ve been using it for hundreds of years but the truth is much more impressive. It is said that spelt has been cultivated since around 5,000/6,000 BC. Over the years, wheat flour became the dominant grain which we bake with and spelt was, for many years, relegated to animal feed. Since the 1970s ancient grains have been re-introduced to UK soils however and thankfully now it is among one of the more popular ancient grains. Milling historic, heritage grains since 1978, Doves Farm has led the way in this and was the first in the UK to grow and produce flour from spelt 

There is, however, a lot of confusion about what spelt actually is. Many think of it as a gluten free option, or that it has less gluten, or less ‘bad’ gluten and strictly speaking none of these are accurate. Rather than less gluten it actually has a different formation of gluten, which for those who suffer gluten intolerances (not coeliac or allergic reactions) can be an easier form to digest. Without getting into too much technical detail, gluten is made up of two proteins and one of these gives stretchiness and the other gives strength and structure. Wheat flour is viewed as having the perfect balance between the two proteins and is why it became the most commonly used grain for baking. The gluten in spelt has more of the stretchy type of gluten which means breads with lots of spelt tends to rise less and spread more and it also means you should avoid kneading spelt doughs too much as it can cause crumbly breads, in fact when you work with spelt bread doughs you’ll find they become incredibly stretchy much quicker than when made with regular wheat. Flavour wise, I like to compare the grain to wholemeal flour, but sweeter - no real bitterness is present, it’s a great taste that suits a wide variety of flavours. As it is also a soft flour, it makes for particularly tender recipes.

How To Use Spelt Flour

For many recipes spelt can be used as a straight swap for regular wheat flour. When making breads it tends to spread out, more than rise up, so I personally like to use it as a portion of the flour if baking a free form loaf or if I want a higher percentage of spelt in the bread. Baking it in a tin ensures the bread holds it shape. When substituting regular wheat flour for spelt flour I happily start by replacing 50% of the flour, in cakes and breads, and for things like biscuits and pastry, recipes that don’t rely on the gluten for structure, you can use a higher percentage of the grain. If you’re not following a recipe that was specifically designed for an alternative grain then when making flour substitutions it is always a good idea to start by subbing out smaller percentages so you can see how the recipe reacts to the alternative grain. With spelt the benefit is you can generally start this at a relatively high level. With a lot of recipes you’ll find using spelt as the sole flour is absolutely possible and absolutely delicious. The one thing to note about using spelt is that it has a higher rate of absorption so it’s often advisable to reduce the amount of liquid called for. I find this particularly true when making spelt breads, and find a 10-20% reduction is advisable.

Muffins

Because of the type of gluten in spelt these muffins tend to rise flatter than is normal but it’s a really good way to start baking with spelt as the muffin cases ensure structure as the batter clings to the paper cases rather than spread out. So if you’re not ready to try breads, this is a great recipe to test the waters. For the muffins I wanted something easy and really packed full of flavour. The base of the recipe is a courgette cake which is similar to carrot cake but the courgette gives less of a flavour which means it’s a great option if you want to use flavours that pair less well with carrots. For its main flavour I added rhubarb, because it’s in season and I will never not be excited to use it in more recipes, and topped the muffins with a little white chocolate because it tastes so good with the rhubarb. I also included some complimentary spices - cinnamon for a background flavour that really bring outs the flavour of the spelt, cardamom which is dream with rhubarb, and finally a little pepper which really gives everything a boost and a bit of liveliness. 

The recipes makes between 12 and 15 depending on the type of muffin case you use. If you use tulip muffin cases then it’ll make 12 large muffins but if you use regular muffins it’ll make 15. With the spelt, but also just because you’re making muffins and we don’t want to work the gluten too much, make sure to fold the batter just until the flour disappears.

Doves Farm Organic Stoneground Wholemeal Spelt Flour is available from ASDA, Morrisons, Ocado, Sainsburys and Tesco. You can also buy direct from Doves Farm


Rhubarb and White Chocolate Courgette Spelt Muffins

Makes 12-15
200g courgette, coarsely grated
175g rhubarb, sliced lengthwise and diced
175g caster sugar
75g unsalted butter
250g Doves Farm Organic Stoneground Wholemeal Spelt Flour
1 tsp baking powder
1/2 tsp baking soda
1 tsp ground cinnamon
1/2 tsp ground cardamom
1/4 tsp ground black pepper
1/4 tsp fine sea salt
3 large eggs
275g natural yoghurt
75g white chocolate, roughly chopped

Preheat the oven to 180ºC (160ºC). If you are using regular muffin cases line two muffin tins with 15 cases, if you are using tulip cases line one muffin tin with 12 cases. 

Place the courgette onto a clean kitchen towel and use to squeeze as much liquid out of the courgette as possible. The courgette has a much higher level of moisture than carrot so to make it behave in the same way we need to get rid as much water as possible. 

Take about 50g of the rhubarb and place it into a small bowl with about 1 tsp of the sugar. Stir it together to coat evenly then set aside for the moment. Place the remaining sugar and rhubarb into a large bowl and similarly mix together. Place the butter into a small pan and heat over low heat just until melted. Remove from the heat and set aside to cool slightly. 

Place the Doves Farm Wholemeal Spelt Flour into a large bowl with the baking powder, baking soda, spices and salt, whisk together so everything is evenly distributed. Add the eggs and yoghurt to the bowl with the majority of the rhubarb and mix together until everything is thoroughly mixed. Make a well in the dry goods and pour in the liquid goods and add the courgette. Gently fold together just until the flour has just about been absorbed, a few spots of flour is fine. The key thing with muffins is mixing as little as possible, you don’t want a tough muffin. 

Divide the batter evenly between the prepared muffin cases, you should be filling the cases about 2/3-3/4 of the way. Sprinkle over the reserved rhubarb and the white chocolate. Bake in the preheated oven for about 18-20 minutes or until the top of the muffin springs back to a light touch. Remove from the oven and allow to set for 5-10 minutes before transferring to a wire rack to cool completely. 

Kept sealed the muffins will keep for about 2-3 days.

In Breads and Quickbreads, Cakes Tags courgette cake, courgette muffins, rhubarb cake, rhubarb white chocolate cake, rhubarb muffins, spelt muffins, spelt cake, theboywhobakes
3 Comments
NYC Bagels.jpg

New York Style Bagels

Edd Kimber January 24, 2020

What makes a good bagel? I think its a hard question to answer because it depends where you live, what style you prefer and even then it’s just personal taste, surely? Yet across the internet the debate rages on about what makes the perfect bagel, arbritary rules for the perfect chew, how  shiny the crust should be and even what PH level water should be used. When I asked online there were still people telling me that it would be impossible to make great bagels at home, here in London, because I didn't have access to New York water. Now look, I love bagels and I love New York but I refuse to believe that to make great bagels I have to jump on a plane and fill up a bottle with a couple litres of water somewhere in Manhattan or Brooklyn. That also seems to discount any bagels from literally any other city in the world. I think Montreal might have something to say about that.

So what do I think makes a good bagel, what is my personal preference. The crust should have a bit of a shine, be chewy with an almost crisp texture when you bite into it and the interior should be denser than regular sliced bread but not so much so that its impossible to eat. I also think the dough should have the teensiest hint of sweetness. This to me feels like it is also the idea of a New York bagel, which would make sense as its the place I’ve tried the most bagels.

My method is fairly simple using a low hydration dough made with a relatively low amount of yeast, flavoured with a touch of barley malt syrup (you can use honey or brown sugar too but as malt is traditionally used and as I have it in the cupboard I use that). The sweetness level is low because I don’t want a sweet dough and I don’t want a really strong barley flavour but a hint makes the dough taste right, almost like it was the seasoning. I use cold water for the dough which is kneaded as normal and then immediately portioned and formed into bagels. Once shaped the bagels go into the fridge for about 10 hours. At this point I boil and then bake them. Simple.

The eagle eyed bakers among you will notice there is no traditional second rise and the reason for this is simple. I tested the recipe like a regular bread dough, letting the dough rise before knocking it back and forming in bagels before resting them in the fridge, but when the bagels were boiled they were prone to deflating, looking like sad deflated rubber rings. This happened even when I reduced the period spent in the fridge.  The fridge is used to develop flavour as the dough rests for a long time, maturing and developing more complex flavours. With my final recipe because the bagels go in cold they can stay in there for a relatively long time. If the dough proves at room temperature before being formed into bagels the dough will have warmed up too much, the yeast will be excited and hungry and the formed bagels will rise in the fridge a lot quicker. By starting the dough cold it takes a lot longer before the dough can over proof.

Do you need New York water to make great bagels? No. Do I want to go to New York and see if my recipe is nicer in the states? Absolutely, but for now Ill have to stick to making bagels with boring old London tap water.


New York Bagel Recipe
Makes 8

500g strong white bread flour
10g fine sea salt
4g dried fast action yeast
300ml cold water
2 tsp barley malt syrup
Toppings of choice (sesame seeds, poppy seeds, everything seasoning etc)

To Boil
30g barley malt syrup
1 tbsp baking soda

To make the bagel dough place the flour, yeast and salt into the bowl of an electric stand mixer and with the dough hook attached, mix briefly to combine. Add the barley malt sryup to a jug with the cold water and mix together until dissolved. Pour this mixture into the mixer and on low-medium speed mix to form a shaggy dough. On the same speed continue to knead the dough for about 15-18 minutes or until the dough passes the windowpane test. This dough is a relatively low hydration and stiff dough, so be careful using this on lower quality stand mixers, you dont want to burn out the motor. You can knead this by hand but it will be a workout, it’ll take about 30 minutes of constant kneading. 

Tip the dough out onto the worksurface and divide into equal sized pieces (I weigh the dough for accuracy but you can eyeball this if you prefer). Form each piece of dough into a tight ball and cover with a kitchen towel to prevent the dough from drying out. Working with one piece of dough at a time use a flour dipped finger to poke a hole in the middle of the dough ball and then we need to extend this to between 2-3 inches (depending on the finished look of the bagels you’re going for). My preferred method is to spin it around your finger to start off with, to get the hole started and then, with the bagel ring around the fingers of one hand, I light rub my hands together, gently stretching out the bagel. Rotate the dough around your hand so the ring stays the same thickness all around. When the hole is the desired size place on onto parchment lined baking sheets. The sheets needs to be either coated with a thin layer of cornmeal or lightly sprayed with oil. Wrap the baking sheets with a couple layers of clingfilm and place into the fridge for 10-12 hours.

When I tested this recipe I tried a few different rest periods in the fridge and found 10-12 hours to be the sweet spot. A longer rest makes a lighter, more open, bagel and a shorter rest makes bagels that are a too dense, 10-12 hours gave me that characteristic texture I was looking for. 

When you are almost ready to bake preheat the oven to 200C(390F).

When the bagels are ready fill a large saucepan with water and add the barley malt syrup and bring to the boil. Reduce the heat to a simmer, add the baking soda and whisk to combine. Take one sheet of bagels out of the fridge and working in batches of 4 cook in the water for a minute per side. Use a large slotted spoon remove from the water, letting as much water drain off as possible, before coating in the topping of your choice, or leaving plain if you prefer. Place the bagels onto a parchment lined baking sheet and set aside until the sheet is full of bagels. 

When coating the bagels there is a couple ways you can do this. Firstly if you add the toppings when the bagels are fresh from the water nothing else is needed to make then stick, the surface of the bagels will be tacky enough. To add the toppings you can either place the different flavours in bowls and add the bagels tossing to coat, which makes a very generous coating. Because of the moisture present it can also make any leftover seeds wet, making them clump together, so this is best if you making a big batch of bagels. My preferred method is to place the bagels on a plate and sprinkle over the toppings, turning over to make sure both sides are coated. This method ensures you only use what you actually need and wastage is kept to a minimum.

Once all the bagels have been boiled bake them in the preheated oven for about 18-22 minutes or until the bagels are golden brown. The darker you take the bagels the firmer the crust will be so bare that in mind when you go to pull them from the oven. Remove the trays from the oven and carefully transfer the bagels to wire racks to cool completely.

Bagels are best served within a couple days but once cooled they freeze wonderfully so I often make a big batch and keep the freezer well stocked.

NYC Bagels-3.jpg

Everything Bagel Seasoning
2 tbsp poppy seeds
2 tbsp white sesame seeds
1 tbsp black sesame seeds
1 tbsp garlic granules 
1 tbsp onion granules 
2 tsp flaked sea salt

Add all of the ingredients to a bowl and mix together, add to a jar and store until needed. Whilst this is great as a bagel seasoning you can add this to popcorn, sprinkle it over eggs, or just use it as a general seasoning.

In Breads and Quickbreads Tags New York style bagels, bagel recipe, traditional bagels, barley malt syrup, everything seasoning recipe
11 Comments
Everything Biscuits-3.jpg

Everything Bagel Buttermilk Biscuits

Edd Kimber September 21, 2019

Okay lets agree the name of this recipe is a bit of a mouthful and its not particularly elegant either, but there’s really nothing else to call it. I love an everything bagel, with its pungent garlic and onion, but I don’t always have time to whip up a batch of bagels. When the craving for that flavour hits but the time doesn’t permit these biscuits are the perfect thing. I wanted to replicate the bagel flavouring a little more than just sprinkling on the everything seasoning so the dough has two extra additions, cream cheese and chives, both helping with the bagel illusion. The cream cheese adds flavour, obviously, but it also adds tenderness, as unlike butter the water content in the cheese doesn’t really evaporate, giving flakiness, the fat melts into the dough instead. For the big punch of flavouring though I was recently given a couple jars of Trader Jo’s ‘Everything Bagel Seasoning’ and this is what I used, but for those of you not in the US I have also given a recipe for a homemade version. Whilst I love these biscuits on their own, simply split and slathered with plenty of butter, these would make the most delicious breakfast sandwiches filled with scrambled egg, bacon and cheese. In fact, since I am writing this at 8am on a Saturday morning, maybe that’s what I should make for breakfast today!

'Everything Bagel’ Buttermilk Biscuits
65g salted butter, diced and frozen, plus a little extra for glazing
65g cream cheese, chilled
350g self raising flour
1/2 tsp baking soda
3 tbsp finely chopped chives
200ml buttermilk
1 large egg yolk, for egg wash
2-3 tbsp everything bagel seasoning (see recipe below)

Everything Bagel Seasoning
2 tbsp poppy seeds
2 tbsp white sesame seeds
1 tbsp dried minced garlic
1 tbsp dried minced onion
2 tsp flaked sea salt

Everything Biscuits-4.jpg

For the everything bagel seasoning mix everything and store in a small jar. It can be used in a whole host of recipes or used as a finishing spice, used to spinkle over dishes like fried eggs, in a salad, on vegetables or even on fries. I tend to use it simply for making bagels or other bread like dishes.

To make the biscuits place the flour and baking soda into a large bowl and mix together. Add the cream cheese and use a rounded blade knife to cut the cheese into the flour, until it is smaller pieces. To rub the cheese fully into the flour you make need to get your hands involved and finish it off manually. Once the cream cheese has all but disappeared into the flour add the diced butter and toss to coat in the flour. Use your fingertips to rub the butter briefly into the flour until the butter is in large flat flakes. Place the bowl into the freezer for 15 minutes or until the butter is solid. Remove the bowl from the freezer and drizzle in the buttermilk a little bit at a time, using the knife to stir to combine. Once all the buttermilk has been added you should have a shaggy dough.

Tip the dough out onto a well floured worksurface and use your hands to bring the dough together, using a folding motion to make sure there are no dry pockets. Roll the dough out into a rectangle that is roughly 20cm x 50cm and fold the dough in thirds, as if your folding a letter. Turn the dough so the folds are facing you and repeat the rolling and folding a second time. Transfer the dough to a parchment lined baking tray and place into the freezer for 10 minutes to chill briefly.

Remove the dough from the fridge and on a well floured worksurface roll the dough out until it is about 1 inch thick. Using a 3 inch round cookie cutter, which has been dipped in flour, cut out as many biscuits as possible. It is best to use a firm downward pressure, avoiding any twisting as you cut the biscuits, which can inhibit the rise of the biscuits. Place the biscuits onto a parchment lined baking tray, nice and close together so they are almost touching. Contrary to what you might think we want them close together as they because the steam released hits the biscuits next to them and helps prevent the biscuits from setting before they’ve fully risen (in a very similar way to how a lot of breads are baked).

You can press the scraps together and cut out more but I don’t like to do this more than once otherwise the biscuits will end up being tough. Brush the tops of the finished biscuits with the egg yolk and sprinkle liberally with the everything seasoning. Bake in the preheated oven for about 15 minutes or until golden brown. Allow to cool a little before serving warm.

In Breads and Quickbreads
1 Comment
  • Recipes
  • Older
  • Newer

Twitter

  • Was 8 original films, 3 spin off films, a two part play not enough. Can we have something new. https://t.co/cBZdGEGeyv
    Apr 4, 2023, 1:46 PM
  • RT @deliciousmag: Cacio e pepe, but make it buns! These seriously cheesy bread rolls from @TheBoyWhoBakes are inspired by his favouri… https://t.co/oDZlaDgnN2
    Apr 2, 2023, 11:08 AM
  • RT @TheDailyShow: Congrats to Donald Trump on finally winning a majority of votes! https://t.co/ezP55HZgl0
    Mar 31, 2023, 12:43 AM

Instagram

This weeks bonus recipe, for subscribers to my newsletter, is this gorgeous sour cherry and coconut gateau basque. The crust is a buttery cross between pastry and cake, think a cakey cookie. The filling is a layer of sour cherry topped with a rich coconut custard. A real fun one to make too! Link to my newsletter can be found in my bio - #gateaubasque #pastrycream #coconut #sourcherry
In this months @olivemagazine (out today) the team came and photographed my petit kitchen and we talked about how we put our stamp on the place, without spending a fortune. We hated the bland kitchen that we inherited but, as it was relatively new an
In this months @olivemagazine (out today) the team came and photographed my petit kitchen and we talked about how we put our stamp on the place, without spending a fortune. We hated the bland kitchen that we inherited but, as it was relatively new and in good condition, it felt a waste to rip it out and we also didn’t want to spend the money it would take to rip out the whole thing and replace it (it’s a howdens shell so we could have done something cheaper like @plykeakitchens @holte.studio @madebyhusk) so instead I painted all of the cabinets, using @makeitrustoleum kitchen cabinet paint, to give it some personality and lighten the whole thing. Check out the magazine for the full run down. - #kitchendesign #kitchenremodel #rustoleumcabinettransformations #rustoleumkitchencupboardpaint #kitcheninspiration #theboywhobakes #olivemagazine
Are you making scones all wrong? Maybe, maybe not? But I do want to show you how I make them! This recipe is based on the method I learnt at @belmondlemanoir 12 years ago when I did a stage, and it makes the absolute lightest scones. And shock horror, it involves kneading the dough, albeit very lightly. You can get the full recipe in this weeks newsletter (free) linked in my bio. - #scones #bakingday #worldbakingday #afternoontea #hightea #englishscones #clottedcream #creamtea #theboywhobakes
facebook
  • Contact

The Boy Who Bakes

Edd Kimber

facebook