The Boy Who Bakes

Edd Kimber
  • Home
  • Recipes
  • My Books
  • Blog
  • Recipe Index
  • About
  • Home
  • Recipes
  • My Books
  • Blog
  • Recipe Index
  • About

Recipes

  • All
  • baking
  • Biscuits and Cookies
  • Breads and Quickbreads
  • Bundts
  • Cakes
  • Chocolate
  • Dessert
  • drinks
  • Holidays
  • Pastry
  • Scones and Quickbreads
Tahini Babka Buns WEb small.jpg

Chocolate Tahini Babka Buns

Edd Kimber June 20, 2020

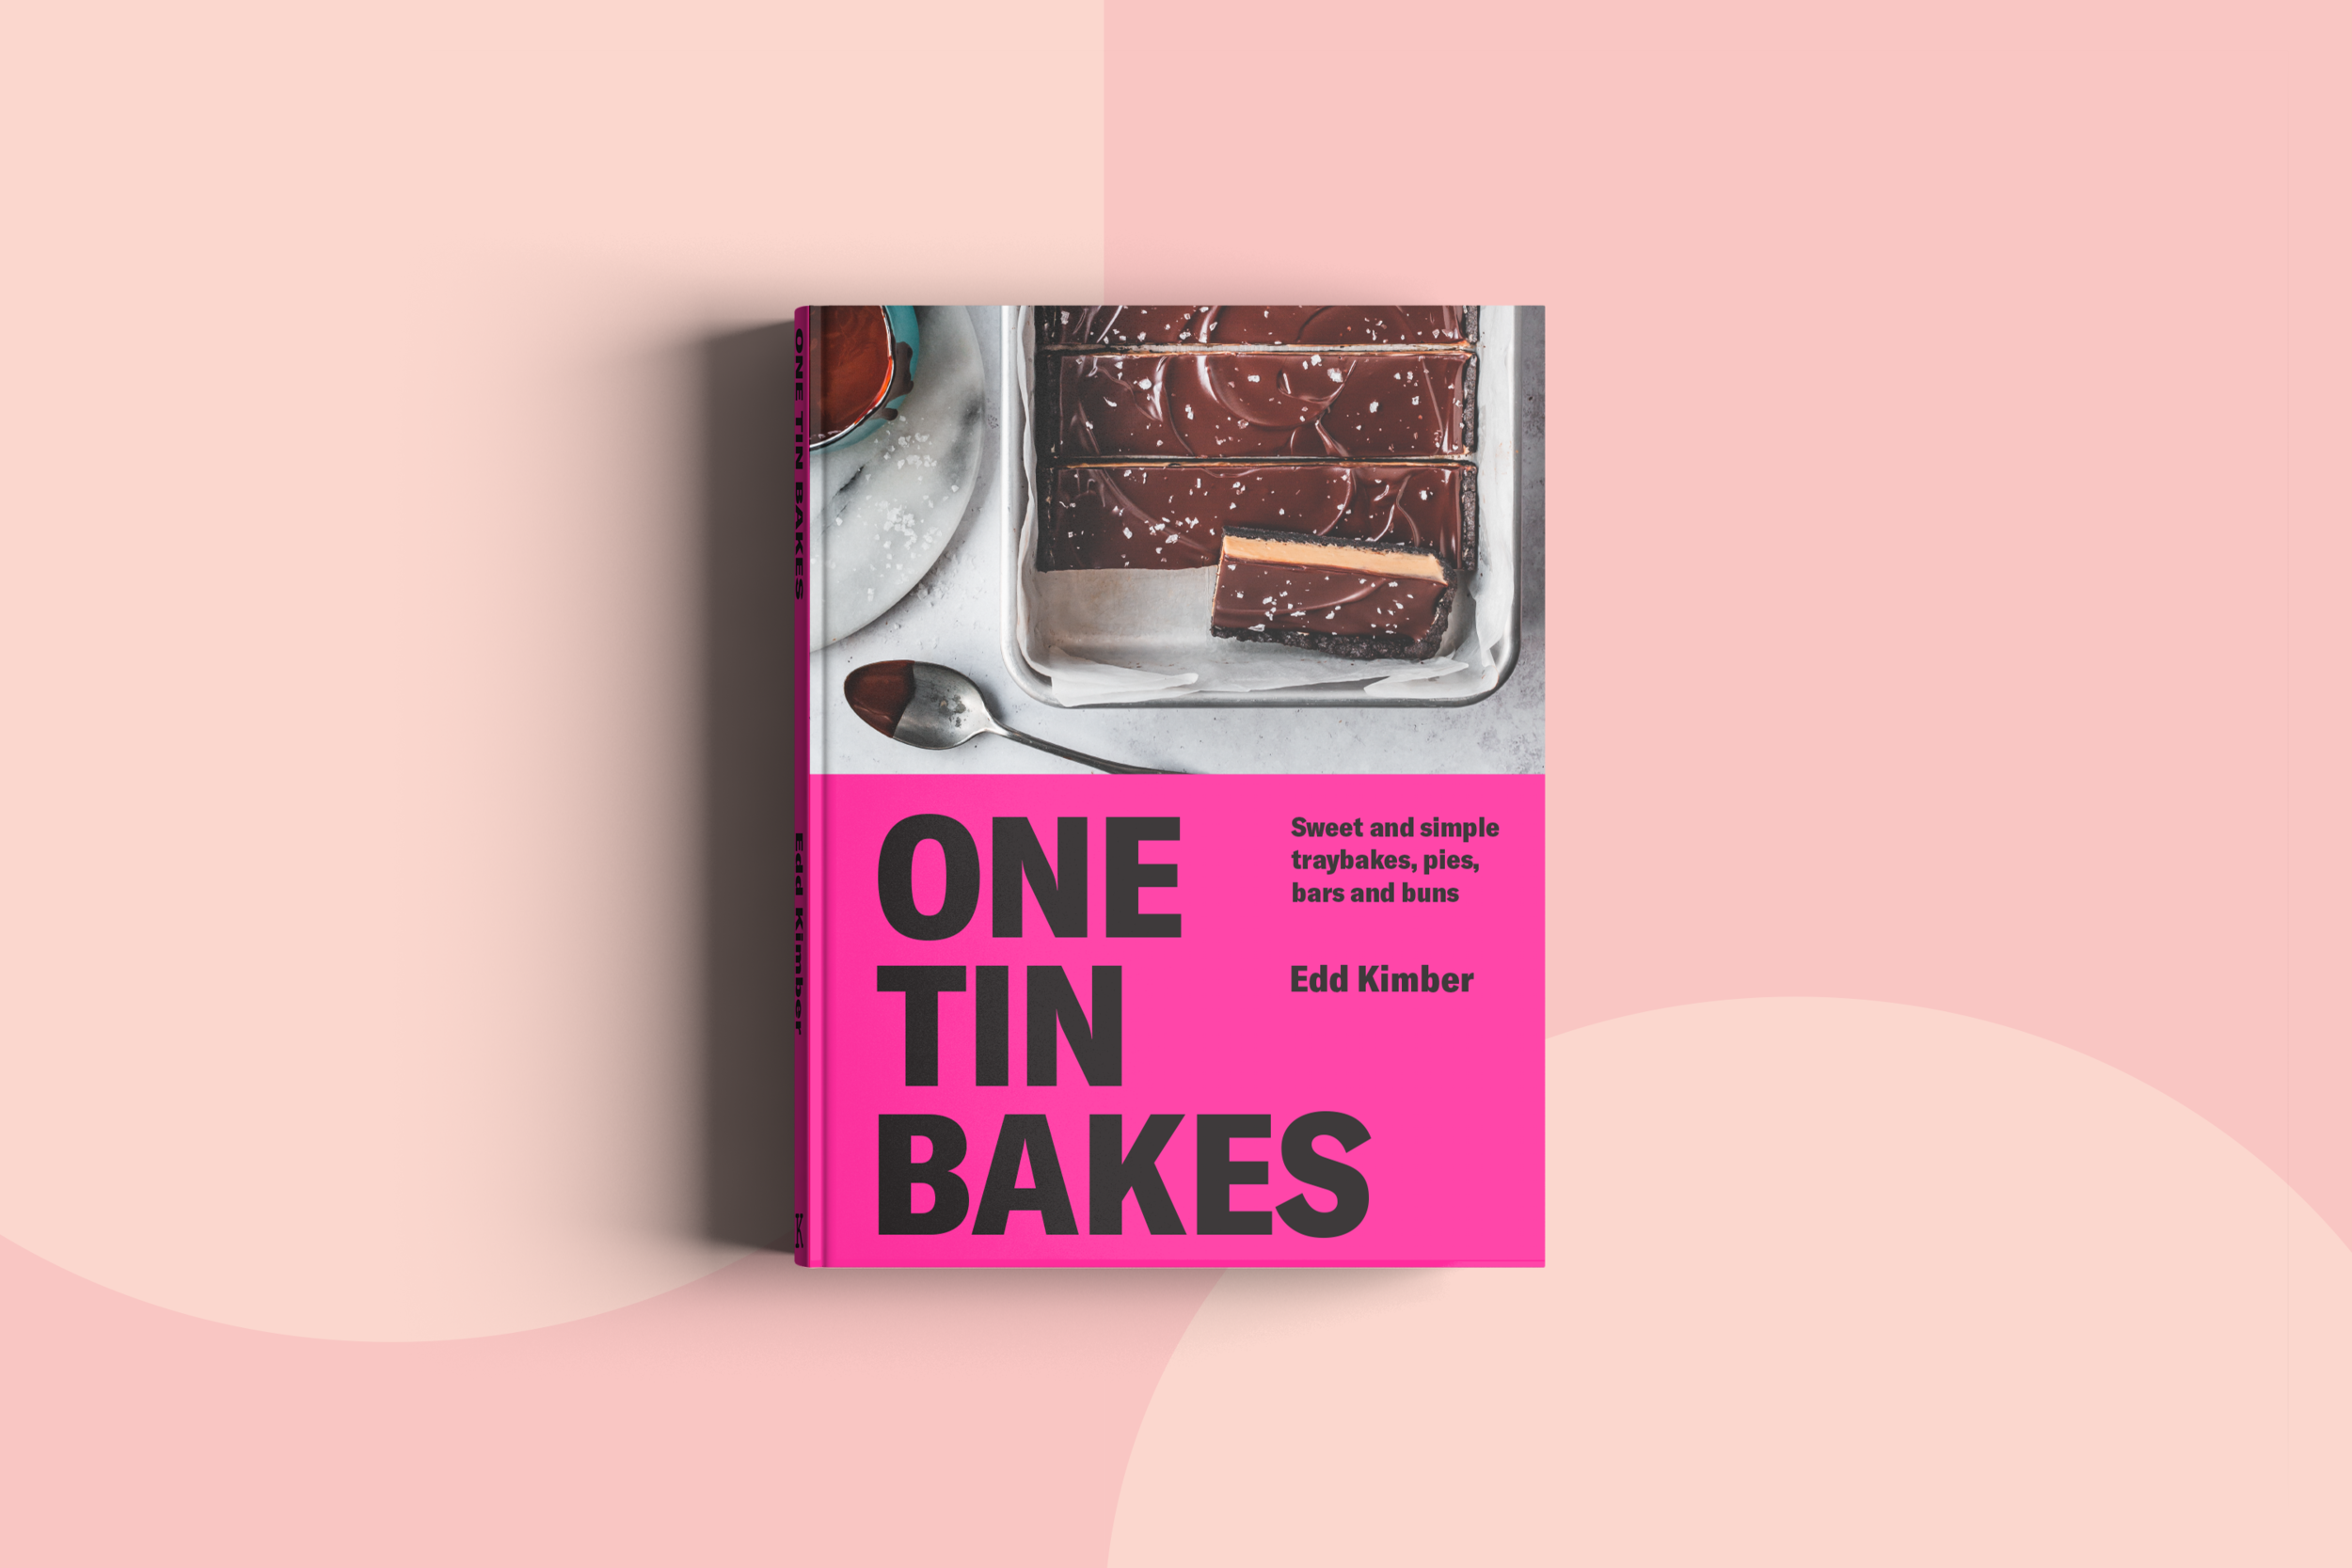
The countdown is on, with only a few days left until One Tin Bakes is finally out in the world. After waiting well over a year my new book is finally published and to say I am excited is an understatement. I can’t wait for you guys to see it, to bake from it and to have it in your kitchens. Always the impatient baker, I couldn’t wait until publication to share a recipe from the book with you, so today I am sharing one of my favourites, the Chocolate Tahini Babka Buns. I am also telling you that the book is out NEXT THURSDAY and if you want it on the day there is still time to preorder, hint there is a link here.

Think of these buns as the meeting of cinnamon buns and babka with tahini thrown in for good measure. The story I tell in the book is how these were inspired after spending the afternoon in the kitchen with Uri Scheft, the baker who led the recent rise in popularity of babka, in the United States and around the world. The traditional babka, of Eastern European Jewish origin, is made with leftover challah dough rolled up with jam or cinnamon, It’s a world away from the babka that most people are making these days, it also lacks the adoration the modern version receives, it seems to have a love it or hate it quality, denser and drier than its modern counterpart. So, what changed the babka’s fortunes? Well, the answer seems to be simple…butter. Traditional Jewish breads would have been made with oil to keep them parve, but when non-jewish or non-parve chefs took on the babka in the early 2000’s they started making them with butter, the doughs became more brioche in style and the fillings became richer with more and more chocolate added. The one modern recipe that can fairly claim the crown, for pushing the babka into a wider public consciousness, is the one served at Breads Bakery in New York. The bakery was founded with Israeli baker Uri Scheft, of Lehamim Bakery (the partnership has since dissolved), and the babka that the bakery introduced to NYC became a true media darling, it was quite literally everywhere. Every magazine, every paper, every blog, it was a bread that went viral. And more importantly, it became the standard, the version that most people now think of when they think of babka, a swirled bread made with a brioche like dough and swirled with chocolate.

Tahini Babka Buns small.jpg

I was lucky to spend the afternoon in the kitchen with Scheft early last year where he taught me his famous babka recipe, as good as I remembered when I first tried in NYC. During that trip, where babka and tahini seemed to be two daily staples, the idea of sneaking in a little tahini into a chocolate babka seemed like an obvious one. On arriving back home I tried out the idea immediately, before my bags were even unpacked, with the memory or Uri’s version still fresh in my mind. I knew immediately it was a good thing, have a second slice good. The version I am finally posting is the one I made for One Tin Bakes, adapting the idea to the form of cinnamon buns which made the recipe 9x13 friendly. If you don’t follow me online elsewhere or you have managed to miss my last few posts let me briefly explain the book. The idea is that every single recipe is baked in the same 9x13 tin (its a classic brownie tin) making the required equipment so much lower than most baking books, hopefully making it more approachable. The recipes run the gamut in terms of style, required skill, and time required to bake them. There is something for everyone and no matter whether lockdown has got you baking for the first time or you’ve baking since you were a kid you’ll find something you will love. 

COMPETITON TIME

Before we get to the recipe I have one last thing to tell you, its competition time! To celebrate the release of the book I have partnered with Nordicware, Guittard Chocolate and Belazu to create a brilliant prize package. The prize is a signed copy of the book, a One Tin Bakes tote bag, the Nordicware 9x13 tin I recommend in the book plus one of their iconic bundt pans, a whopping 3kg bag of Guittard Chocolate (they’re providing a bag of one of my favourites) and belazu are proving a selection of their tahinis (classic and their new black tahini) and oils. To enter the competition all you have to do is make one of the recipes from the book and post a picture on instagram saying that it came from my new book One Tin Bakes and tagging me using the hashtag #OneTinBakes. Obviously the book comes out halfway through the window for this competition so feel free to make these babka buns or get yourself a copy of the June issue of Olive magazine which has a bunch of other recipes from the book. Competition is only open to UK residents and the winner will be picked at random. 

Chocolate Tahini Babka Buns
Taken From my book One Tin Bakes (Kyle Books 2020)
Makes 12 

Brioche Dough
500g strong white bread flour, plus extra for dusting
25g caster sugar
1 teaspoon fine sea salt
7g fast-action dried yeast
250ml whole milk
2 large eggs
100g unsalted butter, at room temperature, diced, plus extra for greasing 

Chocolate Tahini Filling
100g dark chocolate (65–70% cocoa solids), finely chopped
100g unsalted butter, diced
55g light brown sugar
100g tahini
flaked sea salt, for sprinkling 

Vanilla Syrup
65g caster sugar
1 teaspoon vanilla extract
2 teaspoons sesame seeds 

OTB pink swirl.png

For the bread dough add the flour, sugar, salt and yeast to the bowl of an electric stand mixer with the dough hook attachment and mix briefly to combine. Add the milk and eggs and knead on medium-low speed for about 10 minutes, or until the dough is smooth, elastic and pulling away from the sides of the bowl. With the mixer still running, add the butter, a little bit at a time. Once the butter has been worked into the dough, continue kneading for a further 10 minutes or so until the dough is once again pulling away from the sides of the bowl. Place the dough in a lightly greased bowl, cover with clingfilm and refrigerate overnight or for up to 2 days. If you prefer, you can let the dough rise at room temperature, but it’s worth making this in advance as the dough is much easier to handle when thoroughly chilled.

The next day, lightly grease or line the base of the 9x13 baking tin with a piece of parchment paper. Make the filling. Place the chocolate and butter in a heatproof bowl set over a pan of simmering water (ensuring the bottom of the bowl doesn’t touch the water underneath) until melted. Remove from the heat, stir in the brown sugar and tahini, then set aside. 

Remove the dough from the refrigerator and, working on a lightly floured surface, roll out into a large 50 x 50cm (20 x 20in) square. Spread the chocolate tahini mixture evenly over the dough. At this point, the tahini mixture will be loose and glossy, so if you attempt to roll the dough up now it will be very messy, therefore, allow the mixture to sit for a couple of minutes until it goes a little tackier and loses its shine (don’t leave this too long though, because the filling will eventually set, meaning it won’t stick to the dough when it’s rolled). Sprinkle over a little flaked sea salt and roll up the dough into a tight sausage. 

Cut the sausage into 12 equal-sized slices and place them, cut-side up, into the prepared baking tin. Cover with clingfilm and set aside to prove in a warm place for 45 minutes to 1 hour, or until the rolls are touching each other and feel puffy to the touch. 

Meanwhile, preheat the oven to 190°C (375°F), Gas Mark 5. Bake the buns for 30–35 minutes, or until golden brown. 

Meanwhile, make the syrup. Place the caster (superfine) sugar and 60ml (1⁄4cup) water in a small saucepan and cook over a low heat just until the sugar has dissolved. Remove from the heat and add the vanilla. 

When the buns come out of the oven, while still hot, liberally brush them with the syrup and then sprinkle over the sesame seeds. Leave the buns to cool completely in the tin before removing and serving. 

Stored covered, these buns will keep for 2–3 days. 

In Breads and Quickbreads, Chocolate Tags babka, buns, tahini, cinnamon buns, cinnamon rolls, one tin bakes, sesame, sesame seeds
20 Comments

Sourdough Detroit Style Pizza

Edd Kimber June 12, 2020

So I seem to have pizza on my mind a lot right now, and this week that obsession is in the form of Detroit style pizza. I love classic Neapolitan or New York pizzas but the shaping can be tricky, especially if you’ve never done it before and getting a great bake at home needs a couple work arounds to get something close to restaurant standard. None of that normally bothers me, I enjoy the process, but right now I want pizza but I want it with a little less effort, but i’ll get to that in a minute.

Firstly, we need to ask, what actually is Detroit pizza. It’s a type of pan pizza, very closely related to Sicilian style, and Grandma style rectangular pies, in fact they’re effectively brothers. Sicilian style pizza is a focaccia like dough that’s baked on the thicker side in large rectangular sheets, with cheese going on first, before the sauce. That sauce is also classically a cooked tomato sauce, unlike the raw tomatoes that adorn a Neapolitan pizza. As mentioned, Detroit pizza is very similar to its Sicilian sibling so its maybe not too surprising that the origins of the pizza start in, you guessed it, Sicily. The story goes that in 1946 Gus Guerra, of Buddy’s Rendevous, decided his menu needed something new so he looked to his Sicilian mothers pizza recipe. This could easily have become Sicilian style pizza, just served in Detroit, but there are a couple key differences. The biggest change is the pan. Detroit style pizzas are cooked in a ‘blue steel’ pan that was widely used in the automotive industry back in the 40’s and its use became an identifying part of this style of pizza. Thankfully a 9x13 brownie tin is similar enough in size and style so that us home bakers can make our own version at home. The second change is again all to do with location as the cheese used is Wisconsin Brick Cheese, a variant of American cheddar thats slightly higher in fat, kind of like a cross between a low moisture mozzarella and cheddar. This is close to impossible to find in the UK so instead I use a grated blend of mozzarella and cheddar, the type sold in bags at almost every supermarket. But what I consider to be the signature of a Detroit style pizza is the crisp cheese crust. The cheese is spread all over the pizza including the sides. As the pizza bakes the cheese melts and slips down the side of the dough and caramelises into the a crisp skirt of cheese surrounding the pizza, like the cheese that escapes the bread when making a grilled cheese. We all know this is the best bit.

For the dough the recipe is very similar to my Neapolitan recipe although with a couple small changes. Because we want a more bread like chew, I’ve used regular white bread flour, I’ve also upped the hydration to 70%. To make things move along a little quicker I have also included slightly more sourdough starter. The method is the same up until shaping and the good news, there really isn’t any shaping to do, this is pretty hands off pizza making.

Sourdough Detroit Style Pizza Dough
Makes enough for one pizza 

Cooked Pizza Sauce
Makes enough for x2 pizzas

2 tbsp olive oil
2 garlic cloves, crushed
2 x 400g tins chopped tomatoes
2 tsp dried oregano
1/2 tsp chilli flakes

Toppings
250g grated cheese (I use the bagged blends of cheddar and mozzarella sold in most supermarkets)
150g pepperoni, cut into rounds
Parmesan or Grana Padano

Detroit Style Pizza Dough
500g White Bread Flour (100%)
15g fine sea salt (3%)
350ml water, 28-30C (70%)
100g mature sourdough starter*, 100% hydration (20%)
10ml extra virgin olive oil (2%)

DONT FORGET MY NEW BOOK ONE TIN BAKES (WHICH USES THE SAME TIN USED IN THIS RECIPE IS OUT JUNE 25TH YOU CAN FIND MORE DETAILS HERE WWW.THEBOYWHOBAKES.CO.UK/ONETINBAKES

OTB pink swirl.png

*If when you want to start making the dough your starter has fallen and is no longer at its peak (this is what you call mature starter) you can make a levin by simply mixing together 35g of the starter, 35g water at 28-30C and 35g bread flour, covering and setting in a warm spot, oven with the light on is ideal, and leaving until doubled in size. Using the above ratios and temperatures this should take 2-3 hours.

To make the dough pour the water into a large bowl and scrape in the mature starter/levain and mix briefly to break up a little. Add in the flour, salt and olive oil and mix briefly to form a shaggy dough. Pop the mixture into you’re stand mixer and knead, with the dough hook attached, for about 8-10 minutes on low/medium speed. 

Once the dough is smooth and elastic tip out onto the worksurface and use a bench scraper to help you form the dough into a ball and place into a bowl very lightly greased with olive oil. Cover the bowl and set aside somewhere warm (26-27C is perfect) for the moment. After 30 minutes, using the techniques we learnt making our first loaf of sourdough bread, were going to preform a set of stretch and folds to build in more strength. If the dough feels strong and resisted stretching you can leave the dough to rise but if it feels a little slack you can do a second set of stretch and folds in another 30 minutes. Once your folds are done let the dough rest for another 30 minutes to relax. Meanwhile pour in a couple tbsp of olive oil to your 9x13 tin and spread all over, making sure to rub it up the sides as well. Once the dough is rested carefully transfer to the pan and gently stretch it out a little. Dont worry about getting it to the edges of the pan just yet, but give it a little push on its way (you don’t want to de-gas the dough just gently tease it towards the edges). Cover the pan and set aside to proof. This dough, kept in an area around 26-27C, should take about 7 hours in total to proof, this window of time starts when you’ve taken the dough off the mixer.

Whilst the dough is proving make the sauce. Pour the oil into a saucepan and heat over low/medium heat. Add the crushed garlic and cook for 30 seconds or until fragrant and the garlic is just taking on the barest of colour. Add the chilli flakes and oregano and stir to combine. Tip in the tomatoes and stir to combine, seasoning with salt and pepper (at this point I like to puree the sauce with an immersion blender but that is optional). Gently simmer for about 15 minutes or until reduced by about a third to a thick tomato sauce. Remove and chill until needed. The sauce can be refrigerated for a couple days or even frozen for up to a couple months. 

After a total of 7 hours you should see the dough has expanded, pushing to the sides of the tin, and it should have nice signs of fermentation on the top of the dough. Using lightly oiled hands gently press the dough into the corners if it hasn’t already reached them. Cover the tin with clingfilm and refrigerate for anything up to 24 hours. 

A few hours before you make the pizza you need to get it out of the fridge and allow to to come to room temperature, this should take about 2 hours. You know it’s ready to bake when the dough has a nice jiggle when you rock the tin. 30 minutes before you bake the pizza place a baking stone or pizza steel into the oven and preheat to 230ºC (210ºC Fan). 

To assemble the pizza sprinkle over the cheese, making sure there is plenty all around the edges. Spoon 1/2 of the sauce onto the pizza, either in random dollops or in a few strips. Add any extra toppings. Bake in the preheated oven for about 25 minutes or until the cheese is melted and lightly browned, there should also be lots of bubbling around the edges from the combination of melted cheese and olive oil. As soon as the pizza is out of the oven use a round-bladed knife to separate the pizza from the sides of the tin, as it cools it will glue itself to the tin. Carefully remove the pizza from the tin, grate over some parmesan or grana padano and serve. 

In Breads and Quickbreads Tags Detroit pizza, pizza, grandma, sicilian, focaccia, 9x13, pan, one tin bakes
17 Comments
pizza crust-1-3.jpg

Sourdough Neapolitan (ish) Pizza

Edd Kimber May 15, 2020

You’ve made your sourdough starter, your regularly turning out loaves and you’ve used the discard to make banana bread and cookies, so I think its time to make pizza. When I think of the holy grail of homemade pizzas I think 75% of people would probably be aiming for something akin to a Neapolitan pie, simple toppings, a light puffy crust and thin but slightly soft base, no hard cracker like pies here please. To be a true Neapolitan pizza there is rules you have to follow and since were making these at home were going to breaking a few of them. The main rules I’m breaking, sorry Italy, is with the dough and with the cooking. To be a true Neapolitan pizza the dough should only include water, salt, yeast (sourodugh is allowed) and flour, im breaking that by adding a little olive oil. Why? I find making pizzas at home the oil helps to make an easy to handle dough that gives a little head start. The biggest rule we are breaking though is the oven, Neapolitan pizzas have to be cooked in a wood fired oven and I live in a small apartment in London, I don’t think my landlord or my neighbours for that matter would be happy if I installed a wood fired oven in my kitchen. Rules are made to be broken so whilst my pizzas will only be Neapolitan-ish there’ll still be in the spirit of those excellent pizzas.

The dough recipe is pretty straight forward and whilst it takes the best part of a day to prepare its pretty hands off and really we are just waiting for most of that time, waiting for the sourdough to do its thing, its slow stubborn thing. Once we have a dough the trickiest part is the cooking or baking, or actually in my recipe I guess a bit of both. The problem with making pizzas at home is that they are normally cooked in ovens that can get as high as 500C meaning the pizzas are cooked in just 60-90 seconds. If you’ve ever tried baking a pizza at home you’ll know it takes much longer in a regular oven. The high heat helps to give the crust its lift, its leopard spotting around the outside and it cooks the toppings just so. In a domestic oven by the time the pizza dough is cooked the toppings are sadly overdone. Part of the reason this happens is how the heat is conducted, in a pizza oven the pie is sat straight on the heat source whereas at home you’re putting the pie on a cold baking tray which has to heat up first whilst the toppings start to cook via ambient heat, its like the cooking is reversed. Thankfully you could bake the pizzas on a baking stone or even better a baking steel but the oven still isn’t hot enough to burnish the crust in the way we all want. The key to success? We don’t start the pizza in the oven, we start it in a frying pan.

Frying pan pizza is nothing new, I learnt about it from the guys at Pizza Pilgrims back in 2013 when they released their cookbook. I cant find earlier mentions of the idea so it may well be their idea, and a great idea it is. To replicate the high heat the idea is to separate out the cooking of the base and the toppings, using a very hot frying pan to cook the base and then popping the pizza under a grill to cook the toppings and brown the crust. It works brilliantly and combined with a great dough you can turn out stellar pizzas. In regards to the frying pan we want to get it HOT so a non-stick is out of the question, as the coatings are not normally designed to get that high. The ideal pan is made of cast iron, ive made pizzas in both classic American style cast iron (a lodge frying pan) and in enamel coated pans ala Le Creuset, both worked great but my preference overall would be traditional black cast iron (I use my le cresuet mainly because the lodge pan I have is a little smaller than I would want my pizzas)

Note: if you like working with bakers percentages I have included those below, if you prefer grams just ignore the percentages

Sourdough Neapolitan (ish) Pizza 
Makes Four 9-10 inch Pizzas

500g 00 Pizza Flour* (100%)
15g fine sea salt (3%)
325ml water, 28-30C (65%)
75g mature sourdough starter*, 100% hydration (15%)
10ml extra virgin olive oil (2%)

*I prefer 00 pizza flour which is 12-13% protein but if you can’t get hold of it you can also use plain or bread flours but you may need to up the hydration a little as they will hydrate a little differently than the finely milled pizza flour. Pizza flour is prized because it creates a delicate crust with a slight crisp texture and a soft interior with a little chew

*If when you start making the dough your starter has fallen and is no longer at its peak (this is what you call mature starter) you can make a levin by simply mixing together 25g of the starter, 25g water at 28-30C and 25g flour (this can be the 00 or bread flour) covering and setting in a warm spot, oven with the light on is ideal, and leaving until doubled in size. Using the above ratios and temperatures this should take 2-3 hours.

To make the dough pour the water into a large bowl and scrape in the mature starter/levain and mix with your fingers briefly to break up a little. Add in the flour, salt and olive oil and use your fingers to mix this to form a shaggy dough. We are not kneading at this point, we just want everything to be hydrated with no pockets of flour. Once mixed scrape off any dough from your fingers and cover the bowl and set aside in a warm spot for 30 minutes to rest. 

Once rested we are going to knead the dough. You can do this by hand for about 10 minutes, in mixer for 5-8 minutes or use the slap and fold method. If you haven’t heard of this technique before its a great method for kneading sticky doughs when you don’t have a mixer. I learnt it originally from Richard Bertinet (who has excellent bread books should you want more reading) which makes sense as this is often known as the French method. Basically you scrape the dough out onto the worsurface. Both hands go under the ought, scooping it up turning it over and slapping it dough on the counter (this basically tuns it over) the dough is then stretched back towards you a little and then folded over on itself. This motion is repeated over and over again for about 8 minutes or until the dough looks smoother and is nice and elastic. I don’t have any pictures to illustrate this technique and its a little hard to understand but if you watch the video its much clearer. 

Once the dough is kneaded use a dough scraper to form the dough into a ball and place seam side up into a bowl very lightly greased with olive oil. Cover the bowl and set aside somewhere warm (26-27C is perfect) for the moment. After 30 minutes, using the techniques we learnt making our first loaf of sourdough bread, were going to preform a set of stretch and folds to build in more strength. Cover the bowl and leave for another 30 minutes before doing a second, and final, set of stretch and folds. Cover the bowl and place back in its warm spot and leave for another three hours, a total of 4 hours. 

pizza crust-1-2.jpg

After 4 hours you should be able to see some signs of fermentation, even if the dough hasn’t risen significantly. The dough should have a slight domed appearance and there should be lots of fermentation bubbles over the surface. Carefully turn the dough out onto the worksurface and use a dough scraper to divide into 4 pieces (you can weigh these if you’re looking for perfectly portioned pieces). Form the dough into balls, trying to make the shaping nice and tight so the skin on the outside of the dough is taught. 

Once divided and balled you need to decide if you’re going to use all four of the pizza balls tomorrow or if you want to freeze them to use at a later date. If using tomorrow simple place them into a lightly floured container, a high walled plastic box is good for this or a baking tray with high sides, something that means when covered the lid or clingfilm wont touch the dough. If freezing the balls I like to place these into small individual plastic tubs greased with little oil. Either way once in their new resting place the dough needs to sit for a further four hours, again in a warm spot around 26-27C is ideal. Once out second four hour stint is up you should once again be able to see signs of fermentation. If in the individual containers you should be able to see some rise and bubbling on the sides and if on the floured tray you should see the dough has spread out a little and there is fermentation bubbles on the surface as before. For the dough you want to use later place the containers in the freezer (for up to two weeks) and for the dough you want to use place the container in the fridge for 12-24 hours. You can leave the chilled dough for longer but after 24 hours it can be harder to handle. 

Once your dough has rested for its desired time it needs to come back to room temperature before using, otherwise it’ll be harder to stretch and the chill will affect how it cooks. If using refrigerated dough this means taking out the dough 4-5 hours before you want to use it. If your kitchen is in the low to mid 20’s then room temperature is fine if its colder you’ll want to leave it in a warmer spot. If the dough your using is frozen you need to think a bit further ahead. I take the dough out the day before I want to use it leaving it in there for 12-24 hours to slowly defrost and then as with the regular refrigerated dough take it out 4-5 hours before using. 

When ready to make pizzas get everything set up, get your toppings prepped and your workstation ready. Preheat your frying pan over medium heat for about 5-10 minutes (this should get it about 300C), it wants to be about as hot as you can get it. Turn on your grill and set a rack just below, giving you enough space to fit the frying pan. 

Carefully remove a portion of dough from its container (dough scraper is good for this if you chilled the dough on a tray) and place onto a floured surface, dusting the top of the dough too. Press your fingers into the middle of the dough, leaving the outside inch or so untouched. To stretch the dough I place it on the back of my fists, resting it on my knuckles and gently stretch it as I turn the dough. You don’t want to use a rolling pin as you’ll deflate the dough and you’ll have wasted all that time. Once stretched to about 9-10 inches carefully transfer it to the pan. The base will start to cook immediately so as soon as the base is in top it with your tomato sauce (recipe below) spreading to the edges but leaving the now puffed up crust clear. I don’t add the cheese yet because I find it releases too much water if cooked for too long. Use a spatula to keep an eye on the base and as soon as it has nicely browned spots on the base, working quickly, add your toppings. This entire cooking process should take 2 minutes, 3 max. Carefully lift the frying pan under the grill and cook until the cheese has melted and the crust is browned. With this method you wont get the leopard spotting you associate with Neapolitan pizza but it will brown and I personally like to take it pretty far so there are nice dark spots around the pizza. Remove the pan from the grill and immediately transfer the pizza to a plate. Finish with a drizzle of oil and some fresh basil (you can add the basil before hand but because the pizza cooks for longer than in a restaurant oven I prefer adding it after cooking). 

pizza crust-1-4.jpg

Tomato Sauce
400g can San Marzano (or good quality tinned plum) tomatoes
Large pinch flaked sea salt
2 crushed garlic cloves
1/2 tsp crushed chilli flakes

For the sauce place all of the ingredients into a bowl and use your hands or a hand blender to make a sauce, using your hands is more traditional and will give a sauce with more texture and using a hand blender will make a smoother sauce.

Cheese
For the toppings the one thing I always struggled with was the cheese. Mozzarella is obviously the cheese easiest for us home pizza makers to get our hands on and over the years I’ve tried so many types and they all had problems. Fresh ball style mozzarella from the supermarket or deli tastes great but in a home oven it leaves behind so much liquid it makes for very very soupy pizzas and not in a good Neapolitan way. Pre-grated mozzarella that comes in bags had the opposite problem, it was so dry (often coated in starch to stop it sticking) it just kind of stayed the same. Thankfully I accidentally stumbled on a mozzarella that is the best of both worlds. It’s a block mozzarella called Galbani Cucini thats sold at Waitrose and on Ocado and Amazon. When you see American recipes for call low moisture mozzarella I think this is close as us brits are going to get. It releases next to no water when cooked, but if its cooed for too long it tends to melt away into the pizza, hence my method for adding the cheese just before it goes under the grill. 

In Breads and Quickbreads Tags sourdough, sourdough pizza, neapolitan pizza, neapolitan pizza at home
37 Comments
Sourdough Banana Bread-1-4.jpg

Sourdough Chocolate Chip Banana Bread Muffins

Edd Kimber April 13, 2020

During isolation the internet seems to be obsessed with two things, sourdough and banana bread (okay and maybe toilet roll and growing spring onions from scraps in a jar). Obviously I have you covered on Sourdough, whether you’ve never tackled it before or whether you want a new recipe to try, and of course banana bread isn’t anything new around here. Hopefully by combining the two I can show a really easy recipe that helps you use the discarded starter, preventing waste, and give you something easier to make than the sourdough itself.

Before we get to the recipe lets talk about the sourdough starter and the discard we are going to be using. If you are using your starter on a daily basis you will have a lot of discard and you might not want to bake with that everyday. Thankfully the discard can be kept in the fridge for a few days, topping up each time you feed the starter, or you can even freeze it. When you come to use the discard it is still important to smell it, if there is any off notes, any unpleasant smells these may translate to flavour in your recipe. If you store your starter in the fridge however you won’t have as much discard, you’ve already reduced your waste by slowing down the fermentation meaning the starter needs a lot less feeding. When I store my sourdough baby in the fridge I find it needs two rounds of feeding to bring it back to health and guess what? If you are filling my feeding schedule, two feeds will give you 200g of discard and that is exactly what this recipe calls for, it’s almost like I planned it that way.

Using sourdough discard in your recipes is also easier than you might think. Most sourdough starter recipes are made to be 100% hydration, that is to say with an equal weight of flour and water. This makes using the discard in a recipe straightforward because, say you have 100g of discard, you just divide the amount in half and take out 50g of flour and 50ml liquid from your existing recipe. Using discard in recipes like quick breads like banana bread or muffins, pancakes, waffles are the easiest things to use but you can even use it recipes such a chocolate cake, where the acidity would give a real boost to the chocolate flavour.

Sourdough Banana Bread Muffins
Makes 12

150g plain flour
2 tsp baking powder
1/2 tsp fine sea salt
225g very ripe bananas (weighed without skin)
200g sourdough discard
1 tsp vanilla bean paste
150g unsalted butter, room temperature
185g light brown muscavado sugar
2 large eggs
200g dark chocolate, roughly chopped

Preheat the oven to 180ºC (160ºC Fan). Line a 12-hole muffin tray with paper liners.

In a bowl add the flour, baking powder and salt and whisk together to combine. In a separate bowl add the bananas and use a fork to mash. Pour in the sourdough discard and vanilla and stir until evenly mixed. Place the butter and sugar into a large bowl and using an electric mixer, cream together until light and fluffy, about 5 minutes. Add the eggs one at a time, beating until combined before adding the second. Add the flour mixture and gently fold to combine. Add the banana mixture and mix just until you have an evenly mixed batter. Finally add in about 2/3 of the chocolate and mix briefly to evenly distribute.

Divide the mixture evenly between the muffin paper, filling each one almost to the top. Scatter over the remaining chocolate and throw on a few cacoa nibs too if you like, dried banana chips could be nice too.

Bake in the preheated oven for about 20-22 minutes or until the muffins spring back to the touch. Remove from the oven and allow to cool in the pan for 10 minutes before carefully transferring the muffins to a wire rack to cool completely.

Kept in a sealed container these will keep for a couple days, they also freeze brilliantly

In Breads and Quickbreads, Cakes Tags sourdough, sourdough discard, banana bread, chocolate, chocolate chip
26 Comments
  • Recipes
  • Older
  • Newer

Twitter

  • Was 8 original films, 3 spin off films, a two part play not enough. Can we have something new. https://t.co/cBZdGEGeyv
    Apr 4, 2023, 1:46 PM
  • RT @deliciousmag: Cacio e pepe, but make it buns! These seriously cheesy bread rolls from @TheBoyWhoBakes are inspired by his favouri… https://t.co/oDZlaDgnN2
    Apr 2, 2023, 11:08 AM
  • RT @TheDailyShow: Congrats to Donald Trump on finally winning a majority of votes! https://t.co/ezP55HZgl0
    Mar 31, 2023, 12:43 AM

Instagram

This weeks bonus recipe, for subscribers to my newsletter, is this gorgeous sour cherry and coconut gateau basque. The crust is a buttery cross between pastry and cake, think a cakey cookie. The filling is a layer of sour cherry topped with a rich coconut custard. A real fun one to make too! Link to my newsletter can be found in my bio - #gateaubasque #pastrycream #coconut #sourcherry
In this months @olivemagazine (out today) the team came and photographed my petit kitchen and we talked about how we put our stamp on the place, without spending a fortune. We hated the bland kitchen that we inherited but, as it was relatively new an
In this months @olivemagazine (out today) the team came and photographed my petit kitchen and we talked about how we put our stamp on the place, without spending a fortune. We hated the bland kitchen that we inherited but, as it was relatively new and in good condition, it felt a waste to rip it out and we also didn’t want to spend the money it would take to rip out the whole thing and replace it (it’s a howdens shell so we could have done something cheaper like @plykeakitchens @holte.studio @madebyhusk) so instead I painted all of the cabinets, using @makeitrustoleum kitchen cabinet paint, to give it some personality and lighten the whole thing. Check out the magazine for the full run down. - #kitchendesign #kitchenremodel #rustoleumcabinettransformations #rustoleumkitchencupboardpaint #kitcheninspiration #theboywhobakes #olivemagazine
Are you making scones all wrong? Maybe, maybe not? But I do want to show you how I make them! This recipe is based on the method I learnt at @belmondlemanoir 12 years ago when I did a stage, and it makes the absolute lightest scones. And shock horror, it involves kneading the dough, albeit very lightly. You can get the full recipe in this weeks newsletter (free) linked in my bio. - #scones #bakingday #worldbakingday #afternoontea #hightea #englishscones #clottedcream #creamtea #theboywhobakes
facebook
  • Contact

The Boy Who Bakes

Edd Kimber

facebook