The Boy Who Bakes

Edd Kimber
  • Home
  • Recipes
  • My Books
  • Blog
  • Recipe Index
  • About
  • Home
  • Recipes
  • My Books
  • Blog
  • Recipe Index
  • About

Recipes

  • All
  • baking
  • Biscuits and Cookies
  • Breads and Quickbreads
  • Bundts
  • Cakes
  • Chocolate
  • Dessert
  • drinks
  • Holidays
  • Pastry
  • Scones and Quickbreads

Blueberry and Lemon Poppyseed Bundt Cake

Edd Kimber July 12, 2020

This post is sponsored by Doves Farm Organic Flour

I don’t know about you but during lockdown the thing that has kept me smiling has been spending time in the kitchen, baking up a storm. Whether it’s sourdough, banana bread or any of the hundred things we have all made the last few months, I think we can all agree baking brings us joy. Today’s recipe is another collaboration with Doves Farm and celebrates summer, making something jam packed with berries but also something that can be whipped up minutes. Perfect for summer or to brighten up a grey London day, it’s also a nice tie in with Doves Farm’s new colourful feel-good packaging design which you’ll find in stores now. For those of you who don’t know Doves Farm, they’re a UK organic flour brand and they sell everything from plain flour to ancient grains like rye and buckwheat. Whilst it seems to me that flour shortages are much less frequent at this point if you’re still struggling to find flour and yeast, Doves Farm have also launched an ‘Organic Flour Baking Box’ (£11 plus delivery), available to purchase on their website and delivered direct to your door and contains a great selection of their organic flours - including plain, self raising, bread and specialty flours - plus yeast for making bread, you can find out more here. 

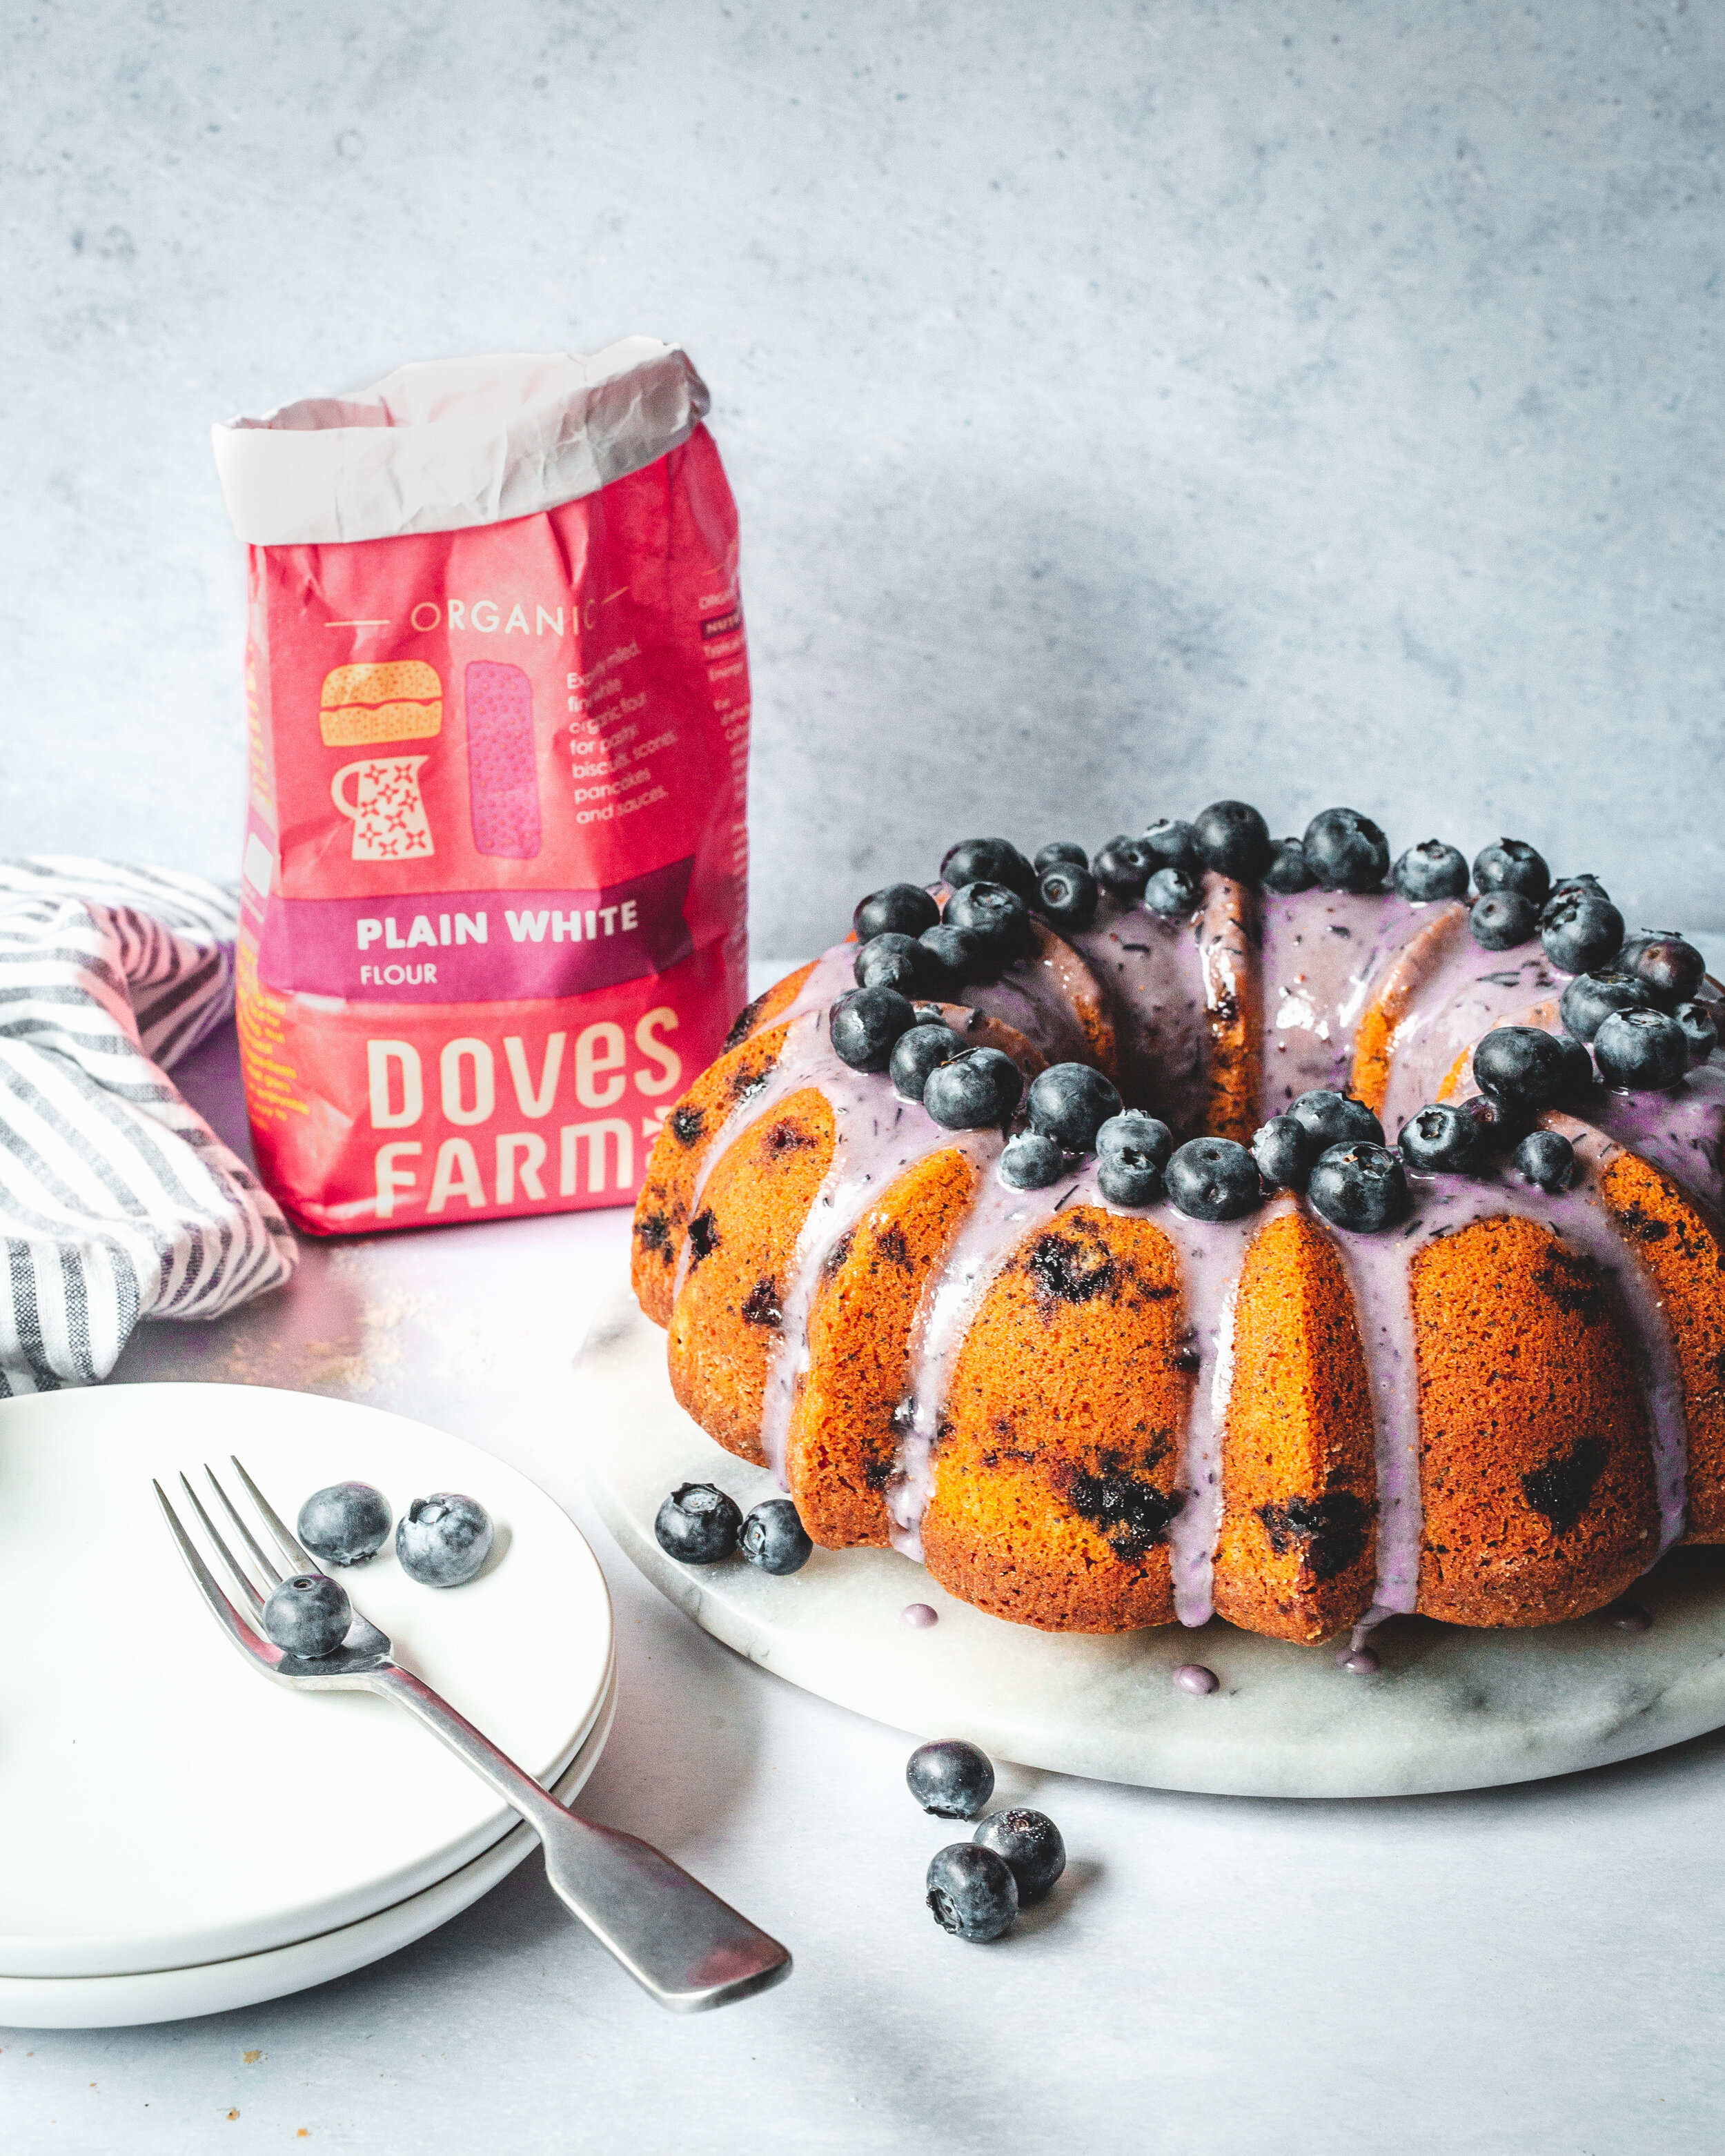
This week’s recipe could not be easier, it can be made as a one bowl or you can add one more little step to make it with two bowls, but regardless of what method you choose it is as easy as pouring some wet stuff into some dry stuff and stirring it all together. Its pure simplicity. For the recipe I went with blueberries and lemon but really this is a very adaptable recipe. Use whatever berry and citrus combination you prefer. Don’t have buttermilk? No worries use yoghurt, or sour cream thinned with a little milk. The recipe is also super bright and colourful, stained with the juice from the berries and topped with a simple blueberry glaze which, depending on the berries you use, will come out a vibrant pink or a beautiful violet. 

This week’s recipe uses Doves Farm Organic Plain flour which is available from Ocado, Sainsburys and Tesco.

Blueberry Bundt 5.jpg

Blueberry and Lemon Poppyseed Bundt Cake
Serves 12-14

265g golden caster sugar
zest of 2 lemons
185ml light olive oil
175ml buttermilk
4 large eggs
1 tsp vanilla bean paste
280g Doves Farm Organic Plain Flour
1/2 tsp fine sea salt
1/4 tsp baking soda 
2 tbsp poppy seeds
300g blueberries

Blueberry Glaze
50g blueberries, plus extra for decoration
200g icing sugar
Few drops of lemon juice

bloobs.jpg

To make the cake preheat the oven to 180ºC (160ºC Fan). Lightly grease, and dust with flour, a bundt pan (you can use anything 8-cup capacity or up). 

If making with my preferred method add the sugar and lemon zest to a large bowl and use your fingertips to rub the zest into the sugar until the sugar has a moist texture. This releases the oils in the zest and makes for a more flavourful cake. Add the oil, buttermilk, eggs and vanilla and whisk until combined. In a separate bowl whisk together the Doves Farm Plain Flour, salt and baking soda. Make a well in the dry goods and pour in the buttermilk mixture, whisking the two mixtures together until smooth. Add the poppy seeds and blueberries and stir together to distribute evenly. 

If you want to make this as a one bowl recipe, add the Doves Farm Plain Flour, salt, baking soda and sugar to a large bowl and whisk together until combined. Make a well in the dry goods then add in the oil, buttermilk, eggs and lemon zest and whisk together until smooth. Add in the poppy seeds and blueberries and stir together.

Scrape the cake batter into the prepared bundt pan and then bake for about 55 minutes or until a skewer inserted into the middle of the cake comes out clean. Remove the cake from the oven and allow to cool in the pan for 15 minutes then carefully invert it onto a wire rack to cool completely. 

For the glaze (which is optional, the cake is plenty moist without it) use a hand blender to puree the berries then mix in the icing sugar and a few drops of lemon juice until you have a thick but pourable glaze. Pour the glaze over the cooled cake and top with a few extra blueberries. 

Kept covered this cake will keep for 3-4 days.

In Bundts, Cakes Tags blueberry, bundt, poppyseed, lemon, buttermilk, oil, one bowl, all in one
3 Comments

Very Vanilla Sour Cream Bundt Cake

Edd Kimber February 12, 2020

I love being experimental in the kitchen, unusual flavours, new combinations, its all fun and games to me but, and hear me out, it’s very important to learn to walk before you can run. With baking I think it is so important to learn the basics before we start playing around. How will you know a cake will turn out well if you’re just making random changes to something you’ve never made? When people ask about learning to bake better, learning to make their own recipes, the advice I give most often is make things multiple times before making changes and even then make changes one at a time. I cant tell you how many times I have received emails from excited bakers that are wondering why something went wrong even though they changed multiple things. If you don’t know the foundations how can you build a successful house. Are you bored of the metaphors yet? I am, so I’ll get to recipe in one second. Really what I am saying is the technical foundations, the skills, the way a recipe works, all of this is super important especially if you love adapting recipes. The more you understand how basic recipes work the easier it is to understand what adaptions can be made without the recipe failing. 

very vanilla bundt cake-3.jpg

One of the best recipes you can have in your arsenal, that recipe that you whip out when you don’t have a lot in the house but need a special cake, is a classic pound cake. My ideal version is a very vanilla forward cake, laced with sour cream. The cake is so simple the vanilla should be very present, this is the time to crack out the vanilla pods, and in fact this recipe uses both a vanilla pod and vanilla extract for a double dose of the good stuff. The cake has no frosting so the texture needs to be the right amount of moist (dont come at me with your hatred for the word moist, it’s useful and I cannot be persuaded to stop using it) and the sour cream ensures a velvety crumb that is a joy to eat without any adornments. 

With this recipe the technique is key and if you follow me over on Instagram you know this year one of my aims is to help you all become more confident bakers and arm you with the skills to master any recipe. For this recipe we are using the creaming method and even if you’ve been baking for years I encourage you to watch the video to really nail your technique. This recipe is based on a classic sour cream pound cake, one of those that appears everywhere but the origin is hard to trace but I have adapted it quite a bit to suit both my tastes and British ingredients. The sugar in the original recipe was much higher and whilst delicious my takeaway was too much sugar so this gives you the right taste without an overwhelming level of sweetness. 

Very Vanilla Sour Cream Pound Cake
Serves 15-16

340g unsalted butter, room temperature
450g caster sugar
1 vanilla pod
5 large eggs, room temperature
325g plain flour
50g cornflour
1/2 tsp salt
1/4 tsp baking soda
240ml sour cream, room temperature
1 tbsp vanilla extract

Preheat the oven to 180ºC (160ºC Fan).

First we need to prep our Bundt pan. Because the pans have nooks and crannies this is especially important. My favourite method for this cake is to lightly spray the inside of the tin with a non-stick baking spray (this is the one I use) and dust the inside of the tin with a little extra flour. When spraying the tin the area I find most people overlook is the core, this is likely where the cake will stick the most so make sure this is fully coated before adding the flour. The flour coating wants to be super thin so once every part of the tin is coated invert the Bundt pan and tap it on the worksurface to remove any excess. 

very vanilla bundt cake-2.jpg
very vanilla bundt cake-4.jpg

When a recipe calls for room temperature butter that can be a little vague, everyones kitchen is a different temperature after all. What this actually means is the butter should between 15-20ºC but no warmer. If you don’t have a thermometer the best way to test this is to press your finger into the butter. Your finger should easily leave an impression without being coated in a layer of greasy butter, the butter should still feel a little firm, it shouldn’t completely give way to a little pressure. This is the ideal temperature for butter to be whipped and for it to hold on to lots and lots of tiny air pockets, making for a nice light cake. We also want to make sure that by this point the eggs and sour cream are also at room temperature. I never keep my eggs in the fridge but to ensure you batter doesn’t curdle, if you do chill your eggs, you’ll need to get them out well in advance of baking to bring them to temperature. 

So to make the cake place the butter and sugar into the bowl of a stand mixer, along with the seeds scraped for a vanilla pod, and on medium speed beat together for about 5 minutes. To test this mixture is ready you’re looking for the butter and sugar mixture to have gone from a dense looking, very yellow in colour, mixture, to a light and fluffy, almost white in colour, mixture. With butter starting at the right temperature this normally takes 5 minutes. 

View this post on Instagram

First in a new weekly series showing you a technique or tip to make you a better baker. Todays video is how to properly cream together butter and sugar. Yes its a simple technique but its the foundation of a lot of recipes so its worth spending the time to do properly. Also if there is a technique you want to film, let me know! - #bakingbasics #techniquetuesday #theboywhobakes #creamingmethod #bakingguide #cakesandbakes #igtv #bundtcake #bundstagram #poundcake #vanillacake

A post shared by Edd Kimber (@theboywhobakes) on Jan 21, 2020 at 10:04am PST

Add the eggs to a large jug and briefly whisk together to break them up. With the mixer still running add the eggs a little bit at a time, mixing until the egg has been fully combined before adding more. This slow addition of the egg, along with the proper creaming of the butter and sugar, ensures a good emulsion and will stop the batter from curdling. Whilst a cake batter that has curdled is worth baking the resulting cake will not be as light as it could have been. Meanwhile add the flour, cornflour, salt and baking powder to a large bowl and whisk together. Once all of the egg has been combined add a third of the flour mixture and mix briefly just until combined. Mix in half of the sour cream and the vanilla. Continue alternating like this until everything has been added. 

Scrape the finished batter into the prepared Bundt pan, trying not to get any up the sides of the pan. Spread the mixture into an even layer and then bake in the oven for about 75-85 minutes or until a skewer inserted into the middle of the cake comes out clean.

Remove the bundt from the oven and set it on a wire rack for 10 minutes before inverting it onto the wire rack and releasing it from the pan. With Bundt cakes this timing is important. I find if you try and turn the cake out immediately after baking the structure of the cake may not be fully set and the cake is more prone to breaking. If you turn the cake out much longer than 10 minutes after removing it from the oven, the sugars in the cake can make it adhere to the pan, I find 10 minutes is the sweet spot for most recipes. Allow the cake to cool fully before serving. Whilst this cake is wonderful on its own I love serving it with a dollop of creme fraiche and roasted rhubarb. Kept covered the cake will keep for 3-4 days. 

In Bundts, Cakes Tags vanilla, bundt, pound cake, sour cream, theboywhobakes
1 Comment
billingtons pic (1 of 1).jpg

Mocha Marble Bundt Cake

Edd Kimber April 25, 2019

This Post Is Sponsored by Billingtons Sugar

Can we talk about the term coffee cake? I think in the US its generally understood that the cake doesn’t actually contain coffee, it’s a cake to be served with coffee, definitely a tad confusing. To my fellow brits coffee cake brings to mind that old fashioned British classic, coffee and walnut cake, a cake that I actively dislike and also had to make for my final audition all those years ago (hmm maybe there is a correlation there somewhere). No, ‘coffee cake’ is an umbrella term for cakes that are served alongside coffee, which is good as todays post is sponsored by Billingtons and there new Barista range of sugars. You know them as the makers of brilliant unrefined sugars and now they’ve launched a range of sugars perfect for your morning coffee. Aside from being great in coffee you could also bake with them. The crystal variety of the sugar has a larger crystal size than most UK sugars and is actually a little bit like a US ‘sanding’ sugar which would be great sprinkled on a cake for texture, like a larger brother to demerara. The classic coffee cake is the cinnamon crumb cake, normally made with sour cream and is the perfect accompaniment to a coffee. My favourite of the genre is a bundt cake and todays recipe, whilst not a cinnamon or a crumb cake, is my take on the coffee cake. White and dark chocolate swirled together to make a very tender, very simple cake that doesn’t need much adornment. I have left it naked, but you could add a simple icing sugar glaze or maybe a drizzle of chocolate, but for me this is the thing I want alongside my mid afternoon coffee, not too sweet and makes my break from work all the more enjoyable.

billingtons post is  (1 of 1).jpg

Mocha Marble Bundt Cake

Base Cake Mix
250g unsalted butter, room temperature
500g golden caster sugar
8 large eggs

White Chocolate
225g self raising flour
100g white chocolate, melted and cooled
100g sour cream
2 tbsp instant espresso powder, mixed with 1 tbsp boiling water

Dark Chocolate 
100g dark chocolate, melted and cooled
200g self raising flour
25g cocoa powder
120g sour cream


Use a spray oil to lightly grease a 10-15 cup capacity bundt pan, making sure the entire surface of the pan is coated, especially the central column as this is the part people often miss and it leads to a cake that will not release from the pan in one piece. Preheat the oven to 180C (160C fan).

Place the butter and sugar into a large bowl and using an electric mixer beat together until lightly and fluffy, about 5 minutes. Don’t underestimate the time this takes, creaming the butter and sugar together is one of the most important steps, make sure you the mixture really is almost white in colour and light in texture. Add the eggs one at a time, beating until fully combined before adding the next. Divide the batter equally between two bowls and set aside for a moment.

In a small bowl mix together the white chocolate, sour cream and espresso mixture. Add the flour to the first portion of batter and mix until combined. Add in the white chocolate mixture and then set aside for a moment.

In a small bowl mix together the cocoa with a couple tablespoons of the sour cream, mixing to make a smooth paste. Mix in the remaining sour cream and the melted chocolate. As before mix the flour into the batter followed by the chocolate mixture.

Dollop in alternate spoonfuls of the two batters into the pan then using a butter knife gently swirl the batters together. I find it’s best to do this very briefly and less aggressively than you think. The more you swirl the batters together the less definition the finished cake will have. Bake in the preheated oven for about 50-60 minutes or until a skewer inserted into the cake comes out clean. Set onto a wire rack to cool for 10 minutes before inverting the cake to release it from the pan. Allow to cool fully before serving. Kept covered the cake will keep for 3-4 days

billingtons post 2 (1 of 1).jpg
In Cakes, Chocolate, Bundts
4 Comments

My Nanna's Gingerbread

Edd Kimber January 10, 2019

I hope you’ll indulge me in a little story before I get to the recipe, its a story of how the recipe came to be and why it means so much more to me than any other. I often talk about the way a recipe can help remind you of a time or a place and can connect you to people you haven’t seen in a long time. It’s why I think food is more than the sum of its simple parts. I make this recipe a lot, more than any other and each and every time I open the tin of golden syrup, every time I smell the cake coming out of the oven, I am taken back to when I am still a toddler, just 3 years old. I’m in my Uncles house, in my Nanna’s room and my twin brother and I are sat on the bed, eating grapes with my Nanna. This memory probably isn’t real, just a fabrication built from stories I have heard my entire life but to me, it is as clear as any picture. This recipe was my Nannas, Jenny’s Gingerbread, and even though I never got to know her properly I have a connection with her through this cake. 

Whilst my memories of her are few, I have in their place a lifetime of stories my family like to tell every time we are together. My mum seems to be the family keeper of stories and she loves nothing more that telling us stories of her life when she was younger, about her twin bothers when they were little, so many stories about her aunts and uncles and of course lots of stories about her mum, my Nanna. Because she passed away when I was very young, those stories have always allowed me to feel close to her and to feel a bond that might not exist otherwise. As a baker and someone whose life is remembered through a series of dishes the handwritten recipes she left behind are precious. She was the baker in our family and as the mother to three children she had a lot of mouths to feed. The story goes that every week this gingerbread would be baked and it would slowly be eaten as the week went by, with another ready to take its place as the week came to a close.

17426399_10158558785555601_3730684953228829883_n.jpg

It’s a cake that all her children and grandchildren associate closely with her, so much so that during a discussion about what makes a good nanna, a good grandmother, the only rule was this cake should make frequent appearances. This thought was taken further when it became part of my sisters pregnancy announcement. When the time came to tell our mum that she was going to become a grandmother for the first time, she didn’t simply tell her, she gave her a tin of this gingerbread and told her she’d be needing this soon. It may have taken my mum a minute or two to understand what she meant but that obviously joyous occasion has managed to put even more importance onto this recipe for us as a family. 

For me personally it is a connection to my wonderful mum and to a Nanna I didn’t really get to know, and I think of it as a way honouring her memory. Every time I make it I hope she would have been proud that I have taken her recipe and put it in the hands of people all over the world and that she would be happy that they enjoy it as much as we do. 

A quick note about the recipe, this a slightly tweaked version from the one that was originally printed in my book The Boy Who Bakes, I have adapted it for a bundt pan, obviously something my Nanna never did but something that looks as special as this cake is to me. 

My Nanna’s Gingerbread
340g plain flour
3 heaped tsp ground ginger
1 heaped tsp mixed spice (if making in the US pumpkin pie spice mix will work)
1 heaped tsp ground cinnamon
1 tsp baking soda
1/2 tsp salt
1 large pinch cayenne pepper (I tend to go with about 1/2 tsp)
170g unsalted butter, diced
115g caster sugar
2 tbsp fine cut orange marmalade
340g golden syrup
2 tbsp chopped stem ginger
2 large eggs
210ml whole milk


Lemon Glaze (optional)
Juice of 1 lemon
150g icing sugar

Preheat the oven to 180C (160C fan) and prepare a 10-cup capacity bundt pan by spraying with a light layer of oil (I prefer spray oils for this as its much more effective) making sure to coat all the nooks and crannies. Bundt pans are very detailed and if the pan isn’t prepared properly the cake may stick. Dust the inside of the pan with flour, again making sure to coat the whole thing. Turn the pan upside down and tap out any excess flour so that it is a thin coating. 

Place all the dry ingredients into a large bowl and whisk together to combine. Place the butter, sugar, marmalade, golden syrup and stem ginger into a saucepan and cook over medium heat until everything has melted together and you have a smooth mixture. Remove from the heat and allow to cool slightly before mixing in the milk, followed by the eggs. When combining the wet and dry ingredients do this for as short a time as possible, you’re not aiming for a completely smooth batter, the odd lump is fine. If you whisk the batter too much it can become a little tough, so ere on the side of caution. Pour the finished batter into the prepared bundt pan and place the pan onto a baking sheet and bake in the preheated oven for about 45-50 minutes or until the cake springs back to a light touch or a skewer inserted into the middle comes out clean.

When the cake comes out of the oven set the pan on a wire rack for 10 minutes before turning the bundt out onto the rack to cool. With bundt cakes I find the 10 minutes to be the sweet spot, if you try to turn the cake out any earlier it might break, as the structure of cakes aren’t fully set fresh from the oven. If you try to turn it out much later the sugars in the cake make the outside of the cake a little sticker mean the cake may stubbornly stick to the pan.

The next stage is totally optional and not something my family do when making this recipe, the cake is delicious as it is. If however you want to a little more you can add this simple lemon glaze. The recipe is a simple icing sugar glaze but by heating the lemon juice and icing sugar together, just until the mixture starts to bubble, when brushed on the cake it forms a thin fondant like glaze that crackles as its cut and creates a nice added level of texture as well as flavour. Brush the glaze onto the cake whilst still warm from the oven and once fully coated pop the cake back into the oven for a couple minutes. This will make the glaze set and turn slightly translucent. 

As with all gingerbread cakes this bundt will be even better if you can resist cutting into it for a couple days, the flavours improve and the cake becomes a little sticker (this is more pronounced without the glaze) so hold back from trying it if you can. I wont blame you if the smell out of the oven is too much to resist though.


In Cakes, Bundts
12 Comments
  • Recipes
  • Older
  • Newer

Twitter

  • Was 8 original films, 3 spin off films, a two part play not enough. Can we have something new. https://t.co/cBZdGEGeyv
    Apr 4, 2023, 1:46 PM
  • RT @deliciousmag: Cacio e pepe, but make it buns! These seriously cheesy bread rolls from @TheBoyWhoBakes are inspired by his favouri… https://t.co/oDZlaDgnN2
    Apr 2, 2023, 11:08 AM
  • RT @TheDailyShow: Congrats to Donald Trump on finally winning a majority of votes! https://t.co/ezP55HZgl0
    Mar 31, 2023, 12:43 AM

Instagram

This weeks bonus recipe, for subscribers to my newsletter, is this gorgeous sour cherry and coconut gateau basque. The crust is a buttery cross between pastry and cake, think a cakey cookie. The filling is a layer of sour cherry topped with a rich coconut custard. A real fun one to make too! Link to my newsletter can be found in my bio - #gateaubasque #pastrycream #coconut #sourcherry
In this months @olivemagazine (out today) the team came and photographed my petit kitchen and we talked about how we put our stamp on the place, without spending a fortune. We hated the bland kitchen that we inherited but, as it was relatively new an
In this months @olivemagazine (out today) the team came and photographed my petit kitchen and we talked about how we put our stamp on the place, without spending a fortune. We hated the bland kitchen that we inherited but, as it was relatively new and in good condition, it felt a waste to rip it out and we also didn’t want to spend the money it would take to rip out the whole thing and replace it (it’s a howdens shell so we could have done something cheaper like @plykeakitchens @holte.studio @madebyhusk) so instead I painted all of the cabinets, using @makeitrustoleum kitchen cabinet paint, to give it some personality and lighten the whole thing. Check out the magazine for the full run down. - #kitchendesign #kitchenremodel #rustoleumcabinettransformations #rustoleumkitchencupboardpaint #kitcheninspiration #theboywhobakes #olivemagazine
Are you making scones all wrong? Maybe, maybe not? But I do want to show you how I make them! This recipe is based on the method I learnt at @belmondlemanoir 12 years ago when I did a stage, and it makes the absolute lightest scones. And shock horror, it involves kneading the dough, albeit very lightly. You can get the full recipe in this weeks newsletter (free) linked in my bio. - #scones #bakingday #worldbakingday #afternoontea #hightea #englishscones #clottedcream #creamtea #theboywhobakes
facebook
  • Contact

The Boy Who Bakes

Edd Kimber

facebook