The Boy Who Bakes

Edd Kimber
  • Home
  • Recipes
  • My Books
  • Blog
  • Recipe Index
  • About
  • Home
  • Recipes
  • My Books
  • Blog
  • Recipe Index
  • About

Recipes

  • All
  • baking
  • Biscuits and Cookies
  • Breads and Quickbreads
  • Bundts
  • Cakes
  • Chocolate
  • Dessert
  • drinks
  • Holidays
  • Pastry
  • Scones and Quickbreads

Flourless Chocolate Cake with Salted Caramel Cream

Edd Kimber October 12, 2016

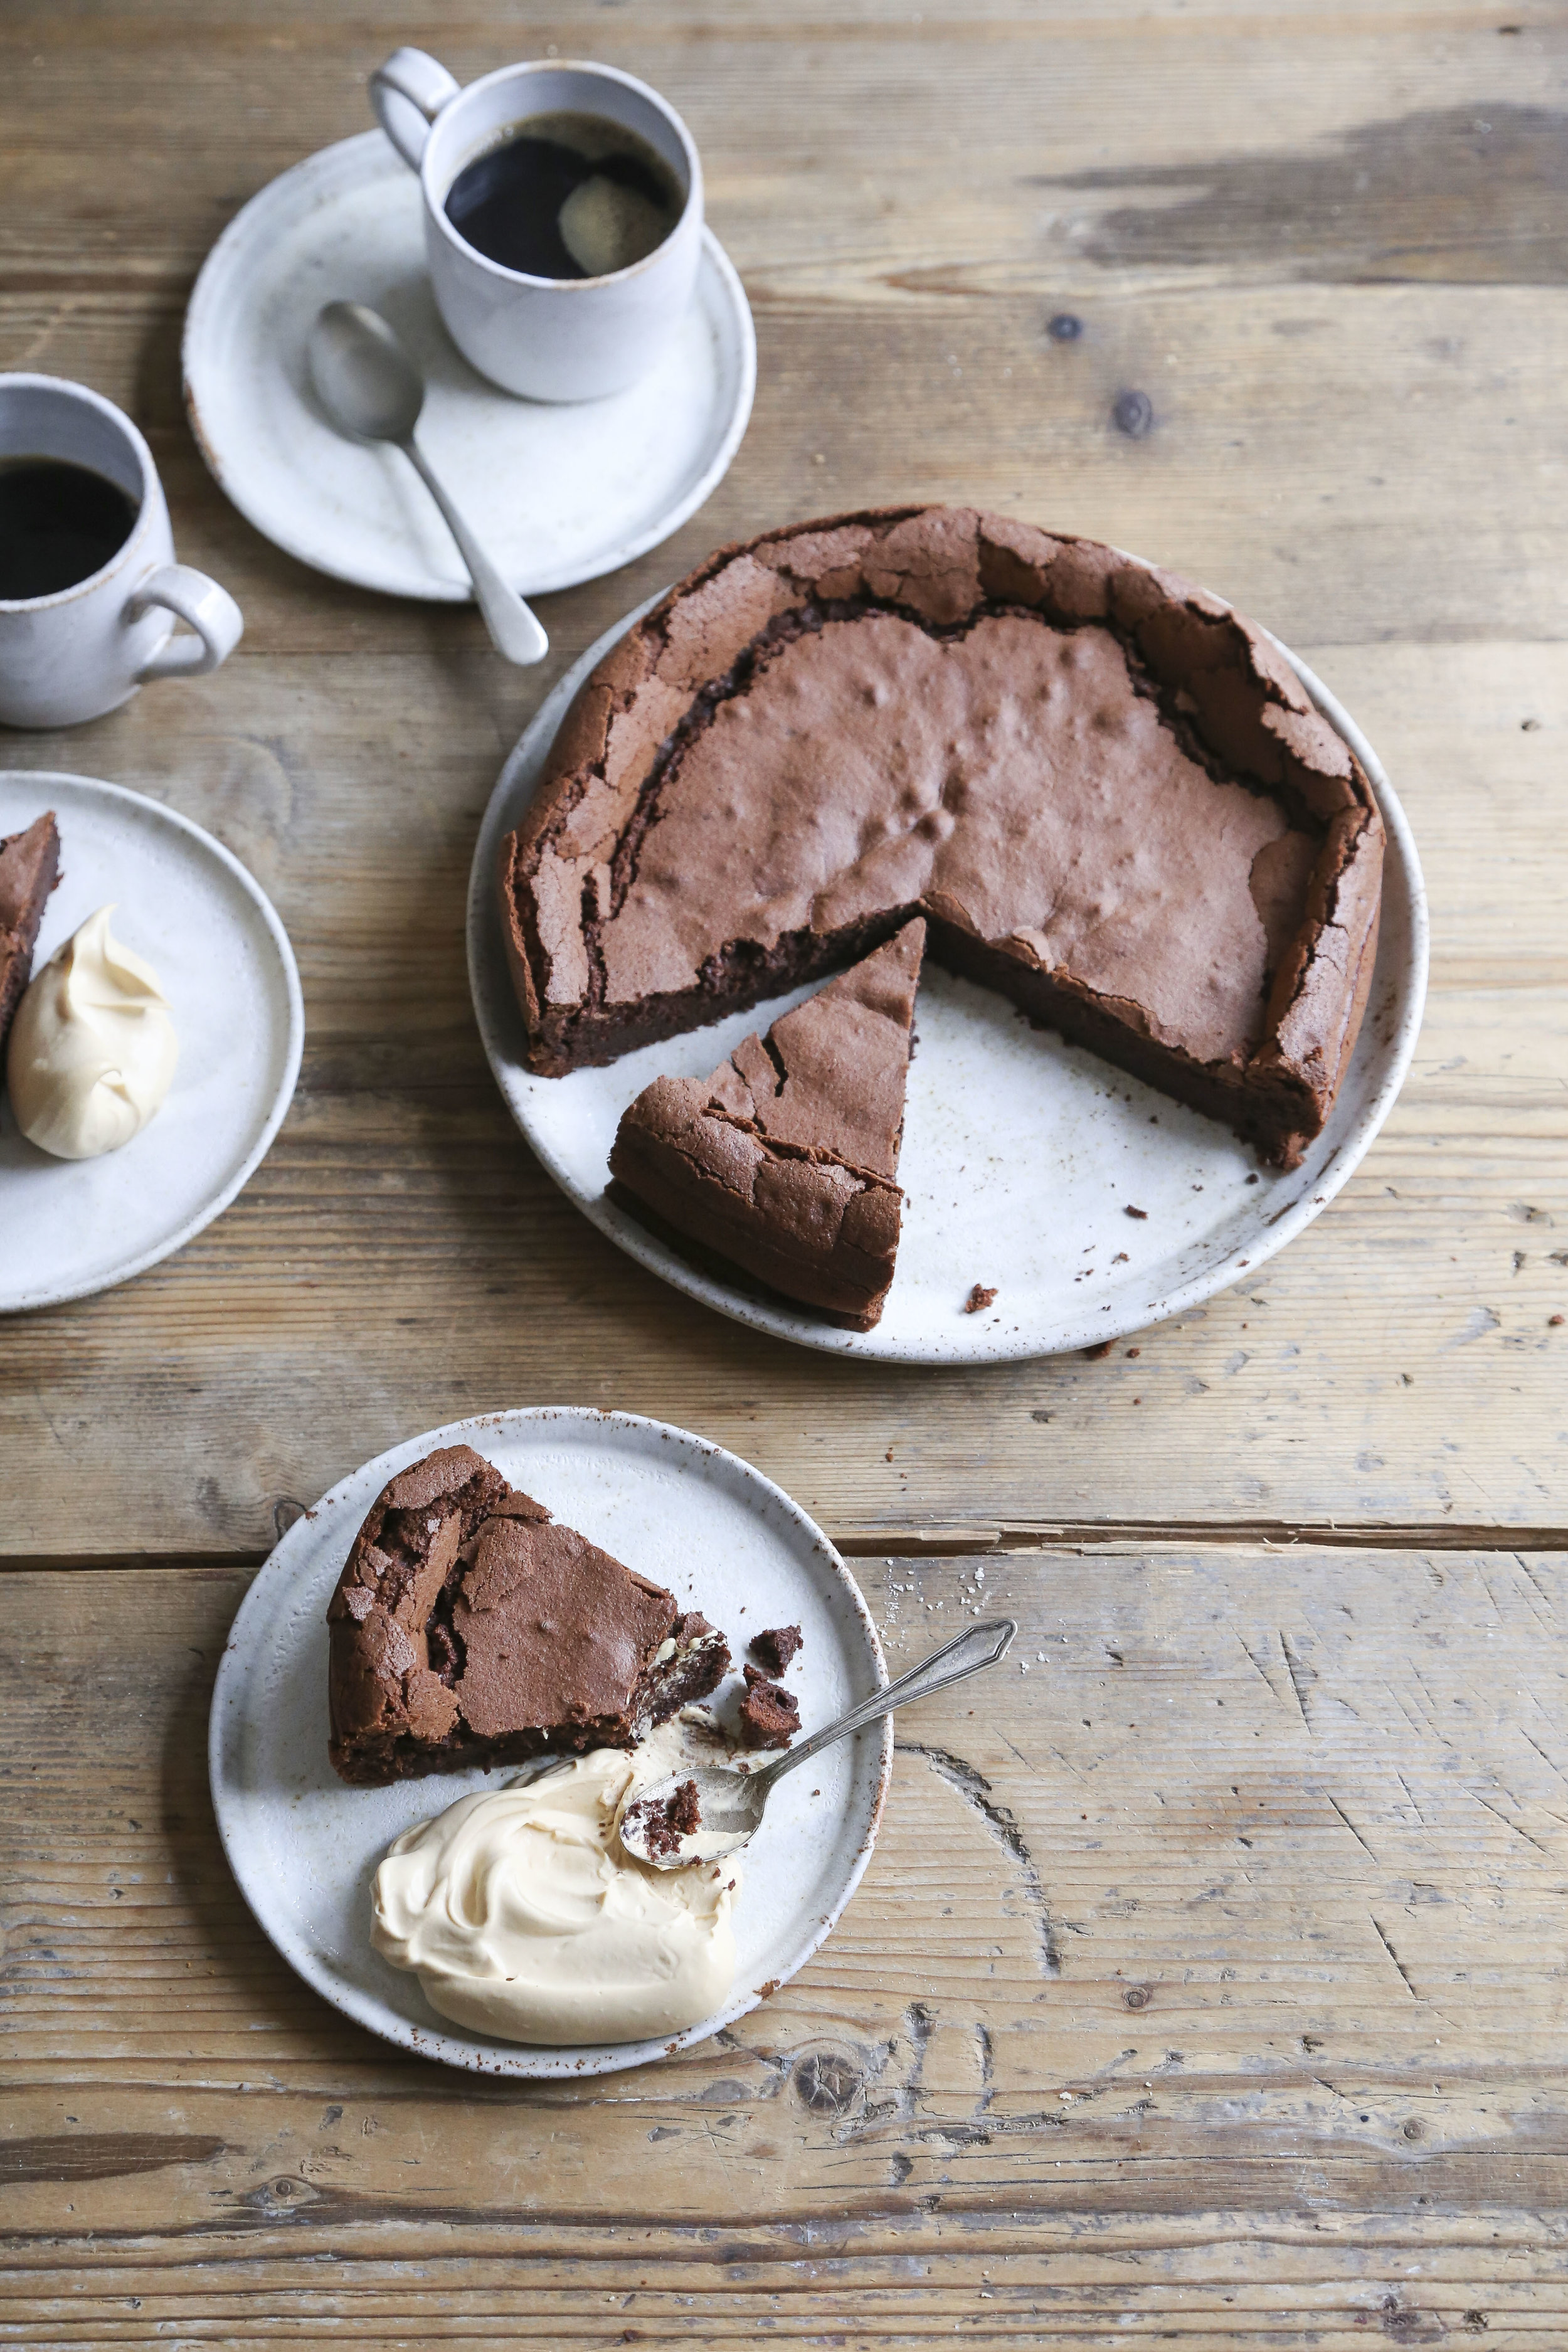
This is my second recipe for Chocolate Week and it's a fabulous dessert for the weekend ahead, no more difficult than a chocolate brownie, the method is actually pretty similar, the caramel cream served with the cake really makes this something special. There is no denying it's on the richer side the spectrum so if you want to lighten it up a little you can always serve it with some poached pear, something fresh to cut through the richness of the chocolate and cream. For me this is best served fairly quickly after baking when it is at is lightest, made with whisked egg white the cake melts in the mouth, but over time the cake becomes a little more brownie like, especially if you refrigerate it.

For the caramel cream, the way to get that rich and dark, almost bitter flavour is to properly caramelise the sugar. Place the sugar into a small pan and cook over medium heat. Once it has melted and started to caramelise you need to watch it carefully, it can burn quickly. If the sugar doesn't caramelise enough the cream will end up just tasting sweet, you need to take it right to the edge, stopping just before it burns. If the finished caramel, before adding the cream, has the colour of a dark rusty penny you should be set. 

If you fancy trying the dish for yourself I will be making this on stage at the Chocolate Show at Earls court this upcoming weekend (on the 16th at 2pm) and I'll be bearing samples. 

Flourless Chocolate Cake
200g unsalted butter
200g dark chocolate (around 65-70% cocoa solids)
5 large eggs, separated
150g light brown sugar
50g caster sugar

Salted Caramel Cream
100g caster sugar
Pinch of flaked sea salt
400ml double cream

To make the cream place the sugar into a saucepan and cook over medium/high heat it has melted and caramelised, turning the colour of an old rusty penny. Add the salt and swirl to combine. Pour in the cream, adding in two additions, pouring slowly as it may bubble up violently. If there are any lumps of caramel, place back over the heat and cook until smooth. Pour into a bowl and press a sheet of clingfilm onto the surface of the cream and chill until thoroughly chilled..

To make the cake line the base of a 9-inch springform tin with parchment paper and lightly grease the tin with a little butter. Preheat the oven to 180C (160C fan).

Place the butter and chocolate into a bowl set over a pan of simmering water and stir until melted. Remove and set aside for the moment. Place the egg yolks and brown sugar into a large bowl and using an electric whisk mix together for about 5 minutes until thick and pale. Pour in the chocolate mixture and mix until smooth and combined. 

In a separate bowl whisk the egg whites until they hold soft peaks then sprinkle in the sugar and whisk until the meringue holds soft glossy peaks. Add the meringue to the chocolate mixture in three additions, folding gently to combine. When no streaks of egg whites remain gently pour the batter into the prepared pan and bake for 40-45 minutes. Remove from the oven and allow to cool to room temperature (it will collapse in the middle but don’t worry you want that to happen)

Serve the cake at room temperature, topped with some of the cream whipped to soft peaks.

In Chocolate, Cakes, Dessert Tags flourless chocolate, cake, salted caramel, cream, gluten free
4 Comments

Espresso, Cocoa Nib Banana Bread

Edd Kimber July 16, 2015

Baking, for me, has always been therapeutic, it was probably the main reason I started to take it seriously in the first place. In a story I have recounted more times than I can count, baking became an escape from a job I thoroughly disliked (suing people for a living definitely didn't make me happy) and baking was my reaction, it was what I thought about as I was sending out summons, whilst I was being sworn at over the phone, it was what made me happy. After The Great British Bake Off, the story of which im sure you dont want to hear again, I decided that I would try and make baking my living: and remember this was after the first series, it wasn't clear to me if being on the show would be a kickstart to any form of career, it definitely felt like moving to London and quitting my job was a big risk. 

Many of my friends who worked in the food industry and baking in particular told me that baking for a hobby and a career were two very different things and I have definitely come to learn that. Baking isn't my escape anymore, it's my constant and I am forever grateful that is the case, but I so very rarely bake for just myself anymore, because the mood strikes. Baking is now my job, when the oven is on the cake or cookies that come out of it are for a magazine article or a book or maybe even a TV show, so when I get a rare opportunity to slow down and bake for pure pleasure, I relish in it. 

I have recently moved into a new flat and after the slightly stressful (read scarily expensive, London rents are so ridiculous) move, things are slowly finding their new homes and I am falling back into my work rhythm. After finishing a project a day earlier than expected I decided the new flat needed christening with something delicious, work baking doesn't count, and I wanted something easy but comforting and not much else can fit the bill so well as banana bread, okay maybe apart from a warm chocolate chip cookie, which I think is the answer to most problems. Instead of the classic banana bread that I make regularly, I ended up making a loaf spiked with coffee and cocoa nibs and it's definitely worth a try, whilst it might not seem the most obvious combination it works so well. This is the sort of cake that I want toasted, spread with a little salted butter and served with my morning coffee, it is sweet but not cloying, and the coffee and the cocoa nibs just work so well together!

Sometimes an idea pops into my head and it sits there for a few days, scratching away, begging to be tried, and this recipe started out exactly like that. I had finished a week of testing fruit recipes for a project and was left with a bunch of bananas slowly starting to head towards banana bread territory and, after unpacking another box from my move, I found my tonka beans and cocoa nibs, the idea of adding these to my recipe popped into my head and wouldn't go away.  

I, of course, tweeted about the idea because, have we met, I have a slight social media addiction! My friend Chloe suggested that I should try the bread with coffee instead and that initial idea was, very temporarily, shelved and I settled on trying an espresso and cocoa nib banana bread and I'm rather pleased with it, the coffee isnt super strong and the mix of the nibs, coffee and banana is delicious!

Espresso and Cocoa Nib Banana Bread

225g plain flour
2 tsp baking powder
1/2 tsp salt
3 tbsp ground coffee
25g cocoa nibs
250g ripe bananas (weighed without skins)
100ml sour cream
185g light brown muscavado sugar
2 large eggs
1 tsp vanilla bean paste
150g unsalted butter, melted

1. To make the banana bread, grease a loaf tin with a little butter and line with a strip of parchment paper, so that the ends hang over the long sides of the pan (this makes removal of the cake a lot easier) and preheat the oven to 180C (160C fan) 350F.

2. Place the flour, baking powder, salt, coffee and about 2/3 of the cocoa nibs into a bowl and whisk together to combine. (see tips for adjusting strength of the coffee in the cake)

3. Place the banana into a large bowl and use a fork to mash, until just a few small lumps remain. Add the remaining ingredients and mix together until smooth and uniformly combined. 

4. Pour the flour mixture over the banana mixture and gently fold together, mixing until the flour is just combined, but being very careful not to over mix, as this will make the bread chewy and tough. Scrape the batter into the prepared pan and top with the remaining banana, simply sliced through the middle and placed on top, cut side showing. Sprinkle the remaining cocoa nibs on top of the cake, avoiding the banana.  

5. Bake in the preheated oven for about 50-55 minutes or until a skewer inserted into the middle of the cake comes out just about clean. 

6. Allow the cake to cool in the pan for 15 minutes before carefully inverting onto a wire rack to cool completely. Kept wrapped in clingfilm in a sealed container this cake will keep for up to three days but can also be frozen for up to a month (I like to freeze it in individual slices and then I can have a piece whenever I fancy).  


Tips: If you want the coffee flavour to really punch you in the face then I would suggest adding two tablespoons of hot water to the coffee and stirring together before adding to the wet ingredients, this way the flavour will soak into the bread a lot more.

If you want to try this recipe and cant find cocoa nibs I get mine from Sous Chef

In Breads and Quickbreads, Cakes
4 Comments

Pistachio and Pomegranate Cake

Edd Kimber February 12, 2015

This time last year I remember writing a post about Valentines day and how I was single and bitter, slightly tongue in cheek but definitely with a dash of truth (I was recently single to be fair). A year on and well, not much has changed! Okay so thats not exactly true, I’m still single but I’m far from bitter and this cynic is taking a more open approach to Valentines Day. It is far from my favourite holiday but who am I to stop people celebrating there relationships (sounds like the bitter/sarcastic me is slipping back a bit!). The one thing I don't like is cookie cutter solutions, a card and flowers bought lazily from the corner shop is not up my street, effort and originality on the other hand, well that will always gain you points with me. What better way to show someone you love them than with something homemade. With a cake this pretty and colourful it would make the perfect thing to spoil your loved one with and even better it isn't too sweet or heavy, always a no-no for dates.

Pistachio and Pomegranate Cake

225g unsalted butter, room temperature 
200g caster sugar
Zest of 2 large oranges
4 large eggs, lightly beaten
70g plain flour
1 tsp baking powder
1/2 tsp salt
200g green pistachios, plus extra for decoration
Seeds from 1 pomegranate

Preheat the oven to 180C (160C fan) and grease a deep 20cm round cake tin with a little butter and line the base with parchment paper. 

To make the cake place the pistachios into the bowl of a food processor and pulse until finely ground (to prevent the nuts forming a paste you can add a tbsp of the flour to the processor).

Place the butter into a large bowl and, using an electric mixer, beat until light and creamy about 3 minutes. Add the sugar and the orange zest and beat together until light and fluffy, about 5 minutes.

Add the eggs a little at a time, beating until fully combined. Sieve the flour, baking powder and salt together, add the pistachios and mix together. Add the dry goods to the butter mixture and gently fold together until combined. Scrape the batter into the prepared tin and gently level out. 

Bake the cake in the preheated oven for 50-55 minutes or until the cake is golden brown and when a skewer inserted into the middle of the cake comes out clean, if the cake is browning too quickly lightly cover with a piece of foil. 

Allow the cake to cool in the tin for 10 minutes before turning out onto a wire rack to cool completely. To finish the cake sprinkle with extra chopped pistachios and the seeds from a pomegranate. 

Because this cake is made with ground nuts it keeps brilliantly, at least 4 days if kept in a sealed container. 

Notes: You can use pistachios from supermarkets but the colour won't be as vibrant and as they are roasted the cake won't be quite as moist - green pistachios available here) 

In Cakes
9 Comments
  • Recipes
  • Older
  • Newer

Twitter

  • Was 8 original films, 3 spin off films, a two part play not enough. Can we have something new. https://t.co/cBZdGEGeyv
    Apr 4, 2023, 1:46 PM
  • RT @deliciousmag: Cacio e pepe, but make it buns! These seriously cheesy bread rolls from @TheBoyWhoBakes are inspired by his favouri… https://t.co/oDZlaDgnN2
    Apr 2, 2023, 11:08 AM
  • RT @TheDailyShow: Congrats to Donald Trump on finally winning a majority of votes! https://t.co/ezP55HZgl0
    Mar 31, 2023, 12:43 AM

Instagram

This weeks bonus recipe, for subscribers to my newsletter, is this gorgeous sour cherry and coconut gateau basque. The crust is a buttery cross between pastry and cake, think a cakey cookie. The filling is a layer of sour cherry topped with a rich coconut custard. A real fun one to make too! Link to my newsletter can be found in my bio - #gateaubasque #pastrycream #coconut #sourcherry
In this months @olivemagazine (out today) the team came and photographed my petit kitchen and we talked about how we put our stamp on the place, without spending a fortune. We hated the bland kitchen that we inherited but, as it was relatively new an
In this months @olivemagazine (out today) the team came and photographed my petit kitchen and we talked about how we put our stamp on the place, without spending a fortune. We hated the bland kitchen that we inherited but, as it was relatively new and in good condition, it felt a waste to rip it out and we also didn’t want to spend the money it would take to rip out the whole thing and replace it (it’s a howdens shell so we could have done something cheaper like @plykeakitchens @holte.studio @madebyhusk) so instead I painted all of the cabinets, using @makeitrustoleum kitchen cabinet paint, to give it some personality and lighten the whole thing. Check out the magazine for the full run down. - #kitchendesign #kitchenremodel #rustoleumcabinettransformations #rustoleumkitchencupboardpaint #kitcheninspiration #theboywhobakes #olivemagazine
Are you making scones all wrong? Maybe, maybe not? But I do want to show you how I make them! This recipe is based on the method I learnt at @belmondlemanoir 12 years ago when I did a stage, and it makes the absolute lightest scones. And shock horror, it involves kneading the dough, albeit very lightly. You can get the full recipe in this weeks newsletter (free) linked in my bio. - #scones #bakingday #worldbakingday #afternoontea #hightea #englishscones #clottedcream #creamtea #theboywhobakes
facebook
  • Contact

The Boy Who Bakes

Edd Kimber

facebook