The Boy Who Bakes

Edd Kimber
  • Home
  • Recipes
  • My Books
  • Blog
  • Recipe Index
  • About
  • Home
  • Recipes
  • My Books
  • Blog
  • Recipe Index
  • About

Recipes

  • All
  • baking
  • Biscuits and Cookies
  • Breads and Quickbreads
  • Bundts
  • Cakes
  • Chocolate
  • Dessert
  • drinks
  • Holidays
  • Pastry
  • Scones and Quickbreads

My Nanna's Gingerbread

Edd Kimber January 10, 2019

I hope you’ll indulge me in a little story before I get to the recipe, its a story of how the recipe came to be and why it means so much more to me than any other. I often talk about the way a recipe can help remind you of a time or a place and can connect you to people you haven’t seen in a long time. It’s why I think food is more than the sum of its simple parts. I make this recipe a lot, more than any other and each and every time I open the tin of golden syrup, every time I smell the cake coming out of the oven, I am taken back to when I am still a toddler, just 3 years old. I’m in my Uncles house, in my Nanna’s room and my twin brother and I are sat on the bed, eating grapes with my Nanna. This memory probably isn’t real, just a fabrication built from stories I have heard my entire life but to me, it is as clear as any picture. This recipe was my Nannas, Jenny’s Gingerbread, and even though I never got to know her properly I have a connection with her through this cake. 

Whilst my memories of her are few, I have in their place a lifetime of stories my family like to tell every time we are together. My mum seems to be the family keeper of stories and she loves nothing more that telling us stories of her life when she was younger, about her twin bothers when they were little, so many stories about her aunts and uncles and of course lots of stories about her mum, my Nanna. Because she passed away when I was very young, those stories have always allowed me to feel close to her and to feel a bond that might not exist otherwise. As a baker and someone whose life is remembered through a series of dishes the handwritten recipes she left behind are precious. She was the baker in our family and as the mother to three children she had a lot of mouths to feed. The story goes that every week this gingerbread would be baked and it would slowly be eaten as the week went by, with another ready to take its place as the week came to a close.

17426399_10158558785555601_3730684953228829883_n.jpg

It’s a cake that all her children and grandchildren associate closely with her, so much so that during a discussion about what makes a good nanna, a good grandmother, the only rule was this cake should make frequent appearances. This thought was taken further when it became part of my sisters pregnancy announcement. When the time came to tell our mum that she was going to become a grandmother for the first time, she didn’t simply tell her, she gave her a tin of this gingerbread and told her she’d be needing this soon. It may have taken my mum a minute or two to understand what she meant but that obviously joyous occasion has managed to put even more importance onto this recipe for us as a family. 

For me personally it is a connection to my wonderful mum and to a Nanna I didn’t really get to know, and I think of it as a way honouring her memory. Every time I make it I hope she would have been proud that I have taken her recipe and put it in the hands of people all over the world and that she would be happy that they enjoy it as much as we do. 

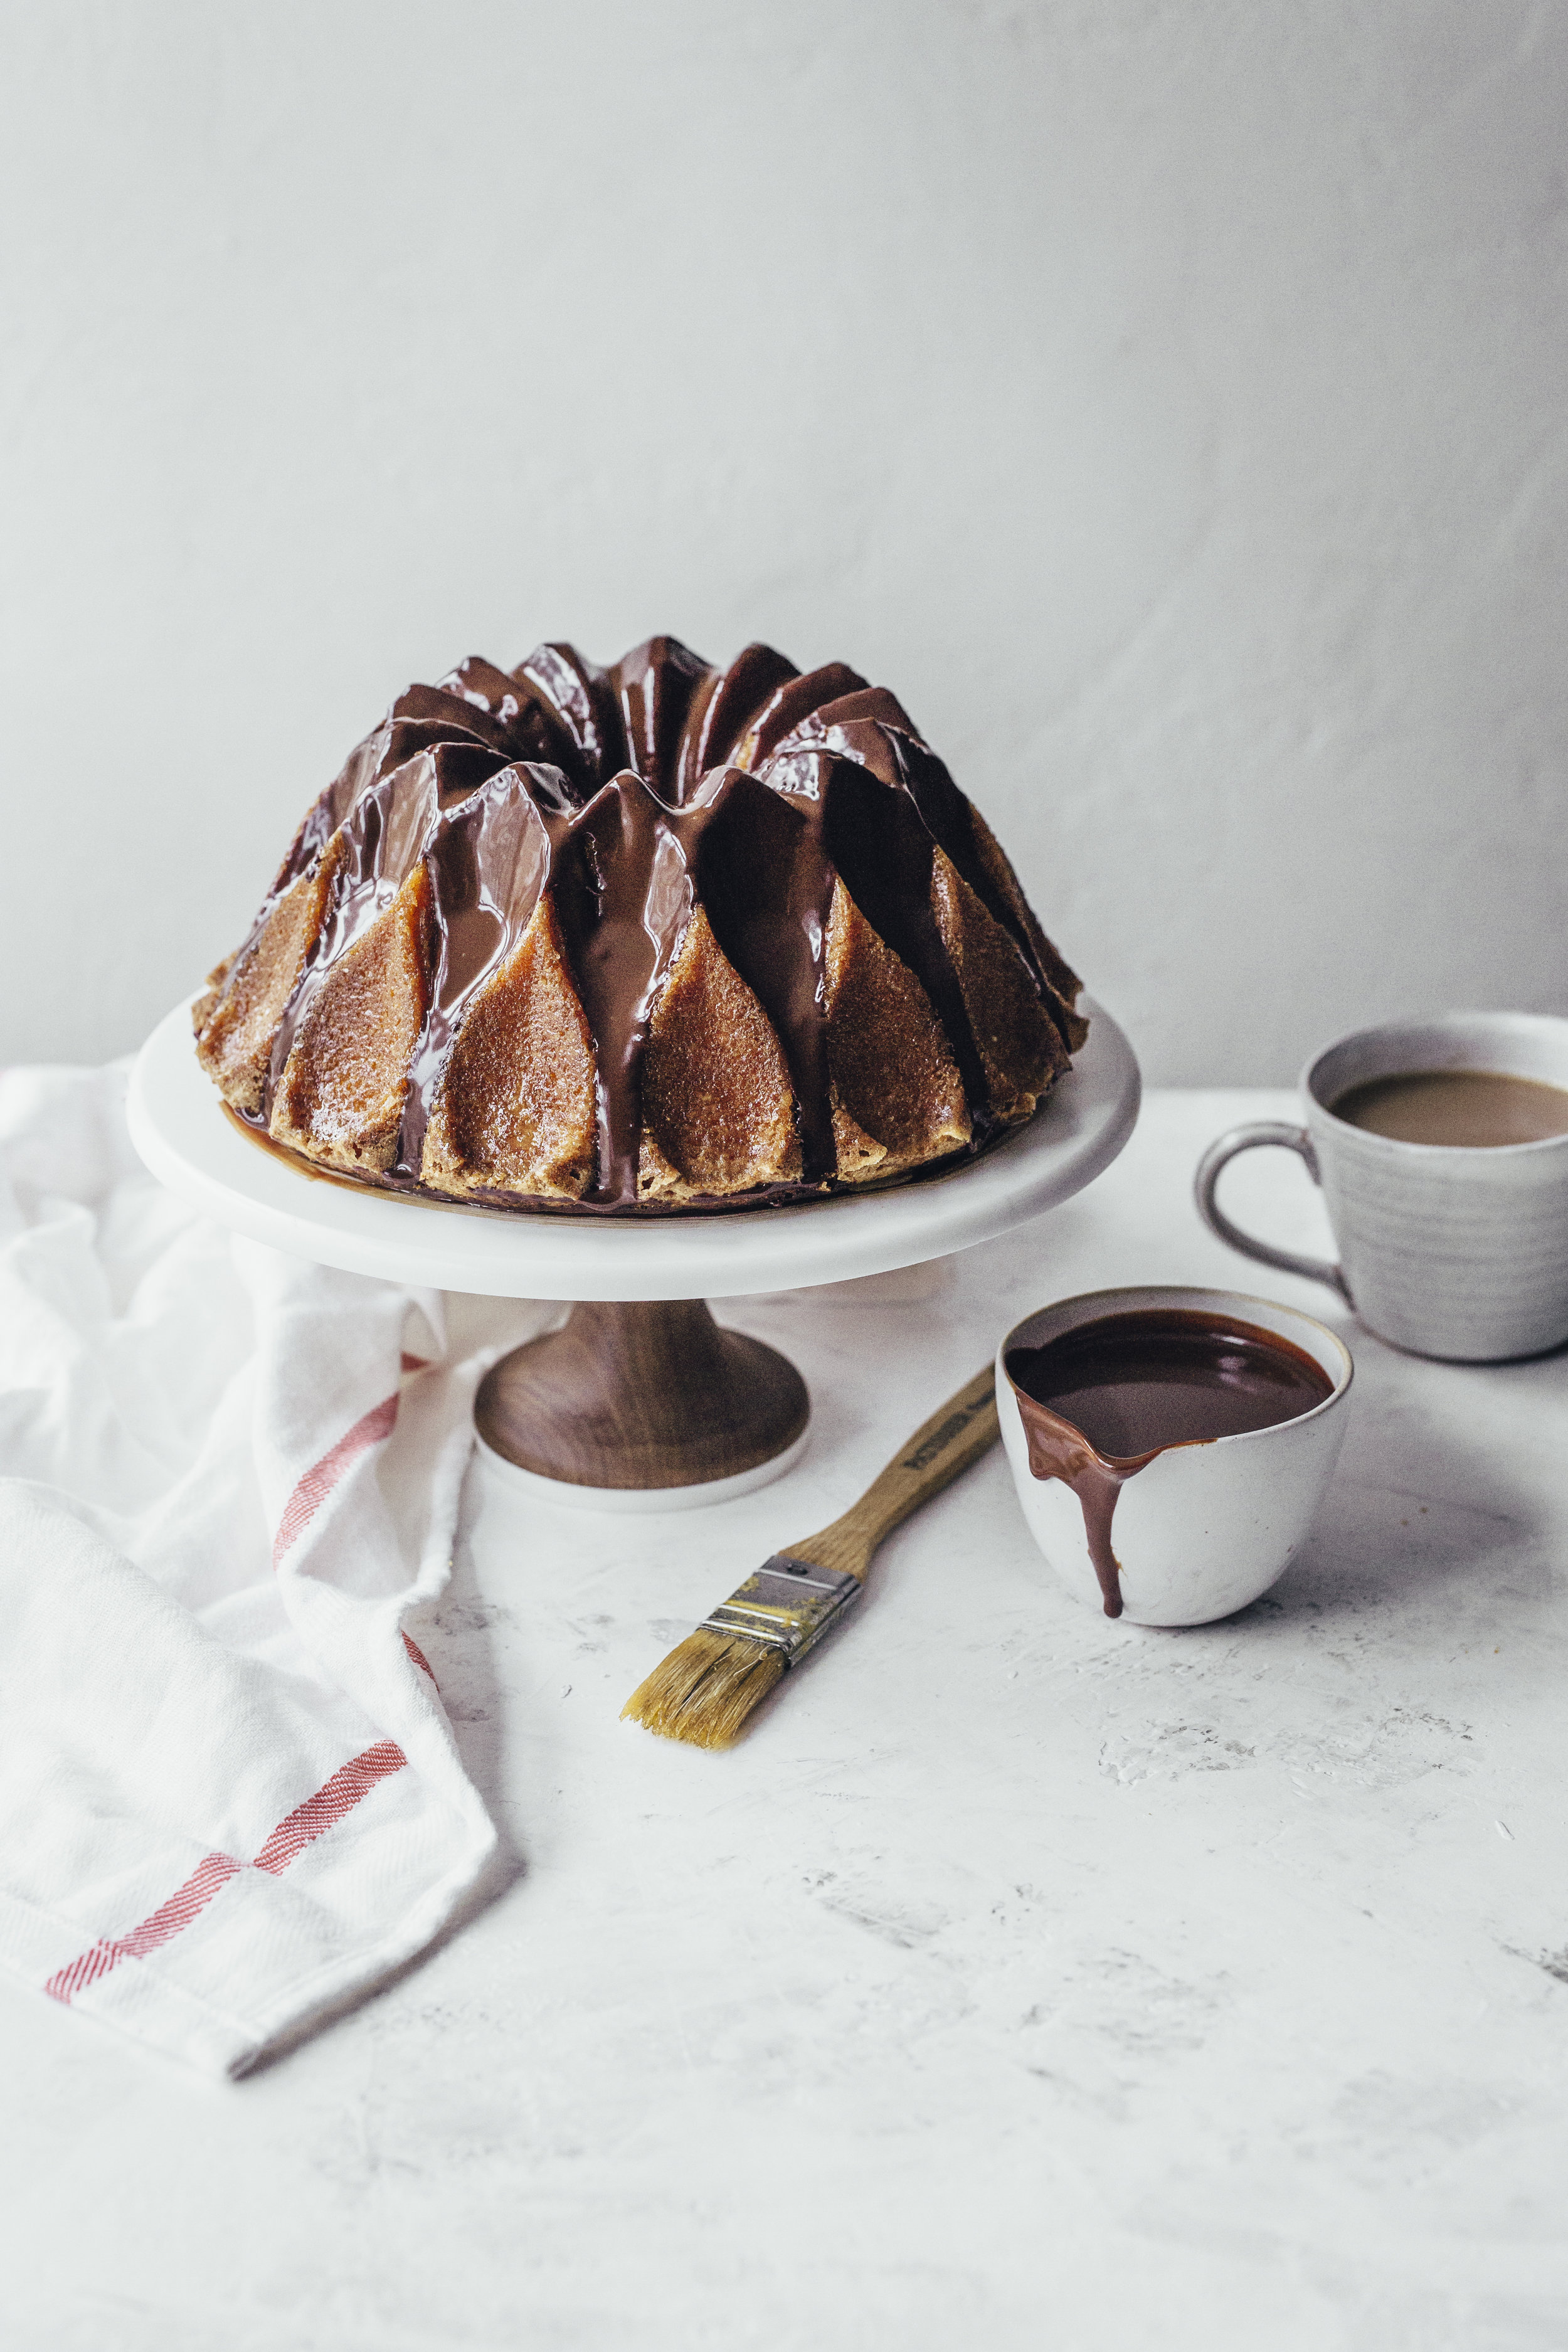
A quick note about the recipe, this a slightly tweaked version from the one that was originally printed in my book The Boy Who Bakes, I have adapted it for a bundt pan, obviously something my Nanna never did but something that looks as special as this cake is to me. 

My Nanna’s Gingerbread
340g plain flour
3 heaped tsp ground ginger
1 heaped tsp mixed spice (if making in the US pumpkin pie spice mix will work)
1 heaped tsp ground cinnamon
1 tsp baking soda
1/2 tsp salt
1 large pinch cayenne pepper (I tend to go with about 1/2 tsp)
170g unsalted butter, diced
115g caster sugar
2 tbsp fine cut orange marmalade
340g golden syrup
2 tbsp chopped stem ginger
2 large eggs
210ml whole milk


Lemon Glaze (optional)
Juice of 1 lemon
150g icing sugar

Preheat the oven to 180C (160C fan) and prepare a 10-cup capacity bundt pan by spraying with a light layer of oil (I prefer spray oils for this as its much more effective) making sure to coat all the nooks and crannies. Bundt pans are very detailed and if the pan isn’t prepared properly the cake may stick. Dust the inside of the pan with flour, again making sure to coat the whole thing. Turn the pan upside down and tap out any excess flour so that it is a thin coating. 

Place all the dry ingredients into a large bowl and whisk together to combine. Place the butter, sugar, marmalade, golden syrup and stem ginger into a saucepan and cook over medium heat until everything has melted together and you have a smooth mixture. Remove from the heat and allow to cool slightly before mixing in the milk, followed by the eggs. When combining the wet and dry ingredients do this for as short a time as possible, you’re not aiming for a completely smooth batter, the odd lump is fine. If you whisk the batter too much it can become a little tough, so ere on the side of caution. Pour the finished batter into the prepared bundt pan and place the pan onto a baking sheet and bake in the preheated oven for about 45-50 minutes or until the cake springs back to a light touch or a skewer inserted into the middle comes out clean.

When the cake comes out of the oven set the pan on a wire rack for 10 minutes before turning the bundt out onto the rack to cool. With bundt cakes I find the 10 minutes to be the sweet spot, if you try to turn the cake out any earlier it might break, as the structure of cakes aren’t fully set fresh from the oven. If you try to turn it out much later the sugars in the cake make the outside of the cake a little sticker mean the cake may stubbornly stick to the pan.

The next stage is totally optional and not something my family do when making this recipe, the cake is delicious as it is. If however you want to a little more you can add this simple lemon glaze. The recipe is a simple icing sugar glaze but by heating the lemon juice and icing sugar together, just until the mixture starts to bubble, when brushed on the cake it forms a thin fondant like glaze that crackles as its cut and creates a nice added level of texture as well as flavour. Brush the glaze onto the cake whilst still warm from the oven and once fully coated pop the cake back into the oven for a couple minutes. This will make the glaze set and turn slightly translucent. 

As with all gingerbread cakes this bundt will be even better if you can resist cutting into it for a couple days, the flavours improve and the cake becomes a little sticker (this is more pronounced without the glaze) so hold back from trying it if you can. I wont blame you if the smell out of the oven is too much to resist though.


In Cakes, Bundts
12 Comments

Blueberry Oregano Compote with Oregano Lemon Cake

Edd Kimber July 20, 2018

It might seem odd to use oregano in a sweet recipe as it really isn't that common, but trust me, this works so well. We have all become more and more accustomed to herbs traditionally used in savoury cooking appearing in desserts, think of a lemon and rosemary cake, a pear and thyme cake. How about a herbaceous basil ice cream, all much more commonplace these days but this isn't the case with oregano. It still seems a little unusual in a sweet dish and to be honest I wasn't 100% sure it would be a success, but when Schwartz asked me to try it I accepted the challenge and this is the result. When thinking about how herbs blend with sweet flavours there a few common themes but the main one is lemon, it really helps bridge the gap between the sweet and the savoury, it gives balance. The key to making any herb pairing like this work is balance and think of the lemon and the stuff that holds the whole recipe together. Use too much of any herb and the balance will be thrown off and use too little and well you just cant taste it. When playing around with this recipe I found the compote could stand up to a fair amount of the oregano, because the berries aren't the most assertive flavour for a fruit but more mellow and gently sweet the oregano didn't fight too much and just blends together really well. It gives the blueberries a wonderful depth and the herbaceous flavour adds really interest and actually intensifies the flavour in the compote.

You could serve this compote on waffles or pancakes with maple syrup, which would be a divine combination, or you can use it as I have as the topping for a simple summertime cake. The cake is made with the same combination of lemon and oregano but in a gentler way, it’s less upfront a flavour but the inclusion of these flavours helps it pair wonderfully with the compote. In the compote, the lemon is the bridge that connects the two ingredients but in the full recipe with the cake and the compote, the bridge is a white chocolate cream. The three elements together create a wonderful dessert that may seem unusual at first but which are a great way to play with different flavours and try something new. The compote recipe is below but if you would like the full recipe visit the Schwartz blog here.

This recipe and post was sponsored by Schwartz.

Blueberry Oregano Compote

350g blueberries
juice of 1 lemon
60g caster sugar
2 tsp Schwartz Oregano 
1 tsp vanilla extract
1 heaped tsp cornflour

To make the compote place half of the blueberries and all the lemon juice, sugar, vanilla and oregano into a small saucepan and cook over medium/low heat for 10-15 minutes until the berries have started to break down and they have released a lot of juice. Add the remaining berries and stir to combine. Place the cornflour into a small bowl and add a few spoonfuls of the blueberry juice and mix until smooth. Scrape the cornflour slurry into the pan and cook for a few minutes until the compote has thickened. This compote is pretty low on sugar, you could cook it longer to reduce and thicken the liquid but the berries will break down further and the compote will taste sweeter and the joy of this is that is bright and just sweet enough, the cornflour therefore helps to thicken the compote in place of the sugar. Pour the compote into bowl, cover with cling film and refrigerate until needed.

To use the compote I have paired it with a simple lemon and oregano cake with a white chocolate cream, for that recipe head over here.

In Cakes
2 Comments
birthday cake slice (1 of 1).jpg

Devils Food Cake

Edd Kimber June 7, 2018

What is the birthday cake of your dreams, the one you had as a kid and secretly crave every year. It has to be the Devils Food Cake right? A rich, moist layer cake that packs a hell of a chocolate punch and fulfils all your childhood nostalgia needs, it’s the perfect chocolate cake and the one I make time and time again. I have been playing around a lot with chocolate cakes recently, trying to develop something extra special and whilst I was playing around in the kitchen I saw the recipe for Stella Parks’, aka Bravetart’s, Devils Food Cake. At first glance it looked to me like the perfect example of a devils food, the perfect crumb, the perfect colour and layers that stood tall and proud. I was doubly sold on the recipe once I realised it was basically an all in one method, no stand mixer needed here! The desire to bake it was stuck in my head so I got in the kitchen and gave it a whirl and guys, it is one of the easiest and best chocolate cakes I have ever made, so much so that I had to share it with you (and you know how rarely I post other peoples recipes). 

The recipe comes from Stella’s incredible book BraveTart, a dream of a book that was clearly written over a long period of time with a hell of a lot of testing, which is sadly not as common as you would think for baking books. If you love baking you have to get this book, I think it is one of the best baking books in years! But back to the cake. A classic Devils Food needs to be frosted with something nostalgic, something like a quick fudge frosting (which I generally find a tad too sweet), so I decided to use a sour cream ganache frosting that I had originally developed for a different cake. It has the gloss and texture of the lightest buttercream but the full on chocolate flavour you get from a ganache. In my version I only use a portion of sour cream to double cream simply because I find versions made with 100% sour cream have too much tang that gets in the way of the chocolate flavour, just a little tang however really helps to lift the flavour and balance out the sweetness in the cake. 

If you don't already go and follow Stella on Instagram and check out her book BraveTart, she is also resident pastry wizard over at SeriousEats so make sure to check out all her new recipes on there too.

Devils Food Cake
Recipe by Stella Parks, aka Bravetart from her brilliant book BraveTart

340g unsalted butter
340ml brewed black coffee
85g dutch-process cocoa powder, I used Guittard
170g dark chocolate, around 72% cocoa solids
455g light brown sugar
1 tbsp vanilla extract
6 large eggs, cold from the fridge
3 large egg yolks, cold from the fridge
255g plain flour
1 tbsp baking soda
1/2 tsp fine salt

Chocolate Sour Cream Frosting
Recipe by Edd Kimber

400g dark chocolate, around 70% cocoa solids
50g unsalted butter
75g light brown sugar
large pinch flaked sea salt
400ml double cream
150g sour cream

To make the cake preheat the oven to 180c (160c fan) and lightly grease 3x20cm round cake pans and line the base with parchment paper, Stella recommends deep tins 3 inch deep pans instead of the more common sandwich tins as with shallower tins the cakes are more likely to dome and rise less. 

Place the butter and coffee together in a large bowl and set over a pan of simmering water and heat, stirring occasionally, until the butter is fully melted. Remove the bowl from the heat and add the cocoa powder and chocolate and mix together until the chocolate is melted. Add the light brown sugar and vanilla and mix together until combined, as brown sugar has a tendency to clump make sure to work out any big lumps of the sugar. Add the cold eggs and egg yolks and whisk into the batter until fully combined. Finally mix together the flour, baking powder and salt and sieve over the chocolate mixture, mixing together until just combined. 

Divide the batter between the prepared pans, preferably weighing to make super equal layers, and bake in the preheated oven for about 30 minutes or until the cake is starting to come away from the sides of the pan and springs back to a light touch. Allow the cakes to cool in the pans for 10-15 minutes before inverting onto wire racks to cool completely. 

To make the frosting place the chocolate into a heatproof bowl and set over a pan of simmering water and heat, stirring regularly, until fully melted. At the same time place all the remaining ingredients, except the sour cream, into a small saucepan and place over medium heat and cook, stirring frequently until the the butter and sugar has melted and the mixture is smooth. Remove both from the heat and combine together. As this ganache has a high proportion of liquid I find it useful to make this ganache a slightly different way to what I normally do (this is a more traditional/professional way of making ganache). Pour the cream over the chocolate in three additions, stirring  gently in the middle of the bowl until the two mixtures are combined and a super glossy finish is achieved. Doing it in three additions like this makes sure the emulsion of the ganache is very stable and is unlikely to split. Finally add the sour cream and fold into the ganache. Set this mixture aside until it has thickened enough to spread and use like a regular frosting. 

To assemble the cake first use a serrated knife to level the cakes, if needed. Place the first cake layer onto a plate or cardboard cake round and spread with a small amount of the frosting (I use an ice cream scoop to measure out the frosting so the amount going between each layer is equal) spreading it so it is just peaking out over the sides, but just barely. Repeat with the second layer of cake and then finally add the third cake layer and top with the remaining frosting spreading over the top and sides of the cake, decorating in whatever manner you prefer.

One of the wonderful things about Stella’s Devils Food is that it stays fresh for a surprisingly good amount of time, I have now made this cake multiple times and have served it up to five days after baking and people were still incredibly complimentary which is a big plus for me with this cake.

In Cakes, Chocolate
10 Comments
Tour Bundt (1 of 1).jpg

Passion Fruit and Chocolate Bundt Cake

Edd Kimber March 20, 2018

Considering how many times I have made this cake recently you could easily expect me to be completely sick of it. This recipe, a twist on a classic pound cake, infused with passion fruit and glazed with dark chocolate, was originally made for my British Issue of the wonderful Bake From Scratch Magazine. One of the features I helped organise was the Bakers Potluck; we got some of the UK's best and brightest bakers together in a kitchen to bake, share and basically just enjoy each others company, it was an amazing day and a lot of fun. My recipe for the potluck had nothing really to do with British baking more my personal favourite styles and flavours. I am a big fan of Bundt cakes (I have way too many Bundt tins for my tiny kitchen) and the combination of chocolate and passionfruit which I go back to time and time again. The resulting cake was incredibly easy to make, a slight tweak on the all in one method and a cake that happily lasts for up to 5 days. When we set out on the Bake Like A Brit Tour with the magazine this was the recipe we decided to demo at each stop of the tour. We were also sponsored by the fabulous Guittard Chocolate of San Francisco and the brilliant bakeware company, and the inventor of the Bundt Pan, Nordicware from Minneapolis, so the recipe was the perfect fit. 

Note: This version of the cake is slightly different from the version that appears in the magazine, that is because it was originally developed for a larger Bundt pan, so it has been reduced to fit the Crown Bundt pan that I used for this post (if you watch the video for this recipe you will see why I reduced the recipe slightly).

Chocolate and Passion Fruit Bundt Cake

6 large eggs
375g caster sugar
zest of 2 lemons
200ml light flavoured olive oil
135g full fat yoghurt
35ml passion fruit puree
165g self rising flour
75g ground almonds
75g fine semolina
1/2 tsp baking powder

Blood Orange Syrup
100ml passion fruit puree
100g caster sugar 

Dark Chocolate Glaze
150g dark chocolate (I used Guittards 66% dark chocolate discs)
200ml double cream

Preheat the oven to 180C (160C fan) and lightly grease a 10-cup capacity bundt cake pan. Lightly dust the inside of the pan with a little extra flour and tap out any excess leaving a thin coating. These steps will help ensure the cake comes out clean. I personally prefer to use a spray oil for this and it ensures a thin coating then gets into every nook of the pan.

In a large bowl whisk together the eggs, caster sugar and lemon zest using a electric mixer, on high speed, for about 5 minutes or until the mixture is pale and light. Meanwhile, in a jug whisk together the oil, yoghurt and passion fruit puree. Add the oil mixture to the egg mixture and whisk briefly to combine. In a separate bowl mix together all the dry goods, then add to the liquid goods and mix briefly just until evenly combined. Pour the batter into the prepared Bundt pan and set onto a baking tray and bake in the preheated oven for about 45-50 minutes or until a skewer inserted into the cakes comes out clean. 

When it comes to turning out a Bundt without damaging the cake I find the best thing you can do is place the cake onto a wire rack for exactly ten minutes before attempting to turn it out. If you try and remove the cake any earlier it will not have had enough time to fully set so is more likely to break apart. If you wait much longer the cake can become a little sticky and wedge itself inside the pan, so 10 minutes is that perfect sweet spot.

Once the cake has been removed from the pan and is cooling on a wire rack make the syrup. In a small saucepan bring the passion fruit and sugar to a simmer, cooking just until the sugar has been dissolved. Whilst the cake is still warm brush the syrup all over, allowing it soak into the cake. Set the cake aside until fully cool.

Once ready to glaze place the chocolate discs into a bowl and the cream into a small saucepan. Bring the cream to a simmer and pour over the chocolate, setting aside for a couple minutes before stirring together to form a silky ganache. Set the glaze in the fridge for about 15-20 minutes or until the glaze has thickened up but it still pourable. Set the cake, still on a wire rack, over a piece of parchment paper and pour the ganache all over the cake (the paper will catch any drips that fall from the cake). 

Kept in a sealed container this cake will keep for up to 5 days. 

In Cakes, Bundts, Chocolate
2 Comments
  • Recipes
  • Older
  • Newer

Twitter

  • Was 8 original films, 3 spin off films, a two part play not enough. Can we have something new. https://t.co/cBZdGEGeyv
    Apr 4, 2023, 1:46 PM
  • RT @deliciousmag: Cacio e pepe, but make it buns! These seriously cheesy bread rolls from @TheBoyWhoBakes are inspired by his favouri… https://t.co/oDZlaDgnN2
    Apr 2, 2023, 11:08 AM
  • RT @TheDailyShow: Congrats to Donald Trump on finally winning a majority of votes! https://t.co/ezP55HZgl0
    Mar 31, 2023, 12:43 AM

Instagram

This weeks bonus recipe, for subscribers to my newsletter, is this gorgeous sour cherry and coconut gateau basque. The crust is a buttery cross between pastry and cake, think a cakey cookie. The filling is a layer of sour cherry topped with a rich coconut custard. A real fun one to make too! Link to my newsletter can be found in my bio - #gateaubasque #pastrycream #coconut #sourcherry
In this months @olivemagazine (out today) the team came and photographed my petit kitchen and we talked about how we put our stamp on the place, without spending a fortune. We hated the bland kitchen that we inherited but, as it was relatively new an
In this months @olivemagazine (out today) the team came and photographed my petit kitchen and we talked about how we put our stamp on the place, without spending a fortune. We hated the bland kitchen that we inherited but, as it was relatively new and in good condition, it felt a waste to rip it out and we also didn’t want to spend the money it would take to rip out the whole thing and replace it (it’s a howdens shell so we could have done something cheaper like @plykeakitchens @holte.studio @madebyhusk) so instead I painted all of the cabinets, using @makeitrustoleum kitchen cabinet paint, to give it some personality and lighten the whole thing. Check out the magazine for the full run down. - #kitchendesign #kitchenremodel #rustoleumcabinettransformations #rustoleumkitchencupboardpaint #kitcheninspiration #theboywhobakes #olivemagazine
Are you making scones all wrong? Maybe, maybe not? But I do want to show you how I make them! This recipe is based on the method I learnt at @belmondlemanoir 12 years ago when I did a stage, and it makes the absolute lightest scones. And shock horror, it involves kneading the dough, albeit very lightly. You can get the full recipe in this weeks newsletter (free) linked in my bio. - #scones #bakingday #worldbakingday #afternoontea #hightea #englishscones #clottedcream #creamtea #theboywhobakes
facebook
  • Contact

The Boy Who Bakes

Edd Kimber

facebook