The Boy Who Bakes

Edd Kimber
  • Home
  • Recipes
  • My Books
  • Blog
  • Recipe Index
  • About
  • Home
  • Recipes
  • My Books
  • Blog
  • Recipe Index
  • About

Recipes

  • All
  • baking
  • Biscuits and Cookies
  • Breads and Quickbreads
  • Bundts
  • Cakes
  • Chocolate
  • Dessert
  • drinks
  • Holidays
  • Pastry
  • Scones and Quickbreads

Salted Caramel Cocoa Brownies with Burnt Meringue Topping

Edd Kimber August 17, 2017

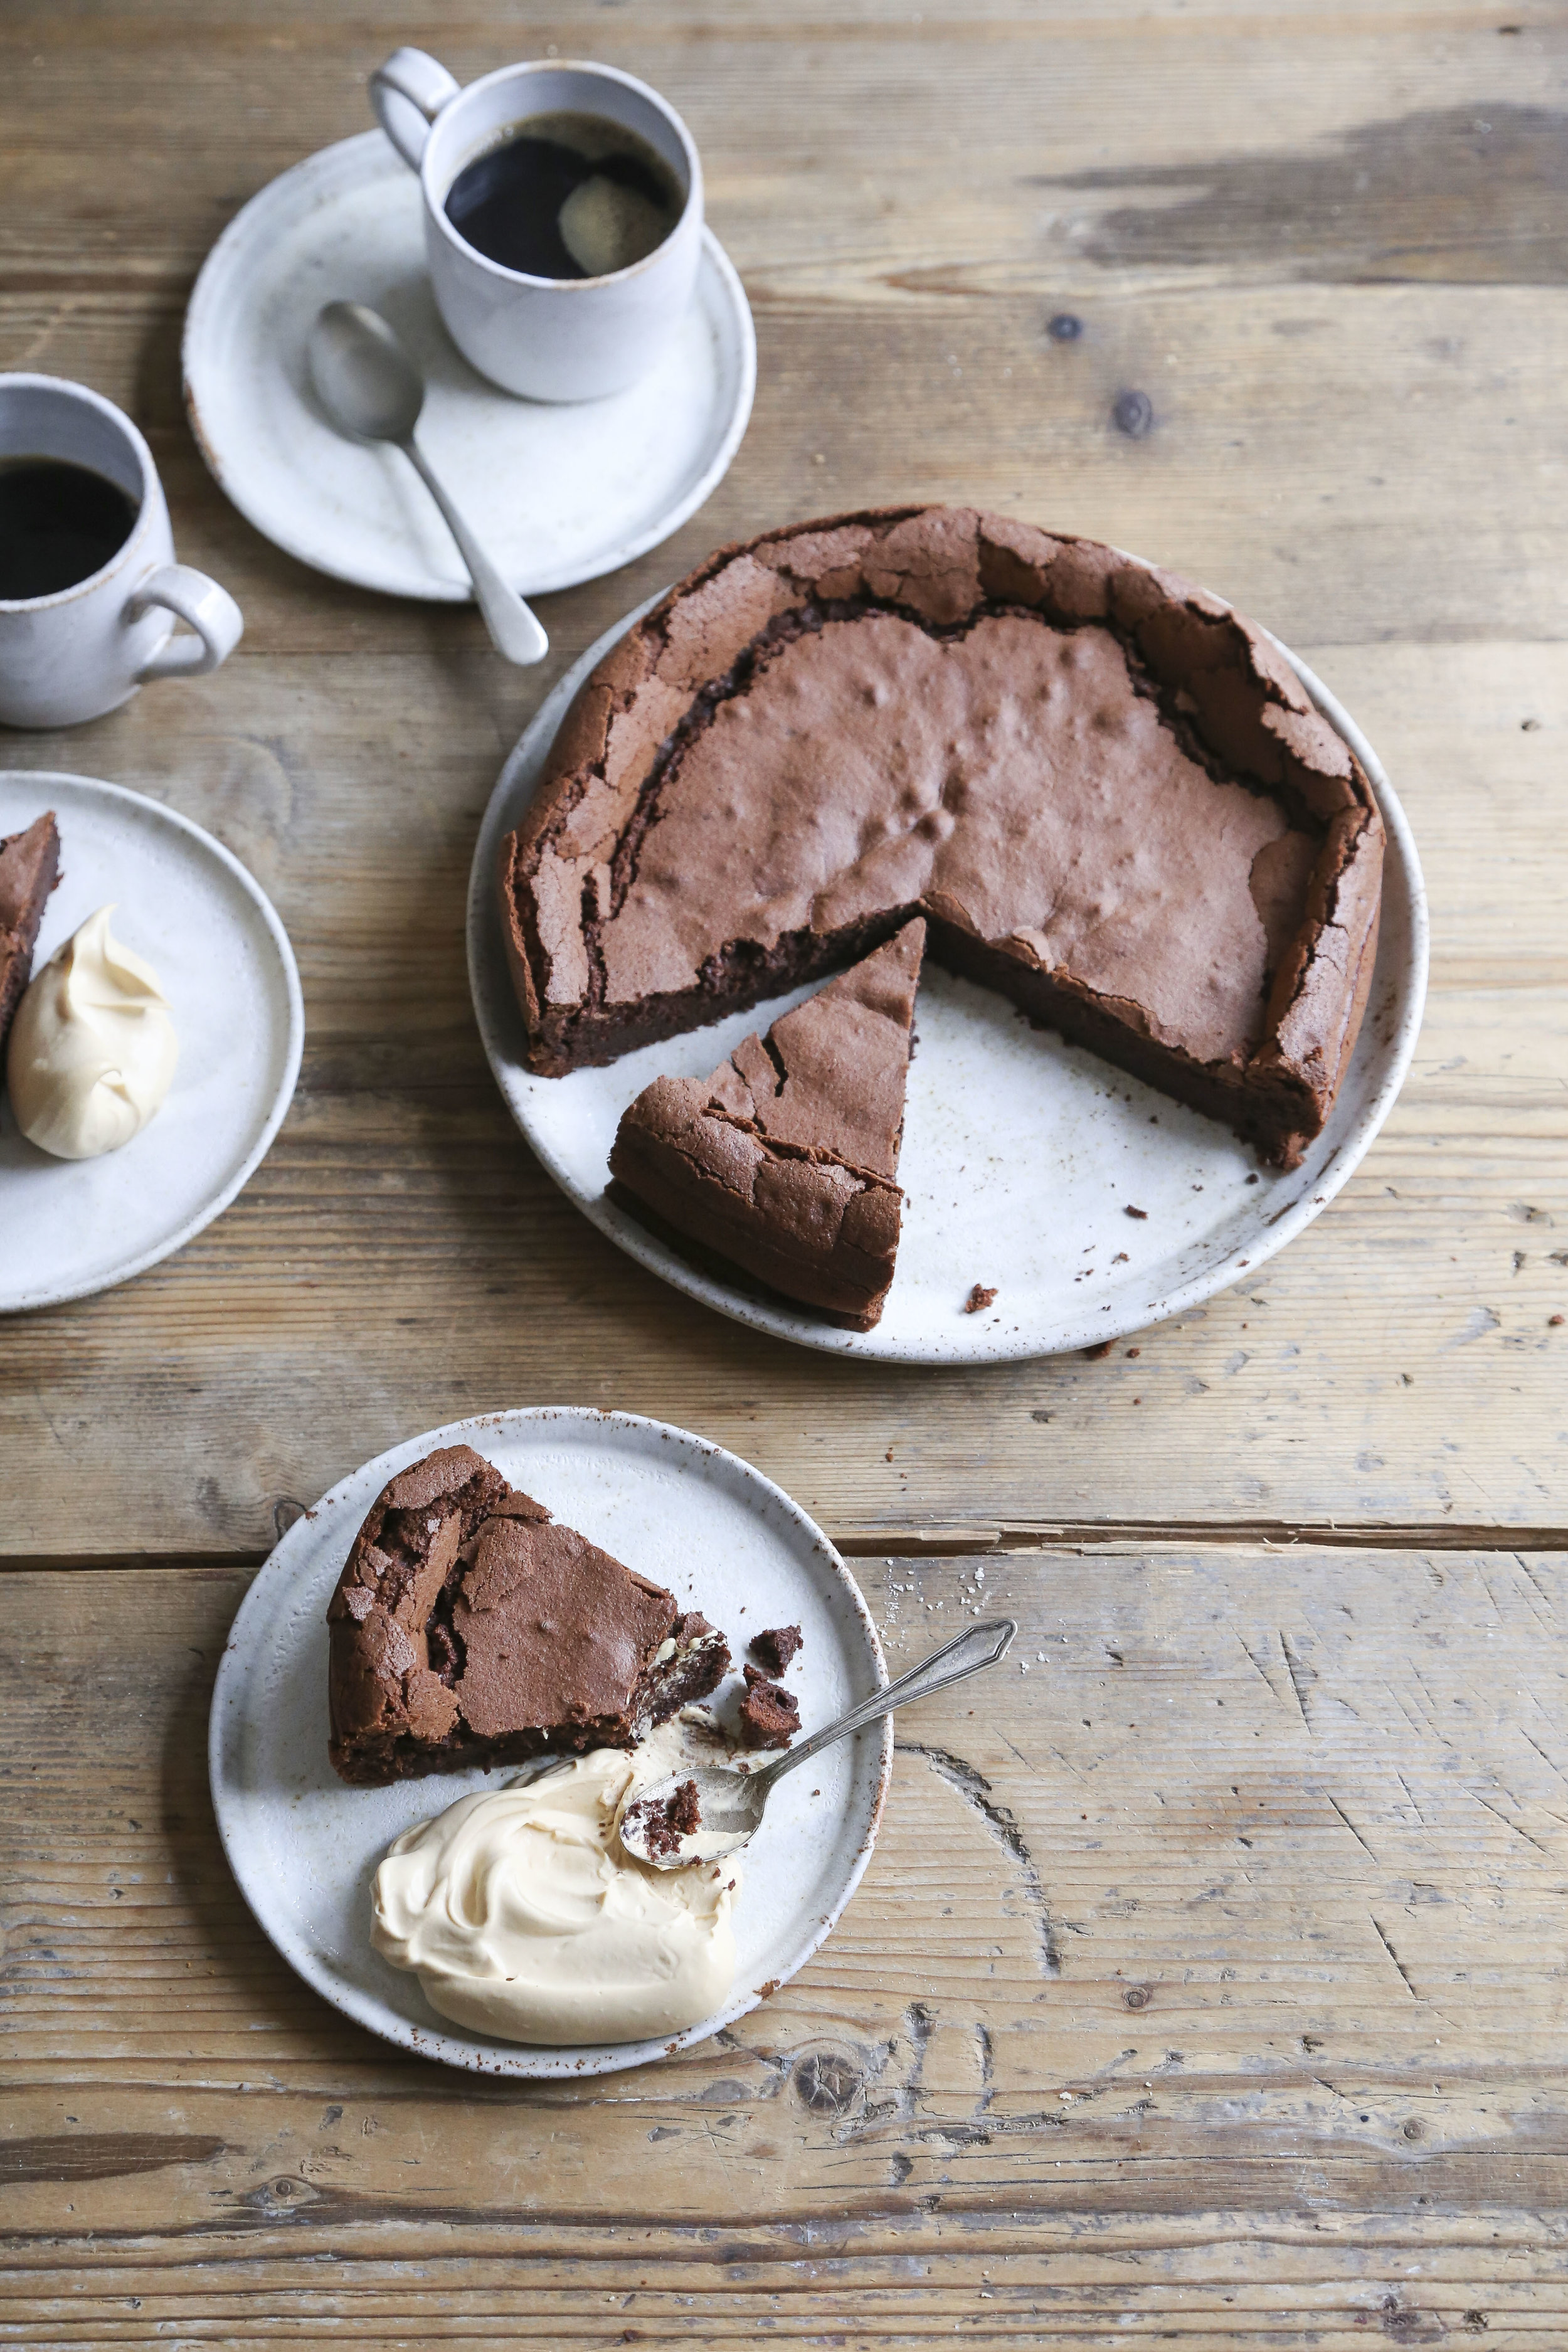
A couple weeks ago, I set up stall on Columbia Road Market to take part in Bake For Syria, a massive charity bakesale raising money for UNESCO, and to say I was a little overwhelmed by the response is most definitely an understatement. Not only did we raise over £10,000.00 (I havent heard the final figure yet) but most of the bakeries had sold hours earlier than expected and hours earlier than we had planned for; those of you who came down later, sorry we couldn't sell you cake! It was the first time I had sold my baking to the public since my short lived bakery Eddibles Bakery (its a pun, get it?) on Maltby Street Market a few years back. I baked liked a maniac for a couple days before the big day, using just one oven and one mixer. I cranked as much sweet stuff as I could manage and then promptly sold out in just few hours! Maybe stupidly I made a variety of things when big batches of one or two things would have been more sensible. On the day it became clear that one thing was, by far, ridiculously popular. The cocoa brownie laced with copious amounts of salted caramel and then topped with swathes of burnt swiss meringue sold out in record time, I think it took barely 30 mins! Every day since you guys have been asking for the recipe, so here it is! I also quickly want to say that the brownie recipe is my spin on the cocoa brownies from Alice Medrich, from her brilliant book Bittersweet. I have adapted the ingredient amounts to suit my tastes and I've changed the method but the idea and base of the recipe come from Medrich.

Rather than simply popping the recipe up here, I wanted to film it so I headed over to Cupcake Jemmas kitchen and we filmed the recipe for YouTube. So once you have fallen into a sugar coma from watching my video jump over to Jemma's channel and watch the video we made together, where Jemma tries to convince me to like cupcakes.

Salted Caramel Cocoa Brownie with Burnt Swiss Meringue

Salted Caramel
150g caster
25g unsalted butter
Large pinch flaked sea salt
125ml double cream

Cocoa Brownies
300g unsalted butter, diced
225g caster sugar
225g light brown sugar
175g cocoa powder (I used Guittard)
1/2 tsp salt
1 tsp vanilla
4 large eggs
140g plain flour

Swiss Meringue
3 large egg white
240g caster sugar
Pinch of salt
Pinch of cream of tartar 

For the caramel filling place the sugar into a medium saucepan and melt over medium heat until turned a dark rusty brown colour, stopping just before it starts to smoke. Remove from the heat and carefully pour in the salt and half the cream. The mixture will bubble violently so be careful and go slowly. Once the mixture has settled add the remaining cream followed by the butter. Place the pan back on the heat and cook another two minutes to thicken the caramel a little and ensure it is smooth. Pour into a jar and refrigerate until cooled and firm (this is best done at least a few hours in advance as the caramel will take a fairly long time to cool).

In a medium sized saucepan set over low heat, melt the butter, cocoa, salt and vanilla together. Once smooth remove from the heat and set aside for the moment. In a large bowl use an electric mixer to whisk together the sugars and eggs until slightly thickened and pale. Pour in the cocoa mixture and mix until smooth. Sieve over the four and fold together until combined.

Pour into a parchment lined 9x13 brownie pan and level out. Top with random dollops of caramel, about a teaspoon in size, using up the whole amount. This will look like a lot of caramel and it is, no one said this was a healthy recipe!

Bake at 180C (160C fan) for 30 minutes, or until a skewer inserted into the brownie comes out with a few moist crumbs attached. When it comes to a brownies nobody wants a dry brownie so it is best err on the side of caution, better to underbake a brownie then overbake it. Allow to cool for an hour or so before transferring to a fridge for a few hours, this helps set the brownies and makes them easier to cut. 

For the burnt meringue topping place all of the ingredients into a heatproof bowl and whisk gently over a pan of simmering water until the sugar has dissolved. Take from the heat and whisk on high speed until the meringue hold stiff glossy peaks. Spread over the brownies and brown with a blowtorch.  

Before the meringue is added the brownies can be kept in a sealed container for up to four days but once the meringue has been added these are best within a day so these are best made for a event where there will be lots of willing recipients.

In Biscuits and Cookies, Chocolate
5 Comments

English Toffee

Edd Kimber October 13, 2016

Todays Chocolate Week recipe is confectionary which, yes, does involve the boiling of sugar, up to 149C in fact. I know this can make people wary and put them off trying a recipe but, trust me, this is a simple recipe that takes just 20 minutes to make and as a bonus there is a good chance you have everything at hand to make it. Before we get to the recipe I want to talk about the name. It is generally known as English Toffee but quizzically not really in England itself. It seems to be an American affectation and I cant really find a reason for the name. My basic assumption is that is was at one point made by a Brit in the US and a nickname sprung from that fact. Either way it is a delicious treat that is a simple combination of toffee, a thin layer of chocolate and most regularly chopped almonds.

As it is now clear that summer is over and the cold has moved in for the rest of the year, this is the perfect autumn treat, in fact it would be fabulous for Bonfire Night and Halloween; those nights where a thick coat is required with a little paper bag of sweets stashed in the pocket. The only piece of equipment you absolutely must use is a candy thermometer. You can go fancy and use an electric version or stay basic and use a cheap jam thermometer, but you do need to measure the temperature accurately so no skipping the thermometer, well unless you like dipping your fingers into boiling hot caramel to measure it (im not joking that is the original way of judging candy).

English Toffee
100g caster sugar
100g light brown muscavado sugar
225g unsalted butter
1/4 tsp salt
2 tbsp water
1 tsp vanilla
85g dark chocolate, roughly chopped
50g toasted almonds, roughly chopped

To make the toffee very lightly oil a baking tray and set aside. 

Place the sugar and the butter into a medium sized, heavy bottomed saucepan and place over a medium heat. Stir until the butter and sugar have melted. Add the salt and water and cook, stirring regularly until the mixture reaches 149C/300F, this will take about 15 minutes. Watch the temperature carefully as it will rise slowly at first before suddenly rising rapidly. If, during cooking, you notice sugar clinging to the side of the pan either place a lid on the pan for a minute or brush the sides of the pan with a wet pastry brush. Both methods clean any sugar from the sides of the pan, stopping any possible caramelisation in its tracks. 

Once at the correct temperature quickly remove the pan from the heat and stir in the vanilla and immediately pour onto the pan, spreading into a rectangle roughly 20x30cm. Sprinkling the chocolate roughly over the toffee and set aside for about 5 minutes or until the chocolate melts. Spread the chocolate evenly over the toffee and sprinkle over the toffee. Set aside to cool for a while before placing into the fridge for an hour or so until everything is set. Remove from the fridge and use a knife to cut into pieces. Because the chocolate hasn't been tempered I keep the toffee in the fridge where it will keep for up to three days. If you temper the chocolate, spreading onto the cooled caramel, this will keep for a lot longer, at room temperature. 


In Chocolate
1 Comment

Flourless Chocolate Cake with Salted Caramel Cream

Edd Kimber October 12, 2016

This is my second recipe for Chocolate Week and it's a fabulous dessert for the weekend ahead, no more difficult than a chocolate brownie, the method is actually pretty similar, the caramel cream served with the cake really makes this something special. There is no denying it's on the richer side the spectrum so if you want to lighten it up a little you can always serve it with some poached pear, something fresh to cut through the richness of the chocolate and cream. For me this is best served fairly quickly after baking when it is at is lightest, made with whisked egg white the cake melts in the mouth, but over time the cake becomes a little more brownie like, especially if you refrigerate it.

For the caramel cream, the way to get that rich and dark, almost bitter flavour is to properly caramelise the sugar. Place the sugar into a small pan and cook over medium heat. Once it has melted and started to caramelise you need to watch it carefully, it can burn quickly. If the sugar doesn't caramelise enough the cream will end up just tasting sweet, you need to take it right to the edge, stopping just before it burns. If the finished caramel, before adding the cream, has the colour of a dark rusty penny you should be set. 

If you fancy trying the dish for yourself I will be making this on stage at the Chocolate Show at Earls court this upcoming weekend (on the 16th at 2pm) and I'll be bearing samples. 

Flourless Chocolate Cake
200g unsalted butter
200g dark chocolate (around 65-70% cocoa solids)
5 large eggs, separated
150g light brown sugar
50g caster sugar

Salted Caramel Cream
100g caster sugar
Pinch of flaked sea salt
400ml double cream

To make the cream place the sugar into a saucepan and cook over medium/high heat it has melted and caramelised, turning the colour of an old rusty penny. Add the salt and swirl to combine. Pour in the cream, adding in two additions, pouring slowly as it may bubble up violently. If there are any lumps of caramel, place back over the heat and cook until smooth. Pour into a bowl and press a sheet of clingfilm onto the surface of the cream and chill until thoroughly chilled..

To make the cake line the base of a 9-inch springform tin with parchment paper and lightly grease the tin with a little butter. Preheat the oven to 180C (160C fan).

Place the butter and chocolate into a bowl set over a pan of simmering water and stir until melted. Remove and set aside for the moment. Place the egg yolks and brown sugar into a large bowl and using an electric whisk mix together for about 5 minutes until thick and pale. Pour in the chocolate mixture and mix until smooth and combined. 

In a separate bowl whisk the egg whites until they hold soft peaks then sprinkle in the sugar and whisk until the meringue holds soft glossy peaks. Add the meringue to the chocolate mixture in three additions, folding gently to combine. When no streaks of egg whites remain gently pour the batter into the prepared pan and bake for 40-45 minutes. Remove from the oven and allow to cool to room temperature (it will collapse in the middle but don’t worry you want that to happen)

Serve the cake at room temperature, topped with some of the cream whipped to soft peaks.

In Chocolate, Cakes, Dessert Tags flourless chocolate, cake, salted caramel, cream, gluten free
4 Comments

Chocolate Sables

Edd Kimber October 10, 2016

It is National Chocolate Week here in the UK and that means it is also Chocolate Week here on The Boy Who Bakes. Over the weekI will posting a whole host of utterly delicious and decadent chocolate recipes. Im starting the week with a doozy, Chocolate Sables, from my book Patisserie Made Simple. 

Im not just baking these just because they’re delicious, and boy are they delicious, I’m baking them because im joining in with the wonderful #cookiesandkindness project launched by Dorie Greenspan. It is such a simple idea, bake a batch of cookies and share them with someone, posting about it online to show the world that there is still a lot of love out there. Every month Dorie will post a recipe on her website as a suggestion but you can bake whatever you fancy, just share the love, and the cookies of course. I bake these cookies on a regular basis, with or without the chocolate coating, and it makes a lot, a natural to share. When making the dough it’s formed into two logs and sliced into cookies. I bake off one half of the cookies for now and the second batch are refrigerated or frozen for a later date. So when making these to share why not do the same thing, it extends the happiness. giving a batch of cookies and a batch of cookie dough, the perfect gift.

To find out more about the #cookiesandkindness project and to get the story on how Dorie got into food I popped across the channel to Paris so we could record an episode of Stir The Pot together. I have met Dorie before but after spending an evening together I can honestly say that Dorie is one of the kindest, most encouraging and passionate people I have met. This episode of the podcast is a gem and if you love food and baking (if you don't how on earth did you get here) I would thoroughly recommend you to give it a listen. If I could also ask a big favour, if you are liking the podcast could you also help spread the love and tweet about it, leave a review on iTunes, or simply subscribe, it would mean the world!

Chocolate Sables

The Chocolate Sablé is the little black dress of biscuits: reliable, grown-up and with just a little hint of naughtiness! They take no time at all to make, but the rewards are bountiful. I use 1/2 teaspoon of sea salt in these biscuits, which might seem like a lot to some people, but salt and chocolate were meant to be together – it highlights the chocolate flavour and enhances the overall taste. Just don’t use table salt; you need a good flaked sea salt, such as fleur de sel. To dress up these cookies even more, I have dipped them in tempered chocolate and sprinkled them with cacao nibs, but this is optional – they are still a wonderful treat without it.

Makes 40

For the sablé dough
275g plain flour
40g cocoa powder
3/4 teaspoon bicarbonate of soda
1/2 teaspoon flaked sea salt
200g unsalted butter at room temperature, diced
50g caster sugar
200g light brown sugar
1/2 teaspoon vanilla extract
175g dark chocolate (60–70% cocoa solids), finely chopped

For the coating
250g dark chocolate (60–70% cocoa solids), tempered
cacao nibs, to sprinkle (optional)

Sift the flour, cocoa powder and bicarbonate of soda into a medium bowl and add the sea salt, then stir together. Set aside.

Put the butter in large mixing bowl and, using an electric mixer, beat until smooth and light. Add the sugars and vanilla extract, and beat together for 2 minutes until smooth. Add the dry ingredients to the bowl and mix together until you have a mixture that looks sandy (which is what sablé means in English), add the chocolate and mix to combine. The final dough should look almost like soil; it should not have formed into one large ball of dough. This is the key to getting the correct texture; mixed for too long the biscuits will be tough.

Tip out the mixture onto a work surface and gently press together to form a uniform dough. Divide in half and roll into two logs, 4cm thick.

Wrap in clingfilm and put them in the fridge to chill for 3 hours or until firm. (At this point you can freeze the dough for baking at a later date, or do as I do and bake one half of the dough and freeze the second.)

Preheat the oven to 180C (160C fan oven)/gas 4 and line three baking trays with baking parchment. Remove the dough from the fridge and, using a thin, sharp knife, cut into rounds about 1cm thick. Put the biscuits onto the baking trays, leaving 2cm between each one. Bake for 10–12 minutes until set around the outside but still soft in the centre.

Leave the biscuits to cool on the trays for 10 minutes, then transfer to a wire rack to cool completely.

Line a baking tray with baking parchment. Once the biscuits are cool, dip each one halfway into the tempered chocolate, allowing the excess to drip off. Put onto the prepared tray and sprinkle with a few cacao nibs before allowing the chocolate to set fully at room temperature. The biscuits will keep for up to one week stored in an airtight container.

Tip
Although I have given a suggestion for the cocoa percentages of the chocolate used in this recipe it is purely a guide; you can use whichever chocolate you prefer. The key is to use one that you love.

(recipe is taken from my book Patisserie Made Simple by Kyle Books and the recipe photograph is by Laura Edwards)

In Chocolate, Biscuits and Cookies
3 Comments
  • Recipes
  • Older
  • Newer

Twitter

  • Was 8 original films, 3 spin off films, a two part play not enough. Can we have something new. https://t.co/cBZdGEGeyv
    Apr 4, 2023, 1:46 PM
  • RT @deliciousmag: Cacio e pepe, but make it buns! These seriously cheesy bread rolls from @TheBoyWhoBakes are inspired by his favouri… https://t.co/oDZlaDgnN2
    Apr 2, 2023, 11:08 AM
  • RT @TheDailyShow: Congrats to Donald Trump on finally winning a majority of votes! https://t.co/ezP55HZgl0
    Mar 31, 2023, 12:43 AM

Instagram

This weeks bonus recipe, for subscribers to my newsletter, is this gorgeous sour cherry and coconut gateau basque. The crust is a buttery cross between pastry and cake, think a cakey cookie. The filling is a layer of sour cherry topped with a rich coconut custard. A real fun one to make too! Link to my newsletter can be found in my bio - #gateaubasque #pastrycream #coconut #sourcherry
In this months @olivemagazine (out today) the team came and photographed my petit kitchen and we talked about how we put our stamp on the place, without spending a fortune. We hated the bland kitchen that we inherited but, as it was relatively new an
In this months @olivemagazine (out today) the team came and photographed my petit kitchen and we talked about how we put our stamp on the place, without spending a fortune. We hated the bland kitchen that we inherited but, as it was relatively new and in good condition, it felt a waste to rip it out and we also didn’t want to spend the money it would take to rip out the whole thing and replace it (it’s a howdens shell so we could have done something cheaper like @plykeakitchens @holte.studio @madebyhusk) so instead I painted all of the cabinets, using @makeitrustoleum kitchen cabinet paint, to give it some personality and lighten the whole thing. Check out the magazine for the full run down. - #kitchendesign #kitchenremodel #rustoleumcabinettransformations #rustoleumkitchencupboardpaint #kitcheninspiration #theboywhobakes #olivemagazine
Are you making scones all wrong? Maybe, maybe not? But I do want to show you how I make them! This recipe is based on the method I learnt at @belmondlemanoir 12 years ago when I did a stage, and it makes the absolute lightest scones. And shock horror, it involves kneading the dough, albeit very lightly. You can get the full recipe in this weeks newsletter (free) linked in my bio. - #scones #bakingday #worldbakingday #afternoontea #hightea #englishscones #clottedcream #creamtea #theboywhobakes
facebook
  • Contact

The Boy Who Bakes

Edd Kimber

facebook