The Boy Who Bakes

Edd Kimber
  • Home
  • Recipes
  • My Books
  • Blog
  • Recipe Index
  • About
  • Home
  • Recipes
  • My Books
  • Blog
  • Recipe Index
  • About

Recipes

  • All
  • baking
  • Biscuits and Cookies
  • Breads and Quickbreads
  • Bundts
  • Cakes
  • Chocolate
  • Dessert
  • drinks
  • Holidays
  • Pastry
  • Scones and Quickbreads
Tour Bundt (1 of 1).jpg

Passion Fruit and Chocolate Bundt Cake

Edd Kimber March 20, 2018

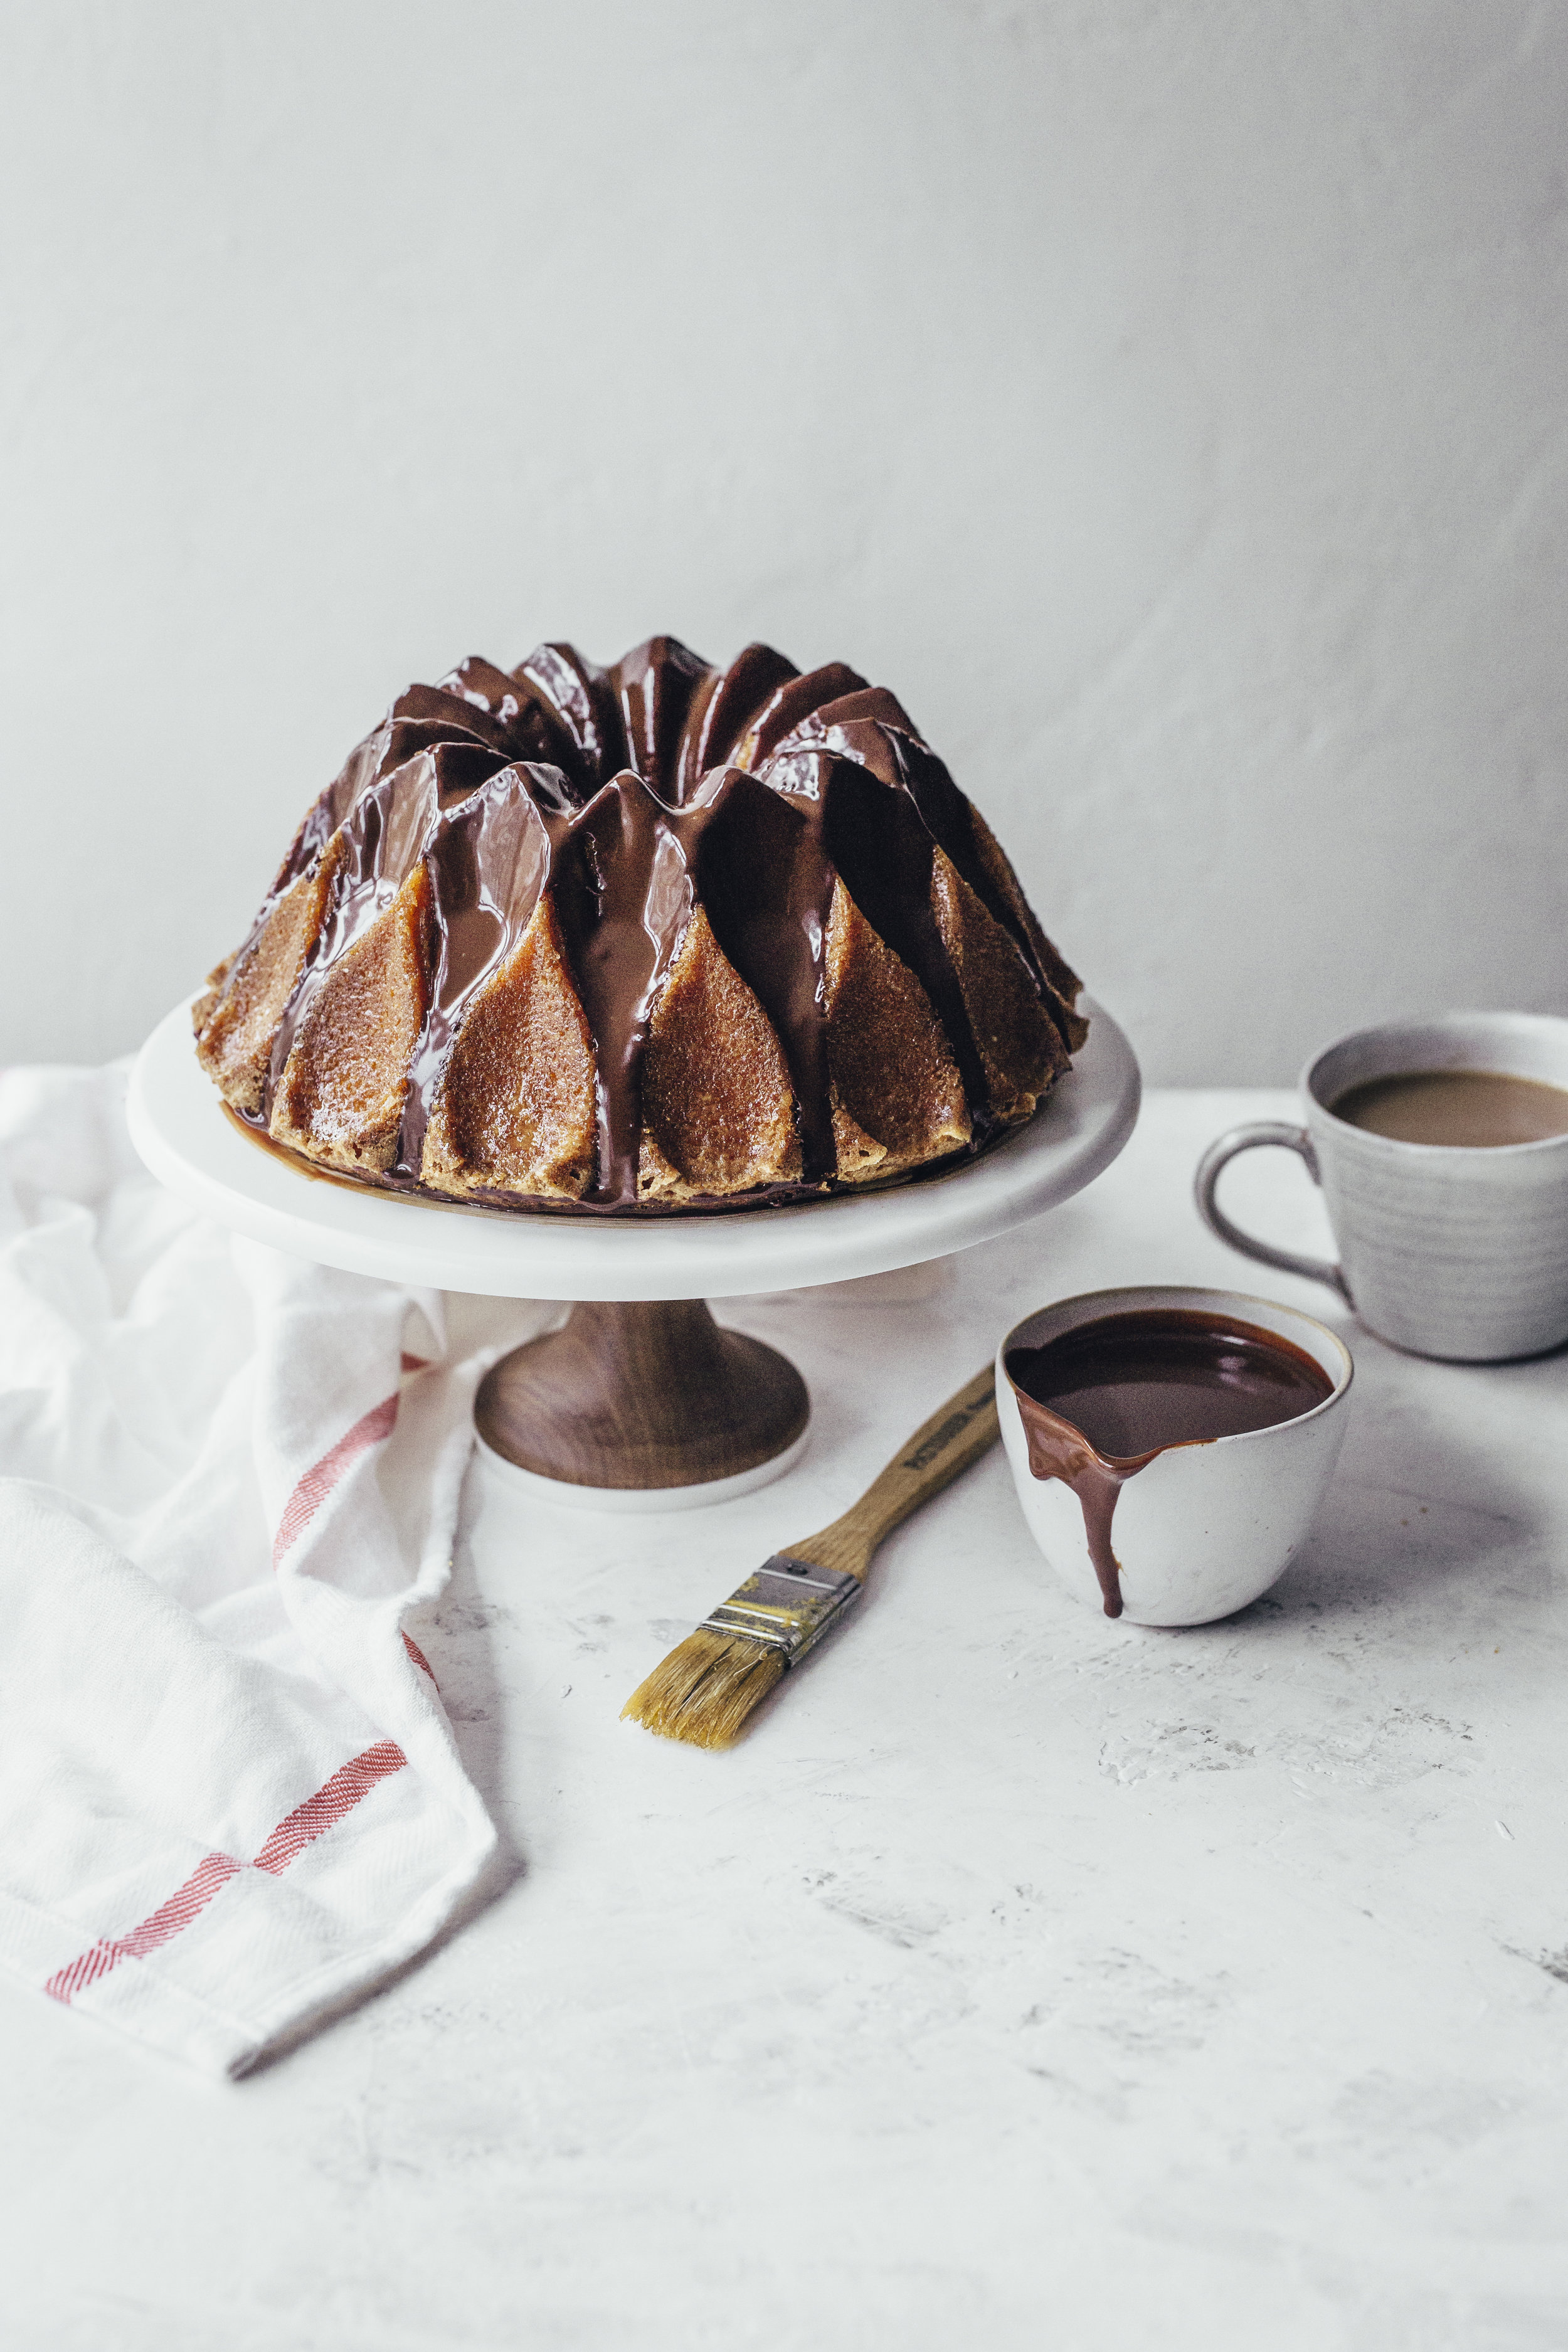
Considering how many times I have made this cake recently you could easily expect me to be completely sick of it. This recipe, a twist on a classic pound cake, infused with passion fruit and glazed with dark chocolate, was originally made for my British Issue of the wonderful Bake From Scratch Magazine. One of the features I helped organise was the Bakers Potluck; we got some of the UK's best and brightest bakers together in a kitchen to bake, share and basically just enjoy each others company, it was an amazing day and a lot of fun. My recipe for the potluck had nothing really to do with British baking more my personal favourite styles and flavours. I am a big fan of Bundt cakes (I have way too many Bundt tins for my tiny kitchen) and the combination of chocolate and passionfruit which I go back to time and time again. The resulting cake was incredibly easy to make, a slight tweak on the all in one method and a cake that happily lasts for up to 5 days. When we set out on the Bake Like A Brit Tour with the magazine this was the recipe we decided to demo at each stop of the tour. We were also sponsored by the fabulous Guittard Chocolate of San Francisco and the brilliant bakeware company, and the inventor of the Bundt Pan, Nordicware from Minneapolis, so the recipe was the perfect fit. 

Note: This version of the cake is slightly different from the version that appears in the magazine, that is because it was originally developed for a larger Bundt pan, so it has been reduced to fit the Crown Bundt pan that I used for this post (if you watch the video for this recipe you will see why I reduced the recipe slightly).

Chocolate and Passion Fruit Bundt Cake

6 large eggs
375g caster sugar
zest of 2 lemons
200ml light flavoured olive oil
135g full fat yoghurt
35ml passion fruit puree
165g self rising flour
75g ground almonds
75g fine semolina
1/2 tsp baking powder

Blood Orange Syrup
100ml passion fruit puree
100g caster sugar 

Dark Chocolate Glaze
150g dark chocolate (I used Guittards 66% dark chocolate discs)
200ml double cream

Preheat the oven to 180C (160C fan) and lightly grease a 10-cup capacity bundt cake pan. Lightly dust the inside of the pan with a little extra flour and tap out any excess leaving a thin coating. These steps will help ensure the cake comes out clean. I personally prefer to use a spray oil for this and it ensures a thin coating then gets into every nook of the pan.

In a large bowl whisk together the eggs, caster sugar and lemon zest using a electric mixer, on high speed, for about 5 minutes or until the mixture is pale and light. Meanwhile, in a jug whisk together the oil, yoghurt and passion fruit puree. Add the oil mixture to the egg mixture and whisk briefly to combine. In a separate bowl mix together all the dry goods, then add to the liquid goods and mix briefly just until evenly combined. Pour the batter into the prepared Bundt pan and set onto a baking tray and bake in the preheated oven for about 45-50 minutes or until a skewer inserted into the cakes comes out clean. 

When it comes to turning out a Bundt without damaging the cake I find the best thing you can do is place the cake onto a wire rack for exactly ten minutes before attempting to turn it out. If you try and remove the cake any earlier it will not have had enough time to fully set so is more likely to break apart. If you wait much longer the cake can become a little sticky and wedge itself inside the pan, so 10 minutes is that perfect sweet spot.

Once the cake has been removed from the pan and is cooling on a wire rack make the syrup. In a small saucepan bring the passion fruit and sugar to a simmer, cooking just until the sugar has been dissolved. Whilst the cake is still warm brush the syrup all over, allowing it soak into the cake. Set the cake aside until fully cool.

Once ready to glaze place the chocolate discs into a bowl and the cream into a small saucepan. Bring the cream to a simmer and pour over the chocolate, setting aside for a couple minutes before stirring together to form a silky ganache. Set the glaze in the fridge for about 15-20 minutes or until the glaze has thickened up but it still pourable. Set the cake, still on a wire rack, over a piece of parchment paper and pour the ganache all over the cake (the paper will catch any drips that fall from the cake). 

Kept in a sealed container this cake will keep for up to 5 days. 

In Cakes, Bundts, Chocolate
2 Comments
Chocolate Mousse (1 of 1).jpg

Chocolate Mousse with Orange Baked Rhubarb

Edd Kimber February 17, 2018

It might be a dessert straight from the 80's but I still love chocolate mousse. Take me to a french bistro, give me that large bowl of chocolate mousse and let me dig in. I don't need many adornments but a little lightly baked rhubarb, to go with the dark chocolate, works wonders. This is another recipe that is part of my healthy eating series where I have paired with WeightWatchers for their new Flex Programme, and I know what your thinking, how is chocolate mousse healthy. When it comes to this recipe I have reduced the sugar and fat to make this a bare bones mousse, just chocolate, a little tough of sugar and eggs, no butter and no cream, but absolutely delicious.

75 g dark chocolate
2 tablespoons caster sugar
3 large eggs, seperated
2 tablespoons, level freshly squeezed orange juice
1 portion(s), medium rhubarb
1 tablespoon honey
1 inch slice root ginger

Preheat the oven to 190°C, 170°C fan.

To make the chocolate mousse place a small bowl over a pan of gently simmering water, making sure the bottom of the bowl doesn't touch the water. Add the chocolate and heat, stirring occasionally, until fully melted. Remove the bowl and set aside for the moment.

Place the egg whites into a large bowl and whisk with a hand mixer until foamy. Add the caster sugar 1 tablespoon at a time, whisking for a minute before adding the second. Continue whisking on high speed until the meringue holds medium peaks.

Working quickly, add the yolks to a large bowl and mix in the orange juice. Pour in the melted chocolate, mixing until fully combined. Add a large spoonful of the egg whites and mix in. Fold in the rest of the meringue one third at a time. Once fully combined, divide the mousse between 4 glasses and refrigerate for 4 hours before serving.

Place the rhubarb into a small roasting tin with the honey, orange juice and the ginger, tossing together to coat. Roast in the oven for 10-15 minutes or until softened but still holding its shape. Top the mousse with the rhubarb and any syrup that is in the pan. Top with a few toasted flaked almonds.

Post sponsored by WeightWatchers

In Chocolate, Dessert
1 Comment

Black Charcoal Doughnuts

Edd Kimber October 24, 2017

If you have been following me on social media (basically lots of cake pictures. You know, the good stuff!) then you know Kitchenaid challenged me to come up with a recipe inspired by their limited edition Black Tie Standmixer, which you can find out about here. Well, this is that recipe. A doughnut turned ink black, using charcoal powder, filled with a delicious chocolate pastry cream, perfect for halloween next week!

Black Charcoal Doughnuts
500g strong white bread flour
50g light brown sugar
1 tsp fine salt
7g dried fast action yeast
25g black bamboo charcoal powder
4 large eggs
150ml whole milk
250g unsalted butter, diced and at room temperature

Dark Chocolate Custard
500ml whole milk
2 large eggs
4 large egg yolks
200g caster sugar
30g cocoa powder
30g cornflour
75g dark chocolate, roughly chopped

Black Tie Doughnuts (1 of 1).jpg

To make the chocolate custard place the milk into a large saucepan and heat over medium heat until it comes to a boil. Meanwhile whisk together the eggs, egg yolks, light brown sugar, cocoa and cornflour until smooth. Pour over the hot milk and whisk to combine. Scrape the custard back into the pan and cook, whisking constantly until the custard has thickened. Scrape the custard into a bowl and add the chocolate, mixing together until melted and combined. Press a sheet of clingfilm onto the surface of the custard and refrigerate until needed. 

To make the doughnut dough place the flour, light brown sugar, salt, yeast and charcoal powder into the bowl of a Kitchenaid Stand Mixer, fitted with the dough hook and mix together to combine. Pour in the milk and the eggs and with the mixer turned to low mix together to form a shaggy dough. Knead on low/medium speed for about 10-15 minutes or until the dough is elastic and pulling away from the sides of the bowl. Start to add the butter a couple pieces at a time, until fully combined. Once the butter has been combined continue to knead until the dough is elastic again and pulling away from the sides of the bowl. This will take about 10-15 minutes. 

At this stage place the dough into a lightly greased bowl, covering with clingfilm, allow to rise until doubled in size. You can either do this at room temperature which will take around an hour or you can refrigerate the dough for about 8-10 hours. 

Tip out the risen dough and divide into 16 equal sized pieces and form into rounds. Set each ball of dough onto a square of parchment paper and flatten slightly with the palm of your hand. Lightly cover with clingfilm and allow to rise until almost doubled in size. To test if the doughnuts are ready for frying press one with your finger. It should spring back slowly, if it springs back quickly it needs to rise longer. 

Fill a large saucepan about 1/2 full with a neutral oil and heat over medium heat to 180C. Once the oil is at temperature turn the heat down to low so that the heat stays at 180C. Add the doughnuts 2 or 3 at a time frying for 5 minutes, flipping half way through cooking. As the doughnuts are black it is hard to tell if they are fully cooked so it is best sticking to the temperature and timings quite closely. Set the doughnuts onto a plate lined with kitchen roll to drain any excess oil. Whilst still a little warm toss in caster sugar. Set aside and allow to cool fully.

To finish use a small knife to cut a slit in the side of each doughnut. Place the custard into a piping bag fitted with a bismarck tip (a long thin piping tip used for filling doughnuts) and fill generously. These doughnuts are best served on the day they are made. 

In Chocolate, Breads and Quickbreads
4 Comments

Matcha Oreos

Edd Kimber October 14, 2017

Makes 20-25

Oreo Cookies
275g plain flour
40g cocoa powder
1/2 tsp baking soda
1/2 tsp fine sea salt
200g unsalted butter
125g caster sugar
125g light brown sugar

Matcha White Chocolate Ganache
300g white chocolate
200ml double cream
2 tsp matcha powder

Matcha Oreos (1 of 1).jpg

Preheat the oven to 180C (160C fan) and line two baking trays with parchment paper. 

To make the cookies place the flour, cocoa powder, baking soda and salt into a bowl and mix together to combine. Add the butter and sugars into a large bowl and using an electric mixer beat together for a couple minutes until everything is combined. Add the flour mixture and on low speed mix until the flour has just been incorporated into the butter, stopping when the dough is still very crumbly but only once you can no longer see any flour. Tip the crumbly dough out on the work surface and carefully bring together into a dough. Divide into two equal pieces and working with one piece at a time roll out between two pieces of parchment paper until about 4-5mm thick. Place the dough onto a baking tray and refrigerate for am hour until firm. 

When chilled use a 5cm round cookie cutter to cut out as many cookies as possible, placing on the prepared baking trays, a couple cm's apart. You can gather the scraps together and re-roll as above once but any more and the cookies will become tough. 

Bake the cookies in the preheated oven for 10-11 minutes. As they are chocolate it is hard to tell when they are done but they will be set around the outside and a little soft. When they bake they also puff up a little so as soon as they are removed from the oven press with the back of a glass so they are nice and flat. 

Whilst the cookies are cooling make the ganache. Place the chocolate into a large bowl and set aside. Add the cream and matcha to a saucepan and bring to a simmer, stirring vigorously to dissolve the tea. Once the cream is at temperature pour over the chocolate and leave alone for a couple of minutes before stirring together to form a vibrant green ganache. Press a sheet of clingfilm onto the surface of the ganache and refrigerate for an hour or so until a pipeable consistency. Place the ganache into a piping bag fitted with a small round piping tip and use to sandwich the cookies together.

Kept in a sealed container these cookies will keep for up to three days. 

In Chocolate, Biscuits and Cookies
2 Comments
  • Recipes
  • Older
  • Newer

Twitter

  • Was 8 original films, 3 spin off films, a two part play not enough. Can we have something new. https://t.co/cBZdGEGeyv
    Apr 4, 2023, 1:46 PM
  • RT @deliciousmag: Cacio e pepe, but make it buns! These seriously cheesy bread rolls from @TheBoyWhoBakes are inspired by his favouri… https://t.co/oDZlaDgnN2
    Apr 2, 2023, 11:08 AM
  • RT @TheDailyShow: Congrats to Donald Trump on finally winning a majority of votes! https://t.co/ezP55HZgl0
    Mar 31, 2023, 12:43 AM

Instagram

This weeks bonus recipe, for subscribers to my newsletter, is this gorgeous sour cherry and coconut gateau basque. The crust is a buttery cross between pastry and cake, think a cakey cookie. The filling is a layer of sour cherry topped with a rich coconut custard. A real fun one to make too! Link to my newsletter can be found in my bio - #gateaubasque #pastrycream #coconut #sourcherry
In this months @olivemagazine (out today) the team came and photographed my petit kitchen and we talked about how we put our stamp on the place, without spending a fortune. We hated the bland kitchen that we inherited but, as it was relatively new an
In this months @olivemagazine (out today) the team came and photographed my petit kitchen and we talked about how we put our stamp on the place, without spending a fortune. We hated the bland kitchen that we inherited but, as it was relatively new and in good condition, it felt a waste to rip it out and we also didn’t want to spend the money it would take to rip out the whole thing and replace it (it’s a howdens shell so we could have done something cheaper like @plykeakitchens @holte.studio @madebyhusk) so instead I painted all of the cabinets, using @makeitrustoleum kitchen cabinet paint, to give it some personality and lighten the whole thing. Check out the magazine for the full run down. - #kitchendesign #kitchenremodel #rustoleumcabinettransformations #rustoleumkitchencupboardpaint #kitcheninspiration #theboywhobakes #olivemagazine
Are you making scones all wrong? Maybe, maybe not? But I do want to show you how I make them! This recipe is based on the method I learnt at @belmondlemanoir 12 years ago when I did a stage, and it makes the absolute lightest scones. And shock horror, it involves kneading the dough, albeit very lightly. You can get the full recipe in this weeks newsletter (free) linked in my bio. - #scones #bakingday #worldbakingday #afternoontea #hightea #englishscones #clottedcream #creamtea #theboywhobakes
facebook
  • Contact

The Boy Who Bakes

Edd Kimber

facebook