The Boy Who Bakes

Edd Kimber
  • Home
  • Recipes
  • My Books
  • Blog
  • Recipe Index
  • About
  • Home
  • Recipes
  • My Books
  • Blog
  • Recipe Index
  • About

Recipes

  • All
  • baking
  • Biscuits and Cookies
  • Breads and Quickbreads
  • Bundts
  • Cakes
  • Chocolate
  • Dessert
  • drinks
  • Holidays
  • Pastry
  • Scones and Quickbreads
Tara O Brady (1 of 1).jpg

Tara O Brady's Chocolate Chip Cookie Recipe

Edd Kimber August 14, 2018

Another week, another bunch of recipes to test for the Cookie Chronicles. First up this week is another extremely popular recipe, this time from another favourite of mine Tara O’Brady, from her beautiful book Seven Spoons. Her approach to the chocolate chip cookie is very much appreciated because of it's pure simplicity. When it comes to equipment nothing more than a whisk, wooden spoon and a mixing bowl is needed and the time to make the recipe is dangerously fast, you could whip up a batch of these cookies in less time then it would take to eat the whole batch! Because the butter is melted this cookie is incredibly quick and easy to bring together but tastes absolutely wonderful, no wonder this recipe has done so well. I have a recipe that I currently rely on to fulfil my cookie cravings but I have a funny feeling this might replace that, it's so simple to make and so satisfying. 

The Breakdown

This is definitely the easiest recipe I have tested for this series so far and this comes using melted butter, it makes the process of making this recipe incredibly quick and simple, no electricity needed (well apart from the oven). The sugar ratio leans heavily towards the light brown sugar meaning this recipe has a real caramel note to it but it still feels balanced and it blends perfectly with the chocolate. It also uses a little more vanilla than some recipes, that always featured 1 tsp, which I think definitely gave the dough a little more flavour. 

1 cup (225g) unsalted butter, diced
3 1/4 cups (415g) all-purpose/plain flour
1 1/4 tsp baking powder
1 tsp baking soda
1 1/2 tsp salt
1 1/2 cups (320g) light brown sugar
1/2 cup (100g) granulated/caster sugar
2 large eggs
2 tsp vanilla extract
12 ounces (340g) dark chocolate (I used Guittard 66% wafers)
Flaked sea salt, for sprinkling

Result

You can probably tell from everything above that I loved this recipes its incredibly simple to make and yields a delicious fairly classic take on the chocolate chip cookie, great texture, great flavour and just the simplest recipe going.

Preheat the oven to 350F (180C) and line two baking trays with parchment paper.

In a medium saucepan set over low heat melt the butter. You don’t want to brown the butter at all so keep the heat as low as it will go.

In a large bowl whisk together the flour, baking powder, baking soda and salt. In a separate bowl pour the melted butter and into that whisk the sugars. It will take a little elbow grease and at first it might look a little separated but give the mixture a whisk for a minute or so and it will smooth out. Add the eggs one at a time, mixing until fully combined into the butter mixture. Mix in the vanilla then switch out the whisk for a wooden spoon or spatula. Add the dry ingredients and mix together just until everything is combined. Don’t worry if there is a few small spots of flour, as this will be mixed in when the chocolate is added. Speaking of which, add the chocolate. Mix until evenly distributed in the dough. Cover the bowl with clingfilm and let the dough rest in the fridge for 10-15 minutes, or overnight. 

Form the cookies into balls roughly 3 tablespoons big, leaving a couple inches between each cookie. Bake in the preheated oven for 10-14 minutes until slightly golden and a little bit cracked. 

Leave the cookies to cool on the tray for a few minutes before transferring to a wire rack to cool completely. Cookies will keep if kept in a sealed container for up to a week.

In Chocolate, Biscuits and Cookies
1 Comment
Bang Insta (1 of 1).jpg

Sarah Kieffer's Pan Banging Chocolate Chip Cookies - Cookie Chronicles

Edd Kimber August 9, 2018

I have been meaning to make this recipe for a full year, yes my to-bake list is so ridiculously long and with my own baking and work to navigate it’s sadly rare that I actually get a chance to bake someone else’s recipe. You will know this recipe, I could show you a picture and you'd probably be able to guess just from the picture which recipe I was talking about. Sarah Kieffers Pan Banging Chocolate Chip Cookies are insanely popular, like all of the recipes in this series, but Sarah’s was one of the recipes I remember taking notice of because of its seemingly overnight success, it went truly viral. The recipe comes from Sarah’s wonderful book the Vanilla Bean Baking Book but it was probably the appearance of the recipe in the New York Times that pushed it into a wider consciousness, I can just imagine the sound of pans banging reverberating around the states the week after the recipe was featured. When I was in the states earlier in the year I met Sarah at one of our events with Bake From Scratch Magazine and she was a joy to meet and if you don't know who she is yet, make this post be your excuse to check out her brilliant work.

The Breakdown

As we will learn throughout this series the ingredients are all very familiar, we’re talking butter, sugar, eggs, vanilla flour and of course chocolate, but it is the ratio and the method that make this a little unusual. Firstly the amount of brown sugar is very low in comparison with the white sugar, this leads to plenty of crisp texture and a flavour that reminds me a little of the Toll House recipe. But what makes its so very different to that recipe is the size and method. The recipes starts off on familiar ground, creaming together the butter and sugar, then just one egg is added along with water (which I believe is there to help with spreading), the dry goods and the chocolate. Remember the Toll House recipe made 60 cookies, well this makes 10, that’s 10 gloriously huge cookies. Of course the main difference is declared right in the name, after baking for 10 minutes the pan the cookies are baking from is lifted from the oven and smacked on the surface making them collapse. This procedure is repeated multiple times creating a rippled effect which leads to a cookie with plenty of crisp edge but because of their size they remain soft and chewy in the middle.

Sarah Kieffer’s Pan Banging Chocolate Chip Cookies
From the Vanilla Bean Baking Book
Makes 10

2 cups (284g) all-purpose flour
½ teaspoon baking soda
¾ teaspoon salt
2 sticks (227g) unsalted butter, room temperature
1½ cups (297g) granulated sugar
¼ cup (50g) packed brown sugar
1 large egg
1½ teaspoons pure vanilla extract
2 tablespoons water
6 ounces (170g) bittersweet chocolate, chopped into bite-size pieces averaging ½ inch with some
smaller and some larger (I used roughly chopped 63% Guittard Chocolate Chips)

Preheat the oven to 180C (160C fan) and line two large baking sheets with parchment paper

To make the cookies mix together the flour, baking soda and salt. 

Place the butter into a large bowl and using an electric mixer beat together until creamy. Add the sugars and beat for 2-3 minutes on medium speed or until light and fluffy. Add the egg, water and vanilla and beat until fully combined. Add the dry ingredients and mix until combined, then stir in the chocolate. 

Form the cookies into 10 equal sized balls, they will be around 100g each or a heaping 1/3 cup. Place 4 cookies onto a large parchment or foil lined baking tray and freeze for 15 minutes, this helps prevent the cookies from spreading too much. Bake the cookies for 10 minutes then lift the tray from the rack, a good 4 inches then drop back, causing the cookies to collapse. Repeat this every two minutes until the cookies are golden brown around the outside but still a little pale in the middle, allow to cool completely before removing from the rack. Repeat the process with the remaining cookies. 

Result

I am a big fan of this recipe, its a little unusual both in size and method but there is something joyous about the recipe, its fun to make and the giant size of the cookie is a greedy child’s dream (yes I am referring to myself). I really like the resulting texture of crisp and chew the only thing I would probably prefer for my perfect cookie is a slightly smaller size with a little bit more body, but this is one hell of a delicious cookie and the pan banging technique is brilliant. Make sure you check out Sarah’s book and her brilliant website, you can also follow her on Instagram. 

In Chocolate, Biscuits and Cookies
Comment
Tollhouse (1 of 1)-2.jpg

Cookie Chronicles - Toll House Cookies

Edd Kimber August 7, 2018

I am on the hunt for the best chocolate chip cookie, and that means im currently on a diet solely consisting of cookies and milk. Is it even possible to find the one perfect recipe? Well i'm about to find out, I've partnered with Guittard Chocolate to go on a cookie adventure. This is the first in a six part series where I am putting some of the internets most popular recipes to the test to see if I can find the best one out there. Since we are talking the best, I thought it smart to start with the original, the cookie from which all other cookies sprang, the Toll House Cookie. Surprisingly I have never made this recipe despite its enduring popularity, but I put that down mainly to location. In the UK our knowledge of the recipe might stop at the episode of friends where Phoebe claims her grandmother invented the cookie (and yes the episode is definitely worth a rewatch), I'm not even sure I had a homemade chocolate chip cookie until I was in my late teenage years.

So what makes this recipe special? Why is it so popular? Well, to start with its been around a long time. The story goes that Ruth Wakefield invented the recipe in the 1930's when she owned the Toll House Inn, supposedly she wanted to make a chocolate cookie and chopped up a bar of dark chocolate and mixed it into her cookie dough. She was surprised to find that upon taking the finished cookies from the oven the chocolate had stayed in pieces. She loved the recipe, named them Chocolate Crunch Cookies and from their the recipe spread through the local community and then through the media and over the years it became what is surely the most popular chocolate chip cookie recipe out there. The interesting thing to note is that the cookie follows a lot of principles we use for cookies today and the resulting recipe is pretty similar to a lot of other cookie recipes out there, it definitely feels like the kicking off place for a lot of different chefs. 

The Breakdown

The ingredients are fairly standard, using plain/AP flour, baking soda, butter, caster and light brown sugar, vanilla, eggs and of course chocolate chips. The suggested size of the cookies is much smaller than average and due to the high ratio of white sugar (compared to most cookie recipes that use more light brown than caster) we can expect these cookies to be on the crisper side, which as anyone who loves cookies knows is a topic of controversy. Crisp or Chewy is the eternal cookie question after all. I will say my preference is a little crisp around the edges with chewy and soft middles. The original recipe also includes the option of chopped nuts but personally I like my cookies unadulterated so its pure chocolate for me.

Toll House Cookie Recipe
Makes 60

2 1/4 cups 315g plain/all purpose flour
1 tsp baking soda
1 tsp salt
2 sticks 225g unsalted butter, room temperature
3/4 cup 150g granulated/caster sugar
3/4 cup, packed 165g light brown sugar
1 tsp vanilla extract
2 large eggs
12 oz 340g chocolate chips - I used Guittard 66% chips (see note below)

Preheat the oven to 375F 190C and line two baking sheets with parchment paper. 

Whisk together the flour, baking soda and salt. In a large bowl using an electric mixer beat together the butter and sugars until creamy, about 2-3 minutes. Add the vanilla and beat briefly to combine. Beat in the eggs one at a time, beating until fully combined before adding the second. Gently mix in the flour mixture, just until combined then briefly mix in the chocolate chips, until evenly distributed. 

Form into tablespoon sized portions (I like to use spring loaded ice cream scoops for this, they come in all different sizes and make this job much easier and quicker) and place on the prepared baking trays, a couple inches apart. 

Bake for 9-11 minutes or until golden brown. Cool on the trays for a couple minutes before transferring to a wire rack to cool completely. 

Result
First off, this recipe makes a whole lot of cookies, 60 of them! These are so much smaller than todays cookies but the batch of dough roughly the same that this recipe churns out a lot of cookies so it would be great for a party. The cookies have a real crisp base and sides, have that real classic cookie flavour and because its a simple flavour the flavour of the chocolate really shines through. For my tastes they fall a little too far on the thin and crispy style of cookies but I can absolutely see why these are so popular, theyre incredibly simple to make, have a lovely flavour and for a lot of people who grew up on them, that will add a huge nostalgia hit and with baking that can never be underestimated.

Note: When it comes to chocolate chips not all are born equal. When looking to buy a chip for these cookies you need to have a look at the ingredients list. There should be nothing but chocolate, no vegetable fats, no oils nothing but cacao beans (in the form of solids, butter), sugar, vanilla and soya or sunflower lecithin, anything else added means it shouldn't be considered a quality dark chocolate and the taste and melt will be affected.

In Chocolate, Biscuits and Cookies
1 Comment
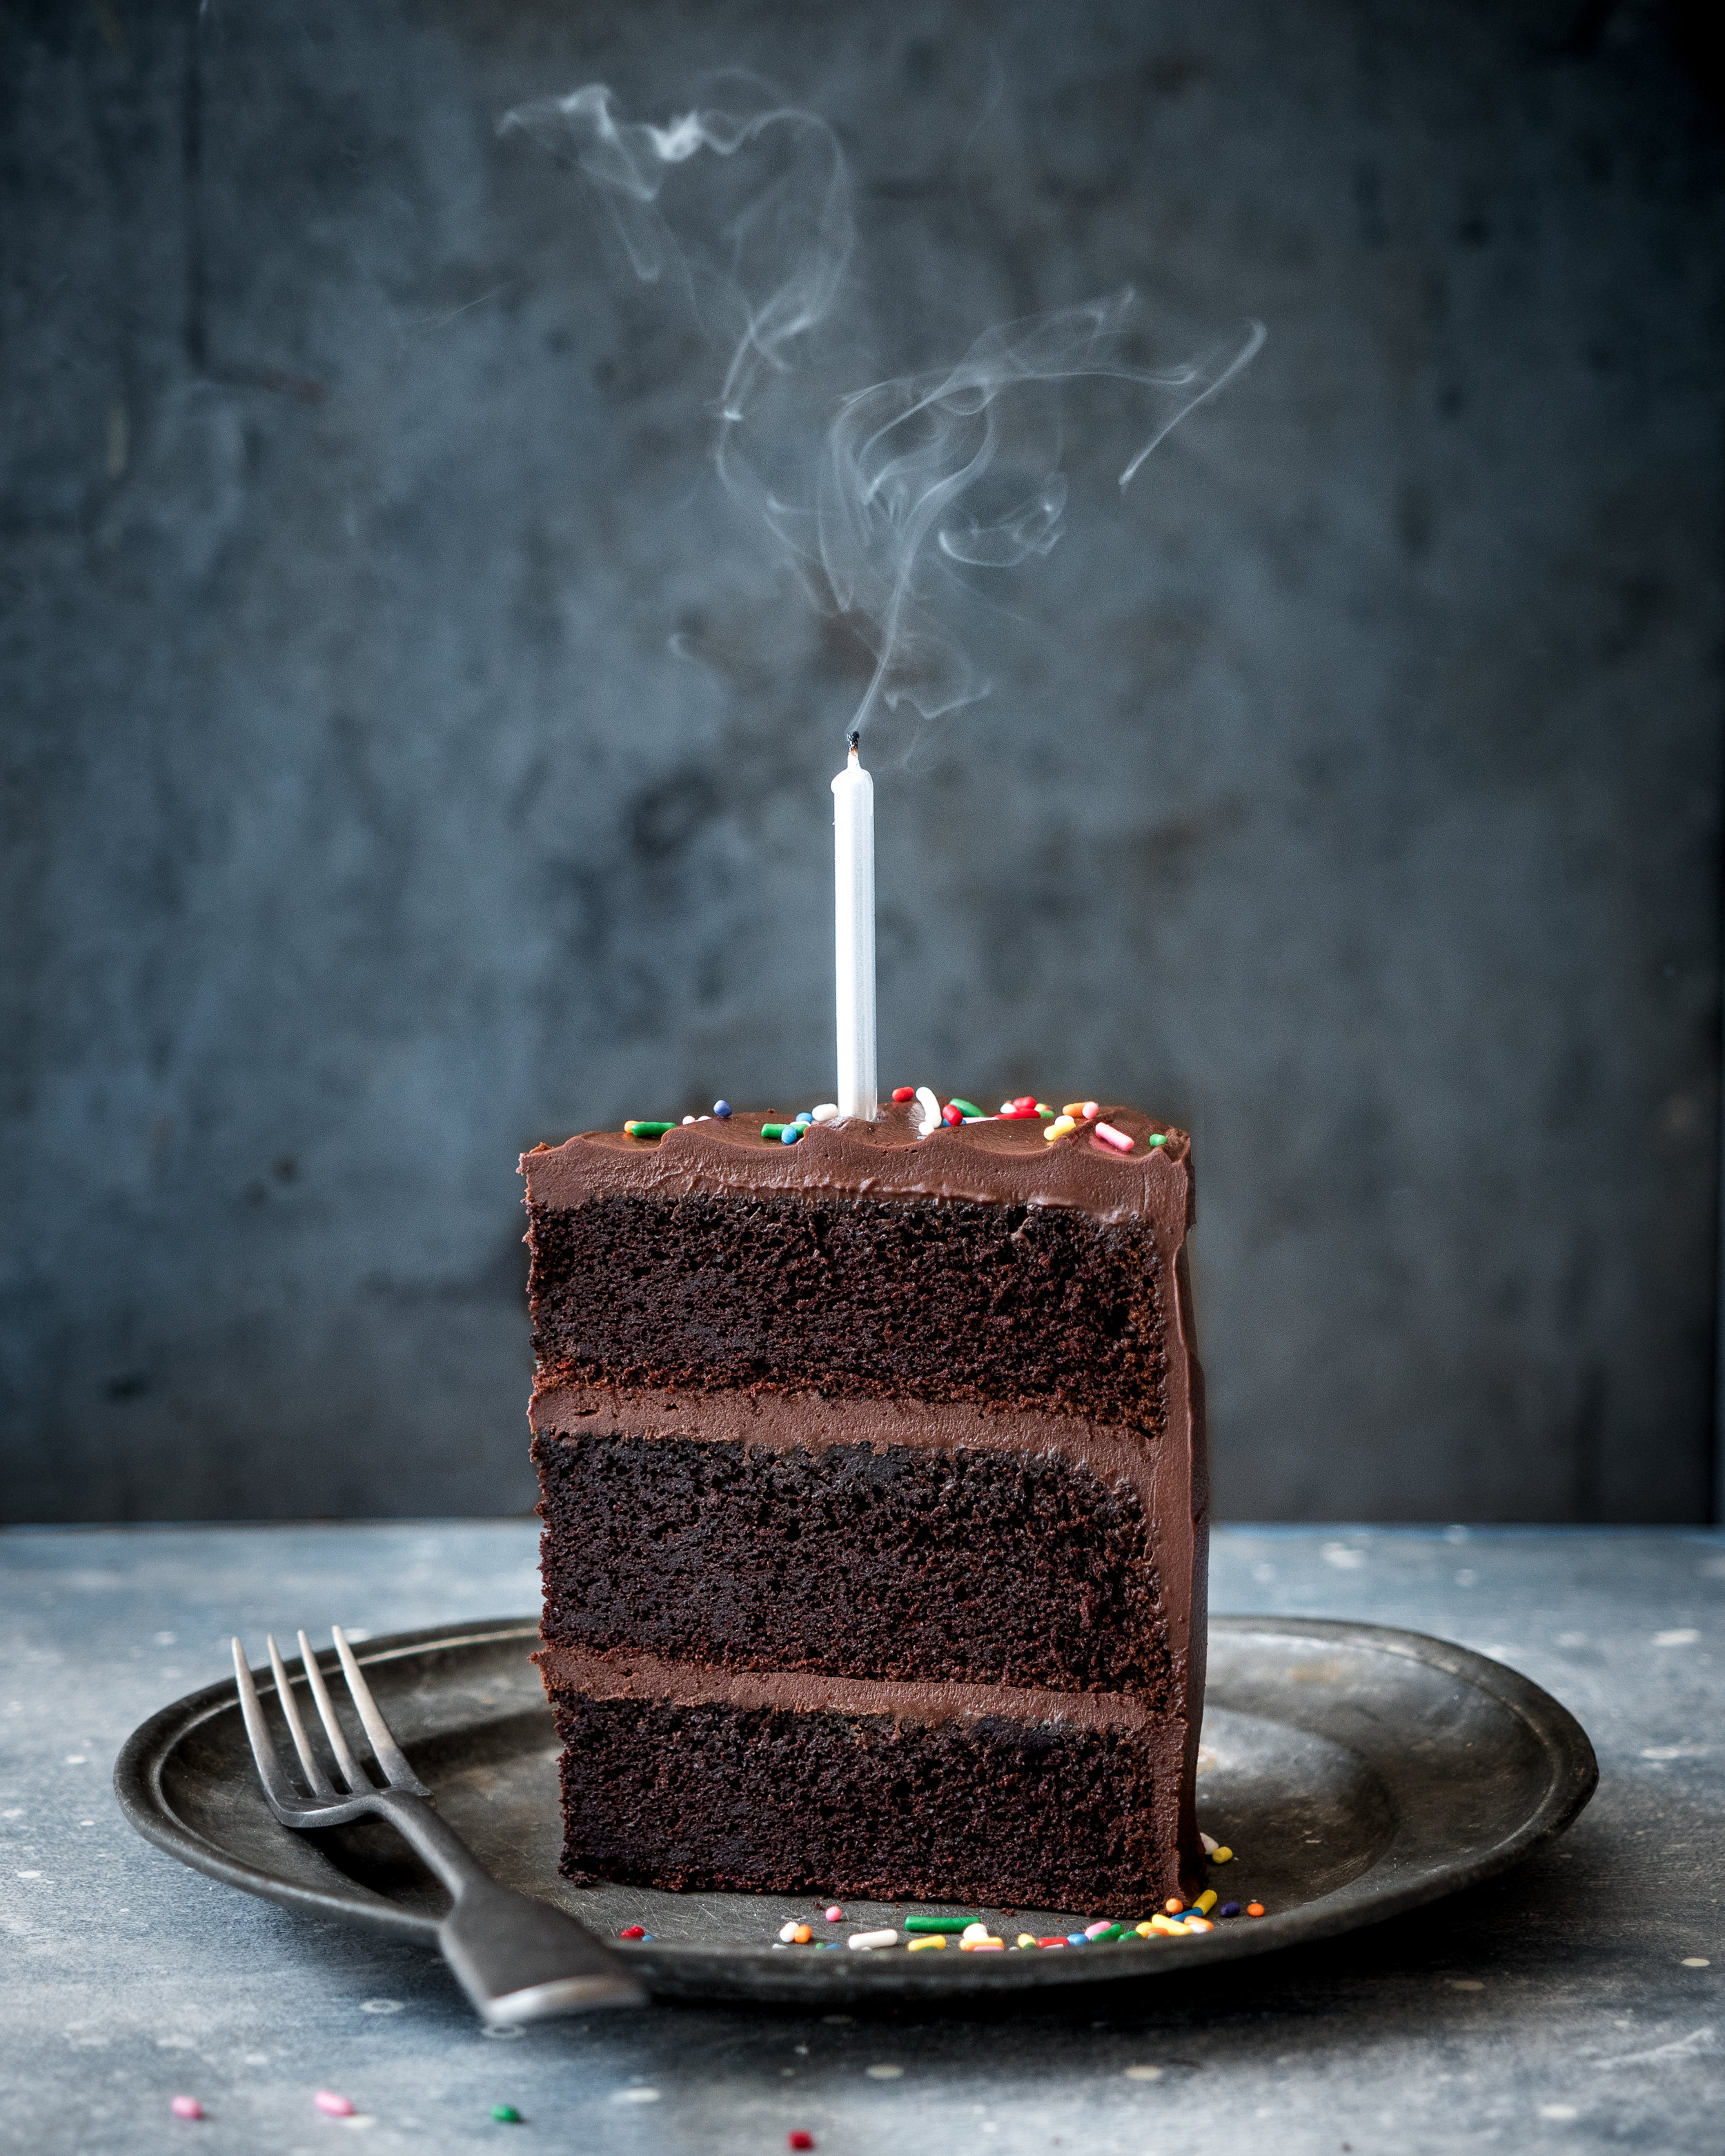
birthday cake slice (1 of 1).jpg

Devils Food Cake

Edd Kimber June 7, 2018

What is the birthday cake of your dreams, the one you had as a kid and secretly crave every year. It has to be the Devils Food Cake right? A rich, moist layer cake that packs a hell of a chocolate punch and fulfils all your childhood nostalgia needs, it’s the perfect chocolate cake and the one I make time and time again. I have been playing around a lot with chocolate cakes recently, trying to develop something extra special and whilst I was playing around in the kitchen I saw the recipe for Stella Parks’, aka Bravetart’s, Devils Food Cake. At first glance it looked to me like the perfect example of a devils food, the perfect crumb, the perfect colour and layers that stood tall and proud. I was doubly sold on the recipe once I realised it was basically an all in one method, no stand mixer needed here! The desire to bake it was stuck in my head so I got in the kitchen and gave it a whirl and guys, it is one of the easiest and best chocolate cakes I have ever made, so much so that I had to share it with you (and you know how rarely I post other peoples recipes). 

The recipe comes from Stella’s incredible book BraveTart, a dream of a book that was clearly written over a long period of time with a hell of a lot of testing, which is sadly not as common as you would think for baking books. If you love baking you have to get this book, I think it is one of the best baking books in years! But back to the cake. A classic Devils Food needs to be frosted with something nostalgic, something like a quick fudge frosting (which I generally find a tad too sweet), so I decided to use a sour cream ganache frosting that I had originally developed for a different cake. It has the gloss and texture of the lightest buttercream but the full on chocolate flavour you get from a ganache. In my version I only use a portion of sour cream to double cream simply because I find versions made with 100% sour cream have too much tang that gets in the way of the chocolate flavour, just a little tang however really helps to lift the flavour and balance out the sweetness in the cake. 

If you don't already go and follow Stella on Instagram and check out her book BraveTart, she is also resident pastry wizard over at SeriousEats so make sure to check out all her new recipes on there too.

Devils Food Cake
Recipe by Stella Parks, aka Bravetart from her brilliant book BraveTart

340g unsalted butter
340ml brewed black coffee
85g dutch-process cocoa powder, I used Guittard
170g dark chocolate, around 72% cocoa solids
455g light brown sugar
1 tbsp vanilla extract
6 large eggs, cold from the fridge
3 large egg yolks, cold from the fridge
255g plain flour
1 tbsp baking soda
1/2 tsp fine salt

Chocolate Sour Cream Frosting
Recipe by Edd Kimber

400g dark chocolate, around 70% cocoa solids
50g unsalted butter
75g light brown sugar
large pinch flaked sea salt
400ml double cream
150g sour cream

To make the cake preheat the oven to 180c (160c fan) and lightly grease 3x20cm round cake pans and line the base with parchment paper, Stella recommends deep tins 3 inch deep pans instead of the more common sandwich tins as with shallower tins the cakes are more likely to dome and rise less. 

Place the butter and coffee together in a large bowl and set over a pan of simmering water and heat, stirring occasionally, until the butter is fully melted. Remove the bowl from the heat and add the cocoa powder and chocolate and mix together until the chocolate is melted. Add the light brown sugar and vanilla and mix together until combined, as brown sugar has a tendency to clump make sure to work out any big lumps of the sugar. Add the cold eggs and egg yolks and whisk into the batter until fully combined. Finally mix together the flour, baking powder and salt and sieve over the chocolate mixture, mixing together until just combined. 

Divide the batter between the prepared pans, preferably weighing to make super equal layers, and bake in the preheated oven for about 30 minutes or until the cake is starting to come away from the sides of the pan and springs back to a light touch. Allow the cakes to cool in the pans for 10-15 minutes before inverting onto wire racks to cool completely. 

To make the frosting place the chocolate into a heatproof bowl and set over a pan of simmering water and heat, stirring regularly, until fully melted. At the same time place all the remaining ingredients, except the sour cream, into a small saucepan and place over medium heat and cook, stirring frequently until the the butter and sugar has melted and the mixture is smooth. Remove both from the heat and combine together. As this ganache has a high proportion of liquid I find it useful to make this ganache a slightly different way to what I normally do (this is a more traditional/professional way of making ganache). Pour the cream over the chocolate in three additions, stirring  gently in the middle of the bowl until the two mixtures are combined and a super glossy finish is achieved. Doing it in three additions like this makes sure the emulsion of the ganache is very stable and is unlikely to split. Finally add the sour cream and fold into the ganache. Set this mixture aside until it has thickened enough to spread and use like a regular frosting. 

To assemble the cake first use a serrated knife to level the cakes, if needed. Place the first cake layer onto a plate or cardboard cake round and spread with a small amount of the frosting (I use an ice cream scoop to measure out the frosting so the amount going between each layer is equal) spreading it so it is just peaking out over the sides, but just barely. Repeat with the second layer of cake and then finally add the third cake layer and top with the remaining frosting spreading over the top and sides of the cake, decorating in whatever manner you prefer.

One of the wonderful things about Stella’s Devils Food is that it stays fresh for a surprisingly good amount of time, I have now made this cake multiple times and have served it up to five days after baking and people were still incredibly complimentary which is a big plus for me with this cake.

In Cakes, Chocolate
10 Comments
  • Recipes
  • Older
  • Newer

Twitter

  • Was 8 original films, 3 spin off films, a two part play not enough. Can we have something new. https://t.co/cBZdGEGeyv
    Apr 4, 2023, 1:46 PM
  • RT @deliciousmag: Cacio e pepe, but make it buns! These seriously cheesy bread rolls from @TheBoyWhoBakes are inspired by his favouri… https://t.co/oDZlaDgnN2
    Apr 2, 2023, 11:08 AM
  • RT @TheDailyShow: Congrats to Donald Trump on finally winning a majority of votes! https://t.co/ezP55HZgl0
    Mar 31, 2023, 12:43 AM

Instagram

This weeks bonus recipe, for subscribers to my newsletter, is this gorgeous sour cherry and coconut gateau basque. The crust is a buttery cross between pastry and cake, think a cakey cookie. The filling is a layer of sour cherry topped with a rich coconut custard. A real fun one to make too! Link to my newsletter can be found in my bio - #gateaubasque #pastrycream #coconut #sourcherry
In this months @olivemagazine (out today) the team came and photographed my petit kitchen and we talked about how we put our stamp on the place, without spending a fortune. We hated the bland kitchen that we inherited but, as it was relatively new an
In this months @olivemagazine (out today) the team came and photographed my petit kitchen and we talked about how we put our stamp on the place, without spending a fortune. We hated the bland kitchen that we inherited but, as it was relatively new and in good condition, it felt a waste to rip it out and we also didn’t want to spend the money it would take to rip out the whole thing and replace it (it’s a howdens shell so we could have done something cheaper like @plykeakitchens @holte.studio @madebyhusk) so instead I painted all of the cabinets, using @makeitrustoleum kitchen cabinet paint, to give it some personality and lighten the whole thing. Check out the magazine for the full run down. - #kitchendesign #kitchenremodel #rustoleumcabinettransformations #rustoleumkitchencupboardpaint #kitcheninspiration #theboywhobakes #olivemagazine
Are you making scones all wrong? Maybe, maybe not? But I do want to show you how I make them! This recipe is based on the method I learnt at @belmondlemanoir 12 years ago when I did a stage, and it makes the absolute lightest scones. And shock horror, it involves kneading the dough, albeit very lightly. You can get the full recipe in this weeks newsletter (free) linked in my bio. - #scones #bakingday #worldbakingday #afternoontea #hightea #englishscones #clottedcream #creamtea #theboywhobakes
facebook
  • Contact

The Boy Who Bakes

Edd Kimber

facebook