The Boy Who Bakes

Edd Kimber
  • Home
  • Recipes
  • My Books
  • Blog
  • Recipe Index
  • About
  • Home
  • Recipes
  • My Books
  • Blog
  • Recipe Index
  • About

Recipes

  • All
  • baking
  • Biscuits and Cookies
  • Breads and Quickbreads
  • Bundts
  • Cakes
  • Chocolate
  • Dessert
  • drinks
  • Holidays
  • Pastry
  • Scones and Quickbreads
Tate and Lyle-5.jpg

Orange and Passion Fruit Chocolate Cake

Edd Kimber November 5, 2019

Orange and Passion Fruit Chocolate Cake

This post is sponsored by Tate & Lyle Sugars

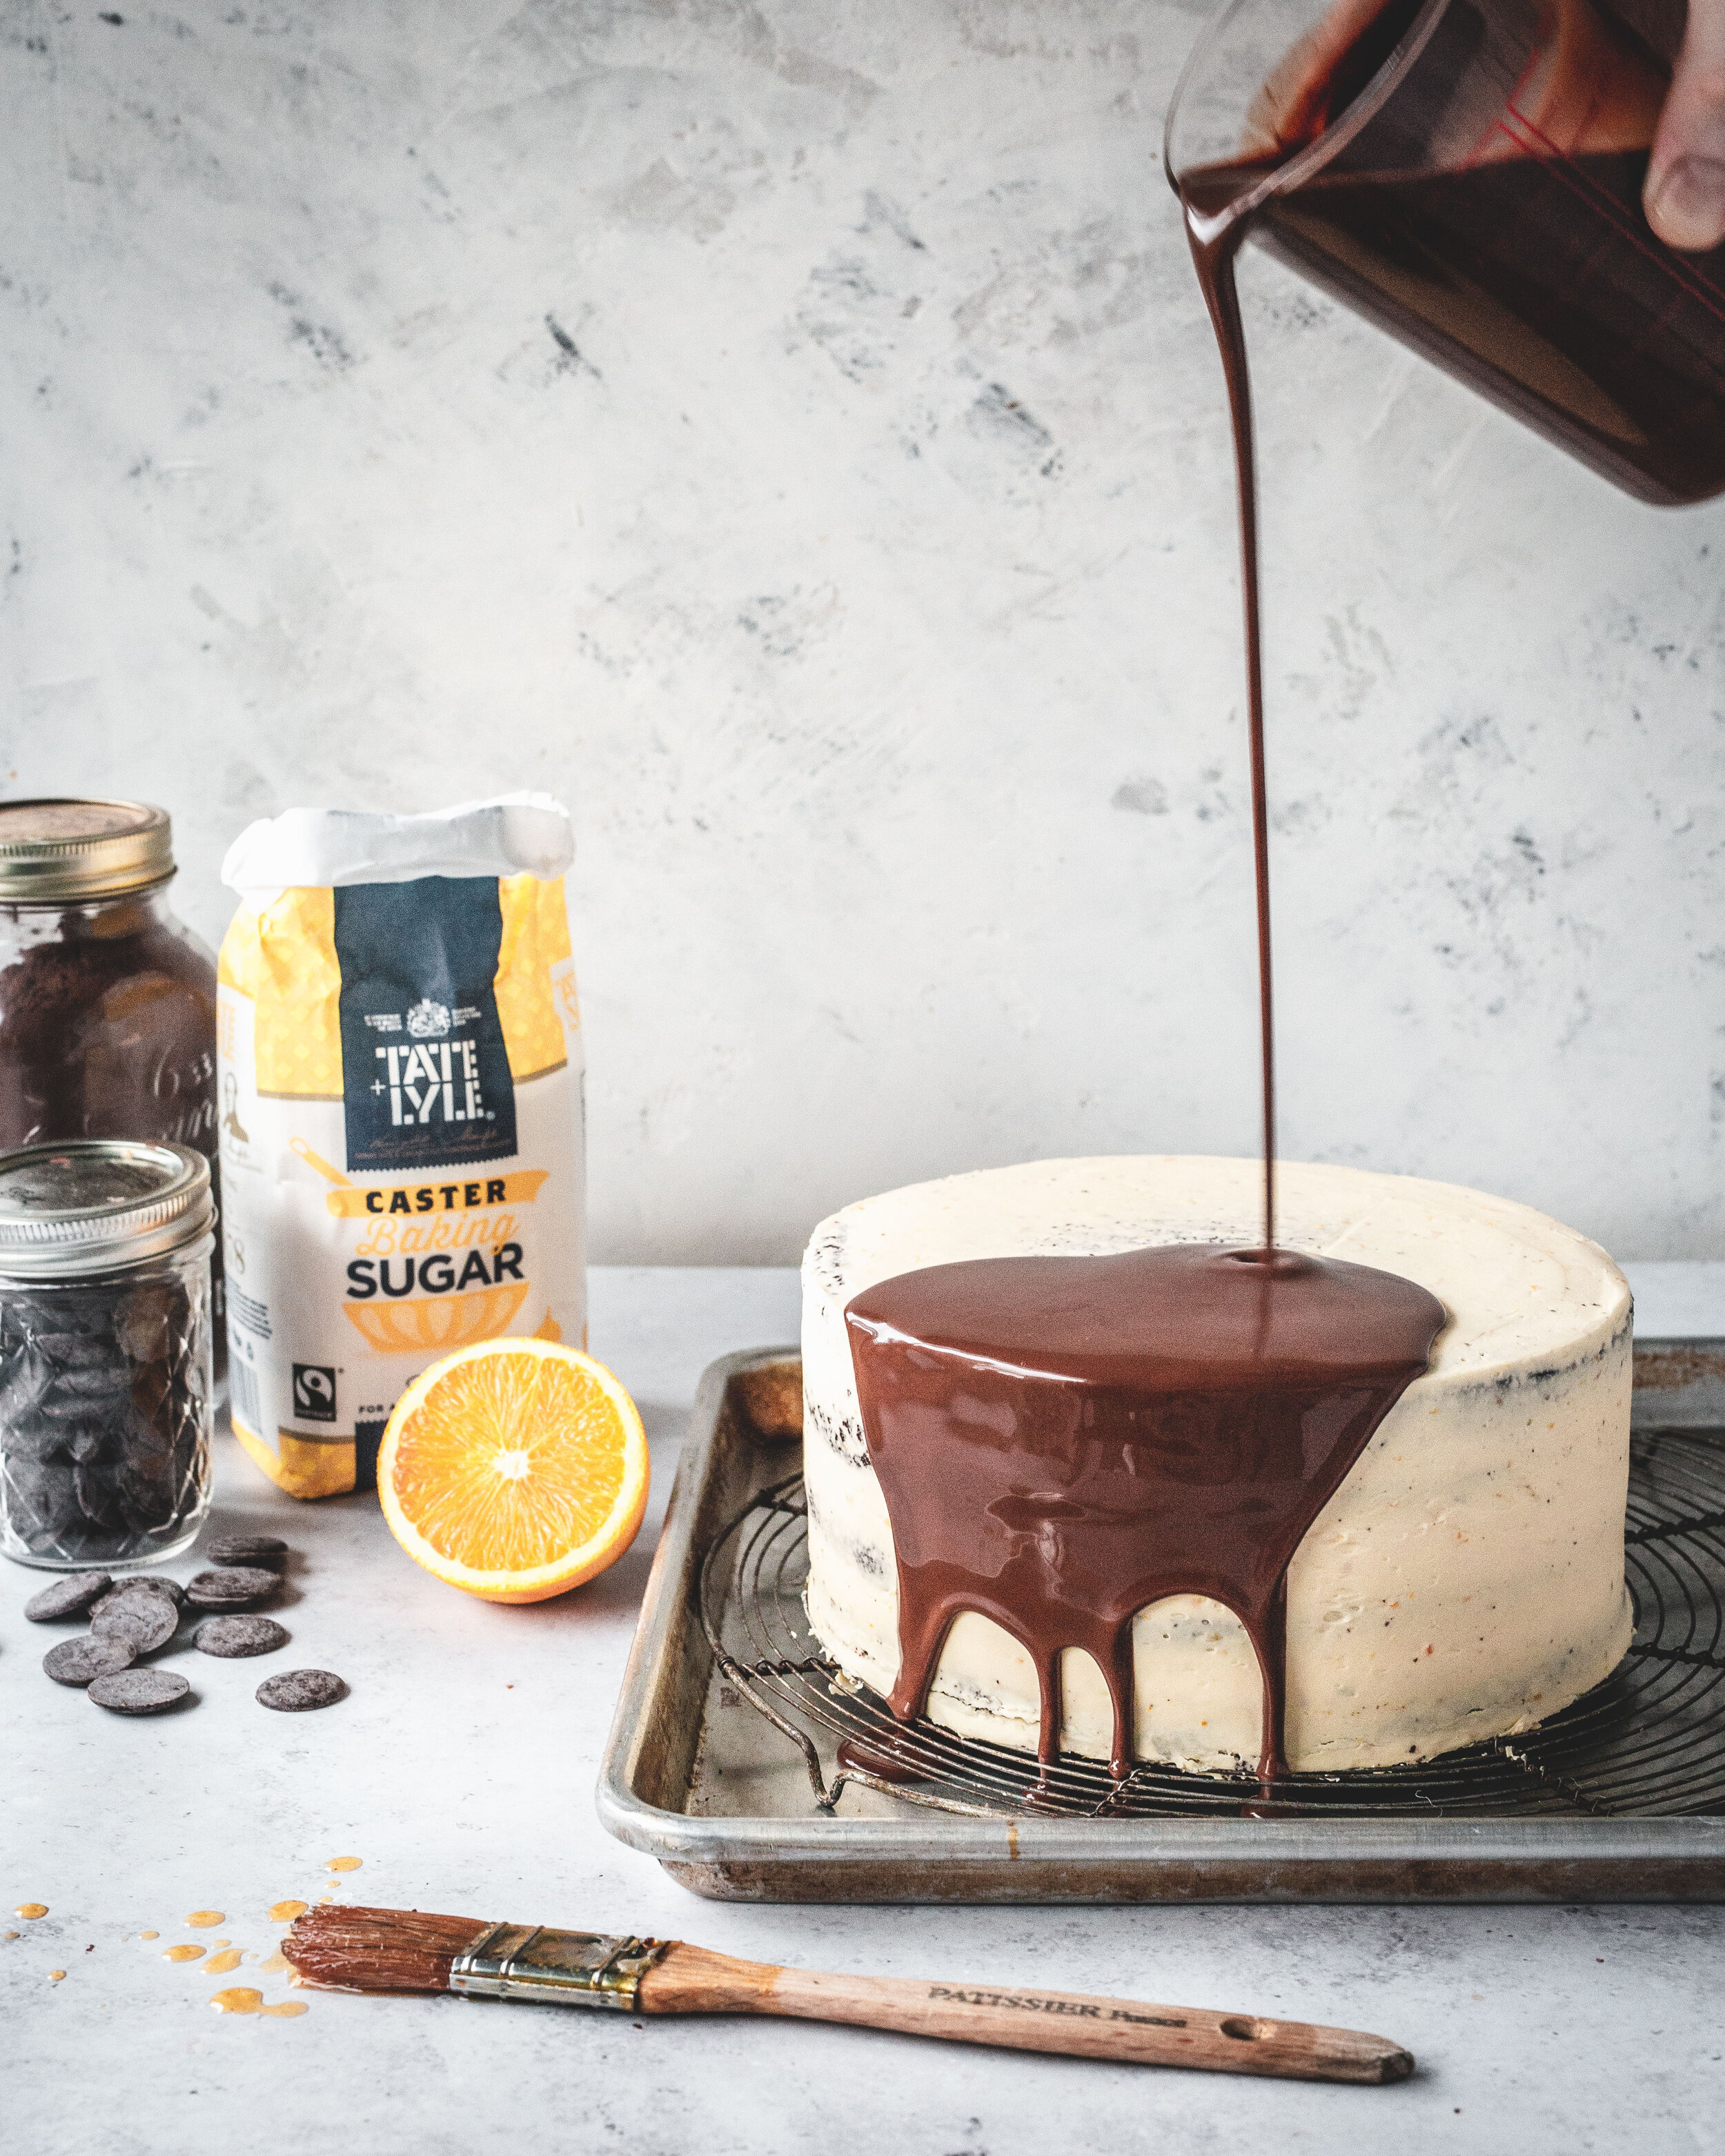
It has been 9 years and 10 seasons of Bake Off since the day I first stepped into that famous tent and it’s still hard to believe that much time, and that many bakers have passed through the tent, it still feels like yesterday when I heard those words ‘ready, set, bake’ for the first time. To celebrate 10 seasons I have paired up with Tate and Lyle sugars to create a recipe inspired by the season 10 finale. As one of the challenges was to make a chocolate cake I wanted to give you a recipe for an impressive chocolate cake that is achievable at home but still gives you the wow factor you’d expect from Bake Off. For that recipe I have turned to a simple one bowl chocolate cake and paired it with an orange and passion fruit buttercream which makes for a delicious flavour pairing. To make it extra special the cake uses a mainstay of the show, a mirror. glaze. Whilst mirror glazes are beautiful they’re often a cocoa powder gelatine mixture that to me isn’t the most flavourful so instead I am using a cheats glaze that is a simple ganache based glaze with some golden syrup to make the glaze nice and shiny. 

Chocolate Cake
250g plain flour
75g cocoa powder
1 tsp baking powder
2 tsp baking soda
1/2 tsp salt
300g Tate & Lyle Light Soft Brown Cane Sugar
2 large eggs
100ml oil (you can use something neutral tasting or olive oil)
225g sour cream
225ml hot coffee

Passion Fruit Syrup
100ml passion fruit puree
75g Tate & Lyle Caster Pure Cane Sugar

Orange and Passion Fruit Buttercream
3 large egg whites
240g Tate & Lyle Caster Pure Cane Sugar
Zest of 1 large orange
360g unsalted butter, room temperature
2 tbsp orange juice
2 tbsp passion fruit puree

Cheats Chocolate Mirror Glaze
130g dark chocolate, finely chopped
250ml double cream
2 tbsp Lyles Golden Syrup
Edible gold leaf, for decoration

To make the cake lightly grease 2x20cm round cake tins (do not use thin sandwich tins, they need to be at least 3 inch deep) and line the bases with parchment paper. 

Sieve the flour, cocoa, baking powder, baking soda, salt and Tate & Lyle Light Soft Brown Cane Sugar brown sugar into a large bowl and use a whisk to combine so everything is evenly combined. Make a well in the middle of the bowl and pour in the remaining ingredients and whisk together until a smooth cake batter is formed. Divide the batter between the prepared tins and bake in the oven for about 30 minutes or until the cakes springs back to a light touch and are slightly pulling away from the sides of the tin. Remove the cakes from the oven and allow to cool for 15 minutes before inverting onto a wire rack to cool completely.

To make the syrup place the puree and Tate & Lyle Caster Pure Cane Sugar into a small saucepan and cook over medium heat until simmering and the sugar has dissolved. Remove from the heat and set aside to cool. 

To make the buttercream place the egg whites, Tate & Lyle Caster Pure Cane Sugar

and orange zest in a heatproof bowl. Place the bowl over a pan of simmering water and whisk gently until the sugar has dissolved (you can tell the mixture is ready when you rub a little between your fingers and you can no longer feel any grains of sugar). I use caster sugar for this but if you want a little more caramel flavour you can use Tate & Lyle Golden Caster Pure Cane Sugar. For this cake I wouldn’t use a brown sugar for the frosting as it will mask the fruity flavours we want to be the focus. Remove the bowl from the heat and use an electric mixer to whisk on high speed until the meringue is thick, glossy and cooled to room temperature. With the mixer still running add the butter a piece at a time. When all the butter has been added and the mixture has formed a buttercream like texture add the orange juice and passion fruit puree, beating for a couple minutes until fully combined. 

To assemble the cake use a serrated knife to slice each cake into two even layers. Place one cake layer on a plate or cake and brush with the passion fruit syrup. Spread a thin layer of buttercream on top of the cake and repeat with the remaining layers. Scrape the remaining buttercream on top of the cake and spread over the top and sides of the cake in a thin layer, making it as smooth as possible. Place the cake into the freezer whilst you make the glaze.

Place the chocolate into a jug and the remaining ingredients into a small saucepan. Place the pan over medium heat and bring to a simmer. Pour the cream over the chocolate and set aside for a couple minutes before stirring together to form a smooth chocolate glaze. Set aside until room temperature but still pourable. Remove the cake from the freezer and place onto a wire rack set on a baking tray. Pour the glaze over the cake, allowing it drip down the sides making sure the entire cake is covered. Allow the glaze to set for about 30 minutes before decorating with the gold leaf. Carefully transfer the cake back to the plate or stand. 

Once assembled the cake will keep for about 3 days although the shine on the glaze will be strongest in the first day or so.  

Tate and Lyle-4.jpg
In Cakes, Chocolate
1 Comment
Espresso and Rye Chocolate Chip Cookies (1 of 1).jpg

Espresso and Rye Chocolate Chip Cookies

Edd Kimber August 15, 2019

Let’s face it, in the world of baking there is little better than a still warm from the oven chocolate chip cookie. Cookies hit all the right notes of nostalgia; texture, flavour and ease of preparation. Even though a classic chocolate cookie is basically my idea of perfection that doesn’t mean we shouldn’t play around with them a little (or in my case a lot). Ever since I tried the chocolate and rye cookies served at Tartine Bakery in San Francisco I have used this grain to give my cookies and cakes a boost and the flavour brought by the flour really marries beautifully with chocolate. For a third dimension of flavour I have added a healthy dose of coffee which makes these extra special.

When it comes to the choice of chocolate I generally stick to something around 70%, not because this is an indicator of quality (it only shows what the chocolate is made with not what the quality of those ingredients are) for these cookies I like to use something around 60%. Because the cookies use a secondary bitter ingredient in the form of the coffee using a slightly sweeter chocolate makes these a little more rounded in flavour and a little less bitter. Of course this is personal preference, feel free to use whatever chocolate you like, a milk chocolate could be amazing in this, I could even imagine a toasted white chocolate being the perfect thing for these cookies.

Espresso and Rye Chocolate Chip Cookies
Makes 18-20

225g unsalted butter, diced

3 tbsp freshly ground coffee

200g plain flour

200g dark rye flour

1/2 tsp salt

3/4 tsp baking powder

3/4 tsp baking soda

200g light brown sugar

150g caster sugar

2 large eggs

2 large egg yolks

1 tsp vanilla extract

340g dark chocolate, roughly chopped (see note)

flaked sea salt, for sprinkling

To make the cookies place the butter into a small saucepan and cook over medium/high heat until fully melted and just starting to bubble. Remove from the heat and add the coffee, stirring into the butter, setting aside to cool slightly. 


Meanwhile mix together the flours, salt, baking powder and soda and set aside. Pour the butter into a large bowl and mix in the sugars followed by the eggs, yolks and vanilla and whisk together until fully combined and uniform. Add the flour mixture and use a wooden spoon to mix together until uniformly mixed. Add the chocolate and mix briefly to distribute evenly. Press a sheet of clingfilm onto the surface of the cookie dough and refrigerate for at least 4 hours but preferably overnight.

When ready to bake preheat the oven to 180C (160C fan) and line a few baking trays with parchment paper.

Divide the dough into 60g portions and roll into balls, you could also just for these with my favourite tool, the old fashioned mechanical ice cream scoops. Place cookies onto the prepared baking trays a few inches apart and sprinkle with a little flaked sea salt. Bake in the preheated oven for about 14-16 minutes or until the cookies are golden around the outside but still a little paler in the middle. Remove the trays from the oven and allow the cookies to cool for 10 minutes before transferring to a wire rack to cool completely.

Kept in a sealed container these will keep for 3-4 days.

In Biscuits and Cookies, Chocolate
27 Comments
chocoalte caramel tart.jpg

Peanut Butter and Pretzel Caramel Tart

Edd Kimber August 6, 2019

I am currently working away on a project that I am super excited about but it is taking up a lot of my time so I am currently going through my archive to find recipes to share with you guys, to tie you over until the project is finished. Whilst looking for recipes I remembered this tart that I never got around to sharing. It was initially included in a pitch for a big piece of work I wanted to do around chocolate that ended up never getting a green light and sadly I forgot about it. Sadly because seeing the pictures reminded me just how wonderful this dish is. So enjoy it, finally!

Sweet and salty isn’t unusual these days, it’s to be expected. We all now generally understand that just like savoury food sweet things need seasoning and with ingredients like chocolate and caramel sometimes a little salt can help to enhance and highlight flavour whilst balancing the sweetness. This simple tart takes this idea and dials it up to eleven. The crust uses a simple biscuit style base, think the type of base you’d make for a cheesecake. The difference though is egg white. I love the texture of biscuit bases but find them a little tricky when you want nice neat slices, they’re just two crumbly. The addition of an egg white helps to bind the mixture together and makes it a lot easier to work with. Peanut butter and chocolate are a classic combo and anyone who’s ever opened a pack of peanut butter cups will know, a dangerously addictive one at that. The ganache used in this tart is made with a mixture of dark and milk chocolates, milk for the creamy sweetness that goes wonderfully with peanut butter but dark chocolate from preventing the tart from being too sweet.

chocoalte caramel tart-3.jpg


Serves 12

Peanut Pretzel Biscuit Base
50g salted peanuts
100g salted pretzels
75g digestive biscuits (or graham crackers)
100g unsalted butter, melted
1 tbsp light brown sugar
1 large egg white

Peanut Butter Caramel
225g caster sugar
180ml double cream
20g unsalted butter
1/2 tsp salt
2 heaped tbsp smooth peanut butter

Ganache Topping
140g dark chocolate, 65%-75% cocoa solids, finely chopped
140g milk chocolate, 40%-50% cocoa solids, finely chopped
20g unsalted butter
150ml double cream

For the biscuit base finely crush the peanuts, pretzels and digestives into a fine crumb then mix together with the butter, brown sugar and the egg white. Press into a loose bottomed 9 inch round tart tin, using your hands or a flat bottomed glass to compact into the base and up the sides of the pan. Bake in an oven preheated to 180C (160C fan) for about 10-12 minutes just until the biscuit base is set and starting to brown slightly. Remove from the oven and set aside to cool.

To make the caramel filling place the sugar into a medium sized saucepan and cook over medium heat until the sugar has melted and caramelised, turning the colour of an old rusty penny. Carefully pour in the cream, stirring gently until the caramel is smooth then add the butter and salt and mix until combined. Remove from the heat and allow to cool down for 10 minutes before stirring in the peanut butter. Pour the caramel into the cooled tart, spreading into an even layer. Refrigerate for an hour or so until the caramel is firm.

Meanwhile place the chocolates for the ganache into a heatproof bowl, set over a pan of simmering water and heat, stirring occasionally, until the chocolate is fully melted. Place the butter and cream into a small saucepan and bring to a simmer. Remove the pan from the heat and pour the cream over the chocolate and set aside for a couple minutes before stirring to form the ganache. Set the bowl aside until the ganache has thickened into the consistency of whipped cream. Dollop the ganache onto the tart and spread out, almost to the edges. Set aside at room temperature for a couple hours to allow the ganache to fully set. When ready to serve sprinkle the ganache with a little flaked sea salt.

Best served on the day made but can be refrigerated for up to 4 days just allow to come to room temperature before serving.

chocoalte caramel tart-2.jpg
In Pastry, Chocolate Tags peanut butter, caramel, pretzel, press in crust, salted caramel, chocolate, ganache, tart
6 Comments

Peanut Butter Ice Cream Sandwiches

Edd Kimber May 24, 2019

I know I am a week late posting this recipe and I apologise for that, maybe the idea that I was going to edit the video for these cookies on my flight to Hong Kong was a tad ambitious. Either way I hope the wait was worth it, I certainly think so, plus at least the weather has changed to a more appropriate summer vibe. The ice cream last week was delicious, whether served on its own, as a sundae or just eaten straight from the freezer with a spoon, but then what monster would eat it like that! But, I think we could take it one step further and use it make peanut butter ice cream sandwiches. What better cookie for this than a peanut butter shortbread, dipped in chocolate? I know shortbread isn’t the go-to cookie for this sort of recipe but here me out as I think it’s the kind off perfect vehicle for ice cream. The texture of the shortbread means this is an easy cookie to eat, even frozen they have very little resistance and chew whereas a chocolate chip style cookie can become very firm and chewy in the freezer making it a little harder to eat. Also because this ice cream has such a delicious flavour already I wouldn’t want to overpower it with something more elaborate and the shortbread cookie just helps to intensify the peanut butter flavour. I don’t really know why I am trying too justify this recipe, knowing full well the picture was probably the only thing needed to convince you guys to make it immediately.

Peanut Butter Ice Cream Sandwiches
Makes 12

Peanut Butter Shortbread Style Cookies
125g unsalted butter, room temperature
200g light brown sugar
300g smooth peanut butter
1 large egg
1 tsp vanilla extract
225g plain flour
1 tsp baking powder
1/2 tsp fine sea salt

1 x batch peanut and caramel ice cream

Homemade Magic Shell
100g dark chocolate
1 tbsp coconut oil


To make the cookies, place the butter and sugar into the bowl of a stand mixer and, with the paddle attachment, beat together on medium speed for about 5 minutes or until light and fluffy. Add the peanut butter, egg and vanilla and beat for a couple minutes more until fully incorporated. Finally, add the flour, baking powder and salt and mix together just until the flour disappears into the butter mixture. Don’t over mix the dough at this point as it will make the finished cookies tough and chewy.

Scoop the finished dough into a bowl and refrigerate for an hour before using. To form the cookies line a couple baking trays with parchment paper and preheat the oven to 180C (160C fan). Roll the dough into roughly tablespoon sized balls and use a glass dipped in flour to press them into discs just a tad over 7cm wide. The edges will be a little rough so use a 7cm round cookie cutter to trim the edges so you have nice smooth round discs of cookie dough. The cookies don’t really spread but make sure they’re have a little space just in case.

Bake in the preheated oven for about 18-20 minutes or until the edges are starting to turn golden brown. Remove from the oven and allow to cool on the baking trays for a couple minutes before transferring to a wire rack to cool completely.

Peanut+Caramel+Ice+Cream+%281+of+1%29-2.jpg

To assemble the ice cream sandwiches place a scoop of the peanut ice cream onto one of the cookies and gently press together with another cookie. Because these cookie are in the shortbread style its best to press from the centre of the cookie rather from the edges, which would likely end up in more broken cookies. The recipe makes a few more cookies than needed so don’t worry too much if you break one or two. The ice. cream recipes makes an ice cream with a perfect texture, nice and scoopable straight from the freezer. If you make this with a shop bought ice cream you may want to let it soften slightly before assembling the cookies. Place the sandwiches back in the freezer to firm up the ice cream whilst you make the homemade magic shell.

To make the magic shell, melt the chocolate in a bowl set over a pan of simmering water. Once melted stir through the coconut oil, making sure it is evenly distributed. Remove from the heat and set aside to cool. You want the chocolate shell runny but cool. Too hot and the ice cream will melt when dipped into the shell.

When ready, dip one sandwich cookie at a time halfway into the chocolate mixture. Allow the excess chocolate to dip back into the bowl then transfer to a piece of parchment. If you want sprinkle with a few chopped peanuts before the chocolate sets, and it should set fast, within a minute or so. Transfer the cookies to the freezer until you’re ready to serve. As this uses homemade ice cream these will be best within a week or two.

In Biscuits and Cookies, Chocolate
3 Comments
  • Recipes
  • Older
  • Newer

Twitter

  • Was 8 original films, 3 spin off films, a two part play not enough. Can we have something new. https://t.co/cBZdGEGeyv
    Apr 4, 2023, 1:46 PM
  • RT @deliciousmag: Cacio e pepe, but make it buns! These seriously cheesy bread rolls from @TheBoyWhoBakes are inspired by his favouri… https://t.co/oDZlaDgnN2
    Apr 2, 2023, 11:08 AM
  • RT @TheDailyShow: Congrats to Donald Trump on finally winning a majority of votes! https://t.co/ezP55HZgl0
    Mar 31, 2023, 12:43 AM

Instagram

This weeks bonus recipe, for subscribers to my newsletter, is this gorgeous sour cherry and coconut gateau basque. The crust is a buttery cross between pastry and cake, think a cakey cookie. The filling is a layer of sour cherry topped with a rich coconut custard. A real fun one to make too! Link to my newsletter can be found in my bio - #gateaubasque #pastrycream #coconut #sourcherry
In this months @olivemagazine (out today) the team came and photographed my petit kitchen and we talked about how we put our stamp on the place, without spending a fortune. We hated the bland kitchen that we inherited but, as it was relatively new an
In this months @olivemagazine (out today) the team came and photographed my petit kitchen and we talked about how we put our stamp on the place, without spending a fortune. We hated the bland kitchen that we inherited but, as it was relatively new and in good condition, it felt a waste to rip it out and we also didn’t want to spend the money it would take to rip out the whole thing and replace it (it’s a howdens shell so we could have done something cheaper like @plykeakitchens @holte.studio @madebyhusk) so instead I painted all of the cabinets, using @makeitrustoleum kitchen cabinet paint, to give it some personality and lighten the whole thing. Check out the magazine for the full run down. - #kitchendesign #kitchenremodel #rustoleumcabinettransformations #rustoleumkitchencupboardpaint #kitcheninspiration #theboywhobakes #olivemagazine
Are you making scones all wrong? Maybe, maybe not? But I do want to show you how I make them! This recipe is based on the method I learnt at @belmondlemanoir 12 years ago when I did a stage, and it makes the absolute lightest scones. And shock horror, it involves kneading the dough, albeit very lightly. You can get the full recipe in this weeks newsletter (free) linked in my bio. - #scones #bakingday #worldbakingday #afternoontea #hightea #englishscones #clottedcream #creamtea #theboywhobakes
facebook
  • Contact

The Boy Who Bakes

Edd Kimber

facebook