The Boy Who Bakes

Edd Kimber
  • Home
  • Recipes
  • My Books
  • Blog
  • Recipe Index
  • About
  • Home
  • Recipes
  • My Books
  • Blog
  • Recipe Index
  • About

Recipes

  • All
  • baking
  • Biscuits and Cookies
  • Breads and Quickbreads
  • Bundts
  • Cakes
  • Chocolate
  • Dessert
  • drinks
  • Holidays
  • Pastry
  • Scones and Quickbreads
Baileys Pie.jpg

Baileys Brûléed Pumpkin and Custard Pie

Edd Kimber October 3, 2019

This post is sponsored by Baileys

Straight from farm to my kitchen. Last week I was in the countryside, south of Dublin, in Ireland, visiting one of the farms that produces cream for Baileys. I was there to learn all about how the famous Irish cream liquor is made. We met farmer Joe and his Baileys ladies, his name for his beautiful herd of cows. We wandered the farm, made milkshakes, had dinner in the barn and even milked some cows. I came back full of so many ideas but this pie was the first idea that sprung to mind and a recipe that I had to make immediately. Ireland, true to its stereotype was absolutely beautiful but it also rained everyday really putting me in the mood for autumn and all the autumnal desserts. As I was there with a group of Americans pumpkin pie seemed appropriate but I wanted to blend it with one of my favourite recipes and one that I thought would be great with the addition of Baileys, a custard tart. 

Whilst this recipe looks fancy, what with its layering, and the recipe is a tad long, I promise you its actually easier than it seems. It is basically a classic pumpkin pie with the addition of a pastry cream layer, one thats been infused with the warm caramel like flavour of Baileys. If you make one pie this season, make it this one!

Baileys Pie-2.jpg

Pie Dough
150g plain flour
1 tbsp caster sugar
1/2 tsp salt
125g unsalted butter, diced and chilled
4-5 tbsp water

Pumpkin Pie Layer
1/2 a 15oz/425g can pumpkin
1 large egg
1 large egg yolk
85g light brown sugar
1/4 tsp salt
1tsp ground cinnamon
1/2 tsp ground ginger
Pinch of freshly grated nutmeg
125ml double cream

Baileys Vanilla Custard
125ml whole milk
125ml double cream
125ml Baileys
1/2 vanilla pod
6 large egg yolks
75g caster sugar, plus extra for brûlée top
20g cornflour

To make the pastry place the flour, sugar and salt into a large bowl and mix together to combine. Add the butter and toss to coat in flour. Using your fingertips rub the butter into the flour until it is mainly in large flat flakes. Place the bowl into the freezer for 10 minutes for the butter to become hard. Remove from the freezer and drizzle in the water a tbsp at a time, stirring to combine. Once all has been combined the mixture should be coming together as a shaggy dough. Tip out onto the worksurface and use your hands to briefly work into a uniform dough. Press the dough into a rectangle and if the butter is feeling warm, wrap in clingfilm and refrigerate for 15 minutes. 

On a lightly floured worksurface roll out the dough into a rectangle, roughly 15cm x 25cm (exact size isn’t important) and roll up into a sausage. Press into a flat disc and refrigerate for at least an hour before using. 

Preheat the oven to 200ºC

Remove the dough from the fridge and on a lightly floured work surface roll out until just a little bigger than your pie plate, I prefer a deep 9-inch metal pie plate. Roll the pastry up onto your rolling pin then carefully unroll it, draping it into the pie plate. Gently lift and press the pastry to make sure it is sitting flush in the corners of the pie plate. Trim the excess so about 1-2cm is hanging over the side of the pie plate. Roll up the overhang of the bottom crust so that sits, like a thick rope, on the rim of the pie plate and locks in the strips. 

Using your favourite method crimp the rope of pastry. Line the pie with a crumpled piece of parchment paper and fill with baking beans or rice. Brush the crimped pie crust with egg wash and liberally sprinkle with demerara sugar. Bake in the preheated oven for about 25 minutes before removing the parchment and rice and bake for a further 10 minutes or until the bottom of the pastry is golden. Remove and reduce the temperature of the oven to 180ºC/160ºC Fan.

For the pumpkin layer mix together all of the ingredients until smooth. Pour into the pie crust and bake for about 25 minutes or until the edge of the custard is fully set with a little wiggle in the middle. Remove from the oven and set aside whilst you make the topping.

For the Baileys custard place the milk, cream and Baileys into a large saucepan along with the beans scarped from the vanilla pod along with the vanilla pod itself. Over medium/high heat bring to a simmer. Meanwhile whisk together the egg yolks, sugar and cornflour, until smooth. When the milk mixture is at temperature pour over the egg mixture whilst whisking to prevent curdling. Pour the custard mixture back into the pan and cook, whilst whisking constantly, until the mixture has thickened. Immediately pour into the pie and spread into an even layer. Press a sheet of clingfilm on top of the custard layer and leave for an hour before transferring to the fridge for at least 4 hours before serving. 

Before serving sprinkle the baileys custard with a light dusting of caster sugar and then using a blowtorch, caramelise until dark. Leave for a couple minutes for the sugar to set before serving.

Kept in the fridge, before bruleeing the pie, this will keep for 3-4 days. Once bruleed the pie is best on the same day. 

In Pastry, Holidays
6 Comments
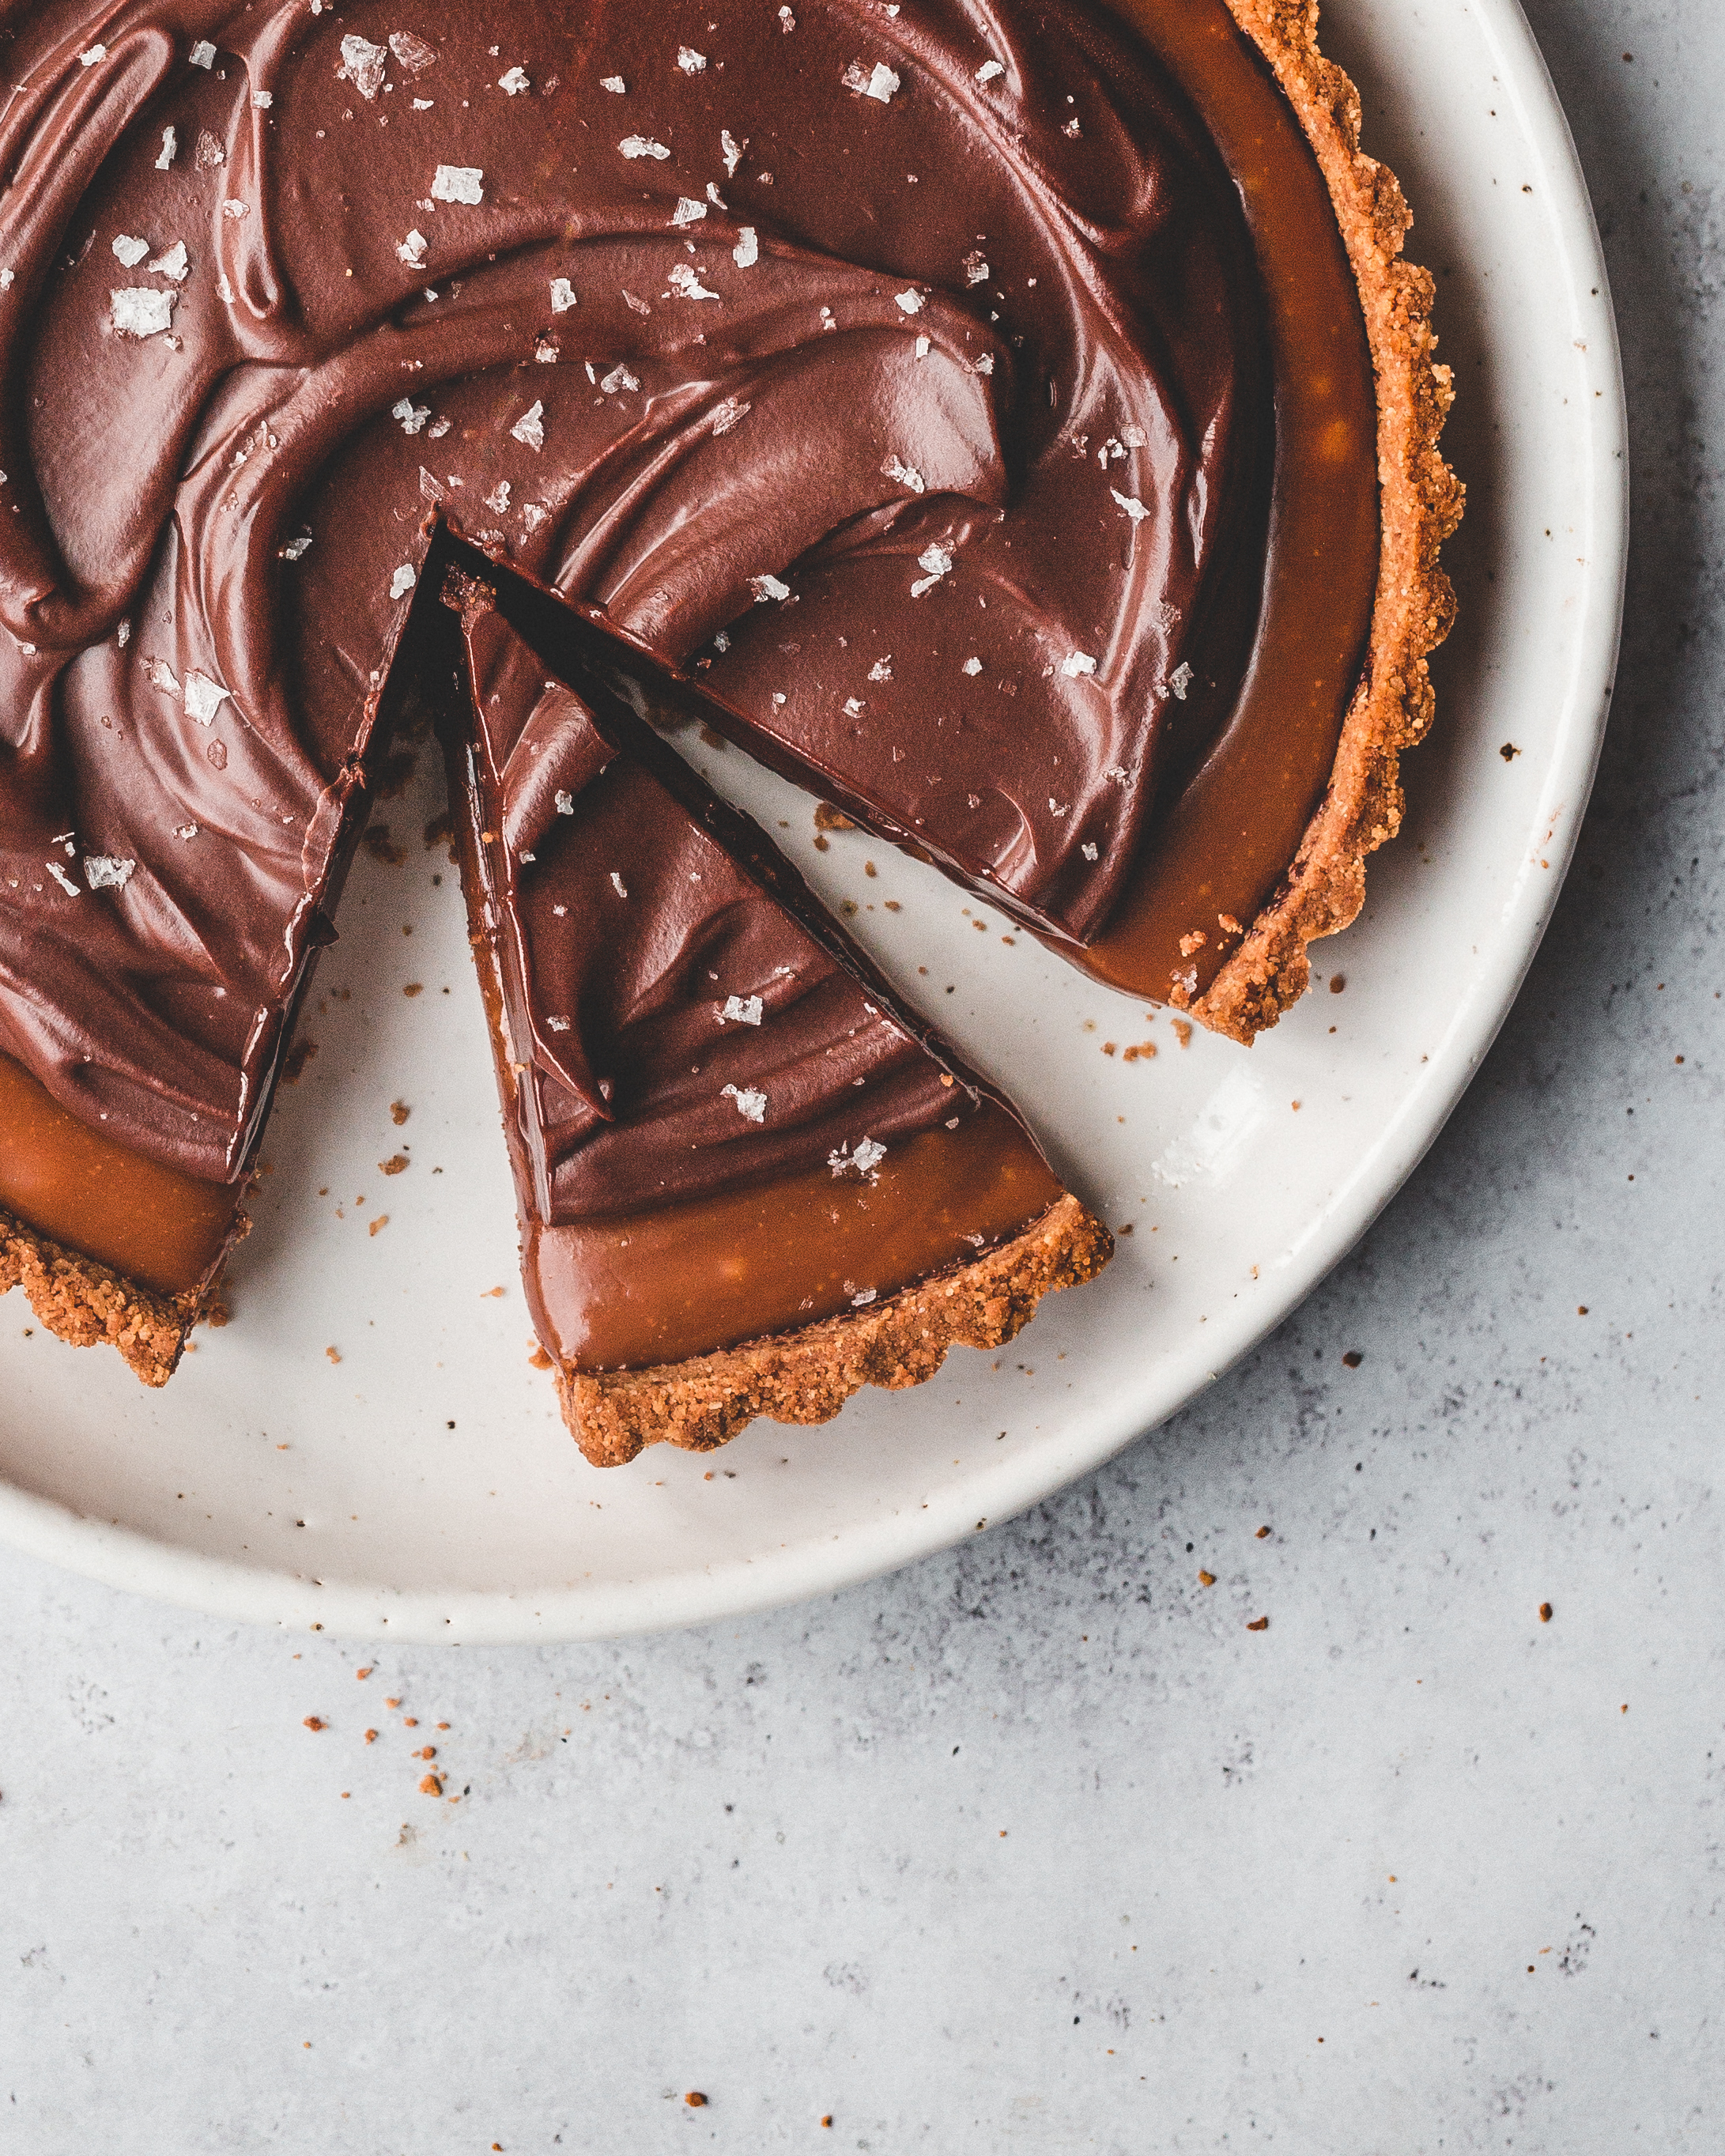
chocoalte caramel tart.jpg

Peanut Butter and Pretzel Caramel Tart

Edd Kimber August 6, 2019

I am currently working away on a project that I am super excited about but it is taking up a lot of my time so I am currently going through my archive to find recipes to share with you guys, to tie you over until the project is finished. Whilst looking for recipes I remembered this tart that I never got around to sharing. It was initially included in a pitch for a big piece of work I wanted to do around chocolate that ended up never getting a green light and sadly I forgot about it. Sadly because seeing the pictures reminded me just how wonderful this dish is. So enjoy it, finally!

Sweet and salty isn’t unusual these days, it’s to be expected. We all now generally understand that just like savoury food sweet things need seasoning and with ingredients like chocolate and caramel sometimes a little salt can help to enhance and highlight flavour whilst balancing the sweetness. This simple tart takes this idea and dials it up to eleven. The crust uses a simple biscuit style base, think the type of base you’d make for a cheesecake. The difference though is egg white. I love the texture of biscuit bases but find them a little tricky when you want nice neat slices, they’re just two crumbly. The addition of an egg white helps to bind the mixture together and makes it a lot easier to work with. Peanut butter and chocolate are a classic combo and anyone who’s ever opened a pack of peanut butter cups will know, a dangerously addictive one at that. The ganache used in this tart is made with a mixture of dark and milk chocolates, milk for the creamy sweetness that goes wonderfully with peanut butter but dark chocolate from preventing the tart from being too sweet.

chocoalte caramel tart-3.jpg


Serves 12

Peanut Pretzel Biscuit Base
50g salted peanuts
100g salted pretzels
75g digestive biscuits (or graham crackers)
100g unsalted butter, melted
1 tbsp light brown sugar
1 large egg white

Peanut Butter Caramel
225g caster sugar
180ml double cream
20g unsalted butter
1/2 tsp salt
2 heaped tbsp smooth peanut butter

Ganache Topping
140g dark chocolate, 65%-75% cocoa solids, finely chopped
140g milk chocolate, 40%-50% cocoa solids, finely chopped
20g unsalted butter
150ml double cream

For the biscuit base finely crush the peanuts, pretzels and digestives into a fine crumb then mix together with the butter, brown sugar and the egg white. Press into a loose bottomed 9 inch round tart tin, using your hands or a flat bottomed glass to compact into the base and up the sides of the pan. Bake in an oven preheated to 180C (160C fan) for about 10-12 minutes just until the biscuit base is set and starting to brown slightly. Remove from the oven and set aside to cool.

To make the caramel filling place the sugar into a medium sized saucepan and cook over medium heat until the sugar has melted and caramelised, turning the colour of an old rusty penny. Carefully pour in the cream, stirring gently until the caramel is smooth then add the butter and salt and mix until combined. Remove from the heat and allow to cool down for 10 minutes before stirring in the peanut butter. Pour the caramel into the cooled tart, spreading into an even layer. Refrigerate for an hour or so until the caramel is firm.

Meanwhile place the chocolates for the ganache into a heatproof bowl, set over a pan of simmering water and heat, stirring occasionally, until the chocolate is fully melted. Place the butter and cream into a small saucepan and bring to a simmer. Remove the pan from the heat and pour the cream over the chocolate and set aside for a couple minutes before stirring to form the ganache. Set the bowl aside until the ganache has thickened into the consistency of whipped cream. Dollop the ganache onto the tart and spread out, almost to the edges. Set aside at room temperature for a couple hours to allow the ganache to fully set. When ready to serve sprinkle the ganache with a little flaked sea salt.

Best served on the day made but can be refrigerated for up to 4 days just allow to come to room temperature before serving.

chocoalte caramel tart-2.jpg
In Pastry, Chocolate Tags peanut butter, caramel, pretzel, press in crust, salted caramel, chocolate, ganache, tart
6 Comments

Summer Tomato Galette

Edd Kimber June 12, 2019

Sponsored by Doves Farm Organic Flour

I would love to title this with all the different ingredients that make this dish great, but it would make the title far too long. The tomatoes are hiding a delicious layer of zataar and cream cheese and are topped with a sprinkling of salty feta and parsley, all cosily packed inside a buttery pastry made with cornmeal and coated in a generous amount of sesame seeds. There’s definitely a lot going on in terms of flavour but in reality, it’s an incredibly simple dish to make, perfect for those summer days where long bakes and hours in the kitchen isn’t something we always want.

The beauty of a galette, a free form tart, is that the more rustic it looks the better it looks. You can make them savoury as I have done here or make use of all the wonderful summer fruits and make an incredible dessert. The pastry is a mix of Doves Farm Organic Plain White Flour and cornmeal, which gives the dish a delightful texture and it comes together in minutes. This dough is my go-to for galettes and in the summer a galette is exactly the style of baking I prefer, quick and easy and a little bit homey. As you probably know, I have worked with Doves Farm before, they’re a UK organic flour producer and you can almost always find a few different bags of their flours in my cupboards. Plain flour is the obvious choice here, we’re letting the filling do the talking, but if you wanted a little extra boost this would be amazing with a little buckwheat flour subbed in too, Doves Farm also have a brilliant version of this flour too widely available in supermarkets. The filling is more of an assembly job than any real work. The base is spread with a generous layer of cream cheese and then topped with a mix of zataar and olive oil before being covered by a scattering of tomatoes and if you want to take it a step further a final addition of feta is always a good idea. This is the sort of dish I would make with friends coming over for lunch over the summer, making the pastry in the morning and then assembling as they arrive serving this fresh from the oven along with a glass or two or rosé.

Doves Farm organic flours are available at Sainburys, Tesco, Ocado and from www.dovesfarm.co.uk


Summer Tomato Galette
Serves 8-10

Cornmeal Galette Dough
185g Doves Farm Organic Plain White Flour
75g coarse cornmeal
1/4 tsp salt
1 tbsp caster sugar
125g unsalted butter, chilled and diced
2-3 tbsp water
4-5 tbsp sesame seeds

Filling
185g cream cheese
1 tbsp zataar
1 tbsp extra virgin olive oil
2 large tomatoes, sliced into 5mm thick rounds
400g cherry tomatoes, halved
25g feta cheese
1 tbsp chopped parsley 

In a large bowl mix together the plain flour, cornmeal, salt and sugar. Add the butter and toss together to coat in flour. Rub the butter into the flour mixture until it resembles coarse breadcrumbs. Add the water a couple tbsp at a time, mixing together with a butter knife. Add enough water so that when you squeeze some of the mixture together it holds as a ball of dough. Tip the mixture out onto the work surface and use your hands to briefly bring together into a uniform dough. Press the pastry into a disc and wrap in clingfilm before refrigerating for at least an hour before using. At this stage the pastry can be refrigerated for up to a week.

About 30 minutes before you assemble the galette prep the tomatoes. Place the sliced tomatoes onto a couple layers of kitchen roll and place a couple more layers on top. Do the same with the halved cherry tomatoes, cut side onto the kitchen roll. Set these aside for 30 minutes so that a little excess moisture is removed from the tomatoes, which will prevent the galette becoming soggy. 

Preheat the oven to 190C (170C Fan).

When ready to assemble the galette remove the dough from the fridge and, between two pieces of parchment paper, roll out into a circle roughly 12-13 inches wide. Pell off the top sheet of parchment and sprinkle over the sesame seeds, coating liberally. Use your rolling pin to gently roll the pin over the seeds, slightly pressing them into the pastry so they stick. Place the parchment back onto the pastry and carefully invert the pastry so the sesame seeds are now on the bottom, placing the dough onto a large baking sheet. This stage is likely to result in a few errant sesame seeds scattering onto your kitchen floor and for that I apologise, but trust me when I say it’s worth it. Peel off the top piece of parchment and spread the cream cheese over the centre of the pastry, leaving a border of roughly 2-3 inches. Mix the zataar with the olive oil and spread this mixture over the cream cheese. Layer the tomatoes on top of the cream cheese, first laying the sliced tomatoes then scattering over the cherry tomatoes. Sprinkle the feta, if using, over the tomatoes and finish with a little salt and pepper. Take the excess pastry and fold up, and over, the tomatoes. 

Bake in the preheated oven for about 45-50 minutes or until the pastry is golden brown. Remove from the oven and allow to cool for 10 minutes or so before serving. I like to drizzle the tomatoes with a little extra virgin olive oil just before serving. 

Tomato Galette (1 of 1)-3.jpg


In Pastry
4 Comments
Quiche (1 of 1).jpg

Wild Garlic Quiche Lorraine

Edd Kimber March 20, 2019

Post Sponsored by Doves Farm

After rye and spelt what other ancient grain flours are out there to try? If you’ve been following my recipes for a while you might know I am also a big fan of buckwheat, but today we are using a flour that’s totally new to me, Khorasan or Kamut as its also known (Kamut is the trademarked name of Khorasan wheat). I wanted to try making a pastry as I find it’s always a great test of how a flour works, how well it absorbs moisture, if it can be overworked and if needs extra binders to hold together.

To test the flour I made multiple batches of pie dough changing the amounts of khorasan in the recipe, from 20% up to 100%. My favourite dough was made with 1/3 plain flour and 2/3 khorasan. It was easy to work with and had a great level of flavour from the khorasan. 100% khorasan works fine but didn’t taste significantly better than my end pie dough where using a little regular plain helps make a great tasting pie dough thats easy to work with. The grain is very fine and absorbs a little more moisture in pie dough than regular plain flour and it has a wonderful malty, buttery flavour that tastes almost caramelised in the pastry, it’s absolutely delicious.

Quiche (1 of 1)-2.jpg

Khorason/Kamut Flour Pie Dough
50g Doves Farm Organic Plain Flour
100g Doves Farm Organic Stoneground KAMUT® Khorasan Wholemeal Flour
1 tbsp caster sugar
1/2 tsp salt
125g unsalted butter, diced and chilled
5 tbsp ice cold water

Filling
3 large eggs, plus 1 yolk for the pastry
200ml double cream
100ml whole milk
250g pancetta, cooked until crisp
75g gruyere, grated
45g wild garlic, finely chopped
Pinch of nutmeg

To make the pie dough mix together the plain flour, khorasan flour, salt and sugar in a large bowl. Add the butter and toss in the flour to coat. Rub the butter into the flour until it is in large flakes, you don’t want to rub in like you would for say a crumble, the flakes of butter makes for a nice flaky pastry.

Drizzle in the water a couple tablespoons at a time, tossing together with the flour mixture. Once all the water is added you should be able to gently press the dough together, forming a uniform disc of dough. Wrap in clingfilm or a beeswax wrapper (great if you’re reducing your usage of plastic) and refrigerate for at least an hour before using. 

When chilled, roll out the pastry on a lightly floured worksurface until just over 10 inches in diameter then roll back onto the rolling pin and unroll into a 9 inch pie plate (I prefer metal or glass). Trim the excess dough so that the overhang is about an inch long. Fold the excess dough under itself so that it forms a thick rim around the outside of the pie plate. Use your preferred method to crimp the pie and then refrigerate for 30 minutes or until firm. 

Quiche (1 of 1)-3.jpg
Quiche (1 of 1)-4.jpg

Line the pie with a piece of crumpled parchment paper and fill with baking beans or rice. Bake in an oven preheated to 190C (170C fan) for about 20 minutes or until the crimped edge is golden. Carefully remove the parchment and the rice and place back into the oven to bake for a further 15-20 minutes or until the base is fully baked. As the filling is a wet custard brush the inside of the pie with a lightly beaten egg yolk. Bake for another minute or until the yolk is set. This will help keep the pastry crisp whilst the filling bakes. Remove and set aside whilst you prepare the filling. Reduce the temperature to 180C (160C fan).

Whisk together the eggs, cream and milk then add the pancetta, gruyere, wild garlic and nutmeg along with some freshly grated black pepper. Pour the custard into the baked pie shell and grate over a little extra cheese. Bake for about 25 minutes or until the outside of the custard is set and the centre is still a little wobbly. Allow to cool to room temperature before serving.

Quiche is best served on the day made but you can refrigerate it for a couple days if needed. 


In Pastry
3 Comments
  • Recipes
  • Older
  • Newer

Twitter

  • Was 8 original films, 3 spin off films, a two part play not enough. Can we have something new. https://t.co/cBZdGEGeyv
    Apr 4, 2023, 1:46 PM
  • RT @deliciousmag: Cacio e pepe, but make it buns! These seriously cheesy bread rolls from @TheBoyWhoBakes are inspired by his favouri… https://t.co/oDZlaDgnN2
    Apr 2, 2023, 11:08 AM
  • RT @TheDailyShow: Congrats to Donald Trump on finally winning a majority of votes! https://t.co/ezP55HZgl0
    Mar 31, 2023, 12:43 AM

Instagram

This weeks bonus recipe, for subscribers to my newsletter, is this gorgeous sour cherry and coconut gateau basque. The crust is a buttery cross between pastry and cake, think a cakey cookie. The filling is a layer of sour cherry topped with a rich coconut custard. A real fun one to make too! Link to my newsletter can be found in my bio - #gateaubasque #pastrycream #coconut #sourcherry
In this months @olivemagazine (out today) the team came and photographed my petit kitchen and we talked about how we put our stamp on the place, without spending a fortune. We hated the bland kitchen that we inherited but, as it was relatively new an
In this months @olivemagazine (out today) the team came and photographed my petit kitchen and we talked about how we put our stamp on the place, without spending a fortune. We hated the bland kitchen that we inherited but, as it was relatively new and in good condition, it felt a waste to rip it out and we also didn’t want to spend the money it would take to rip out the whole thing and replace it (it’s a howdens shell so we could have done something cheaper like @plykeakitchens @holte.studio @madebyhusk) so instead I painted all of the cabinets, using @makeitrustoleum kitchen cabinet paint, to give it some personality and lighten the whole thing. Check out the magazine for the full run down. - #kitchendesign #kitchenremodel #rustoleumcabinettransformations #rustoleumkitchencupboardpaint #kitcheninspiration #theboywhobakes #olivemagazine
Are you making scones all wrong? Maybe, maybe not? But I do want to show you how I make them! This recipe is based on the method I learnt at @belmondlemanoir 12 years ago when I did a stage, and it makes the absolute lightest scones. And shock horror, it involves kneading the dough, albeit very lightly. You can get the full recipe in this weeks newsletter (free) linked in my bio. - #scones #bakingday #worldbakingday #afternoontea #hightea #englishscones #clottedcream #creamtea #theboywhobakes
facebook
  • Contact

The Boy Who Bakes

Edd Kimber

facebook