The Boy Who Bakes

Edd Kimber
  • Home
  • Recipes
  • My Books
  • Blog
  • Recipe Index
  • About
  • Home
  • Recipes
  • My Books
  • Blog
  • Recipe Index
  • About

Recipes

  • All
  • baking
  • Biscuits and Cookies
  • Breads and Quickbreads
  • Bundts
  • Cakes
  • Chocolate
  • Dessert
  • drinks
  • Holidays
  • Pastry
  • Scones and Quickbreads

Semlor - Swedish Cardamon Buns

Edd Kimber February 15, 2015

For a long time I’ve had a fascination with foreign baking traditions, the recipes that centre on religious or national holidays. Every country has their own and whilst there can be similarities across countries more often than not there is something new to discover. The fascination led me to write my last book Patisserie Made Simple but more than that it appears in all my work, I love the stories, the emotion behind them and the character it gives to the country they're from and I happily latch on these recipes and make the traditions my own. 

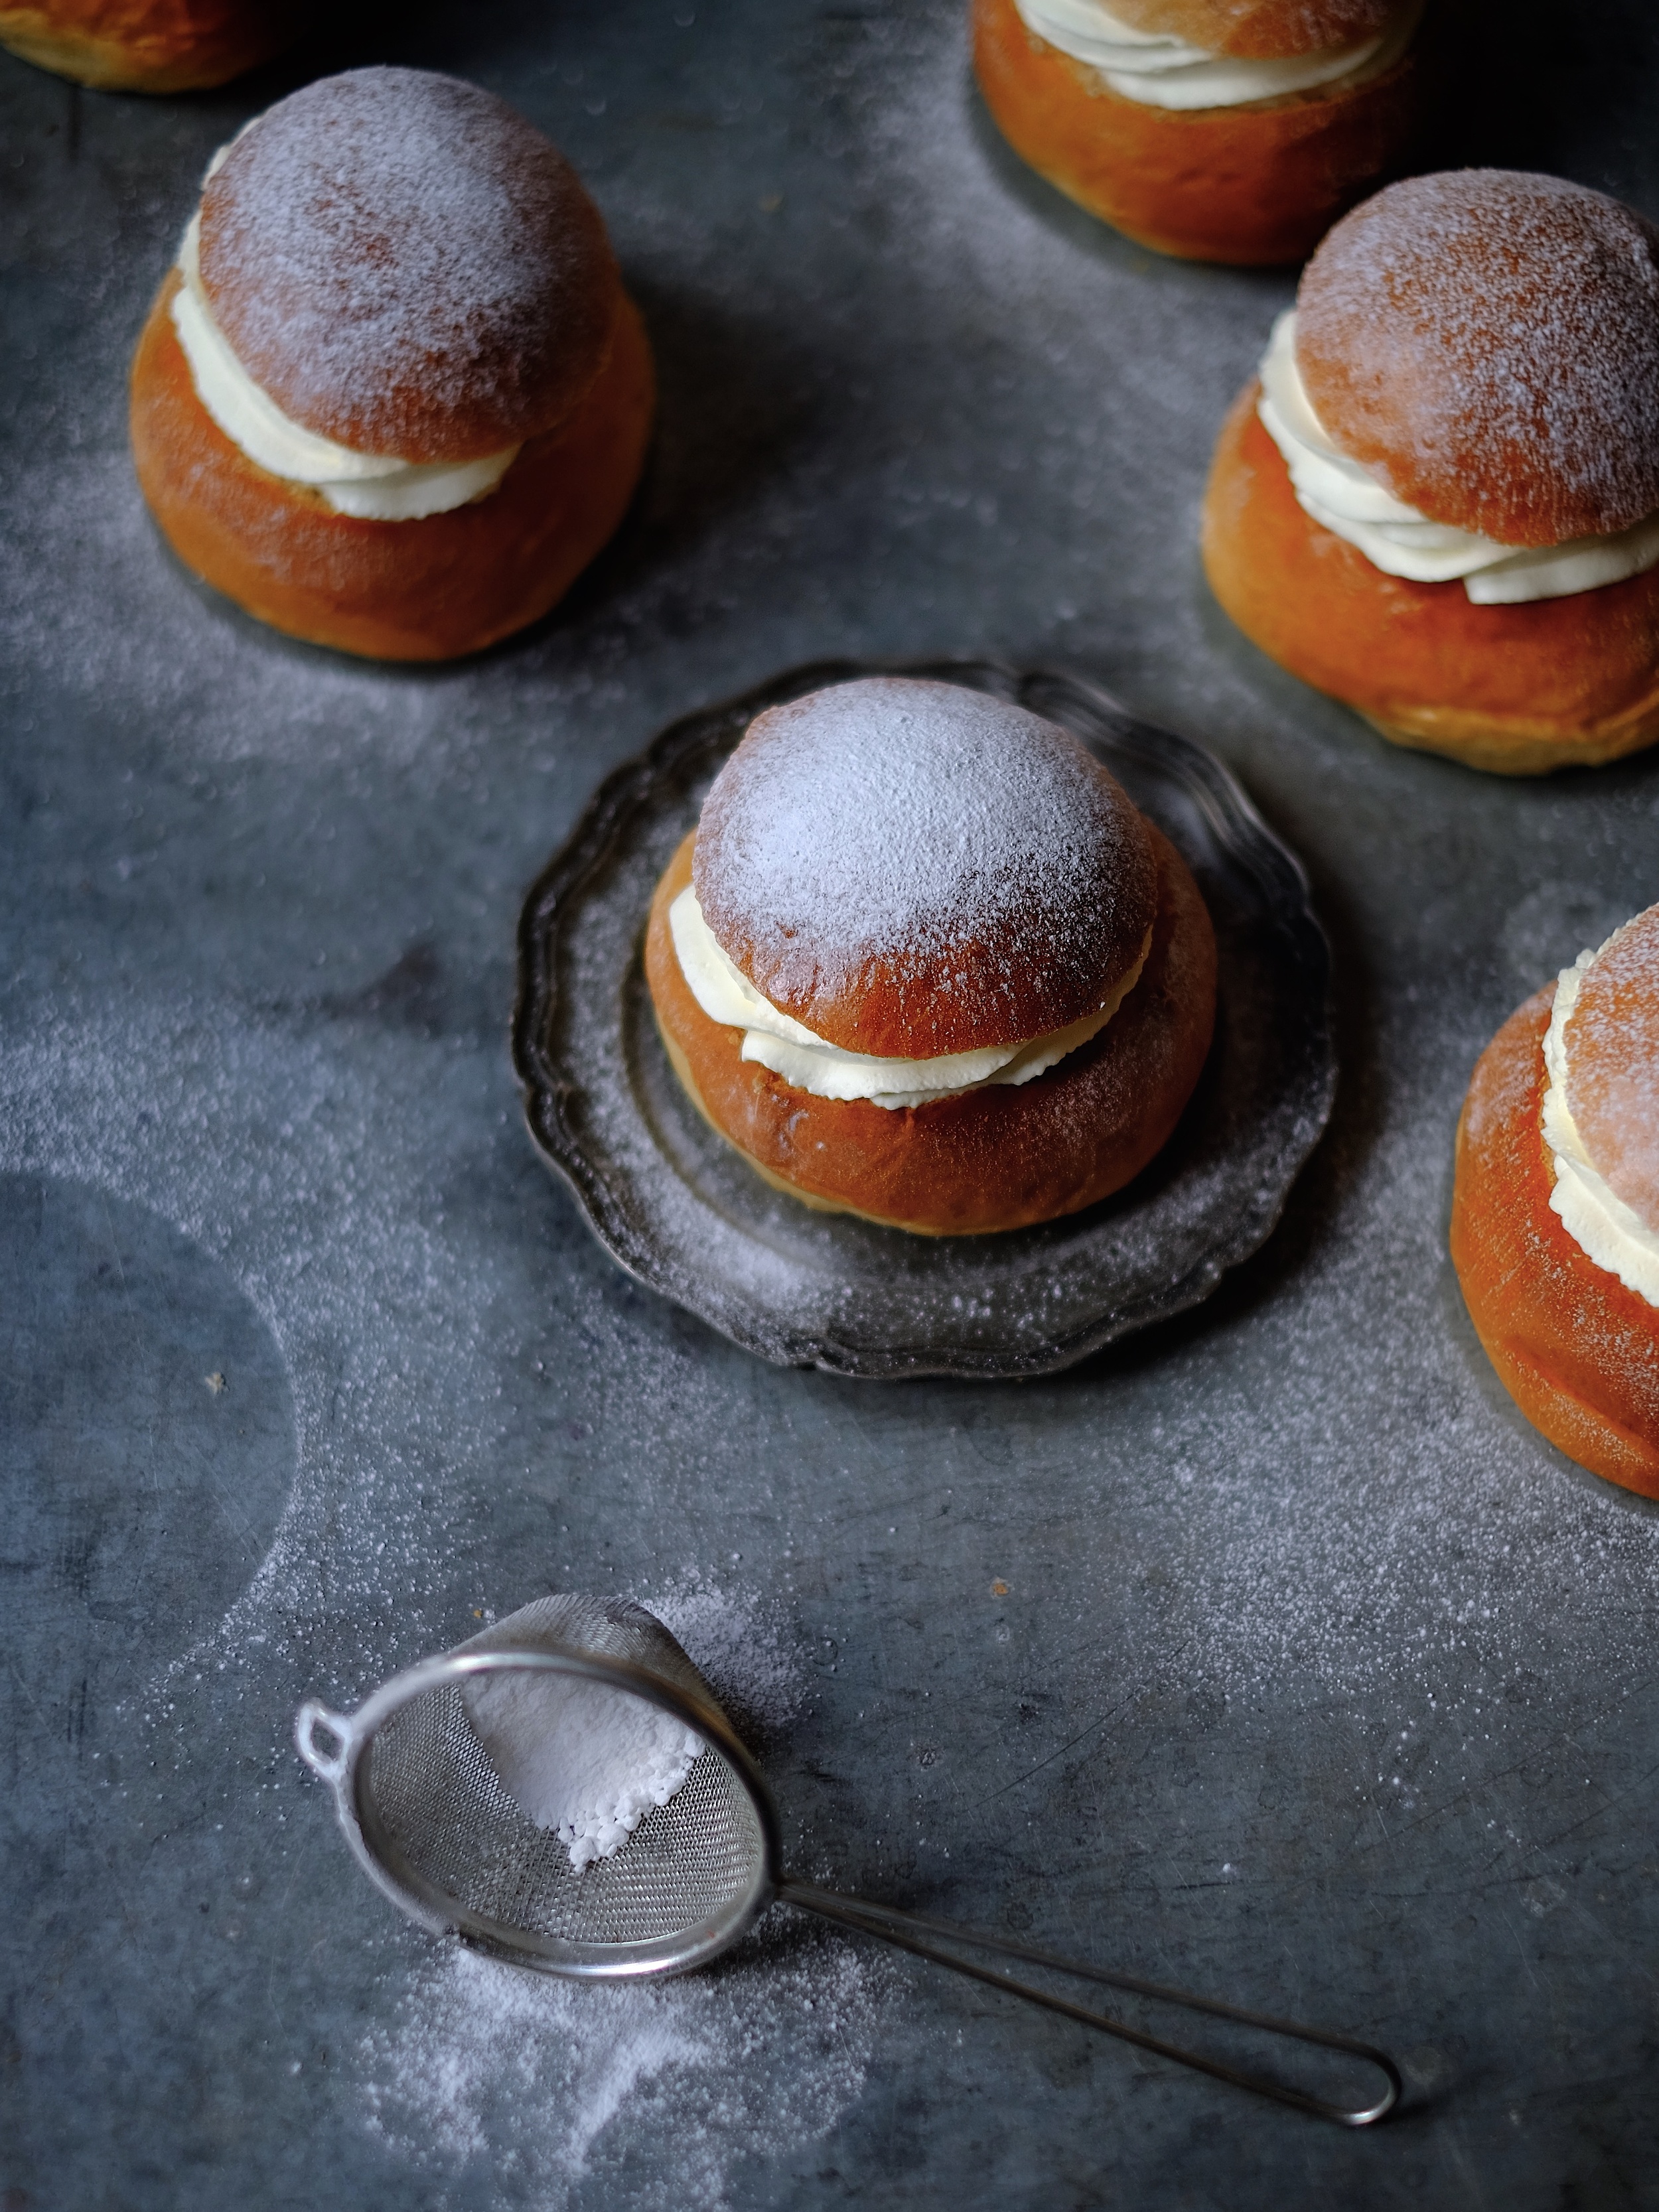
Tuesday is Shrove Tuesday, otherwise known as Pancake Day, a Christian holiday to mark the start of lent. Around the world Tuesday is also known by different names: in Spanish and Italian speaking countries it is called Carnival, in Iceland it is known as Bursting Day but my absolute favourite is the Swedish name of Fat Tuesday. The best bit about Fat Tuesday, other than the name obviously, is the recipe that goes along with it, Semlor, a cardamon flavoured bun filled with almond paste and whipped cream. It sounds incredibly simple but the sum is so much more than its parts, I have a big soft spot for this recipe. 

One of the reasons that I look forward to them every year is that they are a rare seasonal bake, there is absolutely no reason you cant bake them year round but despite that they only appear in bakeries for a few weeks or months around the holiday and as the saying goes, distance makes the heart grow fonder. Living in London we are lucky to have a few Swedish bakeries that sell them but generally I make them myself and they are no more difficult than making a simple bread recipe.

Semlor

250g plain flour
250g strong white bread flour
1 tsp ground cardamon
50g caster sugar
1 tsp salt
50g unsalted butter, room temperature
300ml milk, lukewarm
7g dried yeast
1 large egg (plus 1 extra  for glazing)

Filling
200g marzipan
175ml milk
600ml double cream

To make the semlor preheat the oven to 200C (180C fan) and line two baking trays with parchment paper.

To make the dough place the flours, cardamon, sugar and salt into a large bowl and mix together to combine. Add the butter and rub into the flour until it resembles fine breadcrumbs. Add the milk and the yeast to a jug and stir to combine. Make a well in the flour mixture and pour in the milk and egg, mix to form a shaggy dough then remove from the bowl and knead for about 10 minutes or until the dough is smooth and elastic. Form the dough into a round, place into a bowl and cover with clingfilm. Set aside at room temperature for about an hour or until doubled in size. Remove the dough from the bowl and gently knock out the air. Divide the dough into 12 equal pieces and form into rounds. Place the rounds of dough onto the prepared baking trays and cover lightly with clingfilm. Set aside for about 45-60 minutes or until the buns have almost doubled in size. 

When ready to bake brush each bun with the remaining egg and bake in the preheated oven for about 20-25 minutes or until golden brown. Allow to cool fully before filling. 

To make the filling slice the tops from the buns and scoop out the filling. Rip the bread into breadcrumbs and place into a bowl. Grate the marzipan into the bowl and add the milk, mixing together to form a paste. Divide the filling between the buns and set aside. 

Place the cream into a large bowl and whisk until the cream holds soft peaks. Add the cream to a large piping bag fitted with a large star piping tip and pipe on top of each bun, finishing by placing the lids of the buns on top of the cream, dusting with a little icing sugar. 

(ps. Semla - Singular, Semlor - Plural)

In Breads and Quickbreads, Holidays
3 Comments

Pistachio and Pomegranate Cake

Edd Kimber February 12, 2015

This time last year I remember writing a post about Valentines day and how I was single and bitter, slightly tongue in cheek but definitely with a dash of truth (I was recently single to be fair). A year on and well, not much has changed! Okay so thats not exactly true, I’m still single but I’m far from bitter and this cynic is taking a more open approach to Valentines Day. It is far from my favourite holiday but who am I to stop people celebrating there relationships (sounds like the bitter/sarcastic me is slipping back a bit!). The one thing I don't like is cookie cutter solutions, a card and flowers bought lazily from the corner shop is not up my street, effort and originality on the other hand, well that will always gain you points with me. What better way to show someone you love them than with something homemade. With a cake this pretty and colourful it would make the perfect thing to spoil your loved one with and even better it isn't too sweet or heavy, always a no-no for dates.

Pistachio and Pomegranate Cake

225g unsalted butter, room temperature 
200g caster sugar
Zest of 2 large oranges
4 large eggs, lightly beaten
70g plain flour
1 tsp baking powder
1/2 tsp salt
200g green pistachios, plus extra for decoration
Seeds from 1 pomegranate

Preheat the oven to 180C (160C fan) and grease a deep 20cm round cake tin with a little butter and line the base with parchment paper. 

To make the cake place the pistachios into the bowl of a food processor and pulse until finely ground (to prevent the nuts forming a paste you can add a tbsp of the flour to the processor).

Place the butter into a large bowl and, using an electric mixer, beat until light and creamy about 3 minutes. Add the sugar and the orange zest and beat together until light and fluffy, about 5 minutes.

Add the eggs a little at a time, beating until fully combined. Sieve the flour, baking powder and salt together, add the pistachios and mix together. Add the dry goods to the butter mixture and gently fold together until combined. Scrape the batter into the prepared tin and gently level out. 

Bake the cake in the preheated oven for 50-55 minutes or until the cake is golden brown and when a skewer inserted into the middle of the cake comes out clean, if the cake is browning too quickly lightly cover with a piece of foil. 

Allow the cake to cool in the tin for 10 minutes before turning out onto a wire rack to cool completely. To finish the cake sprinkle with extra chopped pistachios and the seeds from a pomegranate. 

Because this cake is made with ground nuts it keeps brilliantly, at least 4 days if kept in a sealed container. 

Notes: You can use pistachios from supermarkets but the colour won't be as vibrant and as they are roasted the cake won't be quite as moist - green pistachios available here) 

In Cakes
9 Comments
Pistachio Shortbread

Pistachio and Chocolate Shortbread

Edd Kimber February 8, 2015

Sometimes it’s the simple things that satisfy the most. A couple weeks back, I was doing some work for Kitchenaid and I needed to whip up 5 recipes, all simple enough to demo in a short amount of time. I had only a couple hours to prep but I still wanted the recipes to be delicious and attractive and really it’s hard to think of anything easier than shortbread. It is one of those wonderful recipes that relies on the easiest of ratios, simply 1-2-3, one part sugar, two parts butter and three parts flour, easy. All I’ve done differently is add lots of beautiful green pistachios (available here) and a little salt and lemon zest to boost the flavour. Whilst that would be tasty enough as it is I am prone to gilding the lilly, so to add a little extra luxury these humble biscuits were dipped in tempered chocolate, and trust me it is so well worth the effort, the prep kitchen was swarming with people who munched there way through these, which I took as a firm sign of approval.

Classically shortbread is made by rubbing cold butter into flour and sugar, almost like making pastry and that makes a fine biscuit but I make mine by beating the butter and sugar until fluffy then gently mixing in the flour, simply because this makes the biscuits a little lighter and I prefer the texture this way, but really it is up to you this recipe will happily work either way, the only thing I would say is don’t skip the salt with such simple ingredients a little bit of salt really helps to lift the flavour and it works wonders with the pistachios, lemon zest and chocolate.

Pistachio and Chocolate Shortbread

100g unrefined golden caster sugar
200g unsalted butter, room temperature
Zest of 1 lemon
275g plain flour
Large pinch flaked sea salt
75g pistachios, roughly chopped, plus extra for decoration
200g dark chocolate

To make the shortbread place the butter, sugar and lemon zest into a large bowl and using an electric mixer beat together for about 5 minutes or until light and fluffy. Scrape the bowl down and add the flour, salt and pistachios, mixing together briefly until it comes together as a dough. Tip the dough out onto the work surface and bring together into a ball and divide into two equal pieces. Place each piece of dough between sheets of clingfilm or parchment paper and rollout into 1cm thick rectangles, about 10 inches long, wrap in clingfilm and refrigerate until firm. 

Preheat the oven to 170C (150C fan) and line two baking trays with parchment paper. Cut the dough into 1-inch thick fingers and dock with a fork. Place the biscuits onto the prepared baking trays and bake in the preheated oven for 25-30 minutes or until lightly browned. Remove from the oven and allow to cool fully. 

For the chocolate place into a heatproof bowl and microwave in 30 second bursts until about three quarters of the chocolate has melted, remove the bowl and mix vigorously with a spatula until fully melted (this is a quick method of tempering the chocolate). Dip the shortbread halfway into the chocolate, allow the excess to drip off then set onto a clean sheet of parchment, decorating with a few extra chopped pistachios. Once the chocolate has set, devour! (If you really have to, the biscuits will keep for 3-4 days in a sealed container.)

In Biscuits and Cookies, Chocolate
1 Comment

Blood Orange Jaffa Cakes

Edd Kimber January 28, 2015

Do you ever get cravings for things you loved as a kid? For me it is butterscotch Angel Delight (which of course is the best flavour), Jaffa Cakes and Custard Creams. When I was younger, actually who am I kidding still now, I had a very specific way of eating a Jaffa Cake. You nibble the cake around the edge avoiding the jelly, gently peel the sponge from the back and then place the chocolate coated jelly into your mouth, sucking off the chocolate. Weird? A little! Delicious, Absolutely! You can of course make these with regular oranges but I have a slight obsession with blood oranges. I have a wonderful greengrocers near my house and at the moment I seem unable to buy any other fruits or vegetables without also buying a glut of beautiful blood oranges. I maybe obsessed but when blood oranges come into season I have to get my fill, it's a long wait for them to come back into season, so whilst I can get them they're a constant presence in my kitchen.

The idea of Jaffa Cakes is simple enough - a spongy base topped with orange jelly and coated in chocolate, seems straightforward? Thankfully they're actually as simple as you would hope. I used a genoise sponge as the base, a simple blood orange jelly, topped with melted chocolate. So far so easy but there is one slightly tricky part, adding the chocolate. You cant dip them, so you have to gently tease the chocolate with a spoon, its not difficult just fiddly. 

Blood Orange Jaffa Cakes

Sponge Base
2 large eggs
60g golden caster sugar
60g plain flour
30g unsalted butter, melted and slightly cooled

Blood Orange Jelly
160ml blood orange juice
1 tbsp golden caster sugar
2 sheets of gelatine
150g dark chocolate
 

To make the jelly place the blood orange juice and the sugar into a saucepan and bring to a simmer, dissolving the sugar. Meanwhile, place the gelatine into a bowl of cold water, setting aside until softened. Once the sugar has dissolved remove the gelatine from the water, squeezing off any excess water and add to the juice mixture, stirring together until full dissolved. 

Line a 9-inch round cake pan with clingfilm and pour in the jelly mixture, chilling in the fridge for a few hours until set.

Preheat the oven to 180C (160C Fan) and lightly grease two 12-hole muffin pans. 

To make the sponge bases place the eggs and sugar into a large bowl and using an electric mixer whisk together for about 5 minutes until pale and thickened. In two additions sieve over the flour and gently fold together. Pour in the butter and fold together until fully combined. Divide the batter between the prepared pans, about 1 tbsp of batter per base and bake in the preheated oven for 7-10 minutes or until lightly browned. Allow to cool for a couple of minutes before carefully teasing the cakes out of the pans (they tend to stick a little bit but with a little teasing they pop right out).

Remove the jelly from the fridge and using a 4cm cut out 24 disc of jelly and place on the middle of each sponge base. For the topping place the chocolate into a microwave safe bowl and in 30 second bursts heat until about 3/4 of the chocolate is melted, remove from the microwave and stir until fully melted (this is a quick simple way of tempering chocolate, great when using small amounts).

To decorate the cakes use a teaspoon to spread chocolate over the top of the jelly, gently teasing it to the edges of the cakes. To give the classic Jaffa Cake look use a fork and gently press the tines onto the chocolate and lift up, do this after coating each cake as the chocolate needs to be fluid to achieve this look. 

These cakes will keep for up to two days. 

In Chocolate, Biscuits and Cookies
10 Comments
  • Recipes
  • Older
  • Newer

Twitter

  • Was 8 original films, 3 spin off films, a two part play not enough. Can we have something new. https://t.co/cBZdGEGeyv
    Apr 4, 2023, 1:46 PM
  • RT @deliciousmag: Cacio e pepe, but make it buns! These seriously cheesy bread rolls from @TheBoyWhoBakes are inspired by his favouri… https://t.co/oDZlaDgnN2
    Apr 2, 2023, 11:08 AM
  • RT @TheDailyShow: Congrats to Donald Trump on finally winning a majority of votes! https://t.co/ezP55HZgl0
    Mar 31, 2023, 12:43 AM

Instagram

This weeks bonus recipe, for subscribers to my newsletter, is this gorgeous sour cherry and coconut gateau basque. The crust is a buttery cross between pastry and cake, think a cakey cookie. The filling is a layer of sour cherry topped with a rich coconut custard. A real fun one to make too! Link to my newsletter can be found in my bio - #gateaubasque #pastrycream #coconut #sourcherry
In this months @olivemagazine (out today) the team came and photographed my petit kitchen and we talked about how we put our stamp on the place, without spending a fortune. We hated the bland kitchen that we inherited but, as it was relatively new an
In this months @olivemagazine (out today) the team came and photographed my petit kitchen and we talked about how we put our stamp on the place, without spending a fortune. We hated the bland kitchen that we inherited but, as it was relatively new and in good condition, it felt a waste to rip it out and we also didn’t want to spend the money it would take to rip out the whole thing and replace it (it’s a howdens shell so we could have done something cheaper like @plykeakitchens @holte.studio @madebyhusk) so instead I painted all of the cabinets, using @makeitrustoleum kitchen cabinet paint, to give it some personality and lighten the whole thing. Check out the magazine for the full run down. - #kitchendesign #kitchenremodel #rustoleumcabinettransformations #rustoleumkitchencupboardpaint #kitcheninspiration #theboywhobakes #olivemagazine
Are you making scones all wrong? Maybe, maybe not? But I do want to show you how I make them! This recipe is based on the method I learnt at @belmondlemanoir 12 years ago when I did a stage, and it makes the absolute lightest scones. And shock horror, it involves kneading the dough, albeit very lightly. You can get the full recipe in this weeks newsletter (free) linked in my bio. - #scones #bakingday #worldbakingday #afternoontea #hightea #englishscones #clottedcream #creamtea #theboywhobakes
facebook
  • Contact

The Boy Who Bakes

Edd Kimber

facebook