The Boy Who Bakes

Edd Kimber
  • Home
  • Recipes
  • My Books
  • Blog
  • Recipe Index
  • About
  • Home
  • Recipes
  • My Books
  • Blog
  • Recipe Index
  • About

Recipes

  • All
  • baking
  • Biscuits and Cookies
  • Breads and Quickbreads
  • Bundts
  • Cakes
  • Chocolate
  • Dessert
  • drinks
  • Holidays
  • Pastry
  • Scones and Quickbreads

Summer Berry Pavlova

Edd Kimber July 21, 2016

Pavlova is one of those great recipes that you should have in your arsenal, once you know the technique you can whip up a delicious dessert without even thinking about it. Using whatever fruit you have on hand, you can make them whatever season, pile it high with berries and stone fruit in the summer, blackberries and chocolate at christmas, its a super simple recipe that will always please a crowd. It takes minutes to whip up and it really is a low effort recipe. The difference between plain old meringue and pavlova? Its a texture thing. A true pavlova should be delightfully crisp on the outside with a pillowy marshmallow like centre. The key to this perfect texture is baking the pavlova in a low oven and adding a little vinegar and cornflour, which helps stabilise the meringue and give that delicious marshmallow texture. 

Summer Berry Pavlova
Serves 10-12

6 large egg whites
350g caster sugar
1 tbsp cornflour
2 tsp cider vinegar
500ml double cream
2 tsp vanilla bean paste
600g mixed berries

Preheat the oven to 150C (130C fan).

Place the egg whites into a large bowl and use an electric mixer to whisk on high speed until the whites hold soft peaks. Whilst continuing to whisk slowly pour in the sugar whisking until the meringue holds stiff glossy peaks. In a small bowl mix together the the vinegar and cornflour then pour into the meringue and whisk for a minute or so until it is fully combined. Scrape the meringue onto the middle of a parchment lined baking tray and spread out into a disc.

Bake in the preheated oven for an hour then turn off and allow to cool fully in the oven (I do this the night before and just leave it overnight). 

To finish the pavlova whisk the cream and vanilla until the cream holds soft peaks then spread over the the top of the pavlova finishing with the fresh berries. 

Comment

Melting Moments

Edd Kimber June 30, 2016

This recipe is special to me for one big reason. It isn't a complicated or fancy recipe, in fact it's as simple as it gets. It's not from my childhood and it wasn't passed down through my family. It's simply a biscuit that helped me launch my baking business. A couple years ago I had the idea of taking my career in baking to a different level and opening up shop. This is how I found myself down at London's Maltby Street Market come rain or shine, every weekend selling my wares. To my surprise the melting moments became one of the favourites (along with the salted peanut and chocolate cookie sandwich, filled with homemade marshmallow fluff). I think they remind us of being kids, they're a bit like shortbread and are simple and humble, almost British in style, when in fact this recipe hails from Australia. I may not run that business anymore, because I became too busy with other work (hello Patisserie Made Simple) but I still regularly whip up a batch of these biscuits. To add a little bit of sunshine to this disappointingly grey summer I have filled the biscuits with both vanilla buttercream and a bright passion fruit curd and let me tell you, one wont be enough!

Melting Moments
250g unsalted butter, room temperature
½ tsp vanilla bean paste
85g icing sugar
250g plain flour
40g custard powder (or cornflour if you cant find it)
¼ tsp salt

Filling
75g unsalted butter, room temperature
150g icing sugar
1 tsp vanilla bean paste
pinch of salt

Passion Fruit Curd
80ml passion fruit puree (from about 5-6 passion fruit)
5 large egg yolks
150g caster sugar
100g unsalted butter

To make the curd place the puree, yolks and sugar into a heatproof bowl and whisk together until combined. Place the bowl over a pan of simmering water and cook, stirring constantly until the mixture thickens. It should be thick enough to coat the back of a spoon. Take the bowl from the heat and add the butter, mixing together until melted and combined. Pour the curd into a sterilised jar and seal, refrigerating until needed. 

Preheat the oven to 160C (140C fan) and line two baking trays with parchment paper. Place the butter, vanilla and icing sugar into a large bowl and beat together until smooth and creamy. Sift the remaining ingredients into the bowl and gently mix together until you form a uniform dough, this can easily be done either by hand with a wooden spoon or with a mixer.

Using your hands roll the dough into small balls (I weigh these, 20g each) and place onto the prepared trays leaving a couple of inches between each biscuit. Using a fork dipped in flour press the fork onto the centre of each biscuit leaving an indent.

Bake the biscuits in the preheated oven for 20-25 minutes or until uniformly coloured. These shouldn't brown around the edges (due to the slightly lower temperature) so if you want to confirm they are fully baked flip one over, there should be a uniform golden colour across the base. If there is a darker, almost damp looking patch in the middle pop them back in the oven for a few minutes.

Allow to cool on the baking trays for five minutes before transferring to a wire rack to cool completely. Whilst cooling make the buttercream. Place the butter into a large bowl and beat together until smooth and creamy, then slowly add in the icing sugar a little at a time, beating until fully combined. Once you have added all the sugar add the vanilla and salt and beat together until light and fluffy.

To assemble the biscuits place the buttercream into a piping bag fitted with a small plain piping tip a pipe a circle of buttercream around the edges of half the biscuits. Fill the hole left behind with some passion fruit curd and top with a second biscuit (if youre not making the curd you can also use the jam of your choice or even some salted caramel. These will keep well for around four days in a sealed container.


In Biscuits and Cookies
3 Comments

Salted Caramel Ice Cream

Edd Kimber June 21, 2016

Today is the relaunch of my Youtube channel, from today you can expect weekly video recipes with the full recipe of course living here on The Boy Who Bakes. If there is anything you want to see in an upcoming video leave me a comment either on here on Youtube and I will try to make in a future video.

First up on the channel is my all time favourite, Salted Caramel Ice Cream. Frankly you could give me anything Salted Caramel and I would be happy but as it is summer, not that you could tell by looking out the window, I though ice cream would be more appropriate. Thankfully this is an easy recipe and trust me this will become a regular over the summer, its a seriously good ice cream. Just be careful, make sure to invite friends over otherwise you may end up eating it all yourself (I'm speaking from experience).

Salted Caramel Ice Cream
550ml whole milk
200ml double cream
1 tsp flaked sea salt
300g caster sugar
5 large egg yolks
50g skimmed milk powder
1 tsp vanilla extract

Place the milk, cream and sea salt into a small saucepan and place over medium heat until about 50C, hot enough that you cant keep your fingers in the mixture for more than a second or so. 

Pour half of the milk mixture into a bowl along with the milk powder and whisk until smooth. Pour this back into the pan and place back on the hob, turning the heat to low.

Meanwhile place the caster sugar into a large, very clean saucepan and over medium heat cook the sugar until it melts and forms a dark brown caramel, the colour of a rusty penny. Resit the urge to stir too much as the more you stir the more the caramel will crystallise and become a big hard lump of sugar. 

When the caramel is nice and dark take it off the heat and pour in the milk mixture in two additions, it will bubble up quite violently so go slow and be careful. Once all of the milk mixture has been added if there are any lumps of caramel place the pan back on the heat and stir until the mixture is smooth. Pour the caramel mixture into a bowl with the egg yolks, whisking constantly to prevent the eggs from scrambling and then pour the custard mixture back into the pan and over low heat cook until thickened enough to coat the back of a wooden spoon. To check, the custard should reach 75C-80C when it is ready. Pour the finished custard into the bowl and set over a pan of ice and water and stir until chilled, add the vanilla extract and stir to combine. Cover the bowl and refrigerate overnight before churning in your ice cream machine, according to the manufacturers instructions. 

Kept in a sealed container this ice cream will keep for up to a month but is best within a couple of weeks. (homemade ice cream has no stabilisers so doesn't last as long as shop bought).


3 Comments

Berry and Passion Fruit Tart

Edd Kimber February 19, 2016

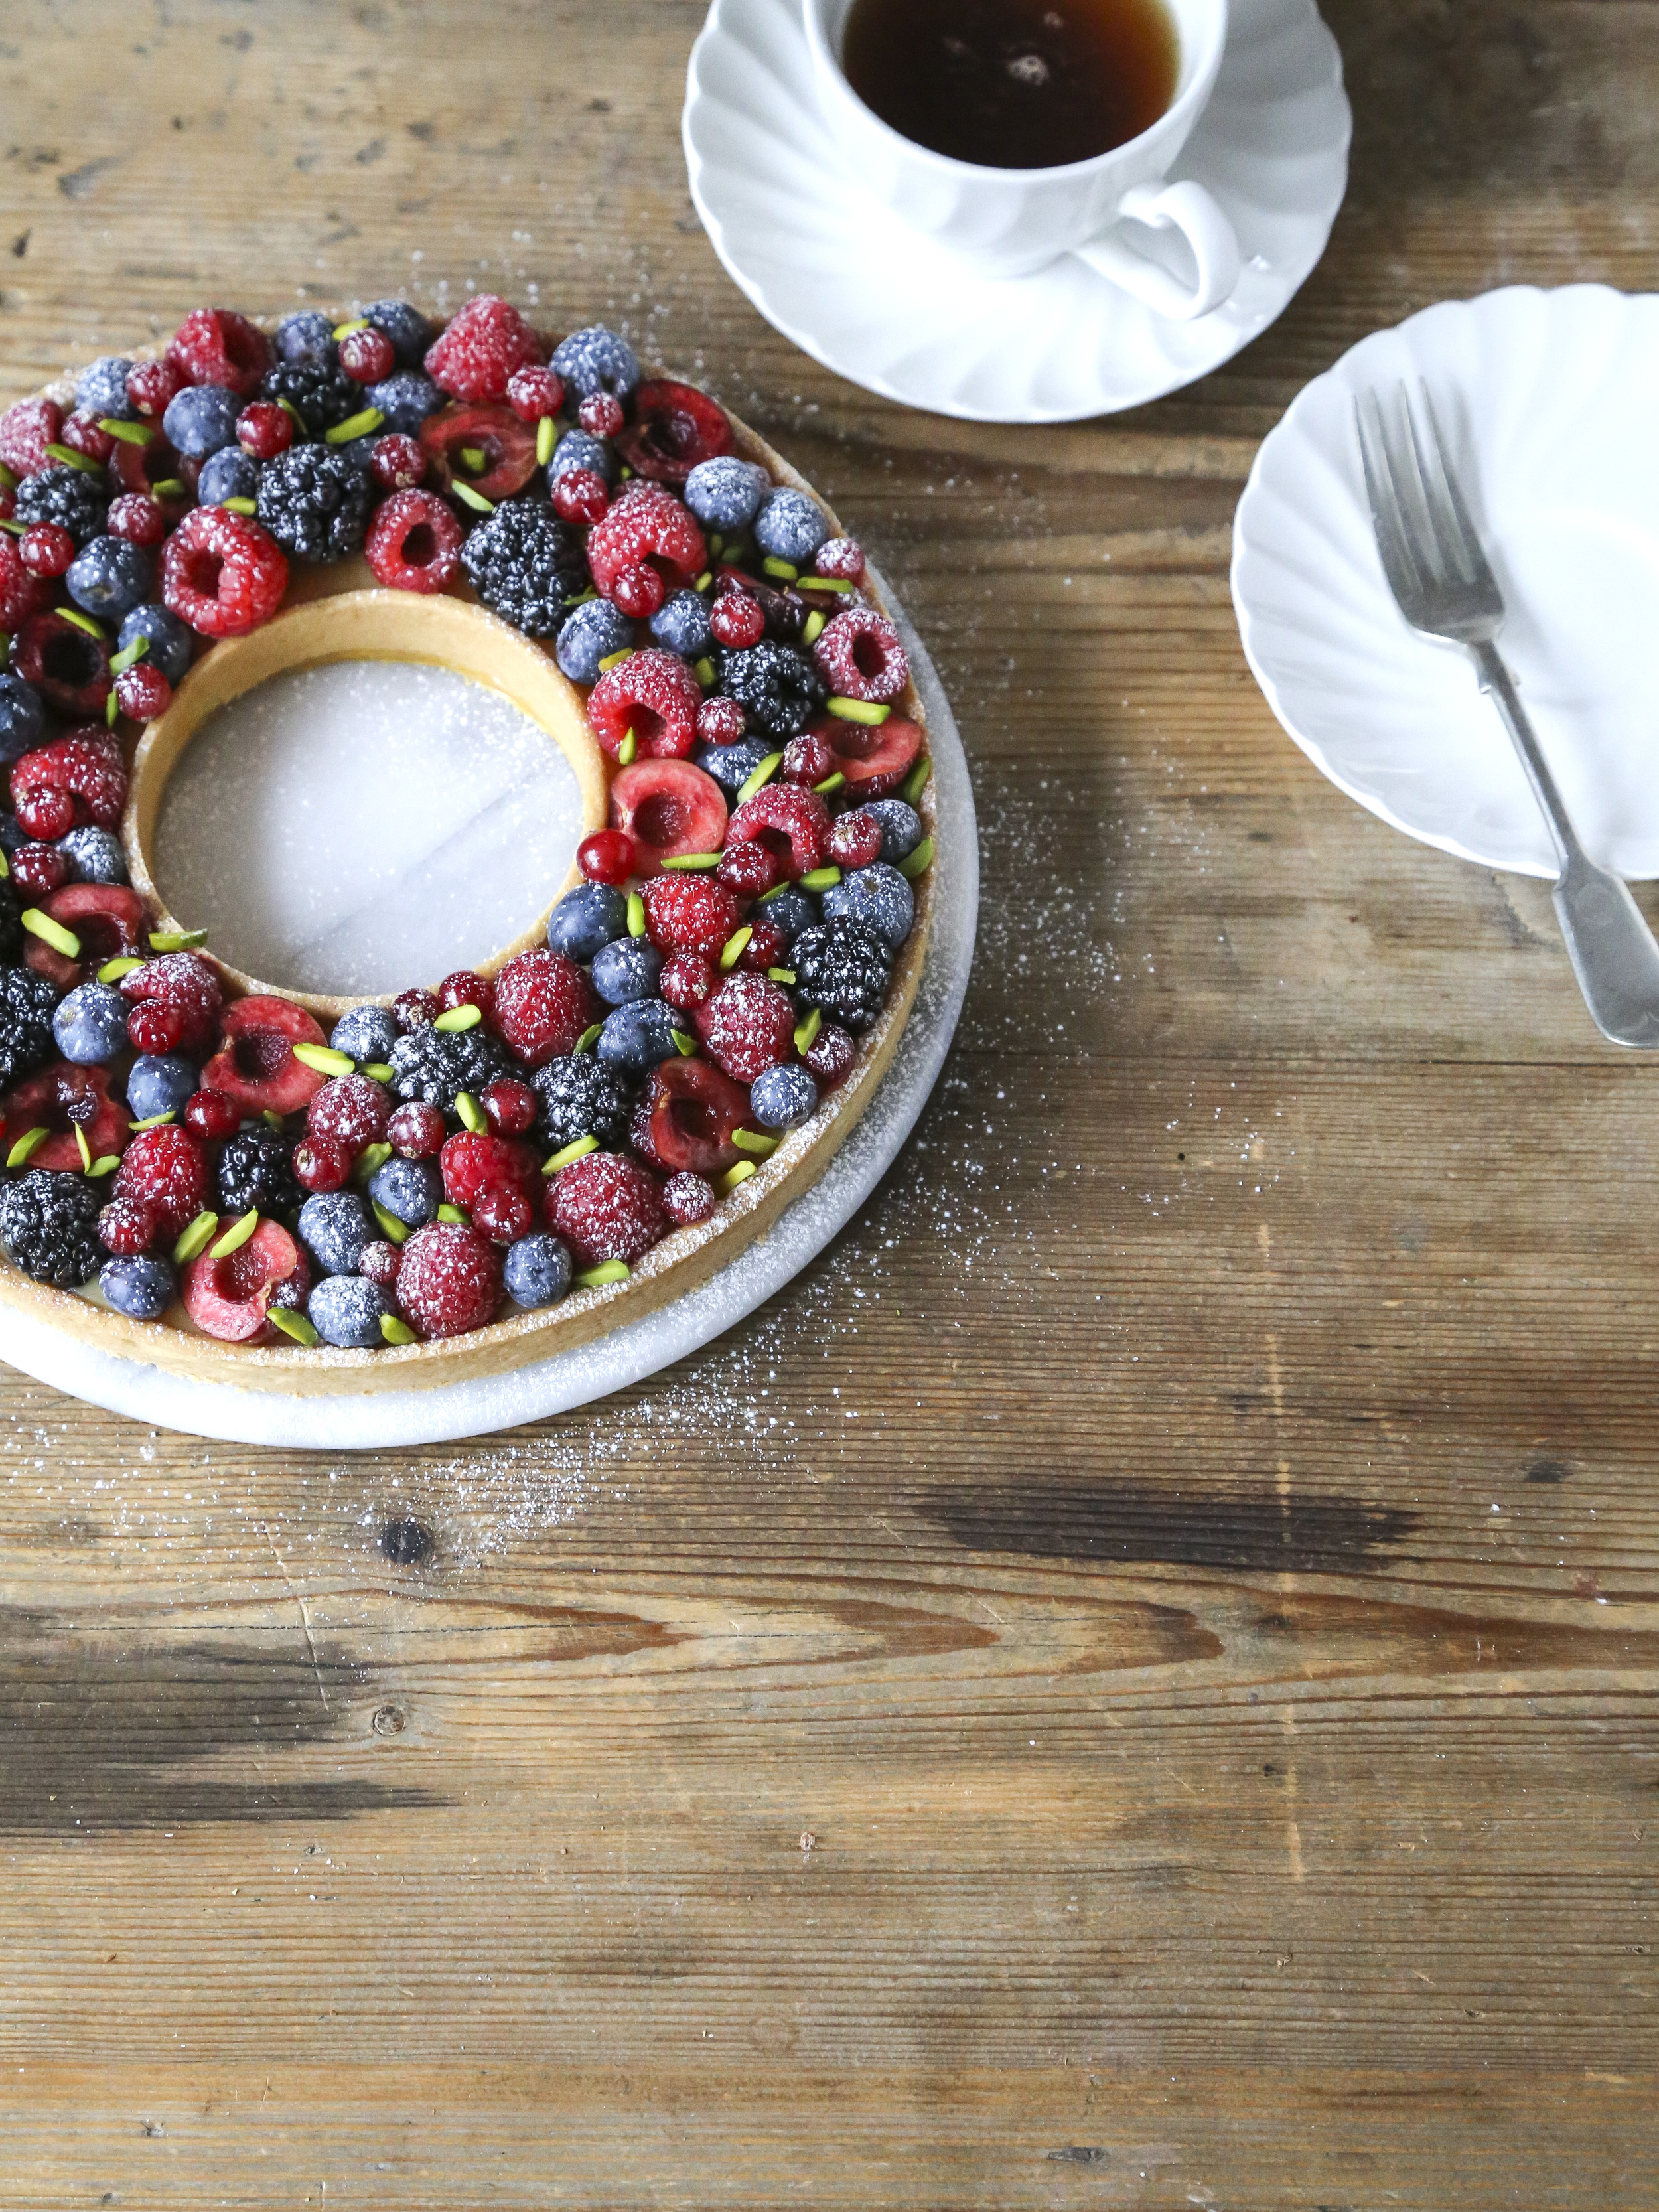
First off let me apologise, mainly because this tart is a bit of a bugger to make. Difficult? Not especially, its just a bit fiddly and has the tendency to break at a crucial point (more on that later). Secondly it's not particularly seasonal. Normally I wouldn't post a recipe full of beautiful berries until they were in season but the idea for this recipe has been an itch I just had to scratch. Its a fairly standard fruit tart with one major difference, there is a big hole in the middle. It might only an aesthetic thing but I'm completely smitten with the way it looks, somehow both more elegant and refined than the normal round affair. The initial idea came from a picture of a Christophe Michalak recipe who had used the shape for a beautiful raspberry tart. I wish it was as easy as using a specially designed tart tin but I had to get a little bit more improvisational to make this, so more apologies if this is using equipment you don't have (I promise i'll get back to my usual approachable recipes next time, indulge me this once).

I guess it is appropriate that I am posting this today as on Monday I am escaping London, if only briefly, for a quick trip to Paris. A couple of days to wander the streets, indulge in a few (maybe a few too many) pastries and generally lose myself a bit. 

For my version of this tart I wanted a riot of colour and flavour so the custard is boosted by passion fruit and the berries are a jumble of blackberries, blueberries, raspberries, cherries and redcurrants with some pistachios to gild the lilly. 

That tricky part I mentioned? Well that happens to be the hole, well actually the wall of the tart around the middle. I find my sweet pastry recipe pretty resistant to shrinkage but even a little bit of shrinkage can be a pain in this recipe, if the tart shell shrinks as it bakes the middle can pull apart from the base and even break in half. In one of my tests of the recipe when it did shrink I found it could still be rescued (use beaten egg yolk as a glue to patch it back together, baking for a couple extra minutes until hardened) but bear this in mind when making and make sure to read the tips at the end of the recipe. 

Berry and Passion Fruit Tart
Sweet Pastry

200g plain flour
20g ground almonds
35g icing sugar
pinch of salt
125g unsalted butter, diced and chilled
1 large egg yolk
approx 1/2 tbsp ice cold water

Passion Fruit Pastry Cream
285ml whole milk
1 tsp vanilla bean paste
3 large egg yolks
1 large egg
135g caster sugar
35g cornflour
3 passion fruit
250g mixed berries (I used blackberries, raspberries, cherries, blueberries and redcurrants)
pistachios, to garnish (optional)
 

To make the pastry place the flour, almonds, icing sugar and salt into the bowl of a food processor and pulse until combined. Add the butter and pulse in short bursts until the mixture resembles coarse breadcrumbs. In a small bowl mix together the egg yolks, water and vanilla, add to the food processor and pulse until the pastry just starts to come together. Dont mix until the dough forms a solid mass as this will overwork the pastry and make it tough and risk it shrinking more as it bakes. Tip the dough out onto the worksurface and use your hands to bring together into a uniform dough, forming into a disc and wrapping in clingfilm. Refrigerate the dough for about an hour before using.

To make the pastry cream place the milk into a medium sized saucepan and bring to the boil. In a large bowl whisk together the egg yolks, egg, sugar and cornflour. Pour over the milk and whisk together to combine. Pour the custard back into the pan and over medium/high heat cook until thickened, whisking constantly. Scrape the pastry cream into a bowl and set aside. Cut the passion fruit in half and scoop the flesh into a sieve set over the pastry cream, pushing on the seeds to release the juice. Discard the seeds and mix the juice into the pastry cream. Press a sheet of clingfilm onto the surface of the custard and refrigerate until needed, at least an hour. 

Take the pastry from the fridge and cut off a small strip and set aside. Roll out the main pastry on a floured worksurface until about 2-3mm thick. Use to line a 9 inch tart ring, trimming off any excess. Use a 3 inch pastry ring to cut out a disc of pastry from the centre of the tart. Roll out the small strip of pastry until it is about 2-3mm thick and long enough to roll around the pastry ring. Trim the strip so it is the same height as the tart shell. Lightly brush the pastry ring with butter and attach the pastry strip to the ring and press into the hole in the middle of the tart shell. Place the tart shell into the fridge for 30 minutes before baking.

Preheat the oven to 180C (160C fan) and line the tart with a crumpled piece of parchment paper and fill with baking beans or rice (it is easier if the paper has a hole in the middle). Bake in the oven for 20 minutes then remove the parchment and the baking beans and bake for a further 10-15 minutes or until golden brown. Allow to cool for 10 minutes before very carefully removing the pastry ring from the centre of the tart. Spread the chilled pastry cream into the tart shell and top with the berries (my preference is to cut the cherries in half but i'll leave that up to you). Finish with a light dusting of icing sugar and a few pistachios. 

Like most fruit tarts this is best served on the day it is made but if you cover with clingfilm and refrigerate it will be good for a couple days longer. 

Tips: This recipe will succeed on the quality of the pastry so to prevent it from shrinking there are two things to bear in mind. When adding the water be careful about adding the right amount. Water evaporates from pastry as it bakes and contributes to shrinkage, so adding too much can make it shrink further. Secondly be very careful not to overwork the pastry. The more you handle it the tougher it can end up and the more it will shrink. 

In Pastry
8 Comments
  • Recipes
  • Older
  • Newer

Twitter

Instagram

This weeks bonus recipe, for subscribers to my newsletter, is this gorgeous sour cherry and coconut gateau basque. The crust is a buttery cross between pastry and cake, think a cakey cookie. The filling is a layer of sour cherry topped with a rich coconut custard. A real fun one to make too! Link to my newsletter can be found in my bio - #gateaubasque #pastrycream #coconut #sourcherry
In this months @olivemagazine (out today) the team came and photographed my petit kitchen and we talked about how we put our stamp on the place, without spending a fortune. We hated the bland kitchen that we inherited but, as it was relatively new an
In this months @olivemagazine (out today) the team came and photographed my petit kitchen and we talked about how we put our stamp on the place, without spending a fortune. We hated the bland kitchen that we inherited but, as it was relatively new and in good condition, it felt a waste to rip it out and we also didn’t want to spend the money it would take to rip out the whole thing and replace it (it’s a howdens shell so we could have done something cheaper like @plykeakitchens @holte.studio @madebyhusk) so instead I painted all of the cabinets, using @makeitrustoleum kitchen cabinet paint, to give it some personality and lighten the whole thing. Check out the magazine for the full run down. - #kitchendesign #kitchenremodel #rustoleumcabinettransformations #rustoleumkitchencupboardpaint #kitcheninspiration #theboywhobakes #olivemagazine
Are you making scones all wrong? Maybe, maybe not? But I do want to show you how I make them! This recipe is based on the method I learnt at @belmondlemanoir 12 years ago when I did a stage, and it makes the absolute lightest scones. And shock horror, it involves kneading the dough, albeit very lightly. You can get the full recipe in this weeks newsletter (free) linked in my bio. - #scones #bakingday #worldbakingday #afternoontea #hightea #englishscones #clottedcream #creamtea #theboywhobakes
facebook
  • Contact

The Boy Who Bakes

Edd Kimber

facebook