The Boy Who Bakes

Edd Kimber
  • Home
  • Recipes
  • My Books
  • Blog
  • Recipe Index
  • About
  • Home
  • Recipes
  • My Books
  • Blog
  • Recipe Index
  • About

Recipes

  • All
  • baking
  • Biscuits and Cookies
  • Breads and Quickbreads
  • Bundts
  • Cakes
  • Chocolate
  • Dessert
  • drinks
  • Holidays
  • Pastry
  • Scones and Quickbreads

Beef Cheek Ragu

Edd Kimber March 17, 2017

We are most definitely in peak comfort food season, politically, emotionally, weatherly (not a word I know) everything this time of year just screams comfort so you wont be catching me eating a lettuce leaf, chia seed, green juice, smoothie bowl concoction. Okay, so I might be exercising for the first time in years but that doesn't mean I don't want to enjoy my food, I’m not that crazy! This type of food, low effort maximum flavour, is what I am all about, its comforting in taste and also in the making. That gentle bubble of a simmering pot, the occasionally stir and the sneaky taste, all accompanied by a glass of red wine. This is how I want to spend my dark winter nights. Nothing makes me happier than throwing something in a pot and then hours later something magical emerges. Its transformative, the same reason I love baking, and utterly satisfying. 

This ragu is, by far (and not simply in the usual website hyperbole) the best thing I have cooked in quite a while. I might as well call the dish ‘the ultimate ragu', or the ‘best ever ragu’, I've got to get that website traffic up right? Okay, okay it might not be the best thing, hell it might not even be the best ragu I ever make. All I know is it is bloody marvellous and whilst it serves a whole host of people, it disappears very quickly around these parts.

Now Ragu. Lets talk. British Bolognese, whilst comforting to me in a whole different way, is not the real deal. One of my death row dishes happens to be my mums’s bolognese (yes one, if I am on death row, you know I'm ordering at least three courses) but lets be honest, it isn't the same thing, Italians must shudder at what we refer to as a bolognese sauce. Ragu is simply a meat sauce, slowly cooked with just a little, if any, tomato, not the other way around. Whilst I make no claims to the authenticity of this dish (no paella backlash for me please) I think this is probably a little more Italian than what I grew up with. 

Beef Cheek Ragu
(serves 10-12)

3 large beef cheeks (about 1.2kg), trimmed of any excess fat or gristle
5 tbsp olive oil
1 large onion, diced
2 medium carrots, diced
2 sticks celery
4 garlic cloves, finely chopped
4 sprigs rosemary
4 sprigs thyme
2 bay leaves
2 tbsp tomato puree
125ml red wine
750ml beef stock
1x400g tin of chopped tomatoes
fresh parsley and parmesan, to serve

Get out your biggest pan, this makes a lot! Pat the beef cheeks dry with some kitchen paper and season well with salt.

Heat 3 tbsp of the oil in a large saucepan (a big cast iron casserole is perfect for this) over medium/high heat and brown the beef cheeks until deep brown all over. Don’t skimp on this step as the browning really helps to give the sauce a deep meaty flavour. Remove the cheeks and set aside on a plate for the moment. 

Reduce the heat to low and add the remaining oil to the pan, tipping in the onion, carrots and celery, sweating down for 10-15 minutes or until soft. Add the garlic, rosemary, thyme and bay leaves and cook for a couple minutes. Add the tomato puree and cook for a minute or two. Pour in the glass of red wine and cook until reduced by two thirds. At this point simply add the beef cheeks back into the pan along with the beef stock and the tomatoes. Bring the pan to a boil then reduce the heat to a gentle simmer and cook for 3-4 hours, stirring very occasionally until the meat is super tender and falling apart. Using a couple forks to shred the meat, it should take almost no effort and and simply fall apart. Depending on the consistency of the sauce continue to cook a little longer until thick and reduced. 

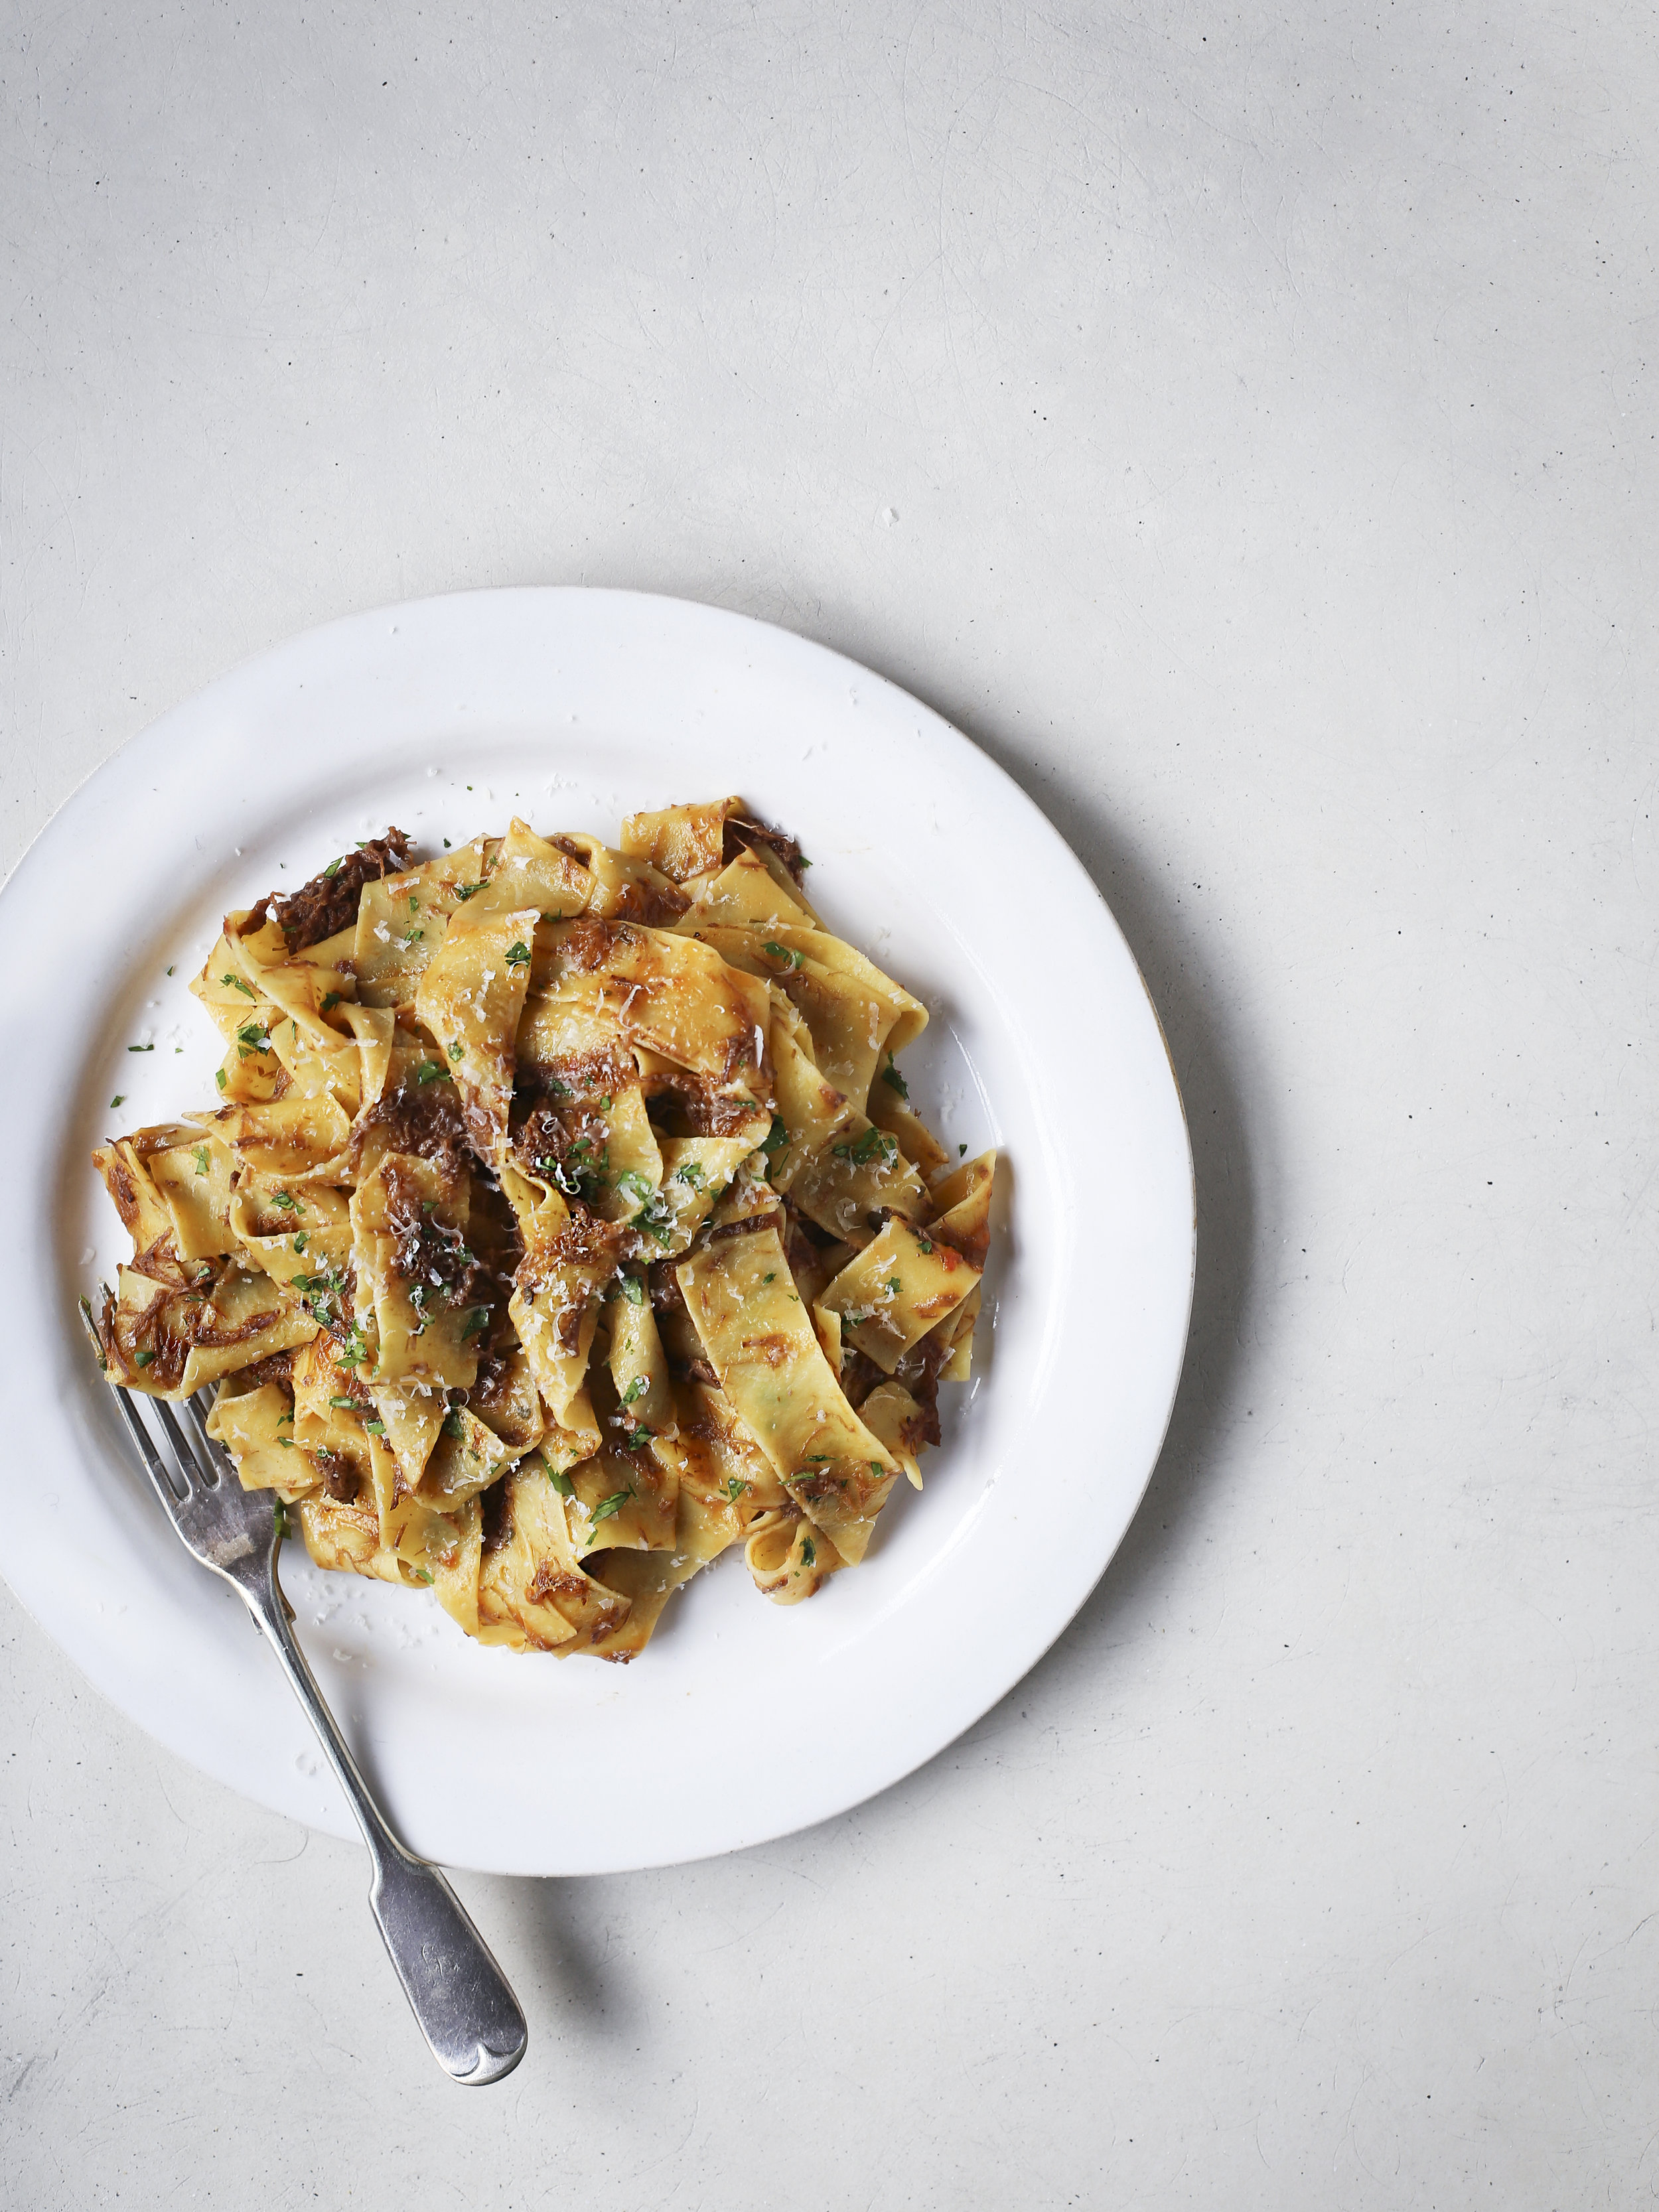
To serve coat some pappardelle in a little of the sauce and finish with a sprinkling of fresh parsley and parmesan. 

Notes - This obviously makes a ton of sauce but trust me, knowing you have this stored away in your freezer will make you very happy! I like to portion it up into ziplock bags, pressing into a nice flat layer. This makes it easier to store, taking up less space in the freezer. It also makes it defrost much quicker. 

1 Comment

Cardamon Creme Brulee Tarts with Roasted Rhubarb

Edd Kimber February 24, 2017

This is the final post for rhubarb week and I have saved the best for last. I have actually had this recipe in my back pocket for at least a year actually, waiting for the right time of year to post. Rhubarb was a regular feature in my childhood, as a family we grew it in our garden and regularly had it for dessert after Sunday lunch. The main difference between then and now is that our homegrown variety was definitely not forced rhubarb, it was thick, green, stringy and so incredibly sharp, almost sour in flavour. Whilst this style of rhubarb was far from my favourite it was something my mum loved. When I made these tarts for her she begged me for the recipe, and because I am a terrible son, who is ridiculously forgetful, it took me a whole year to send her the recipe. I would like to think it is worth the wait but that is just my big head showing! 

Now lets talk about the tricky part of this recipe. The creme brûlée filling is made on the stovetop, slowly stirring a custard until thickened which is theoretically simpler than baking. But and it is big but mastering the finished texture is a little tricky to get spot on. I would actually suggest that rather than using a temperature you should use visual clues. You need to cook the custard slowly for about 10-15 minutes or until the whisk creates tracks in the custard. If you undercook the custard it wont set as firm and wont give you that fabulous set custard of a creme brûlée. 

Buckwheat Pastry
220g buckwheat flour
30g caster sugar
pinch of salt
125g unsalted butter, diced and chilled
1 large egg yolk

Cardamom Creme Brûlée
1/2 vanilla pod or 1 tsp vanilla bean paste
1tsp ground cardamon
500ml double cream
6 large egg yolks
45g caster sugar, plus extra for brûlée topping

Roasted Rhubarb
1 batch roasted rhubarb (recipe here)
3 tbsp roughly chopped pistachios

To make the creme brûlée filling scrape the seeds from the vanilla pod and place into a bowl along with the cardamon, egg yolks and sugar, whisking together. Place the cream into a pan and bring to a simmer. Pour the cream onto the egg mixture and whisk to combine. Place the bowl over a pan of gently simmering water and stir constantly with a whisk (dont whisk vigorously, just stir gently, regularly scraping the bottom of the bowl) for about 10-15 minutes or until the custard has thickened the mixture should be the texture of a thick pouring custard. Remove the bowl from the pan and press a sheet of clingfilm onto the surface of the custard and refrigerate overnight.

To make the pastry place the flour, sugar and salt into the bowl of a food processor and pulse to combine. Add the butter and pulse until the mixture resembles fine breadcrumbs. Add the egg yolk to the processor and pulse to combine. Squeeze some of the mixture together and if it holds its shape it is ready but if it crumbles apart pulse in a little water, a teaspoon at time until the dough holds together (normally it takes about 1-2 tbsp to bring the pastry together). Tip the dough out onto the work surface and bring together with your hands, forming into a short, fat sausage shape. Wrap the dough in clingfilm and refrigerate for at least an hour before using.

Preheat the oven to 180C (160C fan) and line a baking tray with parchment paper. 

To form the tart shells remove the pastry from the fridge and cut into six discs. Roll each disc of pastry between parchment paper until about 2-3mm thick. Gently drape the pastry into a 10cm loose bottomed fluted tartlet tin, pressing into the corners. Trim off the excess and place onto the baking tray. Repeat with the remaining pastry and refrigerate for an hour or until firm. Line the tart shells with a piece of crumpled parchment paper and fill with baking beans or rice and bake in the preheated oven for 25 minutes. Remove the parchment and the baking beans and bake the tarts for a further 5-10 minutes or until golden brown. Set aside to cool.

Once the pastry has cooled remove the creme brûlée filling from the fridge and divide between the tart shells. Top the tarts with a even layer of caster sugar and using a kitchen blowtorch caramelise the sugar. Place the tarts into the fridge for about an hour before serving (any longer and the crisp layer of sugar will start to melt). Preheat the oven to 190C (180C fan). 

Whilst the tarts are chilling roast the rhubarb as in this recipe here.

To serve top each tart with a few pieces of the rhubarb, with a little of the syrup, and a sprinkling of pistachios.

In Pastry
Comment

Rhubarb Gin

Edd Kimber February 23, 2017

Todays rhubarb recipe is the simplest of the week, yes simpler than the roasted rhubarb, rhubarb infused gin. Shall I stop there and get straight to recipe? What else is there to say other than go and grab a bottle of gin and some rhubarb and make this immediately, your gin and tonic will never be the same again!

The basic recipe for this gin is simplicity itself and I would feel remiss simply giving you that, especially considering I could probably fit the whole thing into one tweet. To that end I have also come up with a fabulous cocktail, in case you get bored with the good old gin and tonic. Its based on a classic gimlet, with a double hit of rhubarb coming from the gin but also a little bit of rhubarb simple syrup.

Rhubarb Gin
400g rhubarb (the pinkest you can find)
250g caster sugar
750ml gin

Cut the rhubarb into short 2cm pieces and add to a large container (a 1 litre jar is perfect). Add the sugar and the gin, seal and give the jar a gentle shake. Pop the jar in a dark cool area and set aside for a week or two until the gin has turned a fabulously pink colour. Strain the gin through cheese cloth or a fine mesh sieve and bottle. 

Rhubarb Gimlet
75ml rhubarb gin
25ml lime juice
15ml rhubarb simple syrup (recipe below)

Add all the ingredients to a cocktail shaker full of ice and shake for a good 30 seconds until the shaker is getting too cold to hold. Strain into a martini glass and serve. 

Rhubarb Simple Syrup
250ml water
200g caster sugar
200g rhubarb, cut into 2cm pieces

Place all of the ingredients into a saucepan and bring to a boil before reducing the heat to low and cook for about 15-20 minutes. Pour the mixture through a fine mesh strainer to remove the rhubarband refrigerate the syrup until needed. 

18 Comments

Buttermilk Panna Cotta with Rose Roasted Rhubarb

Edd Kimber February 22, 2017

It is day two of rhubarb week and to ease you in gently, ahead of a trickier recipe later in the week, today is about as easy as it gets, no baking, minimal effort and a definite crowd pleaser.

There is something rather magical about the vibrant pink of rhubarb next to something so simple and pale as a panna cotta, it looks special, elegant almost. It also belies the effort put in, and would look at home in any restaurant or at any dinner party. Actually it makes for a perfect dinner party dessert as everything can be prepared ahead meaning you're not making the faux pas of spending the entire evening in the kitchen (yes, this and all other modern etiquette questions will be answered in my upcoming book Edd’s Guide To Not Screwing Up)

Panna cotta with roasted rhubarb is a natural combo, basically a classic and for a good reason. I like when rhubarb gets a chance to shine, not hidden under lots of other flavours so a panna cotta is the perfect way of serving it. For this version I have taken that classic and tweaked it, just a little. I have used the roasted rhubarb from my last post and, once roasted, added a couple teaspoons of rose water, a magical combo if done right. Rose has a delicate balance to play, which becomes obvious when you ask people if they like the flavour. Quite often the answer will be no, making some reference to old ladies or tasting like perfume. Too much rosewater and you're in old dusty soap territory and too little you just cant taste it. To find your own balance add the rosewater little by little until it tastes just right. Also be wary of different brands, some taste sweeter, some more perfumed so tasting as you go is a sensible idea. For the actual panna cotta I have strayed from the usual dairy to add a little tang using buttermilk, which pairs beautifully with the sweet and sharp rhubarb. 

Rhubarb Panna Cotta 3.jpg


Buttermilk Panna Cotta with Rhubarb and Rose

Panna Cotta
2 gelatine sheets
250ml double cream
50g caster sugar
2 tsp vanilla bean paste
250ml buttermilk

Rose Roasted Rhubarb
1 batch roasted rhubarb (recipe here)
2-3 tsp rose water
edible rose petals, to serve (optional)


For the roasted rhubarb make as per the instructions here. Once finished simply add rose water, to taste. I would suggest 2-3 teaspoons. If serving chilled carefully transfer to a small container and refrigerate until needed. If serving warm I would make this as and when needed, if you reheat the rhubarb you run the risk of turning it mushy, I prefer it just to be holding its shape.

For the panna cotta place the gelatine into a small bowl and cover with ice cold water. 

Place the cream, sugar and vanilla into a small saucepan and bring to a simmer over medium heat, stirring to help the sugar dissolve evenly. Remove the gelatine from the water, squeezing off any excess moisture. Add to the pan and stir until dissolved. Remove from the heat and pour into a jug. Carefully divide the mixture between the dariole moulds and refrigerate for at least four hours. 

When ready to serve dip the dariole moulds into hot water to loosen the puddings then gently invert onto a plate to serve. Spoon some of the rhubarb onto the plate and enjoy.

Dont forget I have two more fabulous rhubarb recipes coming up this week so dont forget to keep checking back, the recipes only get better each day!

In Dessert
2 Comments
  • Recipes
  • Older
  • Newer

Twitter

  • Was 8 original films, 3 spin off films, a two part play not enough. Can we have something new. https://t.co/cBZdGEGeyv
    Apr 4, 2023, 1:46 PM
  • RT @deliciousmag: Cacio e pepe, but make it buns! These seriously cheesy bread rolls from @TheBoyWhoBakes are inspired by his favouri… https://t.co/oDZlaDgnN2
    Apr 2, 2023, 11:08 AM
  • RT @TheDailyShow: Congrats to Donald Trump on finally winning a majority of votes! https://t.co/ezP55HZgl0
    Mar 31, 2023, 12:43 AM

Instagram

This weeks bonus recipe, for subscribers to my newsletter, is this gorgeous sour cherry and coconut gateau basque. The crust is a buttery cross between pastry and cake, think a cakey cookie. The filling is a layer of sour cherry topped with a rich coconut custard. A real fun one to make too! Link to my newsletter can be found in my bio - #gateaubasque #pastrycream #coconut #sourcherry
In this months @olivemagazine (out today) the team came and photographed my petit kitchen and we talked about how we put our stamp on the place, without spending a fortune. We hated the bland kitchen that we inherited but, as it was relatively new an
In this months @olivemagazine (out today) the team came and photographed my petit kitchen and we talked about how we put our stamp on the place, without spending a fortune. We hated the bland kitchen that we inherited but, as it was relatively new and in good condition, it felt a waste to rip it out and we also didn’t want to spend the money it would take to rip out the whole thing and replace it (it’s a howdens shell so we could have done something cheaper like @plykeakitchens @holte.studio @madebyhusk) so instead I painted all of the cabinets, using @makeitrustoleum kitchen cabinet paint, to give it some personality and lighten the whole thing. Check out the magazine for the full run down. - #kitchendesign #kitchenremodel #rustoleumcabinettransformations #rustoleumkitchencupboardpaint #kitcheninspiration #theboywhobakes #olivemagazine
Are you making scones all wrong? Maybe, maybe not? But I do want to show you how I make them! This recipe is based on the method I learnt at @belmondlemanoir 12 years ago when I did a stage, and it makes the absolute lightest scones. And shock horror, it involves kneading the dough, albeit very lightly. You can get the full recipe in this weeks newsletter (free) linked in my bio. - #scones #bakingday #worldbakingday #afternoontea #hightea #englishscones #clottedcream #creamtea #theboywhobakes
facebook
  • Contact

The Boy Who Bakes

Edd Kimber

facebook