The Boy Who Bakes

Edd Kimber
  • Home
  • Recipes
  • My Books
  • Blog
  • Recipe Index
  • About
  • Home
  • Recipes
  • My Books
  • Blog
  • Recipe Index
  • About

Recipes

  • All
  • baking
  • Biscuits and Cookies
  • Breads and Quickbreads
  • Bundts
  • Cakes
  • Chocolate
  • Dessert
  • drinks
  • Holidays
  • Pastry
  • Scones and Quickbreads

The Ultimate Chocolate Chip Cookie

Edd Kimber June 19, 2017

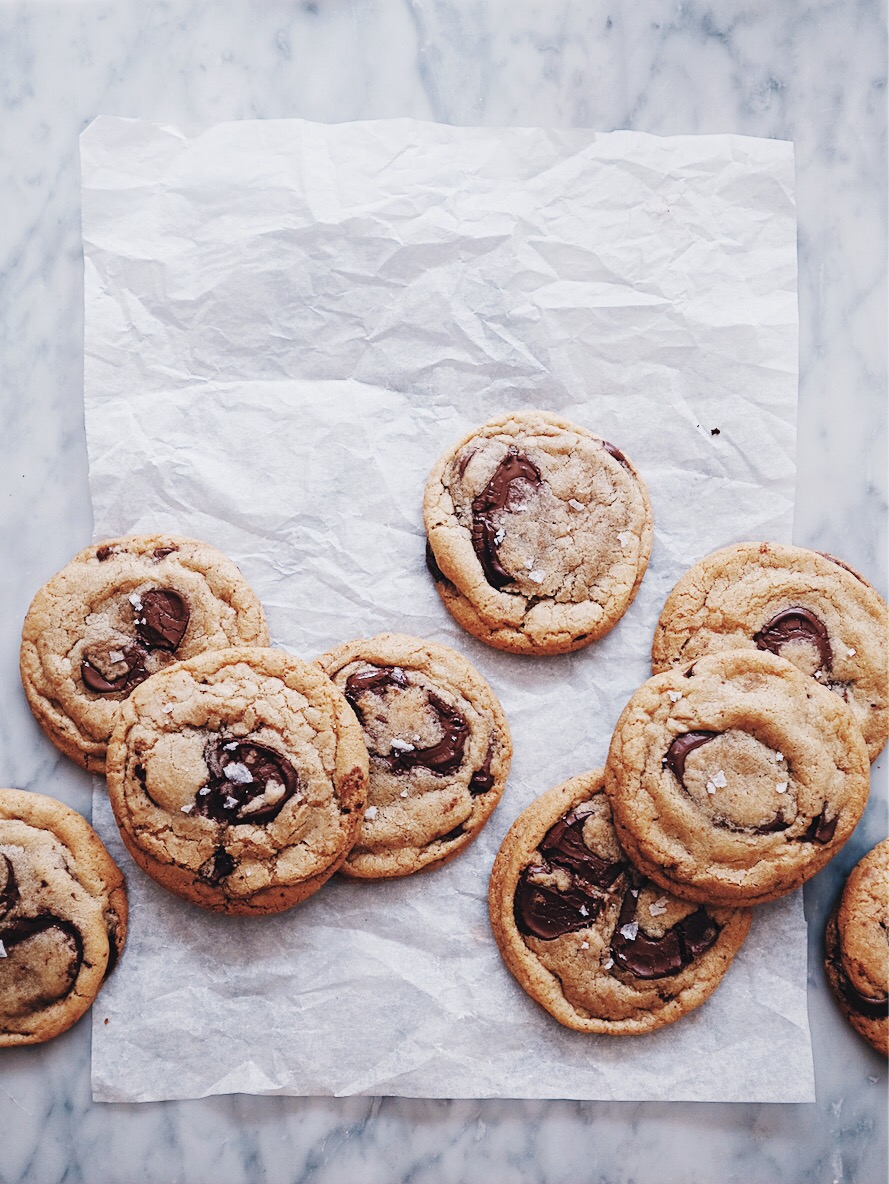
Is there anything better than a chocolate chip cookie? Maybe just a still warm from the oven chocolate chip cookie! Maybe it’s nostalgia but this simple recipe is one of those dishes that almost always makes feel like a little kid again, and we didn't even eat homemade cookies as a kid. Childish, though, these cookies are not. You might notice there is a nice amount of sea salt used in this recipe, both in the dough itself and sprinkled on the cookie after it bakes. By now we all now that sweet and salty play together very nicely, chocolate and salt especially so in my opinion. This recipe is my ultimate version of the chocolate chip cookie, so I decided it was time to film a version of the recipe for youtube so if you want get a peak of my kitchen (no complaints about any mess please) and see how to make the cookies take a look below.

Whilst the recipe is fairly straight forward there is a couple things important to this recipe. Firstly is the resting of the dough in the fridge. I first learnt about this idea in a New York Times article a few years back. It was suggested that the cookies would brown more, giving more of those toasty caramelised notes we all love in cookies. I tried it once and adopted the technique straight away. It makes a noticeable colour difference that translates beautifully into flavour. 

The second thing that of course affects the quality of the end cookie, is the chocolate used. If you've ever heard me talk about chocolate you know what im talking about. For those that haven't lets just say I’m quite evangelical when it comes to quality chocolate. I am not saying you have to spend a fortune, using Green and Blacks instead of Bourneville for example will make a huge difference. What I'm really saying is this, and maybe this is a little obvious, use a chocolate that you love, at least that way you know you will love the cookies. Secondly is all about quality. When you look at the packaging of chocolate there really should only be a small handful of ingredients. Cocoa in one of its forms (labeled variously as solids, mass, liquor, beans, butter etc) sugar, and then two optional ingredients, some sort of emulsifier, most commonly soya or sunflower lecithin, and finally vanilla (and of course some type of milk for milk chocolate). If there is anything else listed, any vegetable oils, or ingredients you just simply don't understand, then don't buy it. Chocolate like that is masquerading as the real deal and you’ll notice the difference. Also a quick note to American bakers. I have been noticing a lot of American websites listing chocolate as an ingredient and then seeing ‘candy melts’ used in the imagery. I cant say this strongly enough, that stuff bears no relation at all to chocolate and should never be used in replacement of chocolate. That isn't me being snobby its just an entirely different product that will work in a very different way. Again, enough of my lecturing, just use what you love. I could easily go into the ethics of buying chocolate, mass cocoa, beans types, single origins but I can feel you falling asleep through the screen so I am going to resist for now. 

Back to the recipe and just one more point about chocolate, its not more lecturing I promise, the format of the chocolate can also make an interesting difference to the cookies. Of course the easiest form for most people is buying a bar of chocolate and chopping it up. There is absolutely nothing wrong with this, half the time I do it this way myself. My preferred method though, is to use callets, small (often oval shaped) discs of chocolate. I use these as they don’t need chopping but as a byproduct of their shape they form big layers of chocolate in the cookies, so that the finished cookie is interlacing layers of dough and chocolate, the perfect format of a cookie. Formally the reserve of professional chefs this style of chocolate is slowly becoming more popular with home bakers and some producers are catching on. Valrhona are of course the pioneers of the form but most of the professional companies produce something similar now. Guittard, a family run San Francisco based company, who recently launched in the UK have chocolate in button form called wafers and in a unique shape called ‘super cookie chips’ which are somewhere between an old fashioned chocolate chip and a callet (I believe Guittard are currently available from Ocado, Amazon and Whole Foods). The chocolate I used in these however was from the British bakery, Pump St Bakery in Orford. For such a small village their bakery sure is producing incredibly high quality chocolate. On a recent visit around the kitchens and chocolate production they very kind to let me take home some of their new callets, which will very soon be available to buy. I decided to use a mix of milk and dark chocolate (mainly because it was what I had left) and trust me these were the best chocolate chip cookies ever!

My Ultimate Chocolate Chip Cookies
Makes 22-25

500g plain flour
1 tsp baking powder
1 tsp baking soda
1 tsp flaked sea salt
225g unsalted butter, diced and at room temperature
220g light brown sugar
220g caster sugar
2 large eggs
1 tsp vanilla extract
500g chocolate (I used a 50/50 mix of 60% dark milk and 70% dark from Pump St Bakery)

To make the cookie dough mix together the flour, baking powder, baking soda and salt together with a whisk (no need to sieve this mixture)

Add the butter and sugars into a large bowl and using an electric mixer, beat together until smooth and starting to lighten, about 3 minutes. Add the eggs one at a time, beating until fully combined, then mix in the vanilla.

Add the flour mixture mixing until just combined. Add in the chocolate and mix for a few seconds until evenly distributed. Chill the dough anywhere from 24-48 hours to help the dough to caramelise more as it bakes. 

Preheat the oven to 180ºC (160ºC fan oven) and line two baking trays with baking parchment. Use your hand or a mechanical ice cream scoop to form balls of dough, about 60/70g per cookie.

Bake six per tray for about 16-18 minutes or until golden around the edges but still a tad pale in the middle. Allow to cool for a few minutes before transferring to a wire rack to cool completely.

Kept in a sealed container these cookies will keep for up to four days. The balls of dough can also be frozen for a few months. Simply place the dough balls onto a parchment lined tray and pop in the freezer for an hour or so, until hardened. Once frozen you can throw the balls into a tupperware box or ziplock bag. Freezing on the tray first just means the dough balls wont stick to each other. When you fancy baking a cookie or two simply bake as above adding a minute or so onto the baking time. 

In Biscuits and Cookies
13 Comments

Layered Jam + Great British Jam Awards

Edd Kimber June 14, 2017

Today I have a simple question for you. Do you make your own jam? If yes, yay amazing! If no, why not? 

I know some people think it is too hard or too old fashioned or would just never consider making it themselves, why would you make it when it is so easily available?! Personally, I find it a wonderful way of preserving the summers’ fruits and once you've made a batch or two the flavour combinations you will come up with are endless, it can easily become a bit of a habit; in the last two weeks I have made about 20 jars. 

Making jam is actually an incredibly simple and quick process and the quality of homemade jam versus supermarket jams are like chalk and cheese. Once you’ve got the jam habit you'll end up with a fair few jars. Trust me when I say, even though it is a little thing, giving a friend or a family member a jar of homemade jam is a simple sweet gesture that will go down very well!

To convince you to get in the kitchen to whip up a batch of jam I have partnered with Tate & Lyle Sugars who have launched The Great British Jam Awards. And to demonstrate just how easy jam making is I’m going to share a variety of jam themed recipes over the next few weeks to inspire you to get jamming – so watch this space!

But, what is The Tate & Lyle Great British Jam Awards you ask? Tate & Lyle Sugars are encouraging you to get jamming at home and submit an image of your jam recipe to three categories - Traditional Jam with a Twist, Jam Bake and Jam on the Rocks (Jam Cocktail). 

For more information, make sure you check out @WeLoveBaking on Facebook or @WeLoveBaking_tl on Instagram!

For my first recipe I’ve made a traditional jam, but with a twist. After seeing a layered jam made by legendary preserve maker Christine Ferber in Pierre Herme’s patisserie in Paris, the idea lodged itself in my head and I just had to give it a go. For my flavours I have chosen fruits that make for easy jams plus I am using Tate & Lyle Sugars Jam Sugar which includes pectin so you don’t have to think about ratios, pectin, setting points or anything scary.

Strawberry Vanilla and Apricot Amaretto Layered Jam
Makes 4x380g jars

Strawberry Jam
500g Strawberries, quartered
500g Tate & Lyle Jam Sugar
Juice of 1 lemon
2 tsp vanilla bean paste

Apricot Jam
500g Apricots, diced
500g Tate & Lyle Jam Sugar
Juice of 1 lemon
4 tbsp Amaretto

To start the recipe it is best to have all ingredients for both jams prepped and ready, so that once the first jam is made you can immediately start the second, so weigh everything, except for the amaretto, for each jam in separate large pans and set aside about 30 minutes to whip up this recipe. 

Once you’re ready it is time for a basic but incredibly important step, sterilising the jars. Wash the jars and lids with hot soapy water then place onto a roasting tray and place into an oven heated to 180C for about 15 mins. This is a boring step, I know, but it just means the jams you are lovingly making will last 6 months without needing to refrigerate the unopened jars. Just before you start making the jam pop a couple plates into the freezer.

Start with the apricot jam (it sets firmer so the jams won’t blend), place the pan with all of the ingredients onto the hob, set over medium/low heat and cook, stirring until the sugar has dissolved. Increase the heat to medium/high and bring the jam to a rolling boil and cook for about 10 minutes. 

To test if the jam is fully cooked there are a few simple ways you can check. The first is the flake test. Lift the wooden spoon above the pan and allow the jam to drip back into the pan, if some dripscling to the spoon rather than running off back into the pan you're good. My preferred way of testing the jam is to take one of the plates out of the freezer and spoon on a little of the jam. Pop the plate aside for a minute or so before pushing the jam with your finger.Iif it wrinkles it will set, if it is still liquid, cook it for a little longer. 

Once the jam has finished cooking turn off the heat and leave for a minute or so to let it settle then stir in the amaretto. If there is any foam on top carefully skim that off and discard (there is nothing wrong with the foam, you could happily stir it back into the jam if you are feeling lazy, but technically the foam is full of air and can make the jam spoil a little quicker, also it just looks ugly so skim away). Remove the jars from the oven and carefully divide the jam between the jars, loosely placing the lids on top but not sealing. I like to transfer the jam to a jug to ease this process. 

The second jam is strawberry and the reason this needs to be on top is that strawberries are a low pectin fruit so it doesn't set as firmly as other fruits. Because we are using Jam Sugar we don't have to worry about this but it will set less than the apricot. Repeat the cooking process with the strawberries in the same way as the apricot jam. Once it is cooked, carefully pour it on top of the apricot jam and seal immediately. 

Kept in a cool dark place jam will keep for at least six months but once opened needs to be kept in the fridge and consumed within a couple weeks. 

1 Comment

Cardamon Cake with Strawberry and White Chocolate (a not so funfetti cake)

Edd Kimber May 26, 2017

Happy Birthday to…well, me actually! Yes I made my own birthday cake, I’m that person now! Actually, I don't really like to celebrate my birthday in a big way, not because I worry about ageing (I really couldn't care) I just don’t like the attention or the fuss, makes me feel a little uncomfortable. Normally I be happy to have a lazy morning in bed with a big mug of coffee opening cards and presents and have that be it. This year I decided *was convinced by friends* to change that so I have a weekend full of fun birthday treats and with the weather looking gorgeous I cant wait! But enough of my existential ramblings, back to cake, that’s what we are here for after all. Birthdays require a cake and come on folks, birthdays are not about subtle and elegant, it requires a taste level that just verges on the tacky. I also think there should be a law requiring all birthday cakes to include a ridiculous amount of sprinkles, but more on that later.

When it comes to birthday cakes I have one main rule, it has to be homemade. I don't care if you’re bringing your kid up on a no sugar diet or you're trying to watch your weight, a birthday is a day to indulge and enjoy yourself. My love of food and cooking comes from that slightly cliched idea of cooking and baking with my mum when I was still young, helping make the mince pies at christmas, making bread with Grandparents, spending a lot time in the kitchen with family, learning by doing. Key amongst those memories were the fabulous birthday cakes my mum made for my twin brother and me. These weren't complex cakes, topped with over the top ornate decorations, these were simple chocolate cakes with smarties and chocolate fingers used to create a train, chocolate buttons used to spell out our age that year. The key thing that I remember though is that they were homemade. I think it is this reason I equate baking with love; baking something for another person really shows you care, to my mind it is one of the nicest things you can do for someone. Short version of that rambling is - homemade birthday cakes are the way to go (even if you make it for yourself).

For my birthday cake I wanted a cake that was a little over the top, colourful and just a little bit garish. Yes I wanted to make a funfetti cake, sprinkles everywhere! Turns out with UK and EU regulations on certain colourings means it’s pretty hard to get really colourful sprinkles that give the right effect. The sprinkles I used, traditional 100s and 1000s, basically vanished once the cake was baked. So this was funfetti lite, just sprinkles on the top of the cake. 

I have also been experimenting with a new type, new to me anyway, of filming video recipe content and this little example is my first attempt. I will be doing a few more over the coming months, with some being full recipes so let me know what you think?

Cardamon Layer Cake with Strawberry and White Chocolate Buttercream

Cardamom Cake Layers
325g plain flour
25g cornflour
4 1/2 tsp baking powder
2-3 tsp ground cardamon (depending on how strong you want the flavour)
1/4 tsp salt
225g unsalted butter, room temperature
400g caster sugar
1 tsp vanilla bean paste
5 large egg whites, lightly beaten
250ml whole milk

Strawberry White Chocolate Swiss Meringue Buttercream
3 large egg whites (roughly 120g)
240g caster sugar
360g unsalted butter, diced and at room temperature
165g strawberry puree, see below
150g white chocolate, melted and cooled
100g strawberry jam

Strawberry Puree
125g diced strawberry
40g caster sugar
1 tsp vanilla bean paste

To make the cake first thing you need to do is make sure all of the ingredients are at room temperature, everything combines better this way, no split or curdled cake batter!

Preheat the oven to 180C (160C fan) and lightly grease three 8 inch round cake tins, lining the bases with parchment. 

Mix together the flour, cornflour, baking powder, cardamon and salt and set aside for the moment. Place the butter, sugar and vanilla into a large bowl and using an electric mixer beat together until light and fluffy, about 5 minutes. Whilst continuing to mix slowly add in the egg white a little at a time beating for about 30 seconds between additions. Once all the egg has been added mix in the flour mixture in three additions, alternating with the milk. Divide the batter equally between the prepared tins and bake in the preheated oven for about 25-30 minutes or until a skewer inserted into the middle of the cake comes out clean. Allow the cakes to cool in the tins for 10 minutes before turning out onto wire racks to cool completely. 

To make the buttercream first start with the strawberry puree. Place all of the ingredients into a small saucepan and cook over medium heat until the fruit starts to release its juice. Mash slightly with a fork and continue cooking until the mixture is very juicy and the liquid has reduced slightly, this should take no more than a few minutes. Remove the pan from the heat and use a stick blender to puree. Set aside to cool fully before using. 

A post shared by Edd Kimber (@theboywhobakes) on May 24, 2017 at 10:28am PDT

For the buttercream place the egg whites and sugar into a heatproof bowl and set over a pan of simmering water. Gently whisk until the mixture is warm to the touch and the sugar has dissolved. To test it is ready dip your forefinger and thumb into the bowl and rub together. If you can feel sugar grains, heat for a little longer. Remove the bowl from the heat and whisk using an electric mixer for about 5-10 minutes or until the meringue is a room temperature. Whilst continuing to whisk, add the butter a little piece at a time. By the time all of the butter has been incorporated you should have a silky buttercream texture. Pour in the cooled chocolate and strawberry mixtures and mix to combine. 

To assemble the cake place the first layer onto a cardboard cake round or a serving plate and top with half of the jam, spreading almost to the outside edge. Top with a layer of the buttercream and spread to the outside edge. Repeat with the second cake and finish by placing the last layer of cake on top, spreading the remaining buttercream over the top and sides of the cake. 

To decorate scatter as many sprinkles across the cake as your inner child desires. 

Kept covered this cake will keep for up to three days but really who is going to keep a cake lying around that long. Make it, light some candles, make a wish and dig in!


In Cakes
5 Comments

Beef Cheek Ragu

Edd Kimber March 17, 2017

We are most definitely in peak comfort food season, politically, emotionally, weatherly (not a word I know) everything this time of year just screams comfort so you wont be catching me eating a lettuce leaf, chia seed, green juice, smoothie bowl concoction. Okay, so I might be exercising for the first time in years but that doesn't mean I don't want to enjoy my food, I’m not that crazy! This type of food, low effort maximum flavour, is what I am all about, its comforting in taste and also in the making. That gentle bubble of a simmering pot, the occasionally stir and the sneaky taste, all accompanied by a glass of red wine. This is how I want to spend my dark winter nights. Nothing makes me happier than throwing something in a pot and then hours later something magical emerges. Its transformative, the same reason I love baking, and utterly satisfying. 

This ragu is, by far (and not simply in the usual website hyperbole) the best thing I have cooked in quite a while. I might as well call the dish ‘the ultimate ragu', or the ‘best ever ragu’, I've got to get that website traffic up right? Okay, okay it might not be the best thing, hell it might not even be the best ragu I ever make. All I know is it is bloody marvellous and whilst it serves a whole host of people, it disappears very quickly around these parts.

Now Ragu. Lets talk. British Bolognese, whilst comforting to me in a whole different way, is not the real deal. One of my death row dishes happens to be my mums’s bolognese (yes one, if I am on death row, you know I'm ordering at least three courses) but lets be honest, it isn't the same thing, Italians must shudder at what we refer to as a bolognese sauce. Ragu is simply a meat sauce, slowly cooked with just a little, if any, tomato, not the other way around. Whilst I make no claims to the authenticity of this dish (no paella backlash for me please) I think this is probably a little more Italian than what I grew up with. 

Beef Cheek Ragu
(serves 10-12)

3 large beef cheeks (about 1.2kg), trimmed of any excess fat or gristle
5 tbsp olive oil
1 large onion, diced
2 medium carrots, diced
2 sticks celery
4 garlic cloves, finely chopped
4 sprigs rosemary
4 sprigs thyme
2 bay leaves
2 tbsp tomato puree
125ml red wine
750ml beef stock
1x400g tin of chopped tomatoes
fresh parsley and parmesan, to serve

Get out your biggest pan, this makes a lot! Pat the beef cheeks dry with some kitchen paper and season well with salt.

Heat 3 tbsp of the oil in a large saucepan (a big cast iron casserole is perfect for this) over medium/high heat and brown the beef cheeks until deep brown all over. Don’t skimp on this step as the browning really helps to give the sauce a deep meaty flavour. Remove the cheeks and set aside on a plate for the moment. 

Reduce the heat to low and add the remaining oil to the pan, tipping in the onion, carrots and celery, sweating down for 10-15 minutes or until soft. Add the garlic, rosemary, thyme and bay leaves and cook for a couple minutes. Add the tomato puree and cook for a minute or two. Pour in the glass of red wine and cook until reduced by two thirds. At this point simply add the beef cheeks back into the pan along with the beef stock and the tomatoes. Bring the pan to a boil then reduce the heat to a gentle simmer and cook for 3-4 hours, stirring very occasionally until the meat is super tender and falling apart. Using a couple forks to shred the meat, it should take almost no effort and and simply fall apart. Depending on the consistency of the sauce continue to cook a little longer until thick and reduced. 

To serve coat some pappardelle in a little of the sauce and finish with a sprinkling of fresh parsley and parmesan. 

Notes - This obviously makes a ton of sauce but trust me, knowing you have this stored away in your freezer will make you very happy! I like to portion it up into ziplock bags, pressing into a nice flat layer. This makes it easier to store, taking up less space in the freezer. It also makes it defrost much quicker. 

1 Comment
  • Recipes
  • Older
  • Newer

Twitter

  • Was 8 original films, 3 spin off films, a two part play not enough. Can we have something new. https://t.co/cBZdGEGeyv
    Apr 4, 2023, 1:46 PM
  • RT @deliciousmag: Cacio e pepe, but make it buns! These seriously cheesy bread rolls from @TheBoyWhoBakes are inspired by his favouri… https://t.co/oDZlaDgnN2
    Apr 2, 2023, 11:08 AM
  • RT @TheDailyShow: Congrats to Donald Trump on finally winning a majority of votes! https://t.co/ezP55HZgl0
    Mar 31, 2023, 12:43 AM

Instagram

This weeks bonus recipe, for subscribers to my newsletter, is this gorgeous sour cherry and coconut gateau basque. The crust is a buttery cross between pastry and cake, think a cakey cookie. The filling is a layer of sour cherry topped with a rich coconut custard. A real fun one to make too! Link to my newsletter can be found in my bio - #gateaubasque #pastrycream #coconut #sourcherry
In this months @olivemagazine (out today) the team came and photographed my petit kitchen and we talked about how we put our stamp on the place, without spending a fortune. We hated the bland kitchen that we inherited but, as it was relatively new an
In this months @olivemagazine (out today) the team came and photographed my petit kitchen and we talked about how we put our stamp on the place, without spending a fortune. We hated the bland kitchen that we inherited but, as it was relatively new and in good condition, it felt a waste to rip it out and we also didn’t want to spend the money it would take to rip out the whole thing and replace it (it’s a howdens shell so we could have done something cheaper like @plykeakitchens @holte.studio @madebyhusk) so instead I painted all of the cabinets, using @makeitrustoleum kitchen cabinet paint, to give it some personality and lighten the whole thing. Check out the magazine for the full run down. - #kitchendesign #kitchenremodel #rustoleumcabinettransformations #rustoleumkitchencupboardpaint #kitcheninspiration #theboywhobakes #olivemagazine
Are you making scones all wrong? Maybe, maybe not? But I do want to show you how I make them! This recipe is based on the method I learnt at @belmondlemanoir 12 years ago when I did a stage, and it makes the absolute lightest scones. And shock horror, it involves kneading the dough, albeit very lightly. You can get the full recipe in this weeks newsletter (free) linked in my bio. - #scones #bakingday #worldbakingday #afternoontea #hightea #englishscones #clottedcream #creamtea #theboywhobakes
facebook
  • Contact

The Boy Who Bakes

Edd Kimber

facebook