The Boy Who Bakes

Edd Kimber
  • Home
  • Recipes
  • My Books
  • Blog
  • Recipe Index
  • About
  • Home
  • Recipes
  • My Books
  • Blog
  • Recipe Index
  • About

Recipes

  • All
  • baking
  • Biscuits and Cookies
  • Breads and Quickbreads
  • Bundts
  • Cakes
  • Chocolate
  • Dessert
  • drinks
  • Holidays
  • Pastry
  • Scones and Quickbreads
April Pics (6 of 8).jpg

How to Make Kouign Amann

Edd Kimber April 26, 2018

I am currently day dreaming about Paris, longing for a lazy morning drinking coffee at my favourite coffee shop in Belleville, wandering the streets of Le Marais going from patisserie to patisserie, finishing the day with a carafe of rosé at my favourite street side wine bar. I get this same feeling every time spring starts to rear its head, when the sun starts to show itself and flowers appear everywhere. Maybe it is because Spring is one of my favourite seasons in Paris or maybe it is when I grow weary of London and need to escape for a while, either way without a trip planned anytime soon I will have to get my francophile fix by making some pastries.

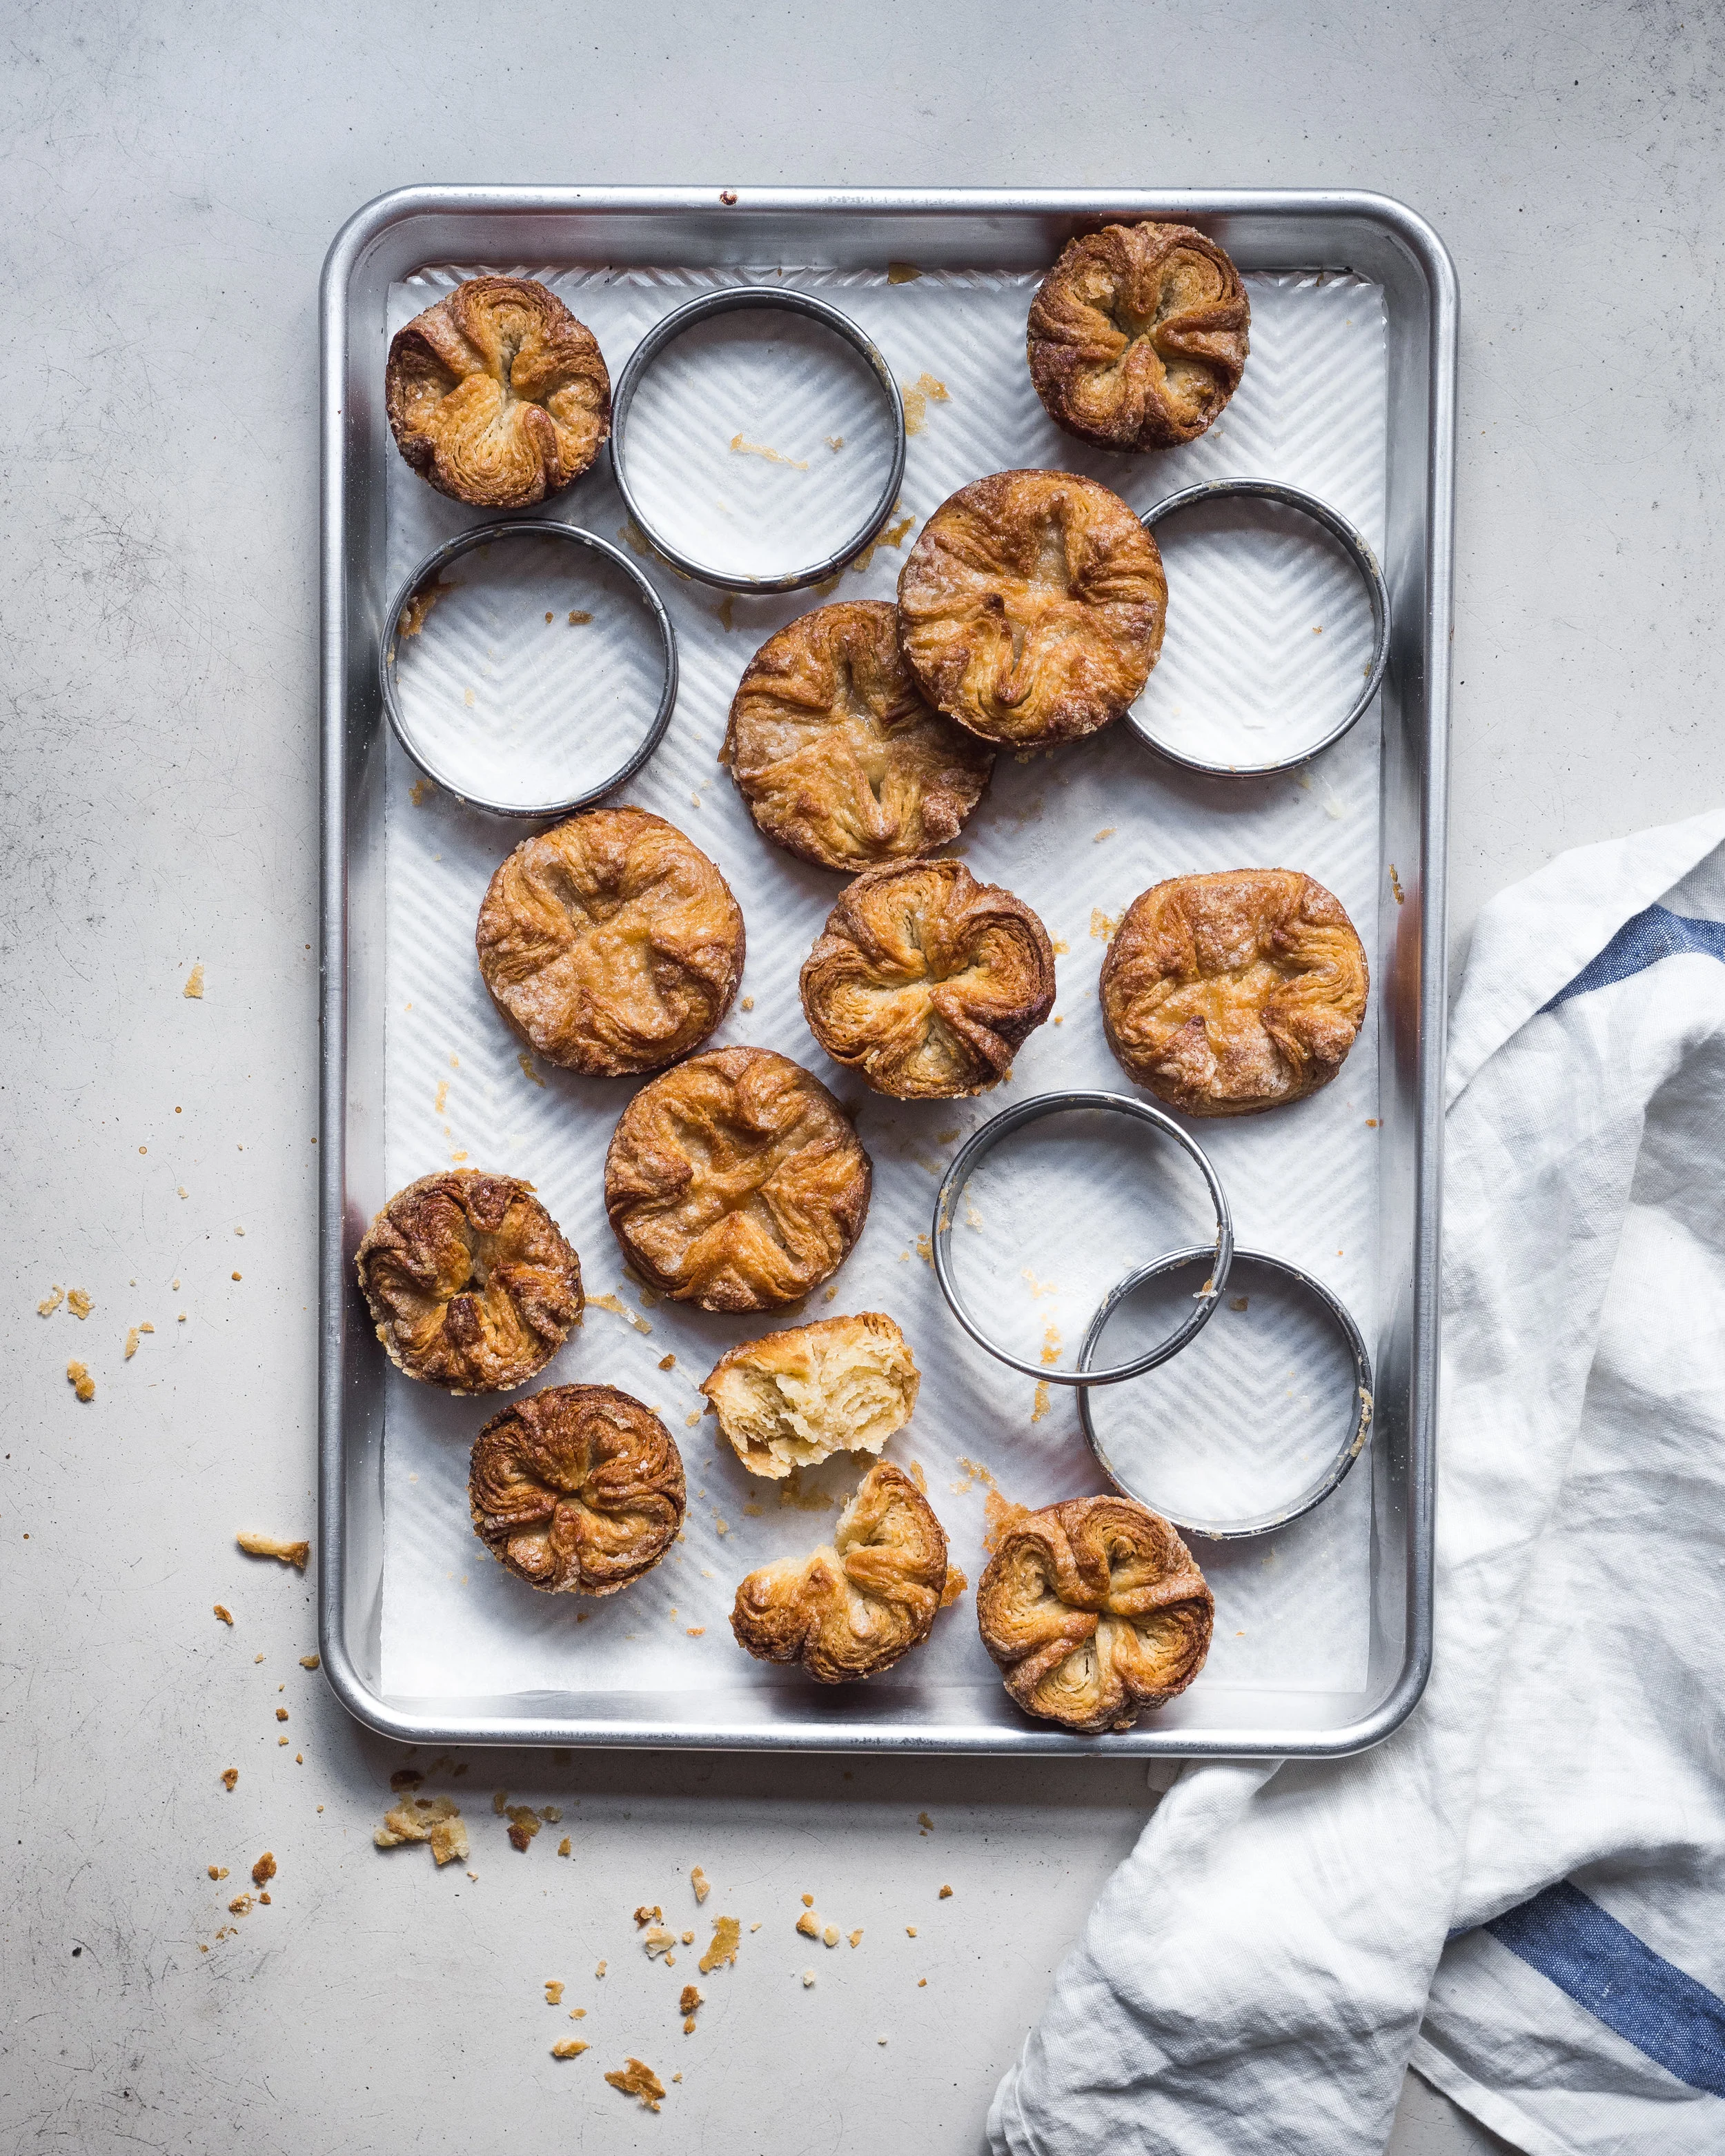
What do you get when take a croissant but as you roll and fold the dough you liberally sprinkle in a layer of sugar? This magical sounding pastry is the kouign amann, which is Breton for butter cake. Butter cake, does anything sound better than that? The folk in the north of France, in the Brittany region, are known for their love of, and the production of, wonderful butter and salt and they put it to very good use in their pastries and confections. If you've had anything salted caramel flavoured then you have Brittany to thank. I happen to think it is the kouign amann though that shows off the flavours of Brittany best, a sweet caramel laced pastry laminated with butter, simple but absolutely delicious. I would say they were elegant but really this is a rustic pastry, that has over the last few years slowly become a trend with the pastry becoming the trademark offering at more than a handful of bakeries (if you ever go to San Francisco both Jane The Bakery and B.Patisserie make world class versions), and these bakeries dont just make the classic version, they have peppered them with flavours as simple as chocolate or apple and flavours as unusual as black sesame. The version below is from my book Patisserie Made Simple and uses a version of my simplified croissant dough, although these are quicker to make than the croissants themselves, if you want to dig further into French baking then make sure you check out my book.

Kouign Amann

60ml whole milk
125g plain flour
125g strong white bread flour
7g active dry yeast (1 envelope)
150g caster sugar
1/2 tsp salt
225g unsalted butter, chilled

Put the milk plus 60ml lukewarm water in a medium bowl and mix to combine, then let sit. Put the flours, yeast, 2 tablespoons of the sugar, and the salt into a large bowl and mix to combine. Dice 125g of the butter into cubes. Add to the bowl and using a pastry blender cut in the butter briefly to form large chunks. This is the most important stage: if the butter is mixed too much into the flour, the dough won’t expand and puff up as it bakes, so it is better to err on the side of caution. If you can’t see chunks of butter, you have blended in the butter too much. 

Transfer the butter and flour mixture into the liquid, and using a spatula, fold the dry ingredients into the liquid, trying to combine everything without making the butter pieces any smaller. Once you have formed a rough dough, transfer to the countertop and very lightly work it into a ball of dough. Form the dough into a flat rectangle, wrap in plastic wrap and put it in the refrigerator for 45-60 minues or until cool and a little firm.

Meanwhile, put the remaining chunk of butter in the freezer to chill it thoroughly (it needs to be hard). Lightly flour a countertop and roll the dough out with the short edge facing you into a long rectangle, about 20x50cm (although the exact measurements are not crucial). Brush off any excess flour. Take the butter out of the freezer and coarsely grate it over the bottom two-thirds of the dough. Fold the top third of the dough over the middle third, then fold the bottom third over the other two-thirds, as if folding a business letter. This is known as the first turn. Wrap the dough in plastic wrap and chill in the refrigerator for 20 minutes. Remove the dough from the refrigerator and turn the dough 90 degrees so that the open ends are facing you, with the seams on the right.

Repeat the rolling process, and before folding, sprinkle the dough with half the remaining sugar. Fold the dough into thirds as before and repeat this a second time. Wrap the finished dough in plastic wrap and chill for 30 minutes before using. Any longer and the sugar will start to liquefy and the dough will become difficult to work with.

Line a large baking sheet with parchment paper. Remove the dough from the refrigerator and cover the countertop with a small amount of caster sugar. Roll the dough out as before. Using a sharp knife, trim the edges of the dough, then cut the pastry into two strips, and divide each strip into five equal squares. Fold the corners of each square into the centre and press gently to secure in place. Put each pastry on the prepared baking sheets, preferably inside lightly buttered tart rings (these help to give the pastries a better shape; if you don’t have them, you can bake the pastries inside buttered muffin tins although I find them to a little on the denser side this way). Leave the pastries to rest for 30 minutes.

Preheat the oven to 190C / 375F.

Bake for 20 to 25 minutes until golden brown and the sugar has caramelised. Remove from the oven and remove the tart rings, if using, then leave the pastries to cool on the baking sheet. I prefer to serve these at room temperature when the sugar on the outside has set, giving you a wonderful texture. They are best served on the day they are made.

From my book Patisserie Made Simple - buy here!

April Pics (8 of 8)-2.jpg
In Pastry
9 Comments

Wild Garlic and Zataar Savoury Scones

Edd Kimber April 19, 2018

I have been making version of these savoury scones for years, switching up the flavours on a whim or according to whatever ingredient is in season. My favourite incarnation of these scones though has to be ones that in some manner include wild garlic. This magical ingredient, which grows wild all across the UK which means if you want to go foraging then this recipe is for you (just be careful wild garlic looks annoyingly similar to lily of the valley which is poisonous so if your confident with distinguishing between the two it is best to find a different source). Generally I find the best place to go looking for the garlic is in damp woodland, where it often grows in abundance. The only other tip I will give you, because im no foraging expert, is that avoid the garlic that is close to the paths and walkways. As these areas are popular with dog walkers the garlic on the sides of the paths has a big risk of being contaminated and not something you want to eat. But enough with that lets talk flavour, in these scones I have paired them with cheese as is common for a savoury scone plus a little background fennel seed with a final flourish topping the scones with a liberal dusting of zataar,  a lebanese herb blend that I have a particular fondness for especially alongside egg and cheese. 

Wild Garlic and Zataar Savoury Scones

350g self raising flour
1 tsp baking powder
1/2 tsp salt
100g unsalted butter, diced and chilled
150g cheddar, grated (plus a little extra for topping)
6 rasher of streaky bacon, cooked until crisp and then dices
75g wild garlic, finely chopped
2 tsp fennel seeds
150ml whole milk
2 large eggs (plus extra for glazing)
zataar, for topping

To make the scones line a couple baking trays with parchment paper and preheat the oven to 190C (170C fan).

In a large bowl mix together the flour, baking powder and salt. The addition of baking powder when you are already using self raising flour is simply that cheese scones can have a tendency to be on the heavy side and need a helping hand to rise and stay light. Toss the butter through the flour and then using your hands or a pastry blender rub in the flour until the butter is in irregular sized pieces, non larger than peas. Mix in the cheddar, bacon wild garlic and fennel seeds, evenly distributing the ingredients. Whisk together the milk and eggs then pour into the middle of the scone mixture, then using a butter knife mix to form a shaggy dough. Tip the dough out onto a floured worksurface and use your hands to briefly bring together to form a uniform dough. Lightly flour the worksurface and roll or press out to a thickness of about 2.5cm thick. Use a 7cm round cookie cutter cut out as many scones as possible. Gently re-knead the off cuts to cut out the last few scones. Transfer to the baking trays. 

To finish lightly brush the top of the scones with a little beaten egg and sprinkle with a healthy dose of zataar and a little extra grated cheese. Bake in the preheated oven for 25 minutes or until golden on top. Best served still a little warm, within a couple days of baking. The scones can also be frozen once fully cooled. 

Scones (1 of 1).jpg
In Breads and Quickbreads
3 Comments
Tahini Shortbreads (1 of 1).jpg

Tahini Shortbread Cookies with Salted Honey Ganache

Edd Kimber April 12, 2018

I seem to become easily obsessed with ingredients, some become short lived obsessions some stick around for years. Tahini has become my most recent obsession, I have been sneaking it into as many recipes as I can. The recipe that started this love affair was a chocolate tahini bundt cake that I developed for Olive Magazine (it's still one of my favourites). The combo of chocoalte and tahini is magical, it just works. If you've never had tahini in a sweet recipe think of it playing a similar role to peanut butter, it has a deep roasted sesame flavour and works beautifully in sweet recipes. This cookie recipe was inspired by a picture of shortbread from a bakery in the states; it was thick and simply served, no adornment, no filling, just simply served sprinkled with black and white sesame seeds. In my mind this turned into what we have here, a crisp tahini shortbread sandwiched together with a salted honey ganache and like most recipes that sit on that line of sweet and savoury they're incredibly moreish, they're also slice and bake cookies making them quick and easy to make. 

Tahini Shortbread Cookies with Salted Honey Ganache
Makes about 35 cookies

200g unsalted butter, room temperature
100g caster sugar
75g light brown sugar
1 tsp vanilla extract
1/2 tsp salt
100g tahini
385g plain flour

Salted Honey Ganache
100g dark chocolate (65-75% cocoa solids)
100g double cream
2 tbsp honey
2 tbsp tahini
1/2 tsp flaked sea salt

Decoration
1 large egg white
a mix of black and white sesame seeds (2/3 white 1/3 black)

To make the cookies place the butter and sugars into the bowl of a stand mixer, along with the vanilla and salt. With the paddle attachment beat together for about 5 minutes or until light and fluffy. Scrape in the tahini and mix briefly to combine. Add the flour and mix briefly just until combined, you want to avoid over mixing at this point as the cookies will come out tough. Tip the dough out onto the worksurface and use your hands to bring together into a uniform dough. 

Cut the dough in half and form into thick sausage shapes, roughly 5cm thick. As these are slice and bake cookies you want to get these logs as round as possible, if you want to learn a nice tip on how to do this you can watch the video. Wrap the logs of dough in clingfilm and refrigerate for about 4 hours until firm. 

Preheat the oven to 180C 350F and line three baking trays with parchment paper. 

Using a thin sharp knife cut the cookies into rounds, about 4-5mm thick and place onto the prepared baking trays. Dont worry too much about the cookies spreading, you can leave just a couple cm's between each cookie. Lightly brush each cookie with egg white and sprinkle liberally with the sesame seed mix. Bake in the preheated oven for about 10-12 minutes or until lightly browned. Allow to cool on the baking trays.

For the filling place the cream, honey, tahini and salt into a small saucepan and over medium heat bring to a simmer. Make sure to stir this mixture regularly as the honey will sink to the bottom of the pan catching and burning quite quickly. Once at a simmer pour the cream mixture into a bowl with the chocolate and sit for a couple minutes before stirring together to form a silky smooth ganache. Set aside until thickened enough to hold its shape then scrape into a piping back and pine rounds of ganache onto half of the cookies, sandwiching together with a second cookie. 

Over the time the ganache will soften the cookies so I prefer to keep these in a sealed container in the fridge, where they will keep for up to four days. 

In Chocolate, Biscuits and Cookies
3 Comments
Brownie Cookies (1 of 1).jpg

Brownie Crinkle Cookies

Edd Kimber March 29, 2018

First off let me apologise for the sheer amount of teasing I did with this recipe, over on Instagram I have been telling you this recipe was on its way, far too many times. The simple reason being that whilst it fudgy, rich and delicious after the first test I wanted to make sure the texture was spot on each and every time it was baked. I wanted to get the texture perfect, the right amount of spread, the fudgy inside and the shiny glossy top. Turns out this cookie, being made of a small handful of ingredients and very limited flour, is very susceptiple to changes depending on the temperature of the batter. Let the chocolate and butter cool down too much and the cookies spread way too much, use it while too hot and the cookies loose that beatiful glossy finish and dont spread enough. After many, many tests, every single one a terrible chocolate filled chore, I finally nailed the recipe. I really wanted to make a intensely chocolate flavoured cookie that had a texture that reminded you of that perfect fudge brownie. What I was trying to avoid however was a recipe that needed a prolonged chilling stage, in fact I wanted to avoid chilling completely if possible, I need my cookie fix way quicker than that! And that isnt to say a cookie like this that is chilled cant be fabulous, this recipe itself is based off my rye chocolate cookies from Olive Magazine which are chilled for 4 hours before baking and they are fabulous. After a lot of tinkering I am finally happy with the cookie and I cannot wait to see you guys making it, and with Easter weekend coming up fast this would be the perfect thing to make.

Brownie Cookies (1 of 1)-2.jpg

Note
Just a quick note on ingredients before I get to the recipe. For this cookie, with so few ingredients, it is really important to use good quality products. For the chocolate stick to something that a) you love the taste of and b) is around the 70% cocoa content mark. This isn't about the notion that 70% cocoa is an indicator of quality, it really isn't, it's more so that it tells you more about what the chocolate is made up of. If you use a 45% chocolate, for example, that's a lot more sugar and will change the texture of the cookies, and trust me these cookies, whilst incredibly simple to make, don't like being messed around with that much. The second important ingredient to choose carefully is the cocoa powder. I used the dutched cocoa rouge from Guittard because it has a deep rich flavour and colour. If you use a natural cocoa instead it wont lend the same colour or intensity of flavour. Now I know a lot of you are know saying, 'what on earth is dutched cocoa' and simply put, it is cocoa powder that has been treated with an alkali that darkens the colour and makes for a richer cocoa. If you are in the UK, or really anywhere in Europe thankfully this is generally what is available, but if you are in the US look for a cooca that mentions that mentions an alkali or calls itself dutched cocoa. Just avoid anything labeled natural, it wont be as good in this recipe. If the cocoa really doesnt give any indicator of wheter it is dutched or not look at the colour, generally speaking dutched cocoa has a deeper darker brown colour, less bright and red than natural cocoa. If you want more info about this, check out this great piece on Serious Eats

Brownie Crinkle Cookies
Makes 10

200g dark chocolate (around 65-70% cocoa solids), finely chopped
125g unsalted butter, diced
150g caster sugar
100g light brown sugar
2 large eggs
130g plain flour
3 tbsp cocoa powder (dutch processed)
1 tsp baking powder
1/4 tsp salt (plus flaked sea salt for sprinkling)

Temperature and timing is very important with this recipe so before you start get all the ingredients weighed out, two baking trays lined with parchment paper and the oven preheated to 180C (160C fan) 350F.

Place the butter and chocolate into a heatproof bowl and set over a pan and gently simmering water. Allow to melt, stirring occasionally until fully melted. Remove the bowl from the heat and set aside for the moment. In the bowl of a stand mixer fitted with the whisk attachment, or using an electric hand mixer, whisk together the eggs and sugars, on medium-high speed, for exactly 5 minutes. Once the eggs have been mixing for exactly 5 minutes pour in the chocolate mixture and mix for a minute or so to combine. Meanwhile mix together the dry ingredients, sieving the cocoa powder if it has lots of lumps. Add the dry ingredients and mix very briefly just until combined. Use your spatula to give one last mix, scraping the bottom of the bowl to make sure everything is evenly combined. Use a ice cream scoop to form the cookies. The batter will be a little on the wet side, so invert the cookie scoop just above the baking tray to avoid spills. Make sure to leave plenty of space between each cookie as they will spread. Sprinkle each cookie with a little flaked sea salt before placing into the oven and baking for 12 minutes. The cookies will come out of the oven with that wonderful crinkled look and slightly domed. They will collapse a little as they cool but this helps form that perfect fudgy centre. The cookies will be very soft so allow them to cool on the baking trays for at least 20-30 minutes before removing from the tray to cool completley. 

These cookies will keep for 4-5 days but will be best within the first 3 days. 

In Chocolate, Biscuits and Cookies
132 Comments
  • Recipes
  • Older
  • Newer

Twitter

  • Was 8 original films, 3 spin off films, a two part play not enough. Can we have something new. https://t.co/cBZdGEGeyv
    Apr 4, 2023, 1:46 PM
  • RT @deliciousmag: Cacio e pepe, but make it buns! These seriously cheesy bread rolls from @TheBoyWhoBakes are inspired by his favouri… https://t.co/oDZlaDgnN2
    Apr 2, 2023, 11:08 AM
  • RT @TheDailyShow: Congrats to Donald Trump on finally winning a majority of votes! https://t.co/ezP55HZgl0
    Mar 31, 2023, 12:43 AM

Instagram

This weeks bonus recipe, for subscribers to my newsletter, is this gorgeous sour cherry and coconut gateau basque. The crust is a buttery cross between pastry and cake, think a cakey cookie. The filling is a layer of sour cherry topped with a rich coconut custard. A real fun one to make too! Link to my newsletter can be found in my bio - #gateaubasque #pastrycream #coconut #sourcherry
In this months @olivemagazine (out today) the team came and photographed my petit kitchen and we talked about how we put our stamp on the place, without spending a fortune. We hated the bland kitchen that we inherited but, as it was relatively new an
In this months @olivemagazine (out today) the team came and photographed my petit kitchen and we talked about how we put our stamp on the place, without spending a fortune. We hated the bland kitchen that we inherited but, as it was relatively new and in good condition, it felt a waste to rip it out and we also didn’t want to spend the money it would take to rip out the whole thing and replace it (it’s a howdens shell so we could have done something cheaper like @plykeakitchens @holte.studio @madebyhusk) so instead I painted all of the cabinets, using @makeitrustoleum kitchen cabinet paint, to give it some personality and lighten the whole thing. Check out the magazine for the full run down. - #kitchendesign #kitchenremodel #rustoleumcabinettransformations #rustoleumkitchencupboardpaint #kitcheninspiration #theboywhobakes #olivemagazine
Are you making scones all wrong? Maybe, maybe not? But I do want to show you how I make them! This recipe is based on the method I learnt at @belmondlemanoir 12 years ago when I did a stage, and it makes the absolute lightest scones. And shock horror, it involves kneading the dough, albeit very lightly. You can get the full recipe in this weeks newsletter (free) linked in my bio. - #scones #bakingday #worldbakingday #afternoontea #hightea #englishscones #clottedcream #creamtea #theboywhobakes
facebook
  • Contact

The Boy Who Bakes

Edd Kimber

facebook