The Boy Who Bakes

Edd Kimber
  • Home
  • Recipes
  • My Books
  • Blog
  • Recipe Index
  • About
  • Home
  • Recipes
  • My Books
  • Blog
  • Recipe Index
  • About

Recipes

  • All
  • baking
  • Biscuits and Cookies
  • Breads and Quickbreads
  • Bundts
  • Cakes
  • Chocolate
  • Dessert
  • drinks
  • Holidays
  • Pastry
  • Scones and Quickbreads

Spelt Sourdough Cinnamon Buns

Edd Kimber February 28, 2019

Post is sponsored by Doves Farm

Did you know it’s #RealBreadWeek? A week celebrating bread made the old fashioned way, nothing but flour, water, salt and yeast, no funny chemicals or mass commercial processes. Unsurprisingly, I can happily get behind this. As a guy who has tried and failed on far too many occasions to successfully work with sourdough the last couple months have been a revelation, as I committed myself to conquering this week spot in my baking arsenal. I am now regularly turning out loaves of bread I am childishly excited about. I would love to say I am joking but I have performed an actual happy dance when I pull from the oven, a blistered loaf of sourdough that looks like it has come from the shelves of one of the many amazing bakeries London has to offer. I do know however that I will never bake loaves of bread more than once a week and so the question is, what else to make with the starter that is happily hibernating in my fridge right now? The answer is clearly cinnamon buns, it’s the very obvious, very delicious choice. To celebrate all things bread we also have to talk flour and for that I turned to Doves Farm, one of the UK’s best organic flour companies. I am currently working with them to show you a whole world of alternative grains, specifically ‘ancient' grains. 

Now the term ancient grain might not be one you’re accustomed to hearing but it has a fairly simple definition. It is a form of grain that has been cultivated for food for over millennia and one that hasn’t been changed much through selective breading like modern cereal varieties like rice, corn and the wheat varieties we use more widely (the stuff found in regular flours). This means grains like buckwheat, KAMUT®  khorasan and spelt. The bigger question might be why use ancient grains when regular wheat is so readily available. The answer I am most interested in is flavour. Those of you that have tried something that pairs the flavours of rye and chocolate together understand what I mean, these grains have their own unique flavours and ones that can enhance your recipes. 

edited.jpg

For today’s recipe I am using spelt. Spelt is one of the ancient grains we are maybe more accustomed to, you’ve been able to buy it supermarkets for years and it’s one of the easiest to use. You can generally substitute in at least 50% spelt flour without any changes to the recipe and in some cases you can use even more. The spelt lends a more complex flavour and has an inherent touch of sweetness. For this bread dough I used 100% spelt except for the starter which I maintain with regular white bread flour. If you need a guide to starting a sourdough starter, Doves Farm have a handy little guide.


Spelt Sourdough Cinnamon Rolls

Spelt Dough
200g sourdough starter (100% hydration)
200ml milk
50g light brown sugar
450ml Doves Farm Organic White Spelt Flour  
1 tsp salt
75g unsalted butter, room temperature
1 large egg

Cinnamon Filling
200g light brown sugar
1 heaped tbsp ground cinnamon
100g unsalted butter, very soft
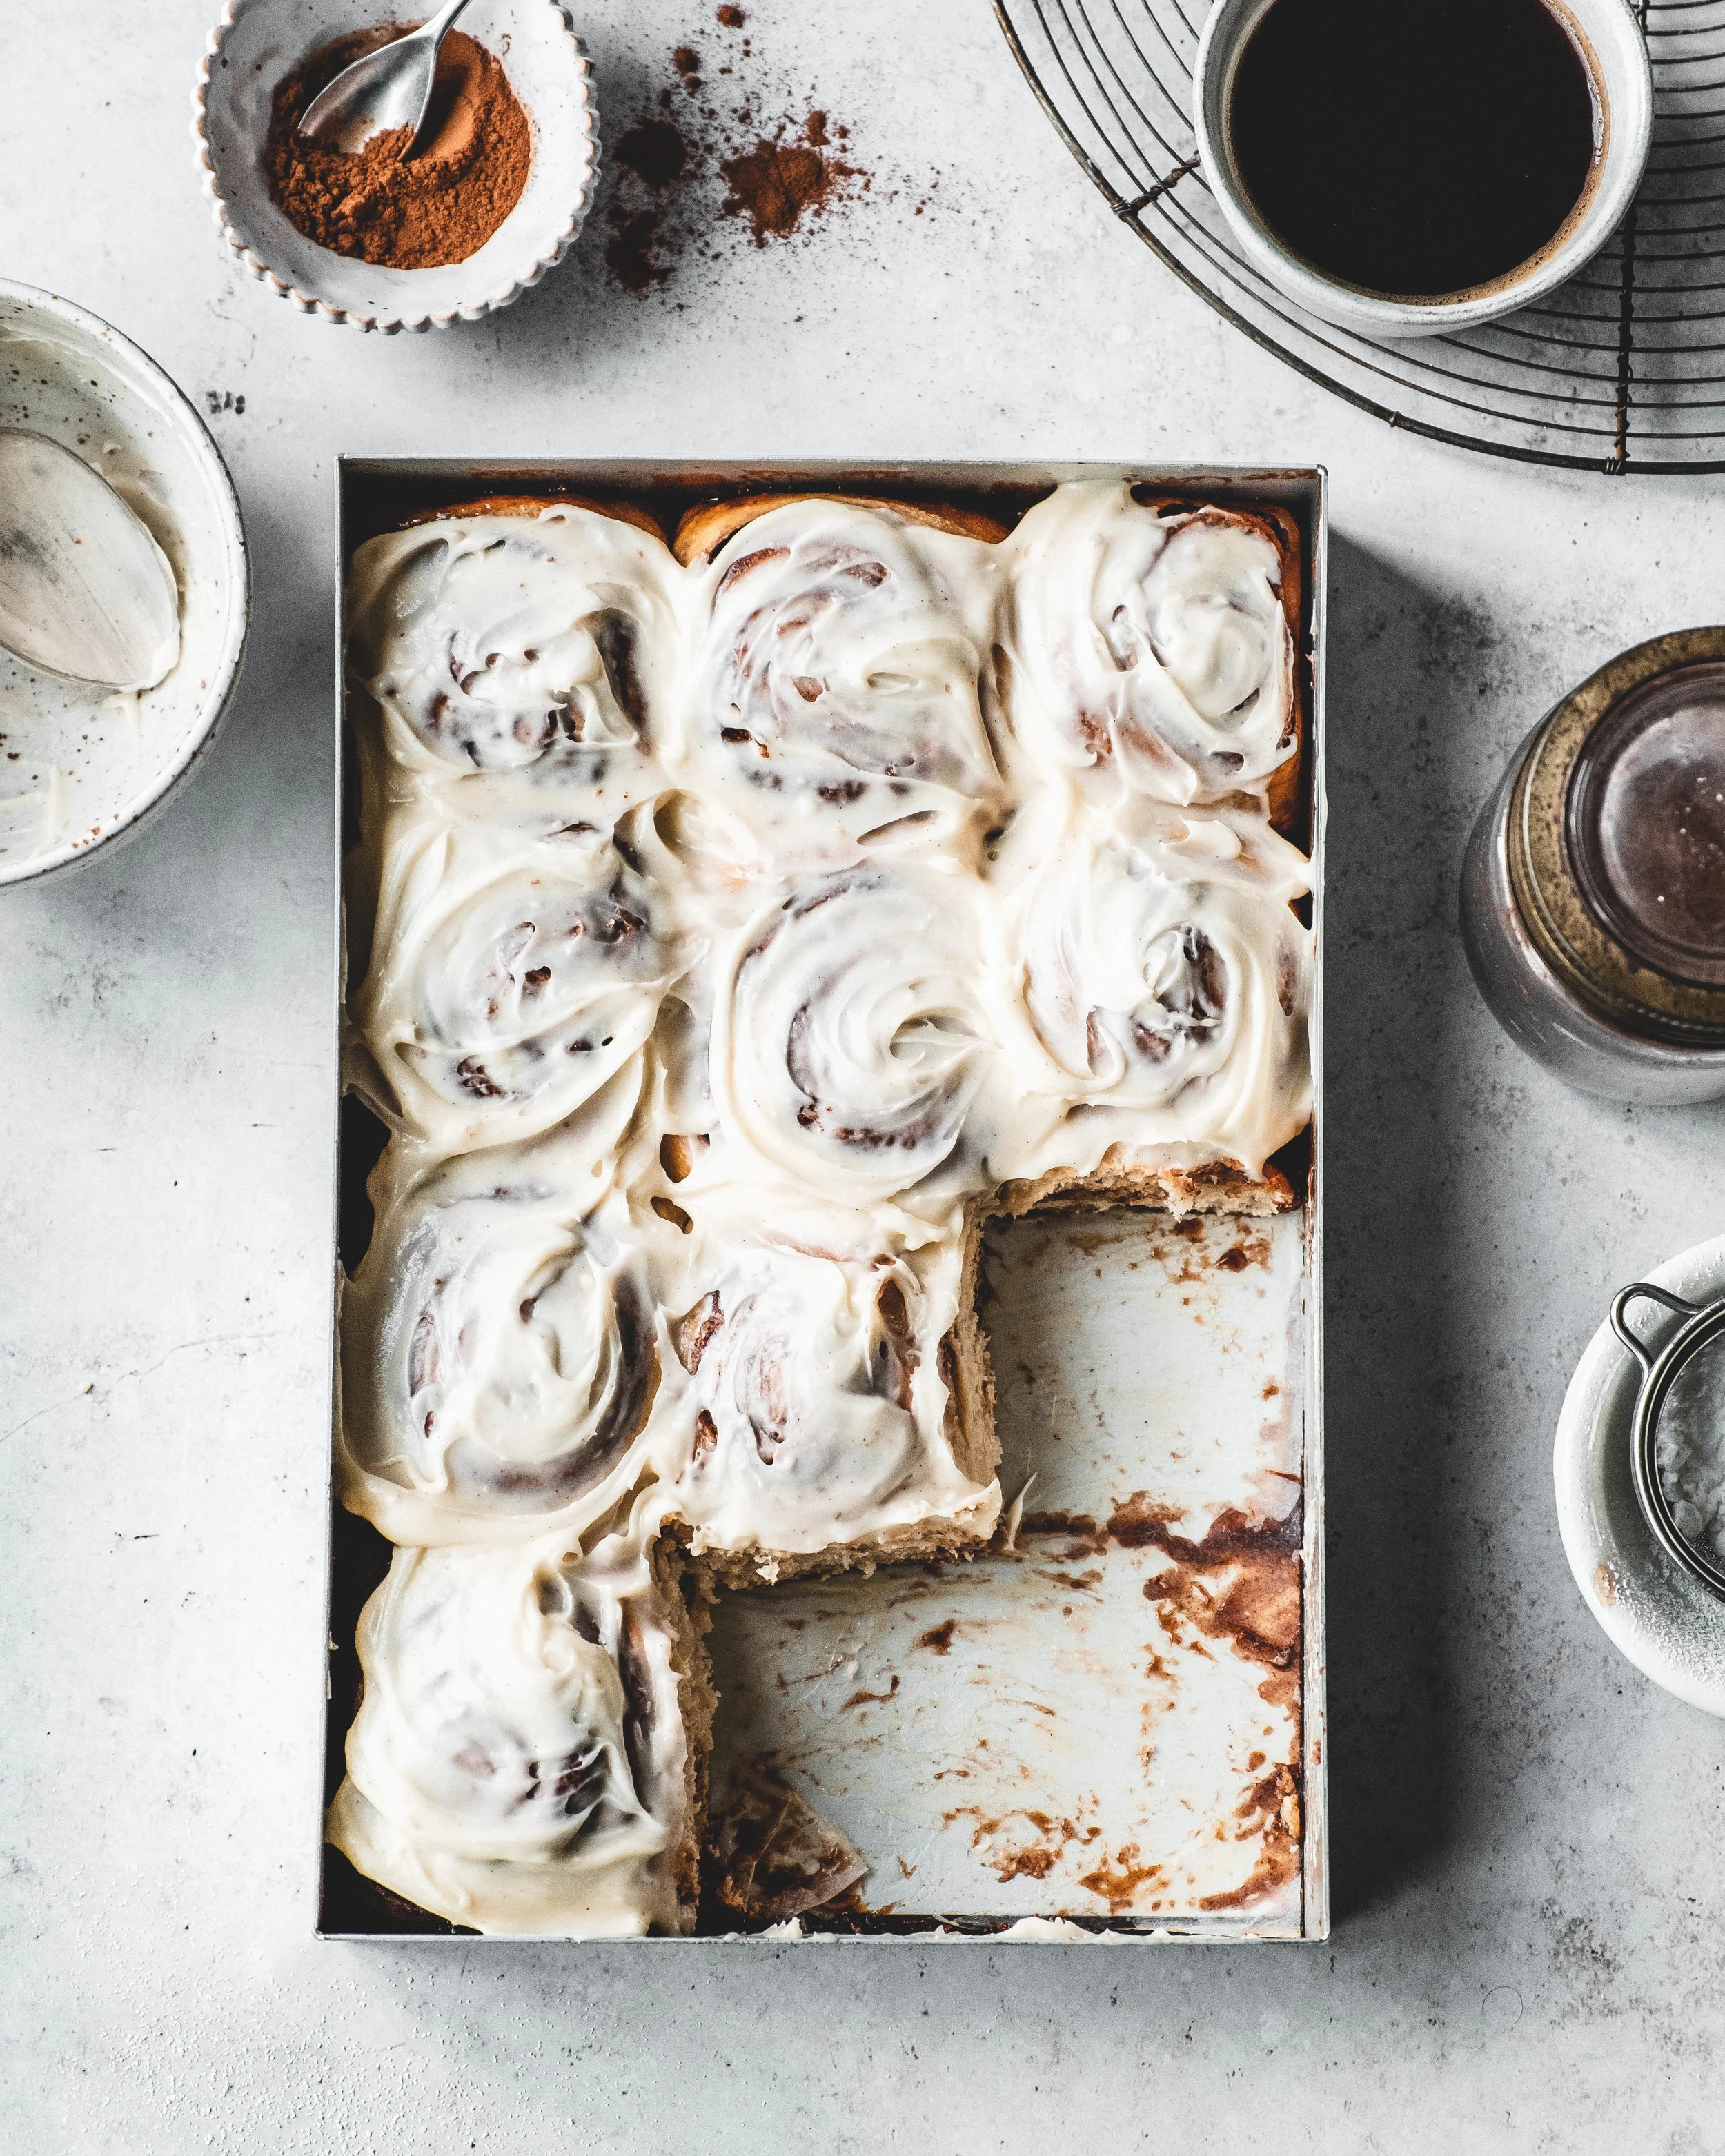
Cream Cheese Glaze
50g unsalted butter, very soft
65g full fat cream cheese
100g icing sugar
1 tsp vanilla bean paste

To make the dough place all of the ingredients, except the butter, in the bowl of an electric stand mixer and on low speed, with the dough hook attached, knead the dough for about 10 minutes or until the dough is smooth and elastic. With the mixer still running add the butter a piece at a time. Once all of the butter has been incorporated knead for a further 10 minutes or until the dough is smooth, elastic and pulling away from the sides of the bowl.

Spelt makes for a dough with incredible extensibility, that is to say a stretchiness you won’t find with regular wheat dough, so I’ve added an extra step that helps make the dough more manageable which might be a little unusual if you’re not used to working with sourdough.

Cover the bowl with clingfilm and set aside at room temperature for two hours. During this period we are going to give the dough a set of ‘folds’ to build strength in the dough. Basically use a wet hand to scoop up the dough from the side, lifting about 20-30cm high and folding it over to the opposite side. Do this at the north, east, south and west side of the bowl. Do this after an hour’s rest and then again after the two hours have passed, making sure to keep the bowl covered between each set. After the two hours are up set the dough aside for 4-6 hours or until the dough has risen by about 50%. Place the bowl into the refrigerator overnight, up to 24 hours. 

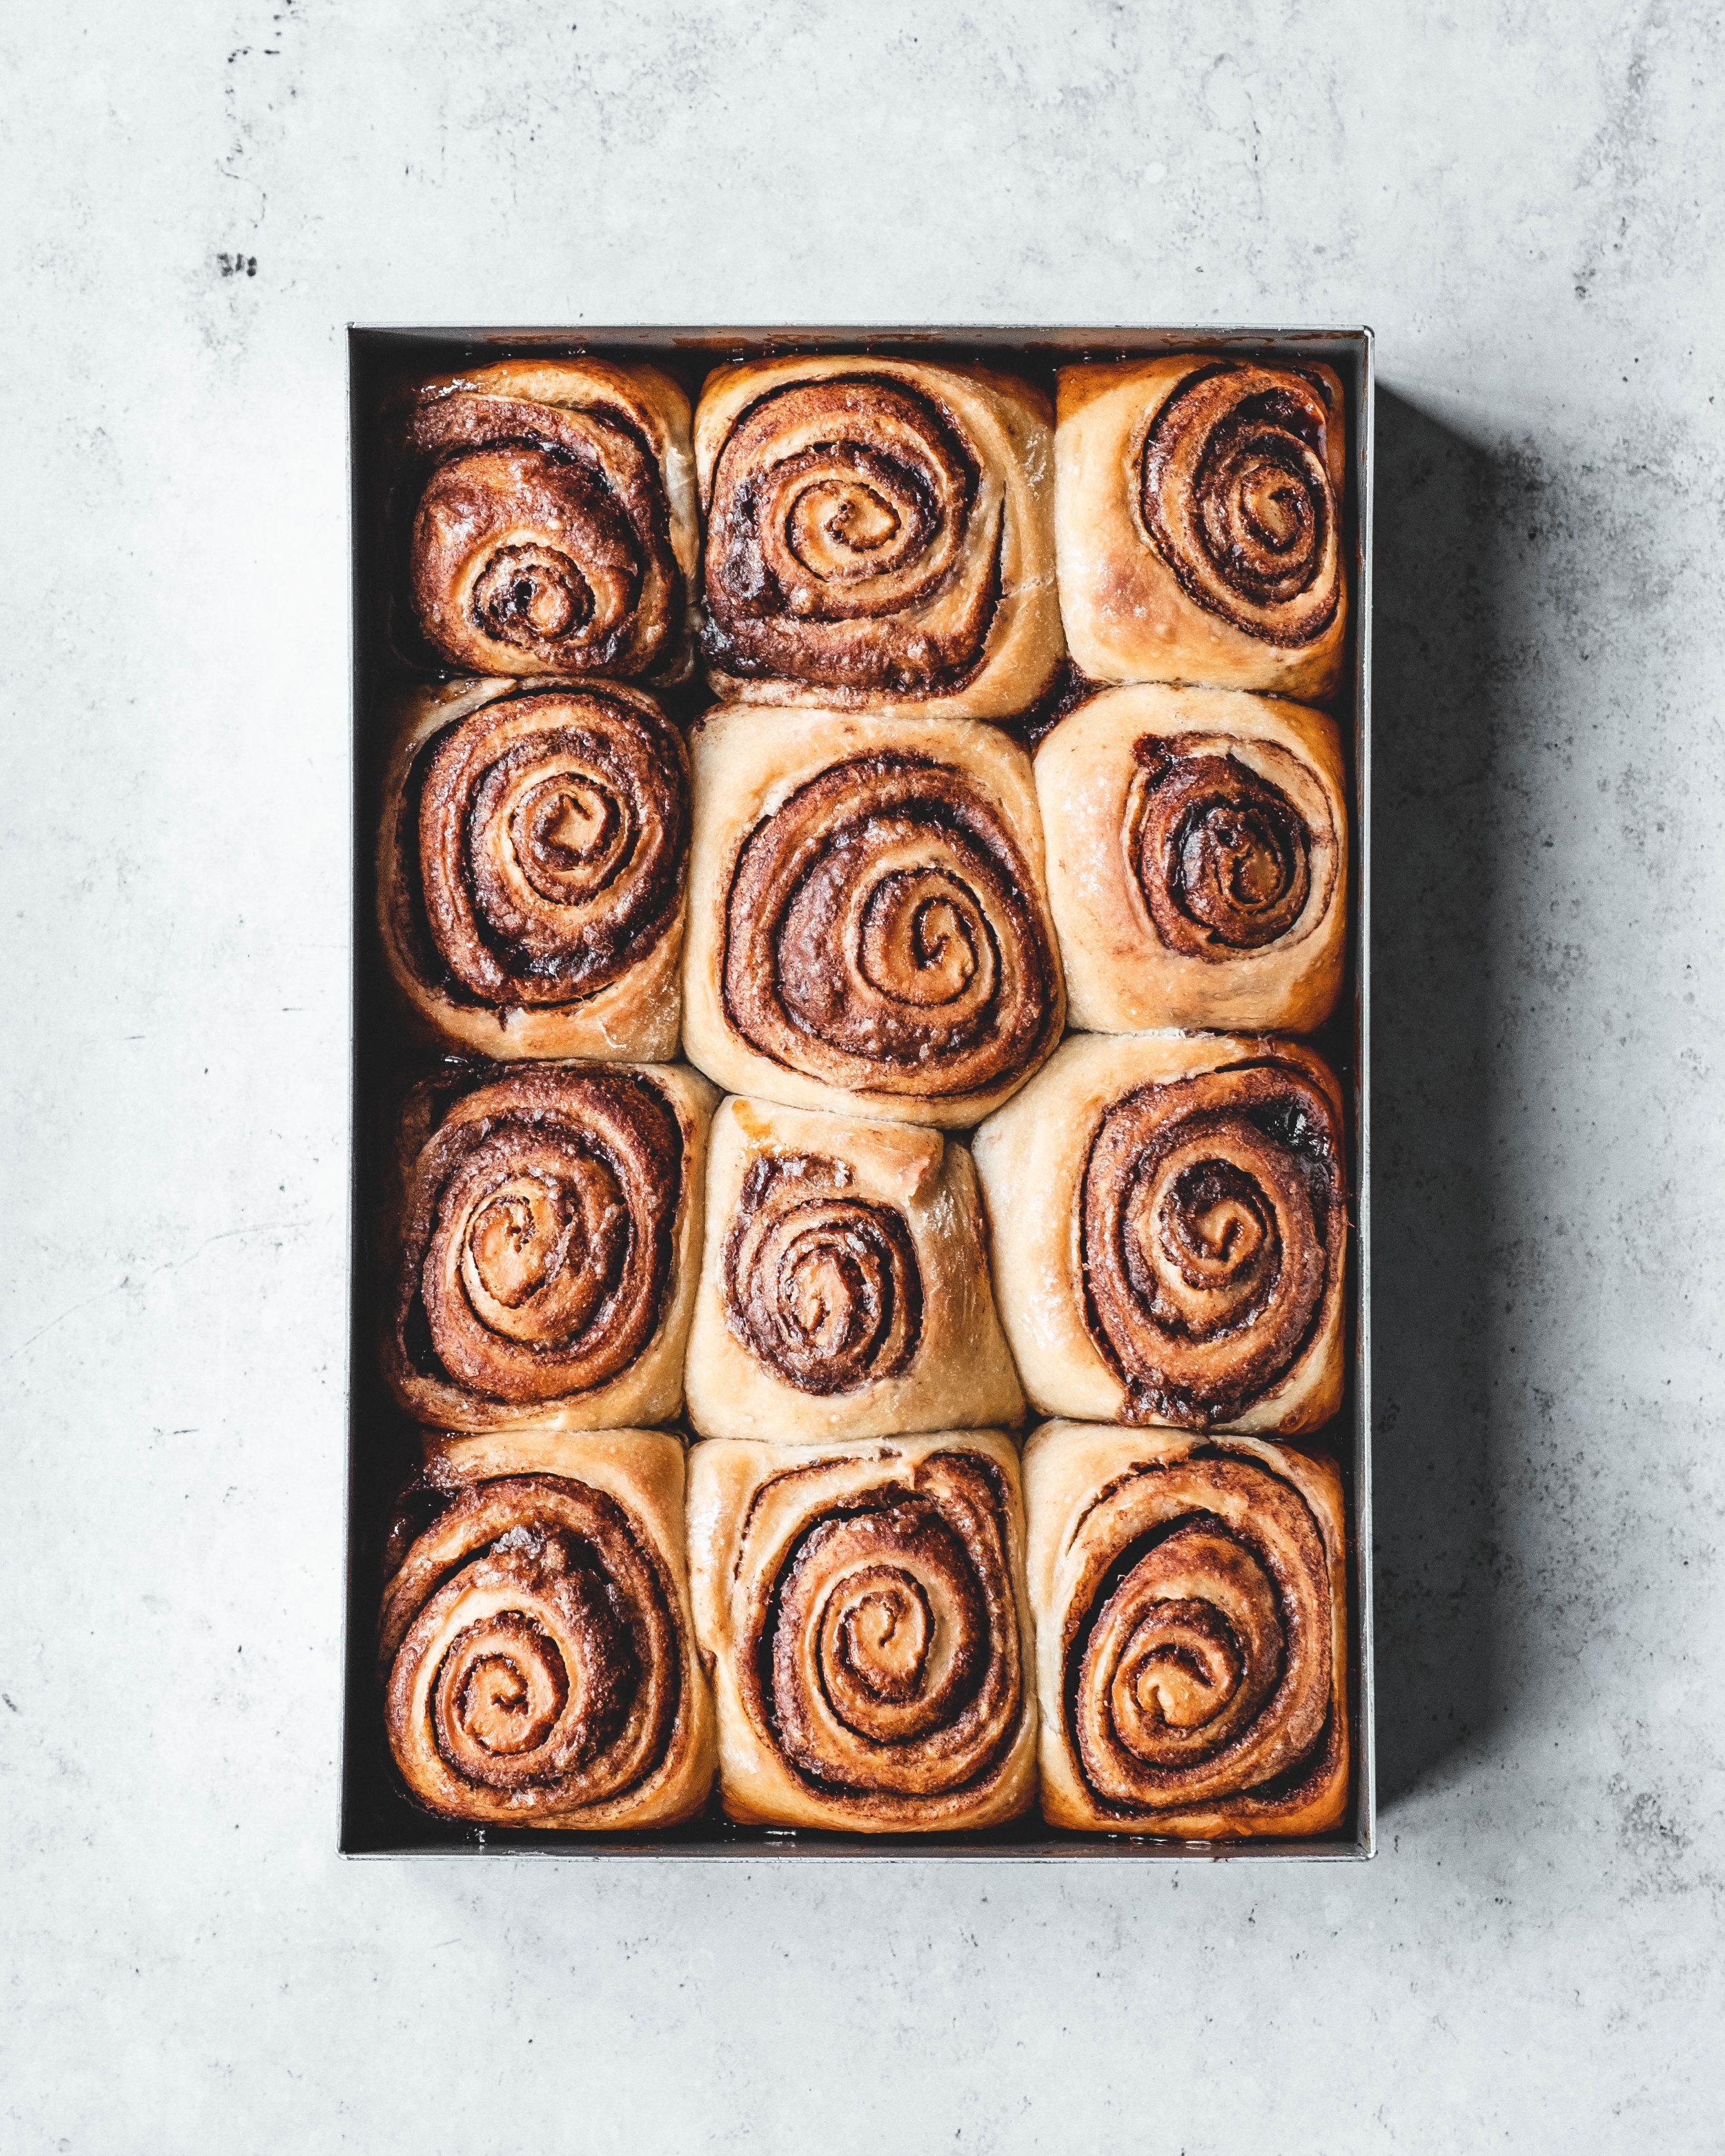
Prepare a 9x13 brownie pan by lightly greasing with butter and lining the base with parchment paper. Take the dough from the fridge and tip it out onto a lightly floured work surface. Roll the dough into a rectangle that is roughly 40cm x 50cm. Spread the butter over the entire piece of dough. Mix together the cinnamon and sugar and sprinkle in an even layer over the butter. Roll the dough up into a tight sausage and cut into 12 equal sized pieces (I find unflavoured dental floss to be the absolute best thing for this as it doesn't squash the layers together, this dough is also fairly soft so you’d need to be delicate if using a serrated knife). Place the buns into the prepared pan and cover with clingfilm. Set the buns aside for about 1-2 hours or until risen and puffy, the buns will not double in size but they should be touching at this point. Whilst the buns are proving preheat the oven to 190C (170C Fan).

Bake the buns in the preheated oven for 25 minutes or until golden brown. Allow to cool in the pan before serving. If making the glaze mix all of the ingredients together until smooth. Spread over the cooled buns and serve. 

Once the dough is refrigerated you can leave it there for up to three days but once baked they are best served on the day made. 

Sourdough Cinnamon Buns (1 of 1)-10.jpg


In Breads and Quickbreads
14 Comments

Blood Orange White Chocolate Pound Cake

Edd Kimber February 15, 2019

Oh blood oranges, you really do brighten up a miserable wet London day. Every winter when I effectively become a hermit, locking myself away in the kitchen making bread…and pies…and cookies…and anything else that makes me feel that the cold is bearable and that a life somewhere sunny isn’t more desirable, there are a couple bright spots in a world of grey. I am obviously talking blood oranges and rhubarb. They are the joy of the season and I relish every week they still make an appearance at the market. Over the years I have managed to squeeze blood orange into as many different recipes as I can convince myself they’ll work in, todays recipe is a little more classic, back to basics, easy to make. A slight twist on a classic pound cake, it is flavoured with the zest of the oranges and a little helping of white chocolate. It is a double cream pound cake meaning it is wonderfully tender and moist, keeping fresh for about 3-4 days.


For the decoration I went back on forth on a couple different styles, trying to make it cleaner, more elegant, I tried to make it more striking, more graphic but in the end I went right back to my original version. I embraced the imperfection and the rustic nature of the cake, and ignored my boyfriend’s suggestion about cleaning up the sides, slightly messy and haphazard works fine for me. 


If you are reading this out of season and you cant find blood oranges, fear not you can happily whip this up with regular oranges but obviously the colour will be different. Regular oranges just don’t have the vibrance to create as dramatic a design so you might want to help the orange glaze a little with some colouring or if you want to replicate the pink hue, a little splash of pomegranate juice will give a very similar look. 


Blood Orange White Chocolate Pound Cake
Serves 10

215g caster sugar
100g unsalted butter, room temperature
Zest of two blood oranges
2 large eggs
150g plain flour
65g ground almonds
3/4 tsp baking powder
1/2 tsp salt
65g white chocolate, melted and cooled
125ml double cream


Syrup
120ml blood orange juice
120g caster sugar


Glaze
2 tbsp blood orange juice
2 tbsp milk
1 tsp vanilla bean paste
400-500g icing sugar

Lightly grease, and line with parchment, a deep 9-inch round cake pan. Preheat the oven to 180C / 160C Fan.

Place the butter, sugar and zest into a large bowl and using an electric mixer beat together until light and fluffy, about 5 minutes. Add the eggs a little at a time, beating in until fully combined before adding more. Mix in the cooled white chocolate until evenly combined. In another bowl mix together the flour, almonds, baking powder and salt. Starting and finishing with the flour mixture, add in three additions, alternating with the cream.  

Scrape the finished batter into the prepared cake pan and gently smooth into an even layer. Bake in the preheated oven for about 45-50 minutes or until golden brown and a skewer inserted into the middle of the cake comes out clean. Pop the pan on a wire rack and allow the cake to cool for 10 minutes before turning out onto the rack to cool completely. 


Whilst the cake is still warm make a syrup by heating the blood orange juice and sugar together in a small pan until the sugar has dissolved and the mixture just comes to a simmer. Brush the syrup all over the cake, doing so whilst the cake is still warm allows it to full soak into the cake. 

Once the cake is fully cooled make the glaze. In one bowl mix together the blood orange juice and half the sugar mixing to form a thick but just pourable glaze. Do the same with the milk, vanilla and remaining sugar. You want the glazes to be thick enough that they will hold some definition when piped but loose enough that will spread together to form a uniform glaze. If you need a visual guide check out the video of the recipe on my Youtube channel. 


Place each glaze into a piping bag and snip off the ends with a pair of scissors. Pipe alternate stripes of the glaze over the cake, allowing a little excess to drip down the sides. Set the cake aside for a couple hours to allow the glaze to set before serving. 

In Cakes Tags blood orange, cake, white chocolate
1 Comment

Salted Peanut Butter Cookies

Edd Kimber January 25, 2019

There are few things with more inherent comfort for me than a cookie, be that a chocolate chip, an oatmeal raisin, a gingersnap, I don’t discriminate, all cookies are welcome in my kitchen. Maybe it’s a nostalgic thing, a throw back to childhood. Maybe it’s simply because they’re sweet. Or maybe it’s just because I love them so much that each one is a little bit of joy. I’m a fan of tricky recipes, I like the challenge, but sometimes simpler is better and with this recipe I cant think how you could dial it back any further, it really is a ridiculously easy recipe and it delivers way more in terms of flavour and texture than it should considering its merger ingredients and distinct lack of technique. 

The recipe for these salted peanut butter cookies comes from the Brooklyn based bakery Ovenly, which I am sad to say I haven’t actually haven’t managed to visit yet. But these cookies have a life outside the bakery. On one of my recent trips to NYC, randomly filming an advert for Yahoo which somehow involved me talking to a cgi flamingo, I was wandering through the West Village and popped into Toby’s Estate for a coffee. At the counter they had this domed, crackly looking peanut butter cookie and in the moment it seemed like the exact thing I was craving without even realising it. It turned out to be the version from Ovenly and it was good, so good I bought a second and nibbled on it as I walked around the village in a jet lagged haze. When I looked into the recipe I found it hard to believe it was based on the classic three ingredient peanut butter cookie, made with just peanut butter, egg and sugar. That classic recipe is fine if a little boring and to be quite honest im not a complete lover of the texture.

The guys at Ovenly took that idea, played with the ratios a little and added two little extras, vanilla and sea salt. Their version is so much better, with a chewy outside and an almost blondie like centre. But I forgot about the recipe until late last year when a box arrived at my door packed full of cookies from the team at the bakery. The cookies somehow survived a transatlantic journey and didn’t seem stale, or any worse for ware at all. I tried very hard to make the cookies last but between myself and my boyfriend they disappeared quick. And that’s how, with the dread of doing my taxes hanging over my head, I found myself making a big batch of them. Call it procrastibaking (can we be done with that awful saying already) or just a craving for comfort and cookies during a stressful week, these ridiculously easy cookies were exactly what the doctor, and maybe my accountant, ordered. 

Peanut Butter Cookies (1 of 1)-4.jpg
Peanut Butter Cookies (1 of 1)-2.jpg

Note about the salt. I posted a picture of some cookies recently and someone complained that they were sick of seeing cookies sprinkled with a little sea salt, calling it pretentious and without merit. Let me say this. Do Not Skip The Salt. Peanuts and salt are made to be together and the salt makes a big difference in the flavour. Think of eating blanched peanuts versus roasted salted ones. We all know which is better, so just add the salt. 

Ovenly Salted Peanut Butter Cookies
Ever so slightly adapted from the ‘Ovenly’, by Agatha Kulaga & Erin Patinkin

Makes 12 

335g (1 3/4 packed cup) light brown sugar
2 large eggs, room temperature
1/2 tsp vanilla extract
450g (1 3/4 cups) smooth peanut butter 
Flaked sea salt, for garnish

Preheat the oven to 180C and line a baking tray with parchment paper.

In a bowl vigorously whisk together the sugar and eggs until incorporated. Add the vanilla and whisk to combine. Switch to a wooden spoon and mix in the peanut butter until no streaks are visible. At this point I divert from the recipe in the book just a little. They suggest chilling the dough in the freezer after forming to help the cookie hold its shape. I find doing this step before scooping the cookies is better, because the dough firms up a little when cold and you’ll get that distinct look of the Ovenly cookie much easier when the dough is firmer. I tend to leave the dough in the fridge for an hour but I know Deb from Smitten Kitchen says a rest in the freezer for 15 mins works fine too (my freezer is tiny so the fridge is just more convenient for me). I have also made this dough and left in the fridge for a couple days and this works great too if you want to prepare ahead but bake the cookies fresh. 

Use an ice cream scoop of spoons to form the dough into roughly 2 inch balls (using the scoop is how I do it and how you replicate the look of the bakery versions, you want a 2 ounce scoop) and place the cookies onto the prepared baking tray, about an inch or so apart from one another. They spread but just a little so they can be closer than regular cookies. Sprinkle each cookie with a little flaked sea salt.

Bake in the preheated oven for about 20-22 minutes, or until the cookies are golden brown around the edges but still a teensy bit paler in the centre. Transfer to a wire rack rack to cool completely before serving. 

These cookies also keep incredibly well, I have had them up to five days after baking and they were still great. 

In Biscuits and Cookies
6 Comments
Linzer Cookies (1 of 1).jpg

Hazelnut Raspberry Linzers

Edd Kimber January 18, 2019

Todays recipe is inspired by a classic Austrian dessert, the Linzer Torte. Traditionally made with a nut rich dough and a redcurrant jam this is a cookie based version using hazelnuts and raspberry jam. Whilst I associate this with Christmas they really do suit any time of year. As it is nearing valentines day I thought the cutout would be nice as a heart, a slight nod to romance. Obviously if your heart is black, or your just making them at some other time of year you can use any shape of small cookie cutter instead.

Hazelnut Linzer Cookies
Makes about 30

300g plain flour
75g ground hazelnuts
1/2 tsp salt
200g caster sugar
225g unsalted butter, room temperature
1 large egg yolk
1 large egg
1/2 vanilla extract
raspberry jam to fill the cookies

To make the cookie dough mix together the flour, hazelnuts and salt. In a large bowl using an electric mixer beat together the butter and sugar until pale and creamy. You’re not looking for cake levels of light and fluffy but you do want to work a little lightness into the mixture to make a lighter, better textured cookie, mixing for about 2-3 minutes. Add the egg yolk and beat to until fully combined before adding in the egg. Add the vanilla extract and beat to combine. Add the flour mixture and mix on low speed until the flour is just worked into the dough. Be careful not to overmix the dough at this stage as it will make the cookies tough and chewy.

Turn the dough out onto a lightly floured work surface and use your hands to gently form into a uniform dough. Divide into two equal portions and press into discs, wrapping in clingfilm and then refrigerating until firm.

Linzer Cookies (1 of 1)-3.jpg
Linzer Cookies (1 of 1)-2.jpg

When you’re ready to roll out the cookies preheat the oven to 160C (140C fan) and line a couple baking sheets with parchment paper. On a lightly floured worksurface roll out a portion of dough until it is about 3-4mm thick and then using a 6cm round cookie cutter cut as many cookies as possible, setting the scraps aside. Place the cookies onto the prepared baking trays and refrigerate for 15 minutes. Repeat this process with the second portion of dough. Gently reform the scraps of dough into a ball and then refrigerate as before whilst you bake off the cookies. This dough can be rolled out again for more cookies.

Take the cookies from the fridge and use a small heart shaped cookie cutter to remove the middle from half of the cookies. Bake in the preheated oven for about 15-18 minutes or until just starting to turn golden on the edges. I bake the cookies lower than usual as it crisps the cookies evenly throughout without too much browning. Allow to cool on the baking tray for a couple minutes before transferring to a wire rack to cool completely.

To assemble the cookies place a teaspoon of raspberry jam onto each base cookie and spread slightly towards the edge. Dust all the top cookies with icing sugar then place one on top of each bottom cookie, sandwiching together. Once assembled the cookies are best on that day as the jam will eventually soften the cookies.

Linzer Cookies (1 of 1)-4.jpg
In Biscuits and Cookies
6 Comments
  • Recipes
  • Older
  • Newer

Twitter

Instagram

This weeks bonus recipe, for subscribers to my newsletter, is this gorgeous sour cherry and coconut gateau basque. The crust is a buttery cross between pastry and cake, think a cakey cookie. The filling is a layer of sour cherry topped with a rich coconut custard. A real fun one to make too! Link to my newsletter can be found in my bio - #gateaubasque #pastrycream #coconut #sourcherry
In this months @olivemagazine (out today) the team came and photographed my petit kitchen and we talked about how we put our stamp on the place, without spending a fortune. We hated the bland kitchen that we inherited but, as it was relatively new an
In this months @olivemagazine (out today) the team came and photographed my petit kitchen and we talked about how we put our stamp on the place, without spending a fortune. We hated the bland kitchen that we inherited but, as it was relatively new and in good condition, it felt a waste to rip it out and we also didn’t want to spend the money it would take to rip out the whole thing and replace it (it’s a howdens shell so we could have done something cheaper like @plykeakitchens @holte.studio @madebyhusk) so instead I painted all of the cabinets, using @makeitrustoleum kitchen cabinet paint, to give it some personality and lighten the whole thing. Check out the magazine for the full run down. - #kitchendesign #kitchenremodel #rustoleumcabinettransformations #rustoleumkitchencupboardpaint #kitcheninspiration #theboywhobakes #olivemagazine
Are you making scones all wrong? Maybe, maybe not? But I do want to show you how I make them! This recipe is based on the method I learnt at @belmondlemanoir 12 years ago when I did a stage, and it makes the absolute lightest scones. And shock horror, it involves kneading the dough, albeit very lightly. You can get the full recipe in this weeks newsletter (free) linked in my bio. - #scones #bakingday #worldbakingday #afternoontea #hightea #englishscones #clottedcream #creamtea #theboywhobakes
facebook
  • Contact

The Boy Who Bakes

Edd Kimber

facebook