All I can say is thank god our tastes change and develop as we get older. As a child I winced at the sharp, almost sour rhubarb we grew in the garden, only happy to eat it when topped with a layer of crumble and accompanied with a dollop of vanilla ice cream. Coming from the rhubarb triangle, its a real place I swear look it up, this comes close to treason in the minds of my fellow Yorkshire folk. To be fair to my childhood taste buds this was not the wonderful forced rhubarb I adore today it was thick, woody and with no hint of pink. Thankfully these days I cannot get enough, it brightens up those cold winter months, a shining star in a world of grey. When it comes to rhubarb no one does it better than Yorkshire, home of the best forced rhubarb in the UK. Forcing is a process of growing rhubarb in dark huts which speeds up the growth resulting in beautifully thin and tender stalks of rhubarb with that delightful pink blush we all associated with rhubarb.
I know the web is full of recipes declaring they’re the best, the ultimate, the best darn recipe you will ever make so I will say this as even handed as I can manage, these are utterly delicious, sorry I couldn’t help myself, they’re just too good not to shout about from the rooftops, you need to make these, I implore you. The combination of rhubarb and custard is a well trodden path, reaching classic status for sure. To add another element I infused the custard with a selection of my favourite things that just so happen to pair wonderfully with the rhubarb. A handful of fresh ginger, a sprinkling of ground cardamom, a couple star anise and of course a healthy dose of vanilla, which all meshes together to give the custard a flavour worthy of the rhubarb that sits atop it.
I have been making a version of these tarts (or buns I’m still not sure what to call them) for years, a blueberry topped version appears on the paperback cover of my book Patisserie Made Simple and is the version I made most often, but this new rhubarb brioche is definitely the only one I am making from now on.
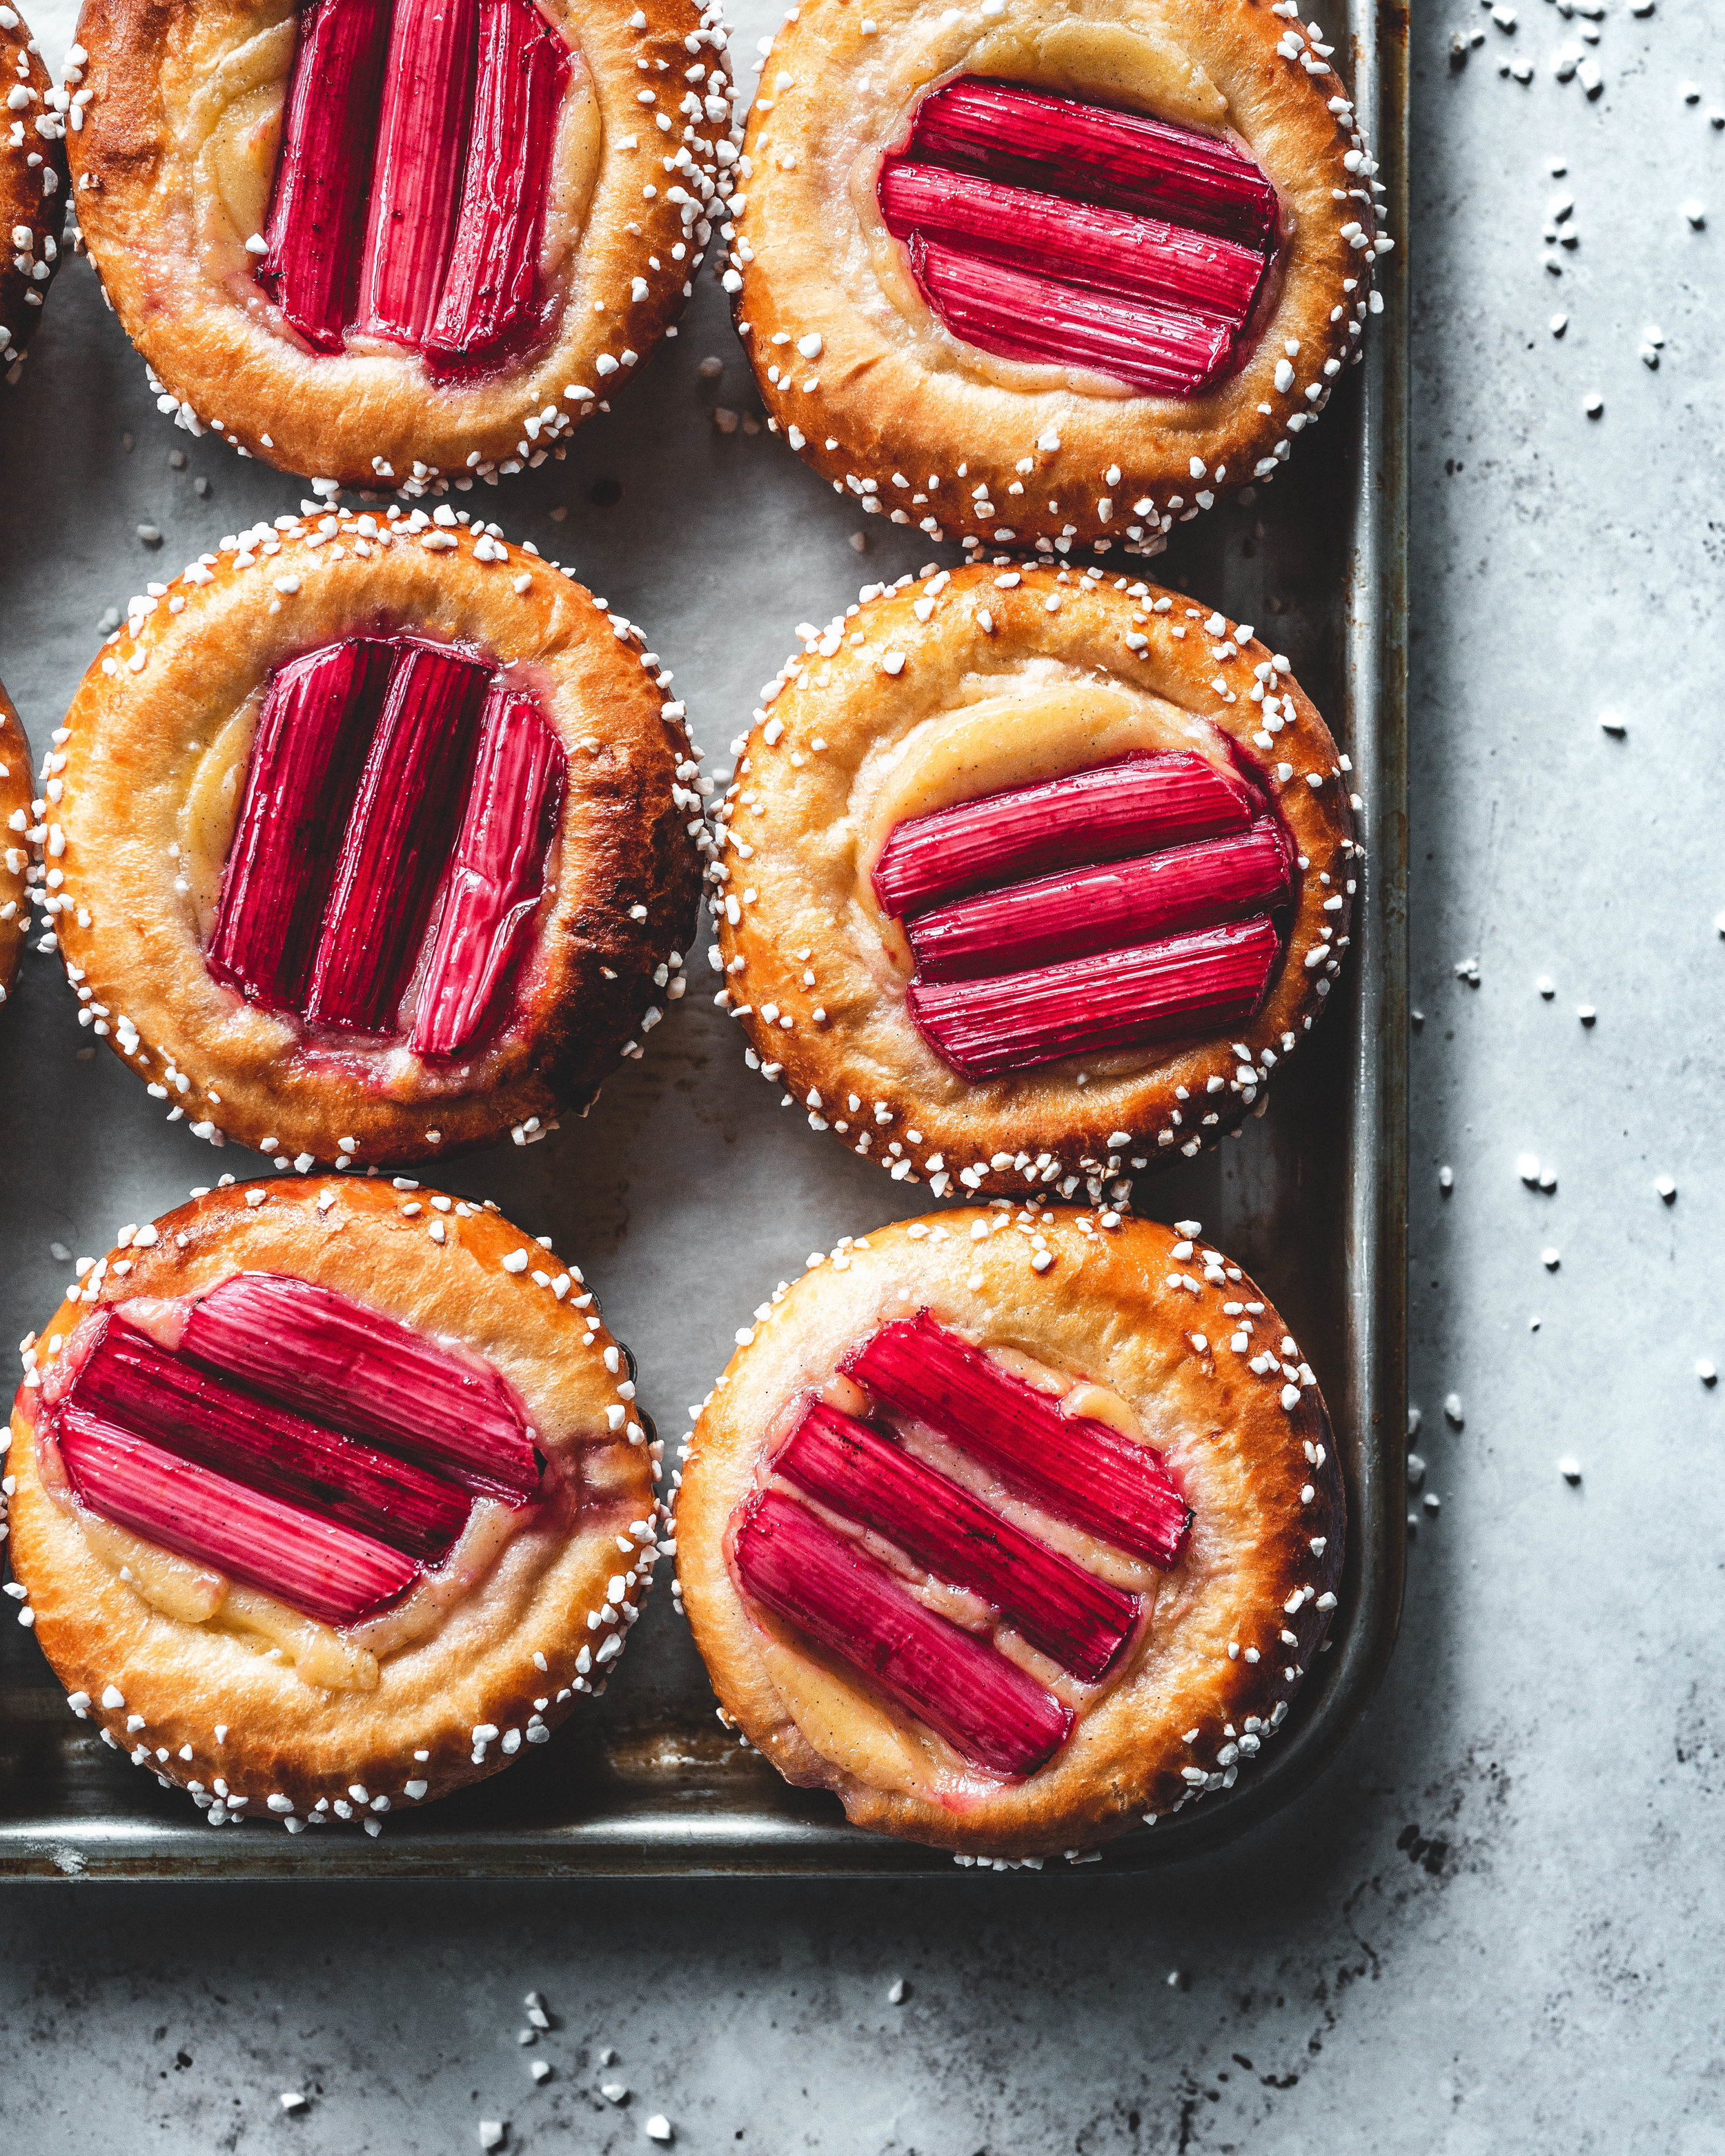
Rhubarb and Custard Brioche Tarts
Brioche
180g plain flour
180g strong bread flour
30g caster sugar
1 tsp fine salt
85ml whole milk, cold
7g dried fast action yeast
3 large eggs, plus one for glazing
150g unsalted butter, diced
Pearl sugar, for decoration
Spiced Custard
250ml whole milk
thumb sized piece of fresh ginger, sliced
1/4 tsp ground cardamom
1 tsp vanilla bean paste
2 star anise
100g caster sugar
1 large egg
2 large egg yolks
20g cornflour
25g unsalted butter, diced
Roasted Rhubarb
250g rhubarb
20g caster sugar
juice of 1 orange (I used a blood orange)
1/2 tsp vanilla bean paste
For the brioche place the flours, sugar salt and yeast into the bowl of a stand mixer and briefly mix to combine. Add the milk and egg and then knead of low/medium speed for about 10 minutes or until the dough is no longer sticking to the sides of the bowl. Add the butter and piece or two at a time, mixing until fully incorporated. Knead for a further 10 minutes or until the dough is no longer sticking to the sides of the bowl and smooth and elastic. Place the dough into a bowl, cover with clingfilm and refrigerate overnight.
Note: the butter doesn’t want to be soft or warm but not cold from the fridge either, it needs to be pliable but still a little cool, when mixing we don’t want to warm up the dough, otherwise we’ll end up with a greasy dough.
Prepare the custard now too as it means come the morning when you assemble the tarts there is little work to do. Place the milk, flavourings and half the sugar into a saucepan and bring to a simmer. Remove from the heat, cover and set aside for an hour or so to infuse. After an hour bring the milk back to a simmer. Meanwhile whisk together the sugar and cornflour (doing this will prevent the cornflour going lumpy). Add the egg and yolks and whisk until smooth. Pour in the milk and whisk to combine. Pour the custard back into the pan, through a fine mesh sieve to remove the flavourings then place the pan back on the heat. Whisking constantly, cook the custard until it is thick, almost the consistency of wallpaper paste. Scrape the finished custard into a bowl, add the butter and mix until fully combined. Press a sheet of clingfilm onto the surface of the custard and refrigerate until needed.
In the morning take the brioche from the fridge and divide into 10 equal sized pieces. This can be done by eye or by weight, which is my preference. Form the brioche into balls and then flatten into discs, about 11-12cm wide. Use these discs of dough like pastry to line 10cm loose bottom tart tins, the excess of the dough will go up the sides as if making a tart shell. Place these onto a parchment lined baking tray and lightly cover with clingfilm or a tea towel, setting them aside for about an hour or until the dough has risen and is puffy, if you gently press the dough with your hand it should spring back very slowly, if it springs back fully it needs a little extra time.
As the brioche proves we can work on the rhubarb. Cut into little battons, about 7cm wide and place onto a baking tray, sprinkling with the sugar, pouring over the orange juice and vanilla. Bake at 180C (160C fan) for about 10-12 minutes just until starting to soften. The baked rhubarb doesn’t want to be fully cooked as it will go back in the oven atop the brioche but it needs to be on its way. Set aside until the brioche is ready.
To assemble remove the custard from the fridge and beat to loosen a little. Brush the edges of the brioche with a beaten egg and then fill the middle of each tart with custard, topping each with a few stalks of rhubarb. Finish by sprinkling the exposed edge of the tarts with pearl sugar which will give a nice look and added texture. If you can get hold of pearl sugar you can use any bake proof sugar you like, be it sanding sugar, demerara or coffee crystals. Bake in the oven for 20-25 minutes or until the exposed brioche is golden brown. Remove and set aside to cool.
You can serve the brioche still slightly warm or room temperature which ever you prefer. These are best on the day made but you can also serve them a couple days after baking, gently reheating in the oven will make them feel fresh again.